The printed parts can be found HERE. Pieces must be printed using ABS except for the knobs which can be PLA or ABS, The arms should use 3 perimeters and 40% infill. The rest of the parts can have 2 perimeters and 30 percent infill.
Let’s walk through the steps to retrofit your Gigabot to use the new knob system. Note: the knobs will be installed in the 4 corners of your Gigabot. The picture shows one centered knob in the back but this is for an early revision of Open GB.
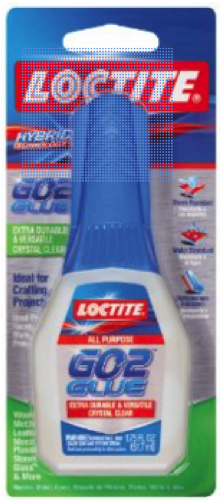
Put a dab of GO2 glue on the sides of a ½ inch nut
Drop the nut into the leveling arm so that the hole lines up with the hole for the nut.
Add some more glue into the recess just for good measure.
Put some glue under the head of the ½ inch bolt and insert the bolt into the knob so that the head hides in the hex hole; make sure it’s pushed in all the way.
Add a little more glue on the other side along the sides of the cutout.
Glue the cap on the other end of the bolt.
Glue sets in 30 min, cures in 24 hours
Preparing for installation
Loosen the bolts holding the bed rails. Lower all bed rails to the bottom of the slotted holes and re-tighten the bolts.
Remove the adjustment bolts/springs in all 4 corners.
Lower the locknuts on all 4 L-bracket spring assemblies. This will provide the bed with the travel it needs. It’s easier to perform this step before putting on the build surface so that you have access to the head of the bolts.
Make sure that the rails are generally level with the bottom motors. The one that I installed these on was a decent amount off.
IMPORTANT: Adjust the Z height so that the natural state of the bed is about ½ cm or a little less than ¼ inch from the nozzle. Apply another nut to the underside of the Z limit switch bolt as this adjustment will no longer be used and should remain in place.
Installing the leveling assemblies
Insert 4 magic t-nuts (or regular t-nuts if you’re building it from scratch) along the top recess of the front bed rail. Make sure the nuts are inserted in between the L bracket/springs. Note: The locknut needs to be lower than the one in the image; ignore that.
Insert 2 t-nuts into each corner of the top recess of the back bed rail. Make sure they go into the side that is front facing. All leveling arms point towards the front of the machine.
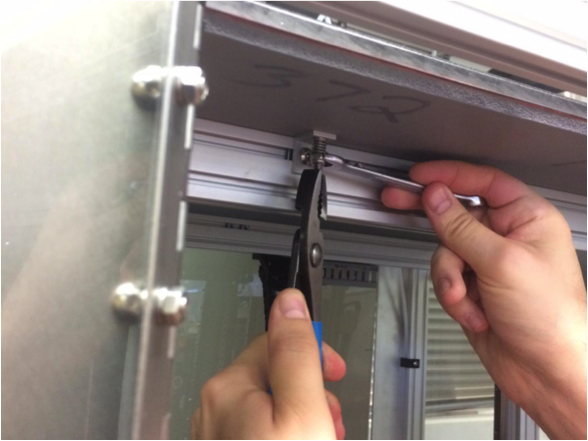
Use M5 x 10 screws to bolt the arm assemblies into the t-nuts in the top rail.
Push the left arm snug against the left L-bracket and the Right snug against the right L bracket. The back arm will sit just left of the cable tray. Give it about a half inch clearance on the right.
Put a line of silicone on the flat side of each of the 3 bed pads.
Lower all knobs so that the nubs are almost touching the top of the arms, manually lift the bed and slip the bed pads over the nubs trying not to make a mess with the silicone in the process.
Raise the knobs and straighten out the pads. The pads should self-align to the nubs but just make sure the pads look visually straight to the edge of the bed and the rail.
Put a bead of silicone around each pad and then removed any excess by smearing it with my finger.
Leveling the bed
Position the nozzle above the left knob and turn clockwise to raise the bed in that corner. Raise so that it’s almost touching. Do the same for the right side.
Raise the back knob so that the nozzle is almost touching the bed.
Go back to the front left and use a sheet of paper to keep between the bed and the nozzle. Turn the knob clockwise until you can feel slight friction on the paper. Do the same for the right side, and then do the same in the back 2 knobs.
Move the nozzle around the bed and try the paper trick to make sure all is flat. If it sticks anywhere, recheck your 4 points.
Meet Travis: A Texan, father, entrepreneur, warrior, and inventor.
re:3D first met Travis in Austin last winter as he was prototyping his second version of Stump Armour: an affordable, accessible device he pioneered in order to expand mobility options for bilateral amputees.
As a combat-wounded Marine, Travis is uniquely qualified to inspire solutions to increase maneuverability for other double amputees while reducing back strain that traditional prosthetics can create. By using himself as the test subject and leveraging business insights he acquired in the 100 Entrepreneurs Project and the Entrepreneurial Bootcamp for Veterans (EBV), Travis launched Stump Armour on indiegogo this week.
Stump Armour Mod 1
About Stump Armour
Stump Armour is a round design that connects to traditional sockets to allow for constant surface contact from any angle. Pressure can be directly applied to a terrain without changing position, allowing amputees to roll themselves up independently when preforming activities close to the ground. Since the round shape can grab from nearly any position, it works great on uneven/irregular surfaces, so the amputee doesn’t need to focus as much concentration on limb placement when compared to other devices. Travis doesn’t feel Stump Armour is intended to replace full leg or knee prosthetics. Rather, it’s meant to increase functionality with specific tasks.
Keeping Costs Low
A key tenant of the Stump Armor’s mission is to make devices as affordable as possible worldwide. For this reason, Travis contracted Mike Battaglia & I last January to see if we could 3D print his vision for a Stump Armour’s Modification. Using Simplify3D we were able to generate a raft & support that could easily break off. The completed PLA prototypes printed great and we were excited to give them to Travis, who planned to use the prints to create a mold to scale Stump Armor globally.
3D printed Stump Armour Mods 3 (left) and Mod 4 (right) cast at SureCast
Prints in hand, Travis partnered with local foundries who guided him through the process of making his own custom mold to cast multiple sets of Stump Armour. This week we interviewed Travis to learn more about the process he used to create a mold from a print by working with Stevens Art. Below are the steps that he described:
From a 3d printed prototype made on Gigabot, a silicone rubber mold was created.
The print was covered in an releasing agent that was then covered in silicone, leaving an inlet for wax to be poured in later.
After the silicone cured, a 2 piece plaster shell was made.
Once completed, the silicone was carefully cut with a razor along where the plaster shells come together so it would come apart into 2 pieces.
The shells were clamped together and hot wax was then poured into the inlet.
When the wax hardened, the wax casting of the original print was removed.
The wax cast was then dipped in a a ceramic slurry and power coat until a hard shell formed.
This shell was fired in an oven to harden the cast melt the wax out.
Metal was poured in and the ceramic shell was broken off after it cooled.
A metal replica of the original 3d print was then ready for finishing!
Stump Armour Mod 2
Using lost wax casting, Travis was able to do his first production run of Stump Armour, which is now available to other amputees on the Stump Armour indiegogo campaign. You can support Stump Armour’s next production run and Stump Armour donations at: https://www.indiegogo.com/projects/stump-armour#/ until July 1st.
Below is the solution to the Monthly Puzzler Chief Hacker presented in our April Newsletter. Want to play? You can sign up to receive our monthly publication by submitting your email address in the sign up at the bottom of re:3D.org. Proposed answers are presented on our forum at: https://re3d.zendesk.com/hc/en-us/community/posts/206262336-April-Puzzler
The Question
The April puzzler is another print quality mystery. Take a look at the below pictures of an oversized auger screw originally designed for an automated pet feeder. On one side of the auger there is a blemish in the print yet from another view the print shows an excellent surface finish. What is causing the poor print quality on one spot only?
The Solution
The winning answer was presented by whosawhatsis who stated both reasons for the problem.
Uneven cooling
Steep overhang with no support
Great job to everyone and keep an eye out for an improved 360 degree cooling feature for the GB3 hot end to give even better printing capabilities!
Below is Gigamachinist's Steve Johnson's first blog on 3D printing for re:3D's Gigabot fabrication shop.
Additive Value for Your Subtractive Manufacturing
by Steve Johnson
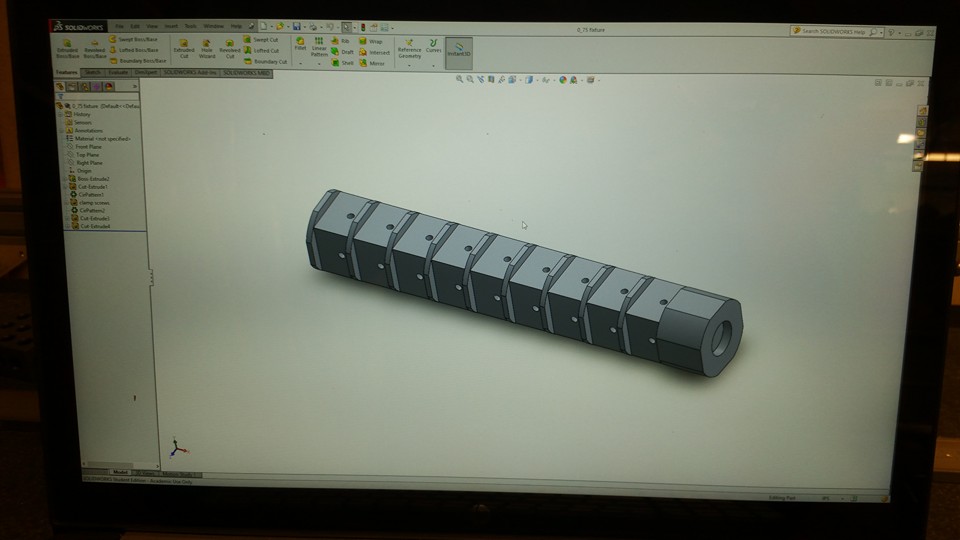
You may be thinking: “Why would a machine shop need a 3d printer?”
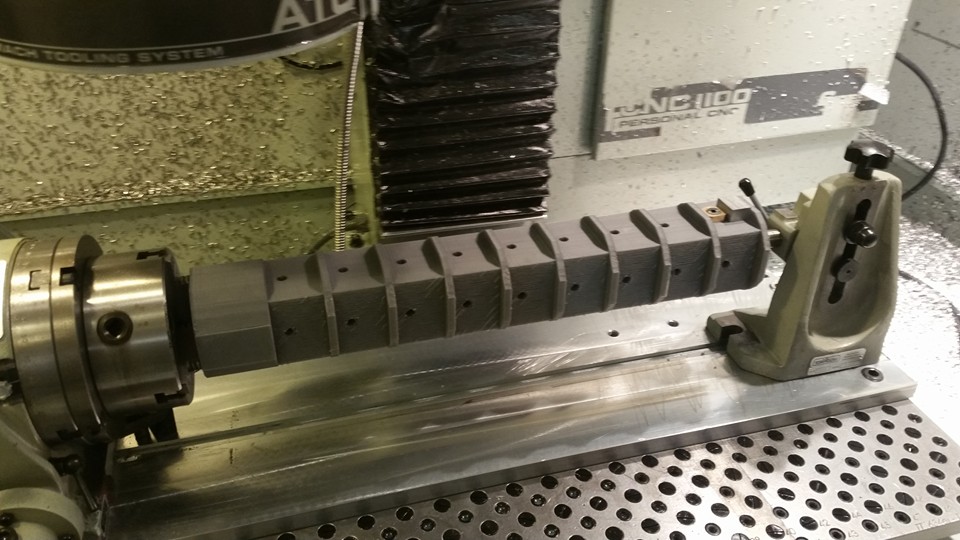
Turns out there are a lot of uses! In my case, we needed to make new fixtures to take advantage of the capabilities of our new 4th axis and the full travel of our machine. When making fixtures, cost is always a main concern, and making a bad fixture can be expensive in terms of both material and man hours.
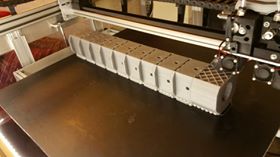
By using re:3D’s Gigabot 3D printer, we were able to design our fixture in Solidworks, export the model, and print a full size model of the fixture overnight on Gigabot (no time wasted).
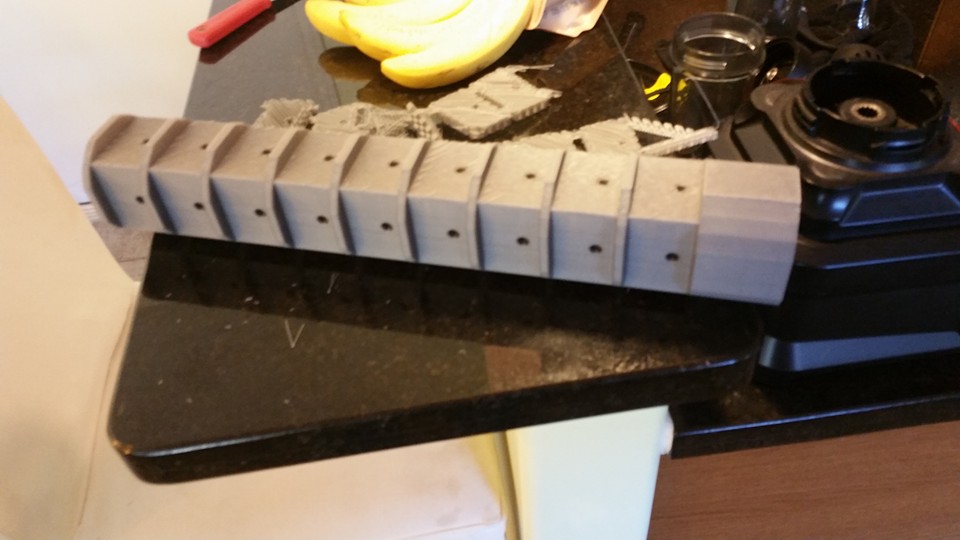
This morning, we tapped the holes for our cam clamps, put the printed fixture into the machine, and checked for clearance and travel issues. In the process we found two issues that we corrected in the solid model, and we are now printing the revised test fixture.
Without the benefit of Gigabot, we may have wasted a 4in diameter by 20in long piece of material, as well as hours of labor. Right now, our only cost has been a few dollars worth of plastic.
This experience has been a great opportunity for me to learn Solidworks and I’m looking forward to using Gigabot again to cut costs, create efficiencies, and to have fun in the shop!
Below is a re-post of content MicheleAbbate hosted on the Local Motors Blog at: https://localmotors.com/MicheleAbbate/lmdrones-re3d-gigabot/
LMDRONES: re:3D Gigabot
As part of the LMDRONES projects that you can find on Local Motors, we want to welcome re:3D and their Gigabot 3D printer as they join our LM Drone efforts!
May 7th was International Drone Day and the Local Motors Teams, from both Vegas and Chandler, paired up with Matthew Fiedler, Co-Founder and Chief Engineer at re:3D, to bring their Gigabot 3D printer to the world’s first drone port, the Eldorado Droneport, in Boulder City, NV.
The all day event included open tuning, demonstrations, races, and freestyle flying. Matt Jackson, Alaric Egli, and Alex Palmer of Local Motors brought a variety of different drones to take part in the event. Matthew began printing with the re:3D Gigabot as soon as it arrived, showing it’s potential and usability for creating parts, wings, and even a full size Wing FPV.
Stayed tuned for what’s next with the re:3D Gigabot which just made its successful journey from Nevada to Chandler, AZ at the Local Motors Headquarters!
Gigabot arrives at Local Motors Phoenix facility after participating in the International Drone day festivities at Aerodrome near Las Vegas, Nevada. Engineers at Local Motors are excited to train on the Gigabot and start running their first prints!
re:3D Gigabot can now be found at the Local Motors’ headquarters in Chandler AZ!
Below are our notes that reflect our new open source filament testing. ASTM test samples are being created and in the upcoming months you can anticipate a summary on our website about our adventures in 3D printing material science.
Material Tested: MakeShaper PLA
Manufacturer: MakeShaper PLA
Filament Diameter: 3.00 mm
Color Tested: Orange
Date Tested: 4/01/2016
OBSERVATIONS
Ease of use: Working with this filament was very enjoyable. It printed easily, was consistent and predictable. No breakage was noticed. The PLA appeared to be of a high quality.
Appearance: The filament exhibited a pleasing orange tone that even the greatest orange pantone haters on our team found appealing. A slight sheen presented when printed.
Size consistency: Awesome, less than 0.1mm within the roll, however the filament measured 2.87mm, not 3mm
Color consistency: Great, consistent throughout the coil.
SETTINGS
Print temperature: 190-215 C (suggested)/202C was used: nozzle / 60C : bed
Printer Used: Gigabot
Speed: 60 mm/s
Layer Height: 0.3mm
Infill: 15%
Type(s) of print surface used: PRINTnZ
List of test files printed: re:3D’s test files 1, 2, and 3 (logo, vase, and Benchy Torture Test). After April’s UX meeting, it was decided to also print a Moai as a 4th print.
You view watch a video summarizing our testing here:
FINDINGS
Odor: None
Bed adhesion (1: terrible – 5: fabulous!)
5- Great adhesion was achieved with no temperature manipulation.
Stringing (1: lots – 5: none!)
5 –No stringing was observed with our settings.
Shrinkage (1: lots – 5: none!)
5- The filament extruded and cooled with no shrinkage.
Interlayer adhesion (1: terrible – 5: fabulous!)
5- Perfect!
NOTES:
The community is fortunate to have several PLA vendors to select from, however we’ve heard cautionary tales from many of our customers that all PLA is not created equal. MakeShaper PLA boasts that it is a high quality and dependable PLA.
Seeing that we offer a limited color selection in our store, we are always eager to test additional PLA sources in order refer customers to other reputable consumer retailers.
This material appears to yield consistent, quality prints.
Filament size consistency was excellent and no breakage was evident in the 1 kg roll we examined, suggesting it was well mixed.
No curling was observed in any of the 4 prints created.
We used the mid point of the temperature range that the manufacture provided (190-225C). No guidance was given for settings aside from temperature, so we used the standard Simplify3D profile on wiki.re3d.org.
The unboxing experience was well done and the recommendation sheet was professional.
A batch number was provided for traceability.
Manufacturer recommended settings were easily referenced on the enclosed documentation.
RECCOMENDATIONS:
After printing 4 objects in our protocol, I support MakeShaper’s claims that they produce high quality PLA and would recommend it to our customers.
Upon review, we would also recommend that we include this filament in our ASTM test sample research.
Want to chat? Join our forum where we have initiated a thread about our experience!
Below are our notes that respect our new open source filament testing. ASTM test samples are being created and in the upcoming months you can anticipate a summary on our website that reflects our adventures in 3D printing material science.
Material Tested: Scorpion Flexible Nylon
Manufacturer: Black Magic 3D
Filament Diameter: – 2.85mm
Color Tested: Natural
Date Tested: 4/06/2016
OBSERVATIONS
Ease of use: Those new to 3D printing may want to budget extra time when printing with Scorpion as it takes a little manipulation to perfect the temperature & retraction settings.
Appearance: The natural filament was clean and consistent. Prints matched filament color & opacity.
Size consistency: Awesome, less than 0.1mm within the roll.
Color consistency: Great, consistent throughout the coil.
SETTINGS
Print temperature: 230-235 C (suggested): nozzle / 60C : bed
Printer Used: Gigabot
Speed: 50 mm/s
Layer Height: 0.3mm
Infill: 15%
Type(s) of print surface used: PRINTnZ with 3M Blue Painter’s Tape and 2 coats of Elmer’s Glue Stick
List of test files printed: re:3D’s test files 1, 2, and 3 (logo, vase, and Benchy Torture Test)
You view watch a video summarizing our testing below:
FINDINGS
Odor: None
Bed adhesion (1: terrible – 5: fabulous!)
4- Great adhesion could be achieved, but required two coats of PVA glue stick, painter’s tape, and the highest heat setting suggested for the bed and nozzle.
Stringing (1: lots – 5: none!)
4 -Stringing was observed across lettering, however doubling the retraction settings eliminated the problem.
Shrinkage (1: lots – 5: none!)
4- Some curling was observed on corners of logo after removal. It is suggested that the print be allowed to cool down on the bed before taking it off.
Interlayer adhesion (1: terrible – 5: fabulous!)
5- Perfect!
NOTES:
A flexible nylon offers a lot of possibility to the 3D printing community
This filament appears to overcome concerns that both flexible and nylon materials are difficult to use.
With the right settings and adhesion hygiene, this material appears to yield consistent, quality prints.
NOTE: this filament required 2 coats of Elmer glue stick on Blue Painter’s tape applied over a heated bed, using the max range of bed and nozzle heat settings
Filament size consistency was excellent.
Curling was observed with only 1 coat of glue stick and was also seen after print removal when the bed was still warm.
It is recommended that the bed be allowed to cool before removal to mitigate curling after print completion.
The best testing outcomes were observed at the highest temperatures settings (235C -nozzle, 60C- bed) and using the speed (50mm/s) that the manufacture provided. No guidance was given for retraction, which we found we needed to double or standard setting in order to eliminate stringing across lettering.
The unboxing experience was well done and the recommendation sheet was very useful.
No date stamp for production was listed, however a batch number was provided for traceability.
Manufacturer recommended settings were easily referenced on the enclosed documentation.
RECCOMENDATIONS:
This filament is extremely impressive and more than exceeded expectations due to past expereinces working with nylons and flexible materials.
Upon review, we would highly recommend that larger, more complex prints be created to further investigate the potential this exotic, and much needed material provides.
Want to chat? Join our forum where we have initiated a thread about our experience!
Below is the solution to the Monthly Puzzler Chief Hacker presented in our February Newsletter. Want to play? You can sign up to receive our monthly publication by submitting your email address in the sign up at the bottom of re:3D.org. Proposed answers are presented on our forum at: https://re3d.zendesk.com/hc/en-us/community/posts/205859796-February-Puzzler
THE SOLUTION
Here are the two reasons you will see a visible mark between processes.
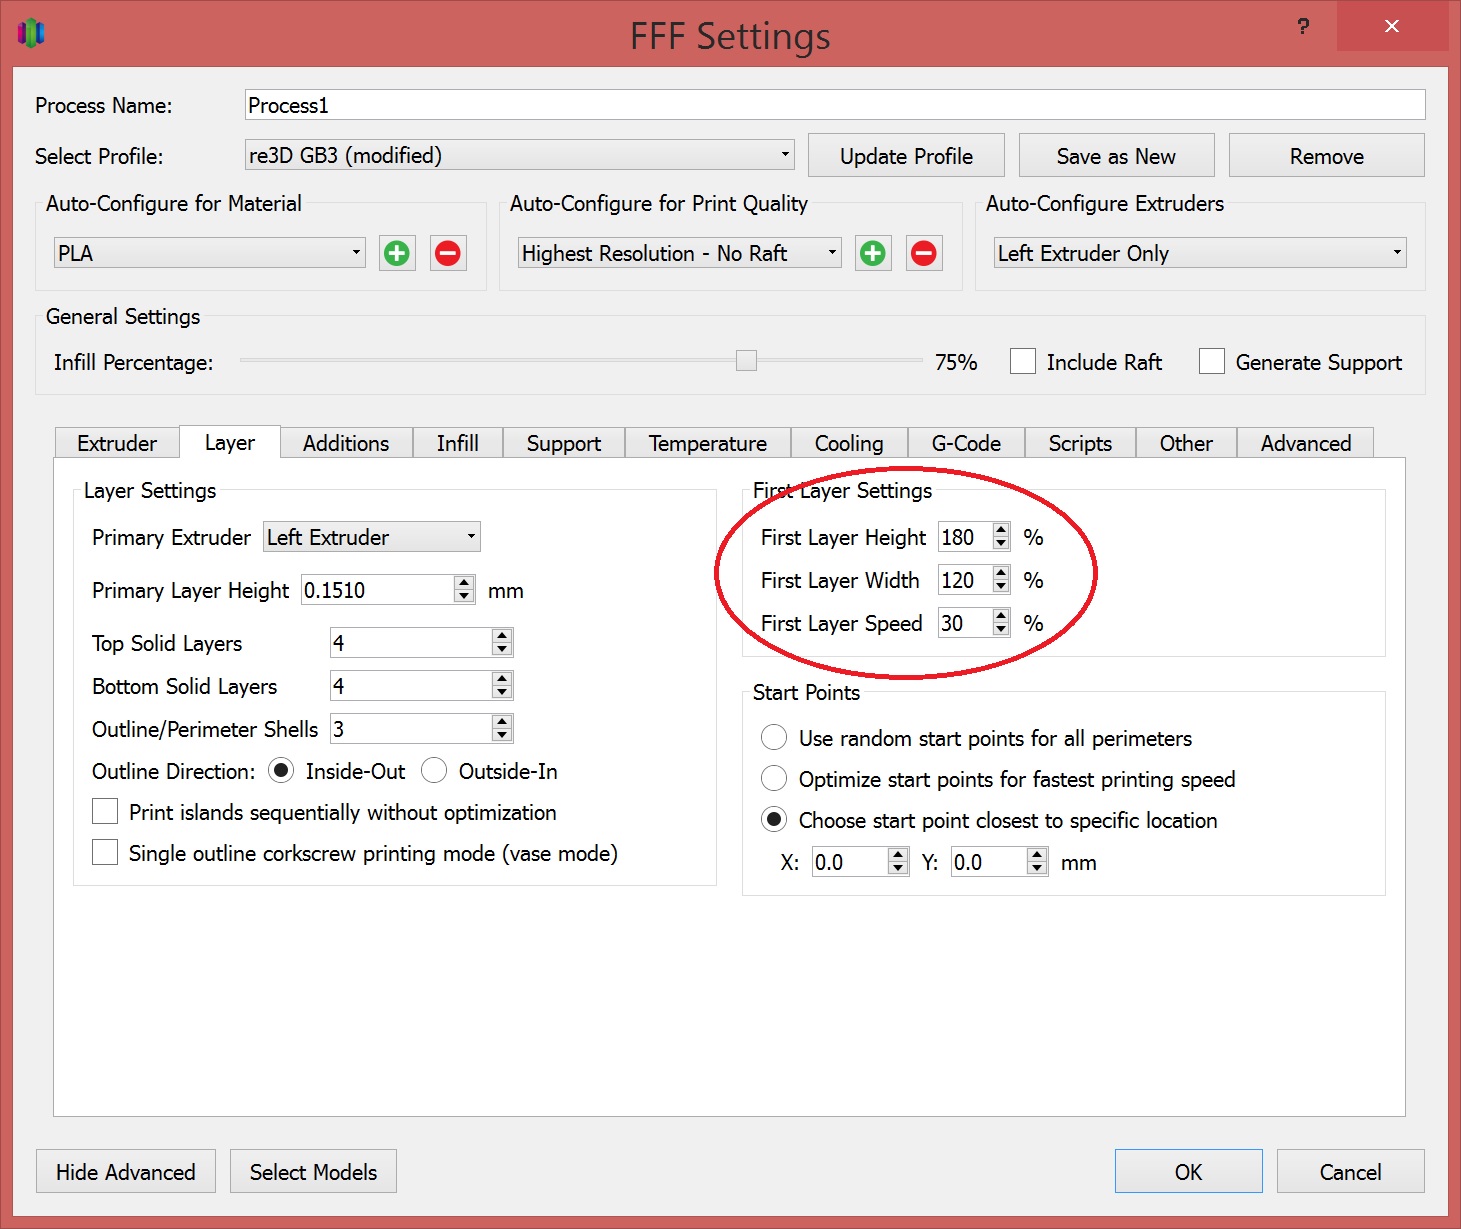
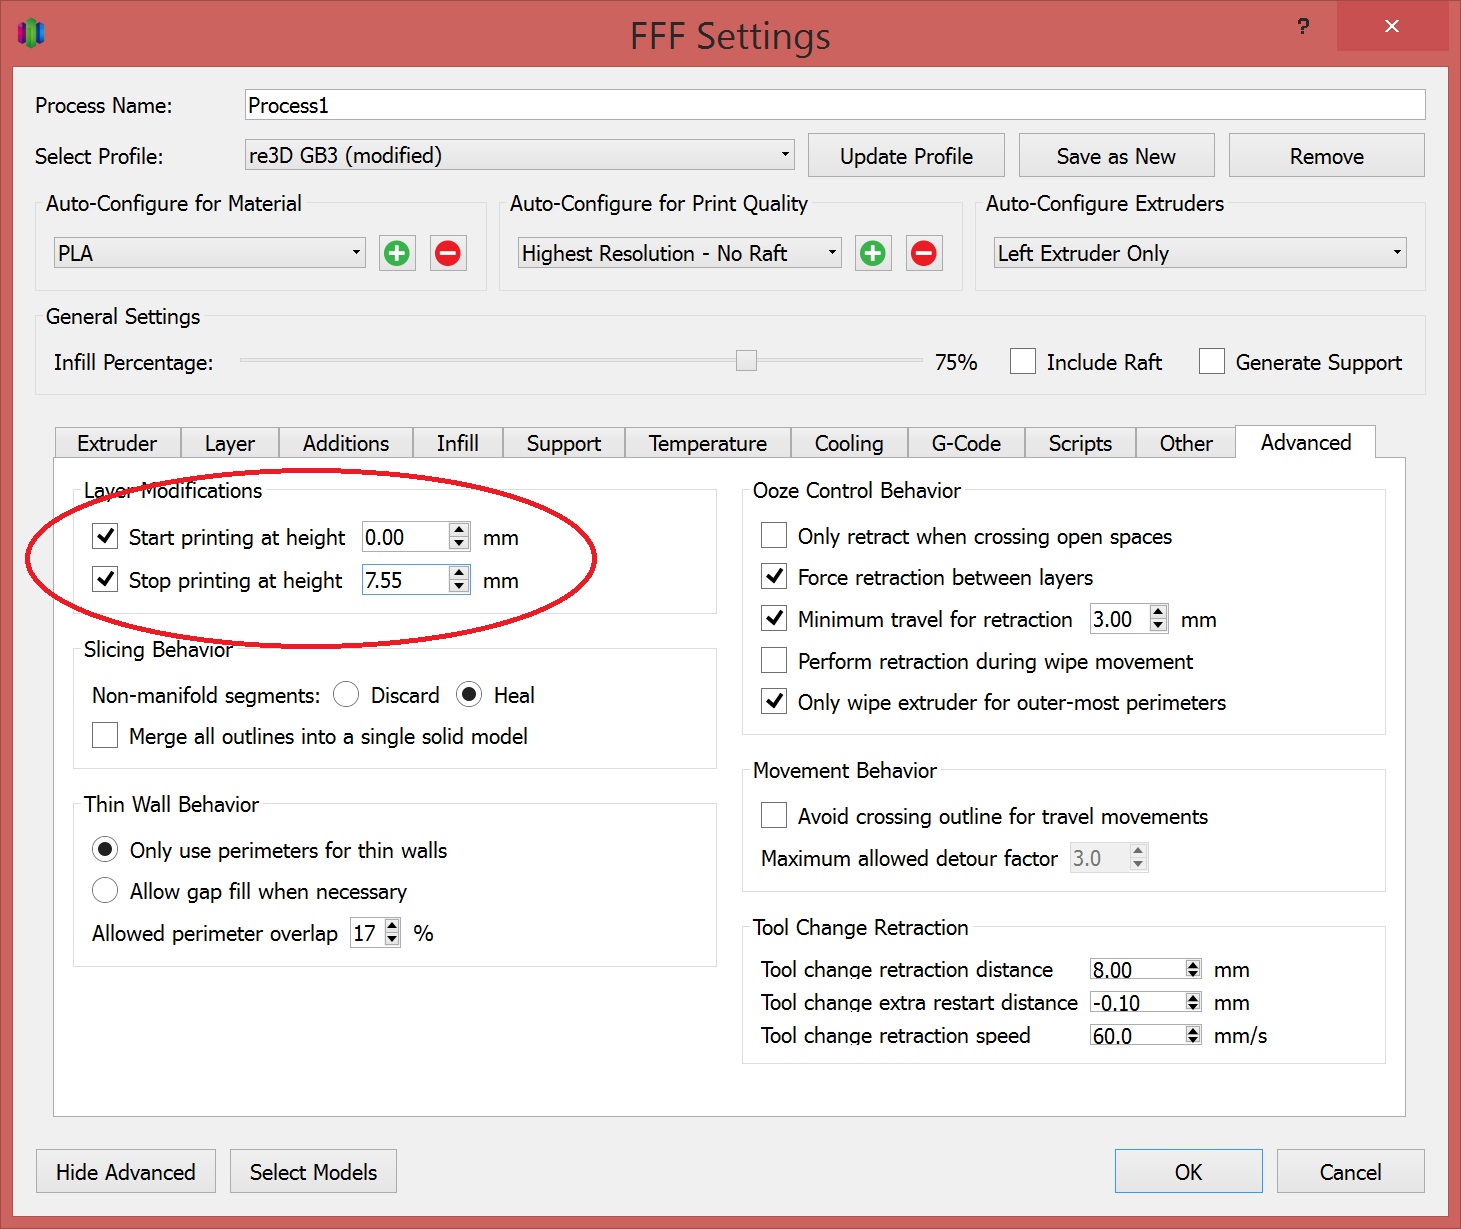
Answer #1. If the SECOND process settings (upper part of the print) has “First layer height” that does not match the layer height for the FIRST process there will be an odd layer thickness visible on your print. Make sure the first layer height and first layer speed for the SECOND process are set to 100%
Answer #2. When setting the “Stop Printing at Height” make sure the dimension is an even multiple of your layer height. Don’t forget to account for any changes in layer height if you enter a value other than 100% for the FIRST process “First Layer Height”!
Since Darrel had one of the two correct answers we will be sending you half a spool of filament 🙂 Just kidding Darrel! Thanks for playing and keep an eye out for next month’s puzzler.
Below are our notes that respect our new open source filament testing. ASTM test samples are being created and in the upcoming months you can anticipate a summary on our website that reflects our adventures in 3D printing material science.
Material Tested: 3D FUEL/APLA
Manufacturer: 3D Fuel
Filament Diameter: – 2.85mm
Color Tested: Bright green
Date Tested: 2/29/2016
OBSERVATIONS
Ease of use: Extremely printable with excellent adhesion.
Appearance: The green filament was vibrant with a smooth texture. Prints yielded a slightly “shiny” surface.
Size consistency: Average, within .1mm within roll.
Color consistency: Great, consistent throughout roll.
SETTINGS
Print temperature: 210 C (nozzle) / 55C (bed)
Printer Used: Gigabot
Speed: 45 mm/s
Layer Height: 0.3mm
Infill: 30%
Type(s) of print surface used: PRINTnZ
List of test files printed: re:3D’s test files 1, 2, and 3 (logo, vase, airplane gear piece)
You can watch a video summarizing our testing:
FINDINGS
Odor: None
Bed adhesion (1: terrible – 5: fabulous!)
5 (only the settings listed above were tested, but the manufacturer’s recommendations seemed to be accurate)
Stringing (1: lots -5: none!)
5 – None!
Shrinkage (1:lots-5: none!)
5-None!
Interlayer adhesion (1:terrible-5:fabulous!)
5- Perfect!
NOTES:
The promise of a more heat resistant PLA is super enticing to the 3D printing community.
After testing, the landing gear was exposed to high temperature heat via a hair dryer and showed little warping.
Further controlled testing would need to be implemented to investigate this claim, but it does initially appear to be stronger and more heat resistant than traditional PLA.
NOTE: this filament was tested 4 months after receipt, however, for many users a 4 month shelf life is necessary.
Testing fresh filament is expected to yield similar or even better results.
Filament size consistency was about on par with most filament.
No delamination or curling was observed.
All testing was conducted at the midpoint of the temperature and speed range that the manufacture provided. It’s likely that the outcome would have been even better had the ranges had been explored in more detail.
The unboxing experience was well done and the recommendation sheet was highly professional.
We appreciated the Made in America reference, and date stamp of quality control on the box & insert.
Manufacturer recommended settings were easily referenced on the enclosed documentation.
RECCOMENDATIONS:
This filament is extremely impressive and more than exceeded it’s claims.
Upon review, we would highly recommend that this filament be submitted to ASTM testing by evaluating coupons at multiple temperature and infill settings.
Want to chat? Join our forum where we have initiated a thread about our experience!
It’s almost here! That time of year where Austin embraces global creatives during the two week whirlwind we call SXSW. We love being so close to the action and can’t wait to see you out and about. If you’re in the area, please stop by any of the events below to say hi!
Description: Exciting hands-on pavilion as well as a number of wonderful STEM sessions. Gigabot Generation 3.0 and OpenGb will be printing live for onlookers while the re:3D team gives high-fives.
News & Schmooze: A SXSW Media Mixer for Startups and Investors
Dates/times: March 11, 5:30pm
Location: Capital Factory
Description: We’re bringing Gigabot to print live at this invite only event hosted by our friends at Own Local! The re:3D gang will be out in full force while Jeric presents our mission and product!
Description: Capital Factory will spotlight several startup and early stage companies already having big impact across borders, and several more on the threshold pondering what to do next…where to go…how to do it? In this conversation Katy will share re:3D’s reach.
Description-Party like an engineer with IEEE and world-renowned technologists & body computing brainiacs! Join us at The Driskill with Gigabot and the re:3D team to let loose with a few drinks at the open bar and enjoy great music!
Description: The exhilaration of the pitch isn’t just for Venture Capitalists anymore! Consumers, geeks and fans are tuning in each week for shows like Shark Tank (and others). How do inventors take a great idea to the airwaves and stay on task to become a great company? What are the pros and cons? Why are so many people watching and how do you capitalize on it? In this session Katy will explore how hardware innovation and entrepreneurship is being showcased and celebrated on prime time and how to make the most of it if you decide to go on the air.
Hubs/RE:3D / Draught House Pub 3D Printing Meetup
Dates/Times: March 14th 12-2pm
Location: The Draught House Pub
Description: Come meet Hubs, re:3D communities and other 3D printing enthusiasts in a laid back environment on March 14th! This is a great opportunity to share your love of 3D Printing and see 3D Printers live. Feel free to bring your best prints and ideas!
Want more? After March 14th Gigabot and the team are super flexible if you’d like to request their presence:)