
You may be thinking: “Why would a machine shop need a 3d printer?”
Turns out there are a lot of uses! In my case, we needed to make new fixtures to take advantage of the capabilities of our new 4th axis and the full travel of our machine. When making fixtures, cost is always a main concern, and making a bad fixture can be expensive in terms of both material and man hours.
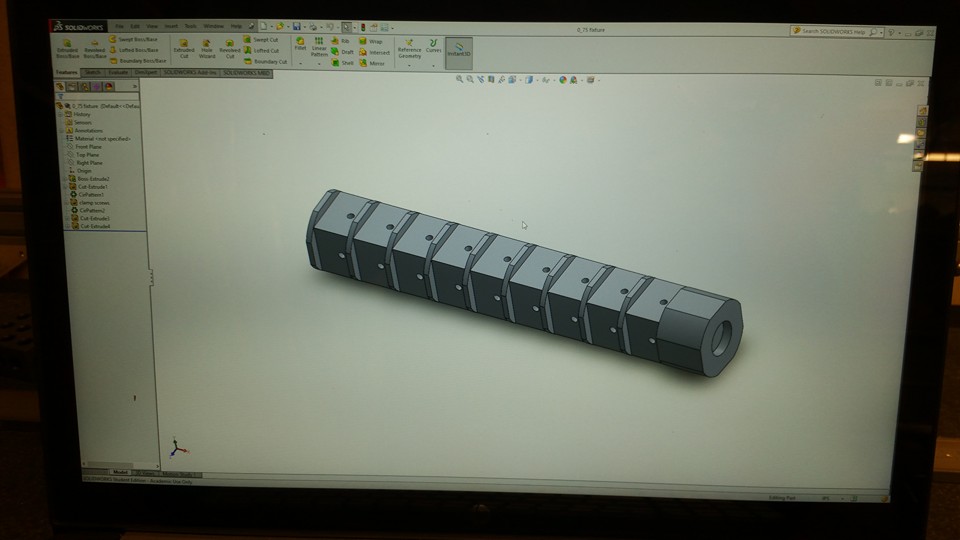
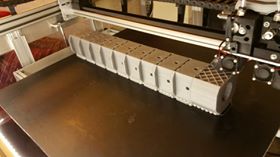
By using re:3D’s Gigabot 3D printer, we were able to design our fixture in Solidworks, export the model, and print a full size model of the fixture overnight on Gigabot (no time wasted).
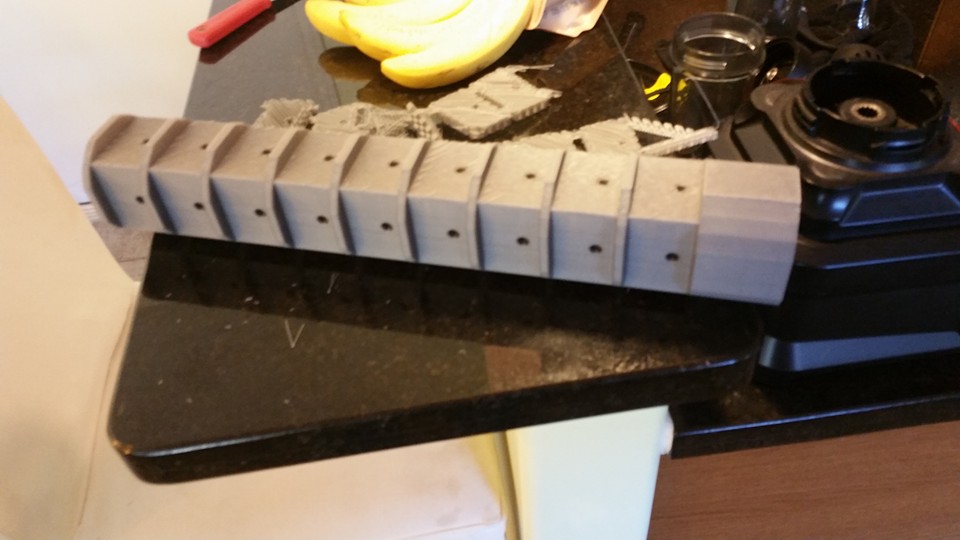
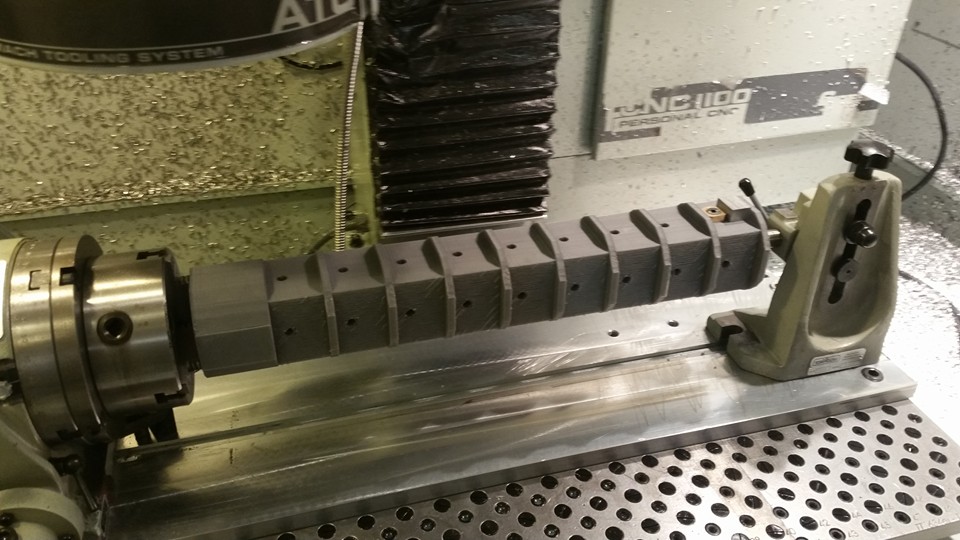
This morning, we tapped the holes for our cam clamps, put the printed fixture into the machine, and checked for clearance and travel issues. In the process we found two issues that we corrected in the solid model, and we are now printing the revised test fixture.
Without the benefit of Gigabot, we may have wasted a 4in diameter by 20in long piece of material, as well as hours of labor. Right now, our only cost has been a few dollars worth of plastic.
This experience has been a great opportunity for me to learn Solidworks and I’m looking forward to using Gigabot again to cut costs, create efficiencies, and to have fun in the shop!
~Happy Printing!
Steve Johnson
Blog Post Author

As part of the LMDRONES projects that you can find on Local Motors, we want to welcome re:3D and their Gigabot 3D printer as they join our LM Drone efforts!

May 7th was International Drone Day and the Local Motors Teams, from both Vegas and Chandler, paired up with Matthew Fiedler, Co-Founder and Chief Engineer at re:3D, to bring their Gigabot 3D printer to the world’s first drone port, the Eldorado Droneport, in Boulder City, NV.

The all day event included open tuning, demonstrations, races, and freestyle flying. Matt Jackson, Alaric Egli, and Alex Palmer of Local Motors brought a variety of different drones to take part in the event. Matthew began printing with the re:3D Gigabot as soon as it arrived, showing it’s potential and usability for creating parts, wings, and even a full size Wing FPV.

Stayed tuned for what’s next with the re:3D Gigabot which just made its successful journey from Nevada to Chandler, AZ at the Local Motors Headquarters!

Gigabot arrives at Local Motors Phoenix facility after participating in the International Drone day festivities at Aerodrome near Las Vegas, Nevada. Engineers at Local Motors are excited to train on the Gigabot and start running their first prints!

re:3D Gigabot can now be found at the Local Motors’ headquarters in Chandler AZ!

Manufacturer: MakeShaper PLA
Filament Diameter: 3.00 mm
Color Tested: Orange
Date Tested: 4/01/2016


Ease of use: Working with this filament was very enjoyable. It printed easily, was consistent and predictable. No breakage was noticed. The PLA appeared to be of a high quality.
Appearance: The filament exhibited a pleasing orange tone that even the greatest orange pantone haters on our team found appealing. A slight sheen presented when printed.
Size consistency: Awesome, less than 0.1mm within the roll, however the filament measured 2.87mm, not 3mm
Color consistency: Great, consistent throughout the coil.
Print temperature: 190-215 C (suggested)/202C was used: nozzle / 60C : bed
Printer Used: Gigabot
Speed: 60 mm/s
Layer Height: 0.3mm
Infill: 15%
Type(s) of print surface used: PRINTnZ
List of test files printed: re:3D’s test files 1, 2, and 3 (logo, vase, and Benchy Torture Test). After April’s UX meeting, it was decided to also print a Moai as a 4th print.
You view watch a video summarizing our testing here:
Odor: None
Bed adhesion (1: terrible – 5: fabulous!)
Stringing (1: lots – 5: none!)
Shrinkage (1: lots – 5: none!)
Interlayer adhesion (1: terrible – 5: fabulous!)


Want to chat? Join our forum where we have initiated a thread about our experience!
https://re3d.zendesk.com/hc/en-us/community/posts/206511376-Testing-MakeShaper-PLA
~Happy Printing!
Samantha snabes
Blog Post Author

I work at re:3D and my job is to figure out and test cool and unique ways to use our 3d printers. I have 2003 VW beetle (and I love it) but some of the aesthetics have been worn and aged poorly over the years. So I had the idea to custom print a rear hood ornament. My amazing bosses thought this was a great idea and helped me to design and realize this idea.
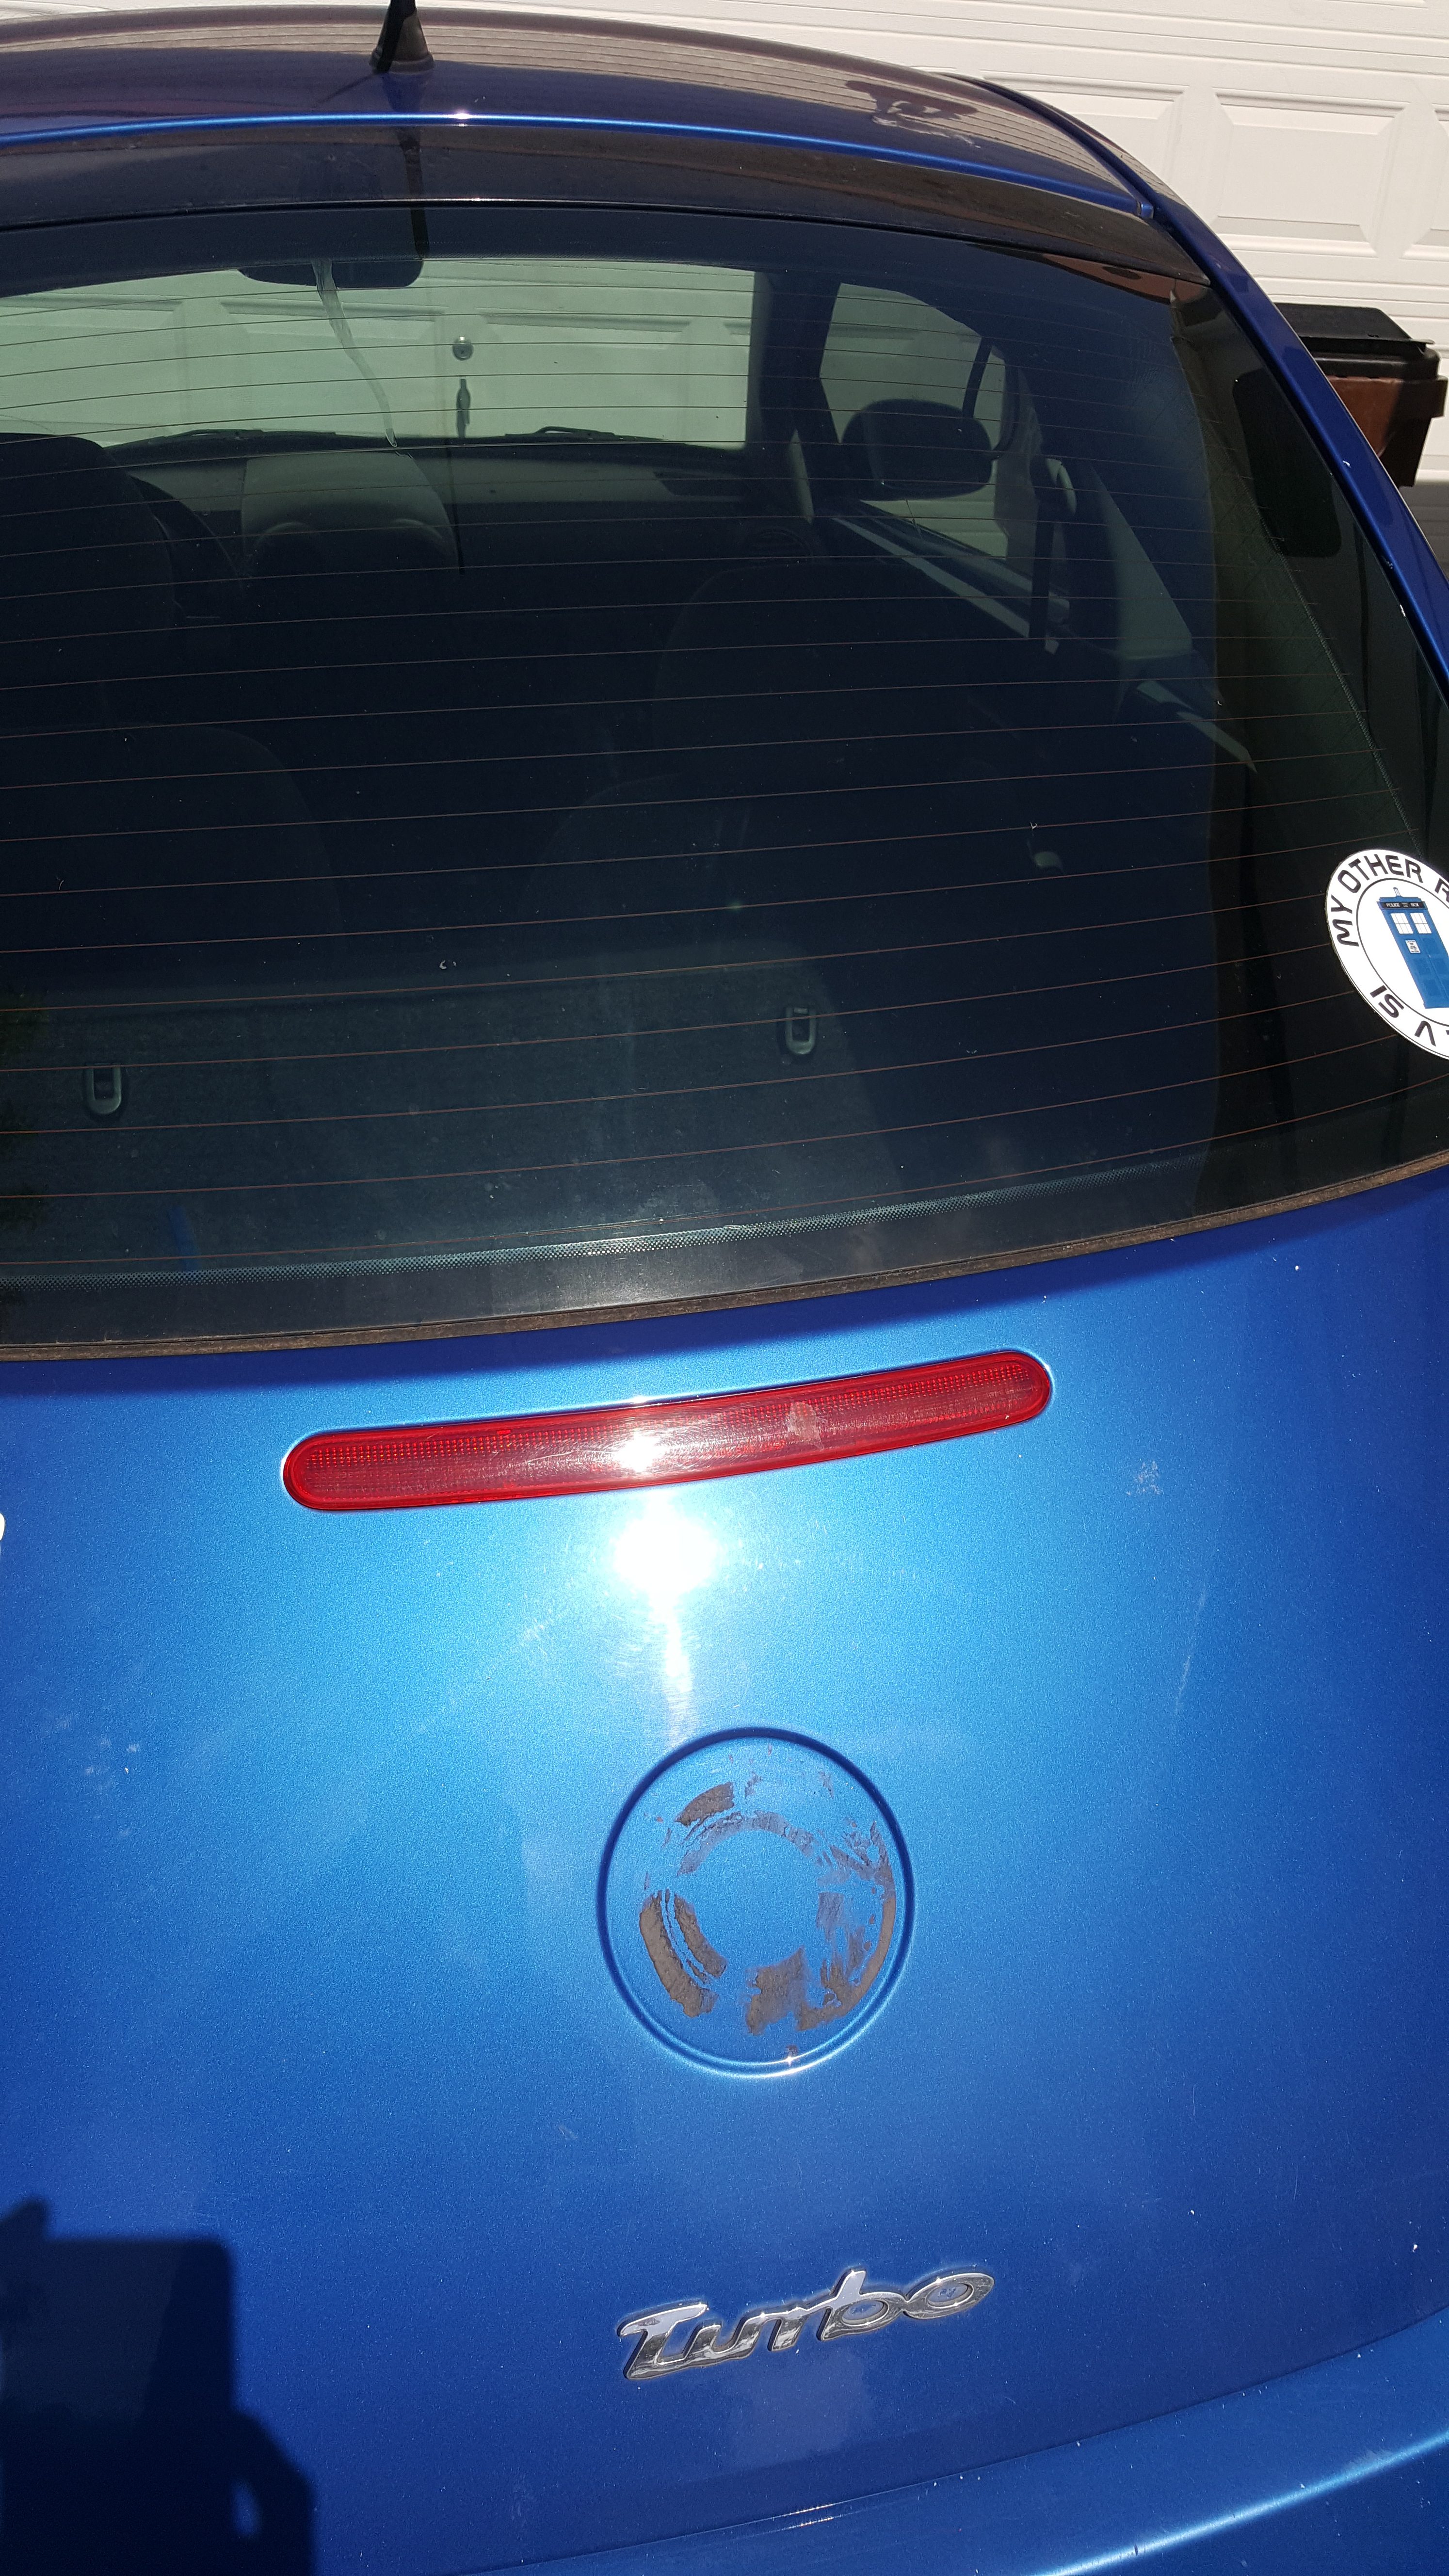
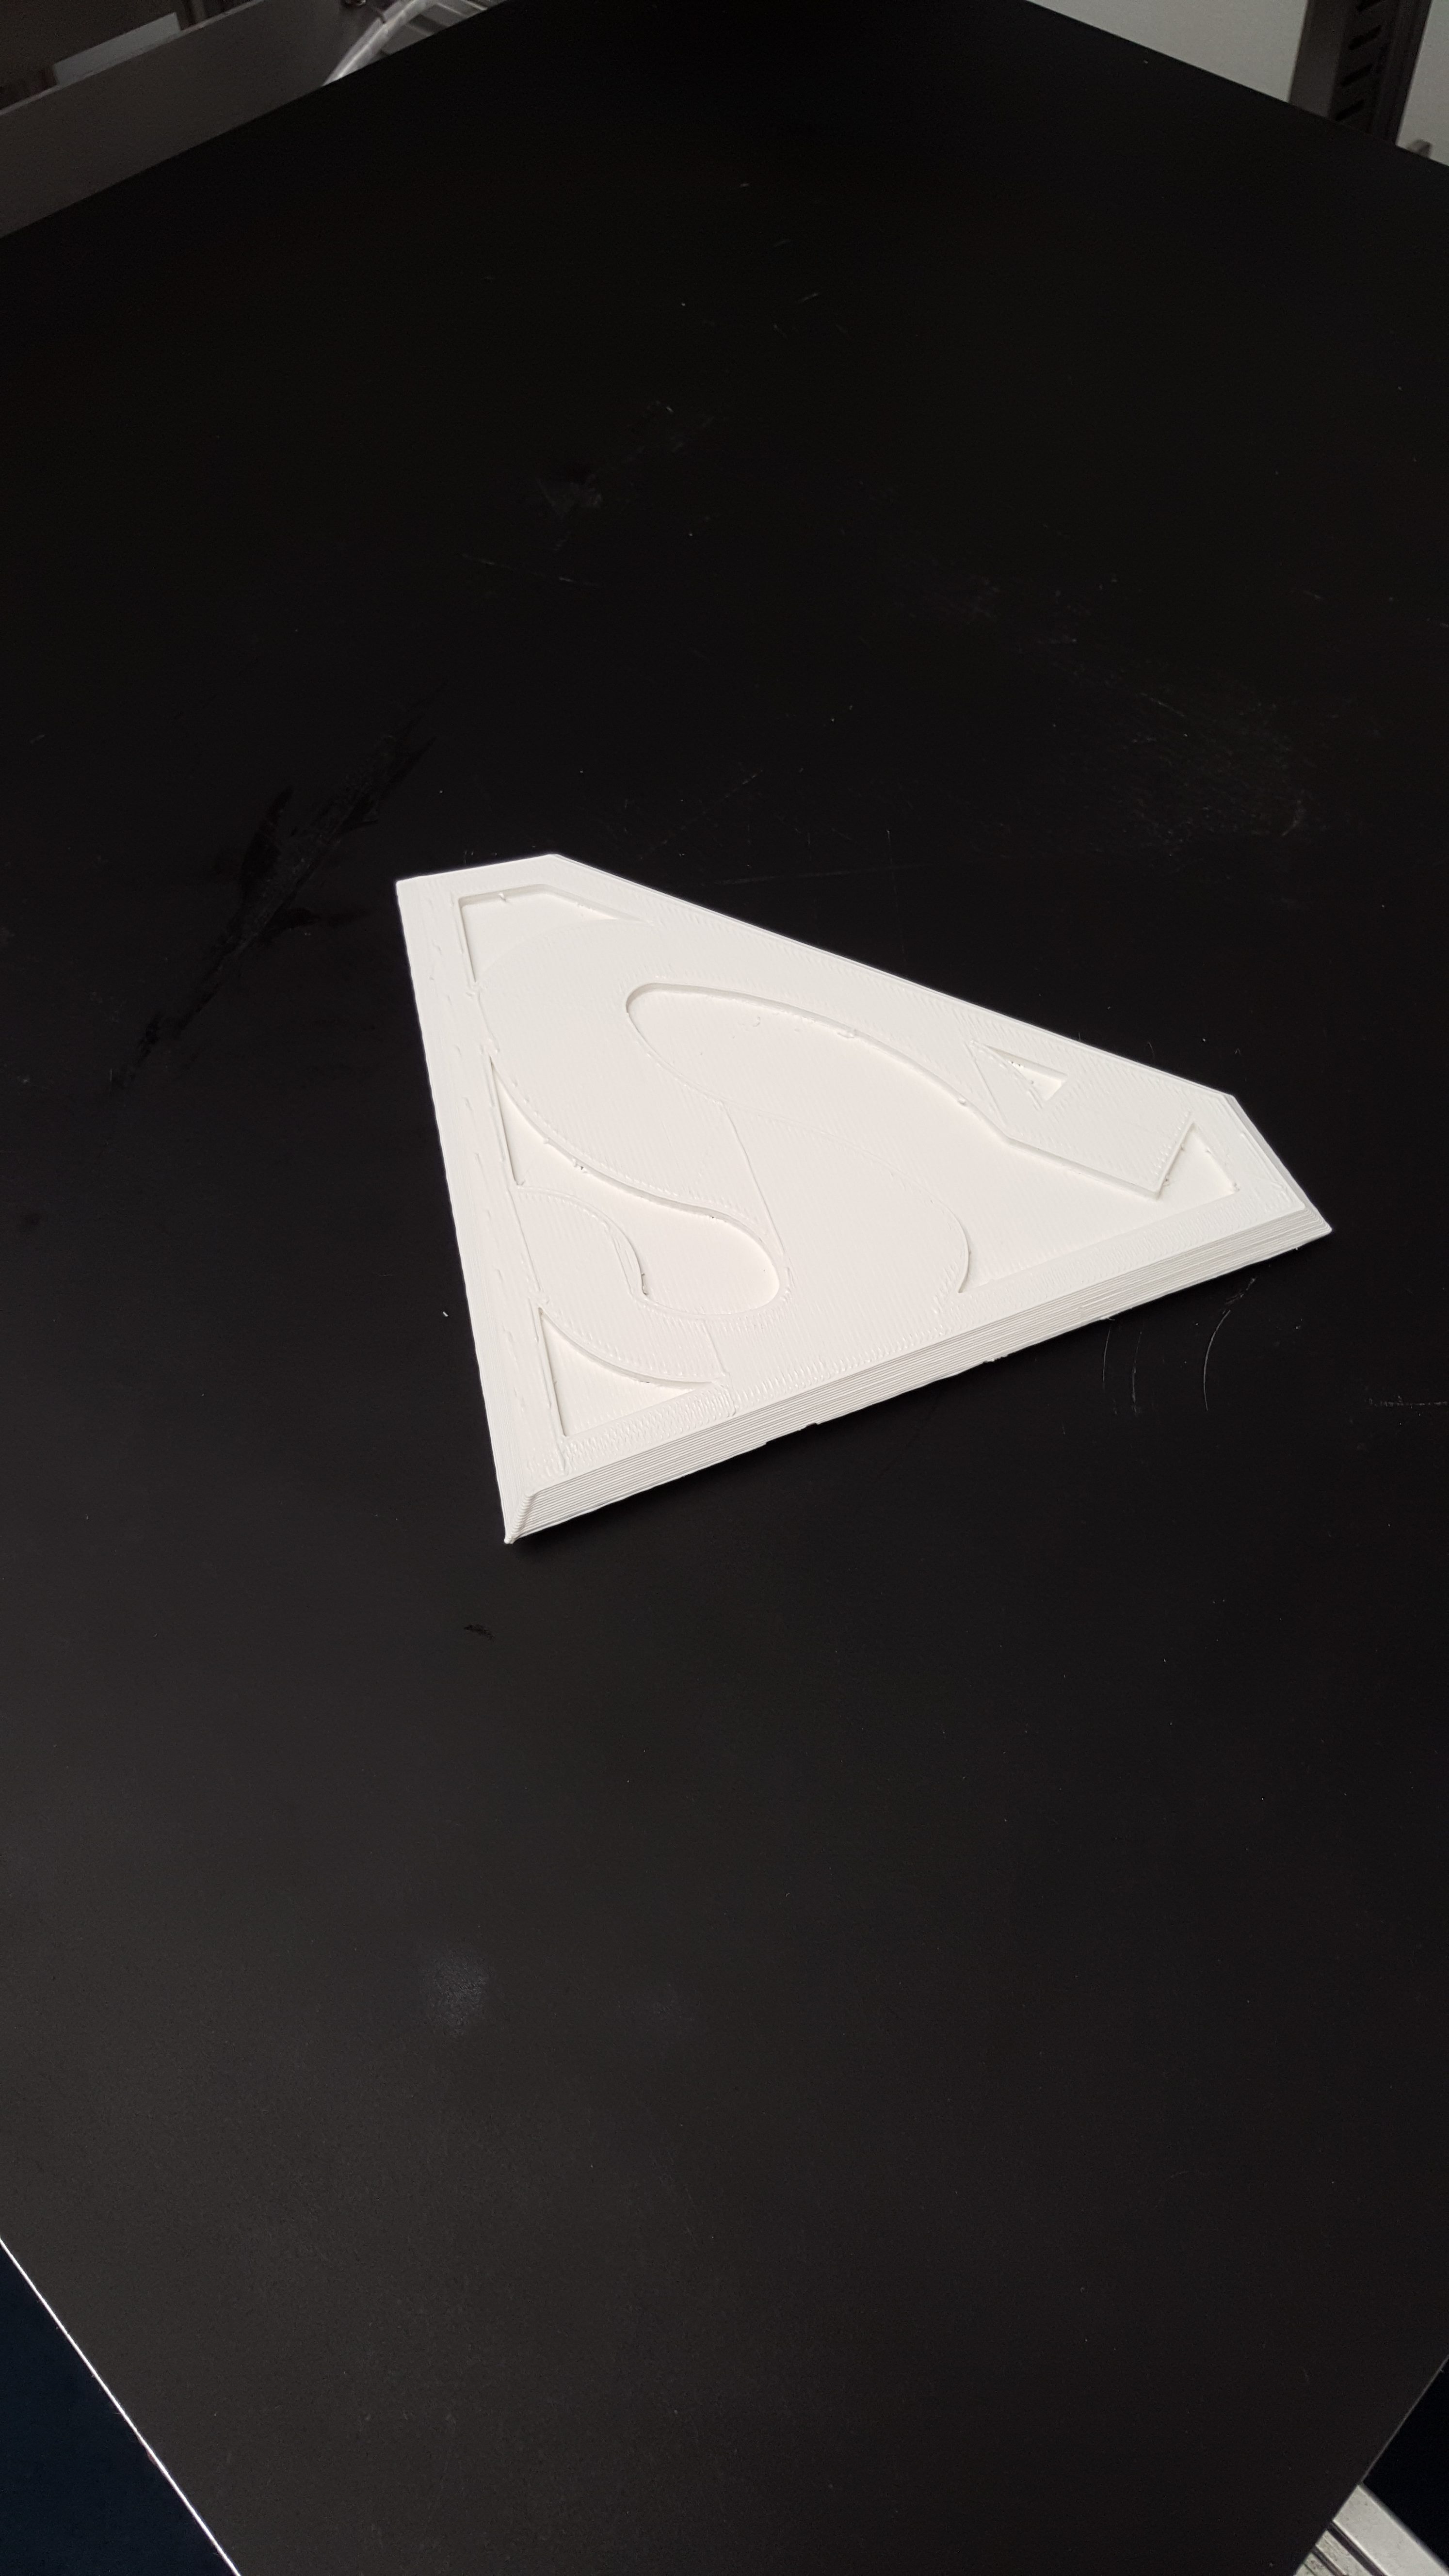
It was hard to pick what exactly I wanted to make for my car. After running through tons of ideas I finally decided that because of the deep sienna blue of my vehicle that a superman logo would look amazing on it. This is a picture of my car after I peeled off the old rusty and broken VW emblem.
First I designed the hood emblem in a free Cad software called Onshape. You can access the tool at this link: https://www.onshape.com/ if you are interested.
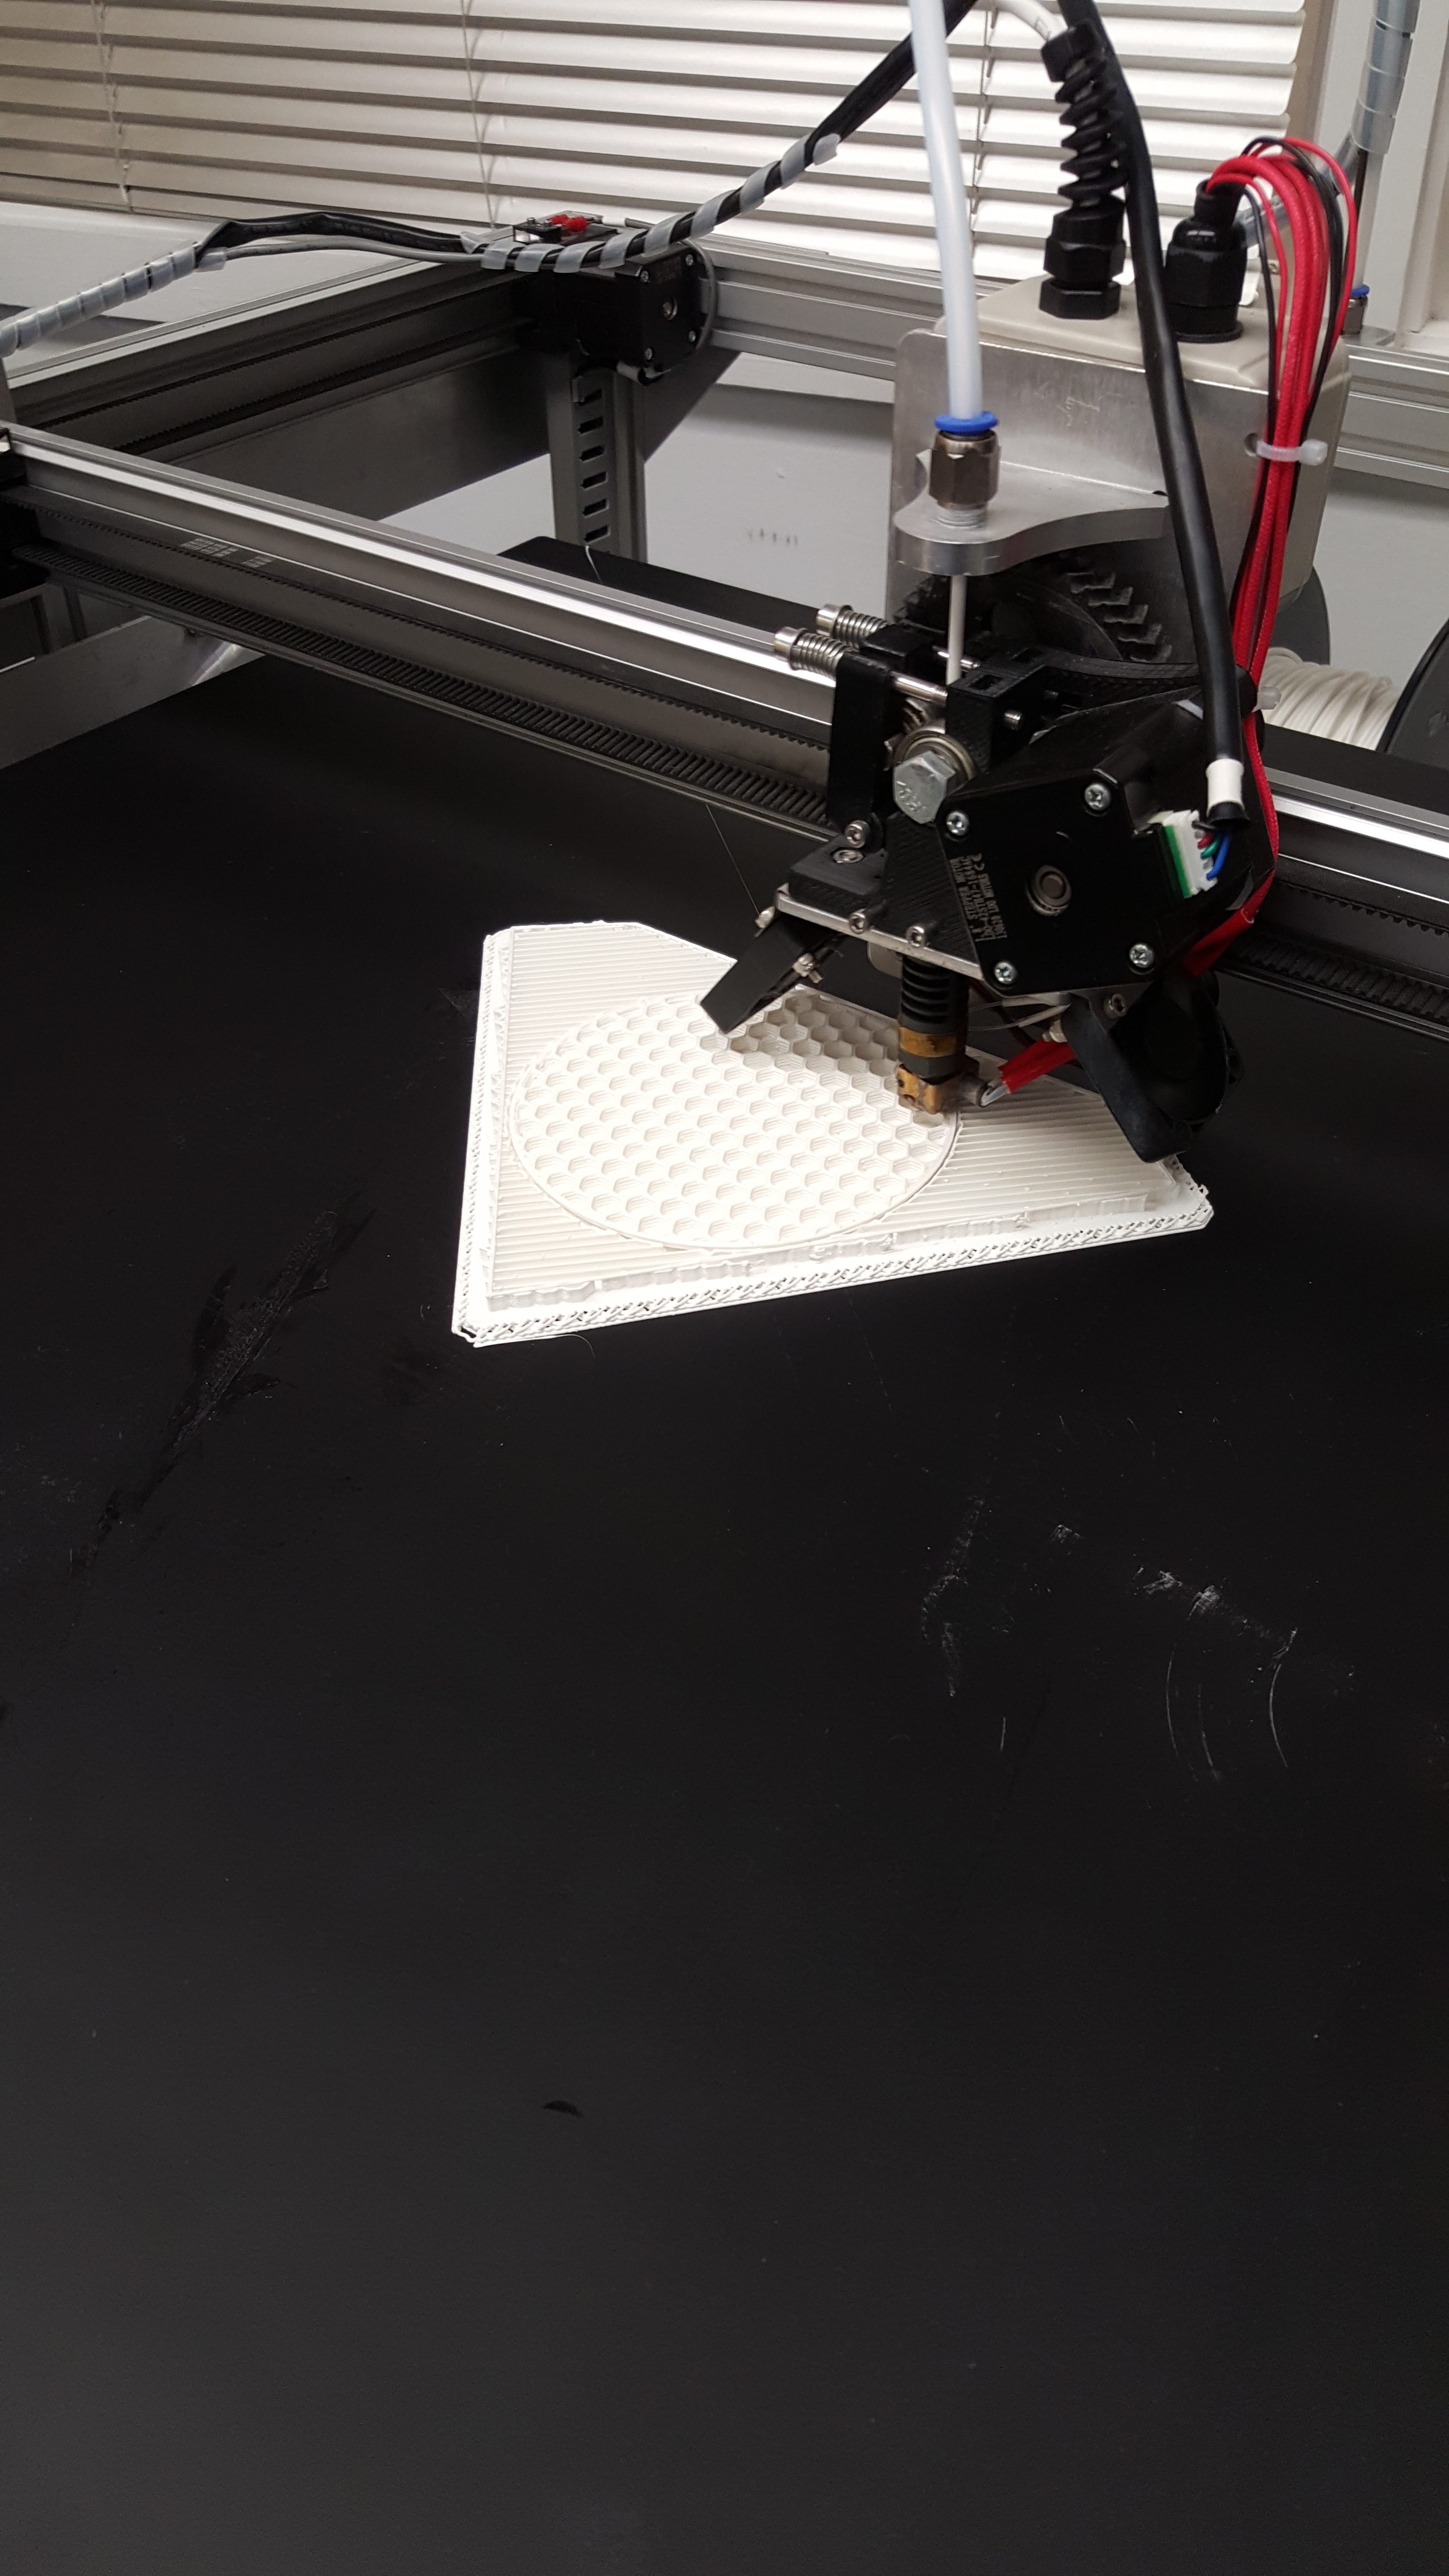
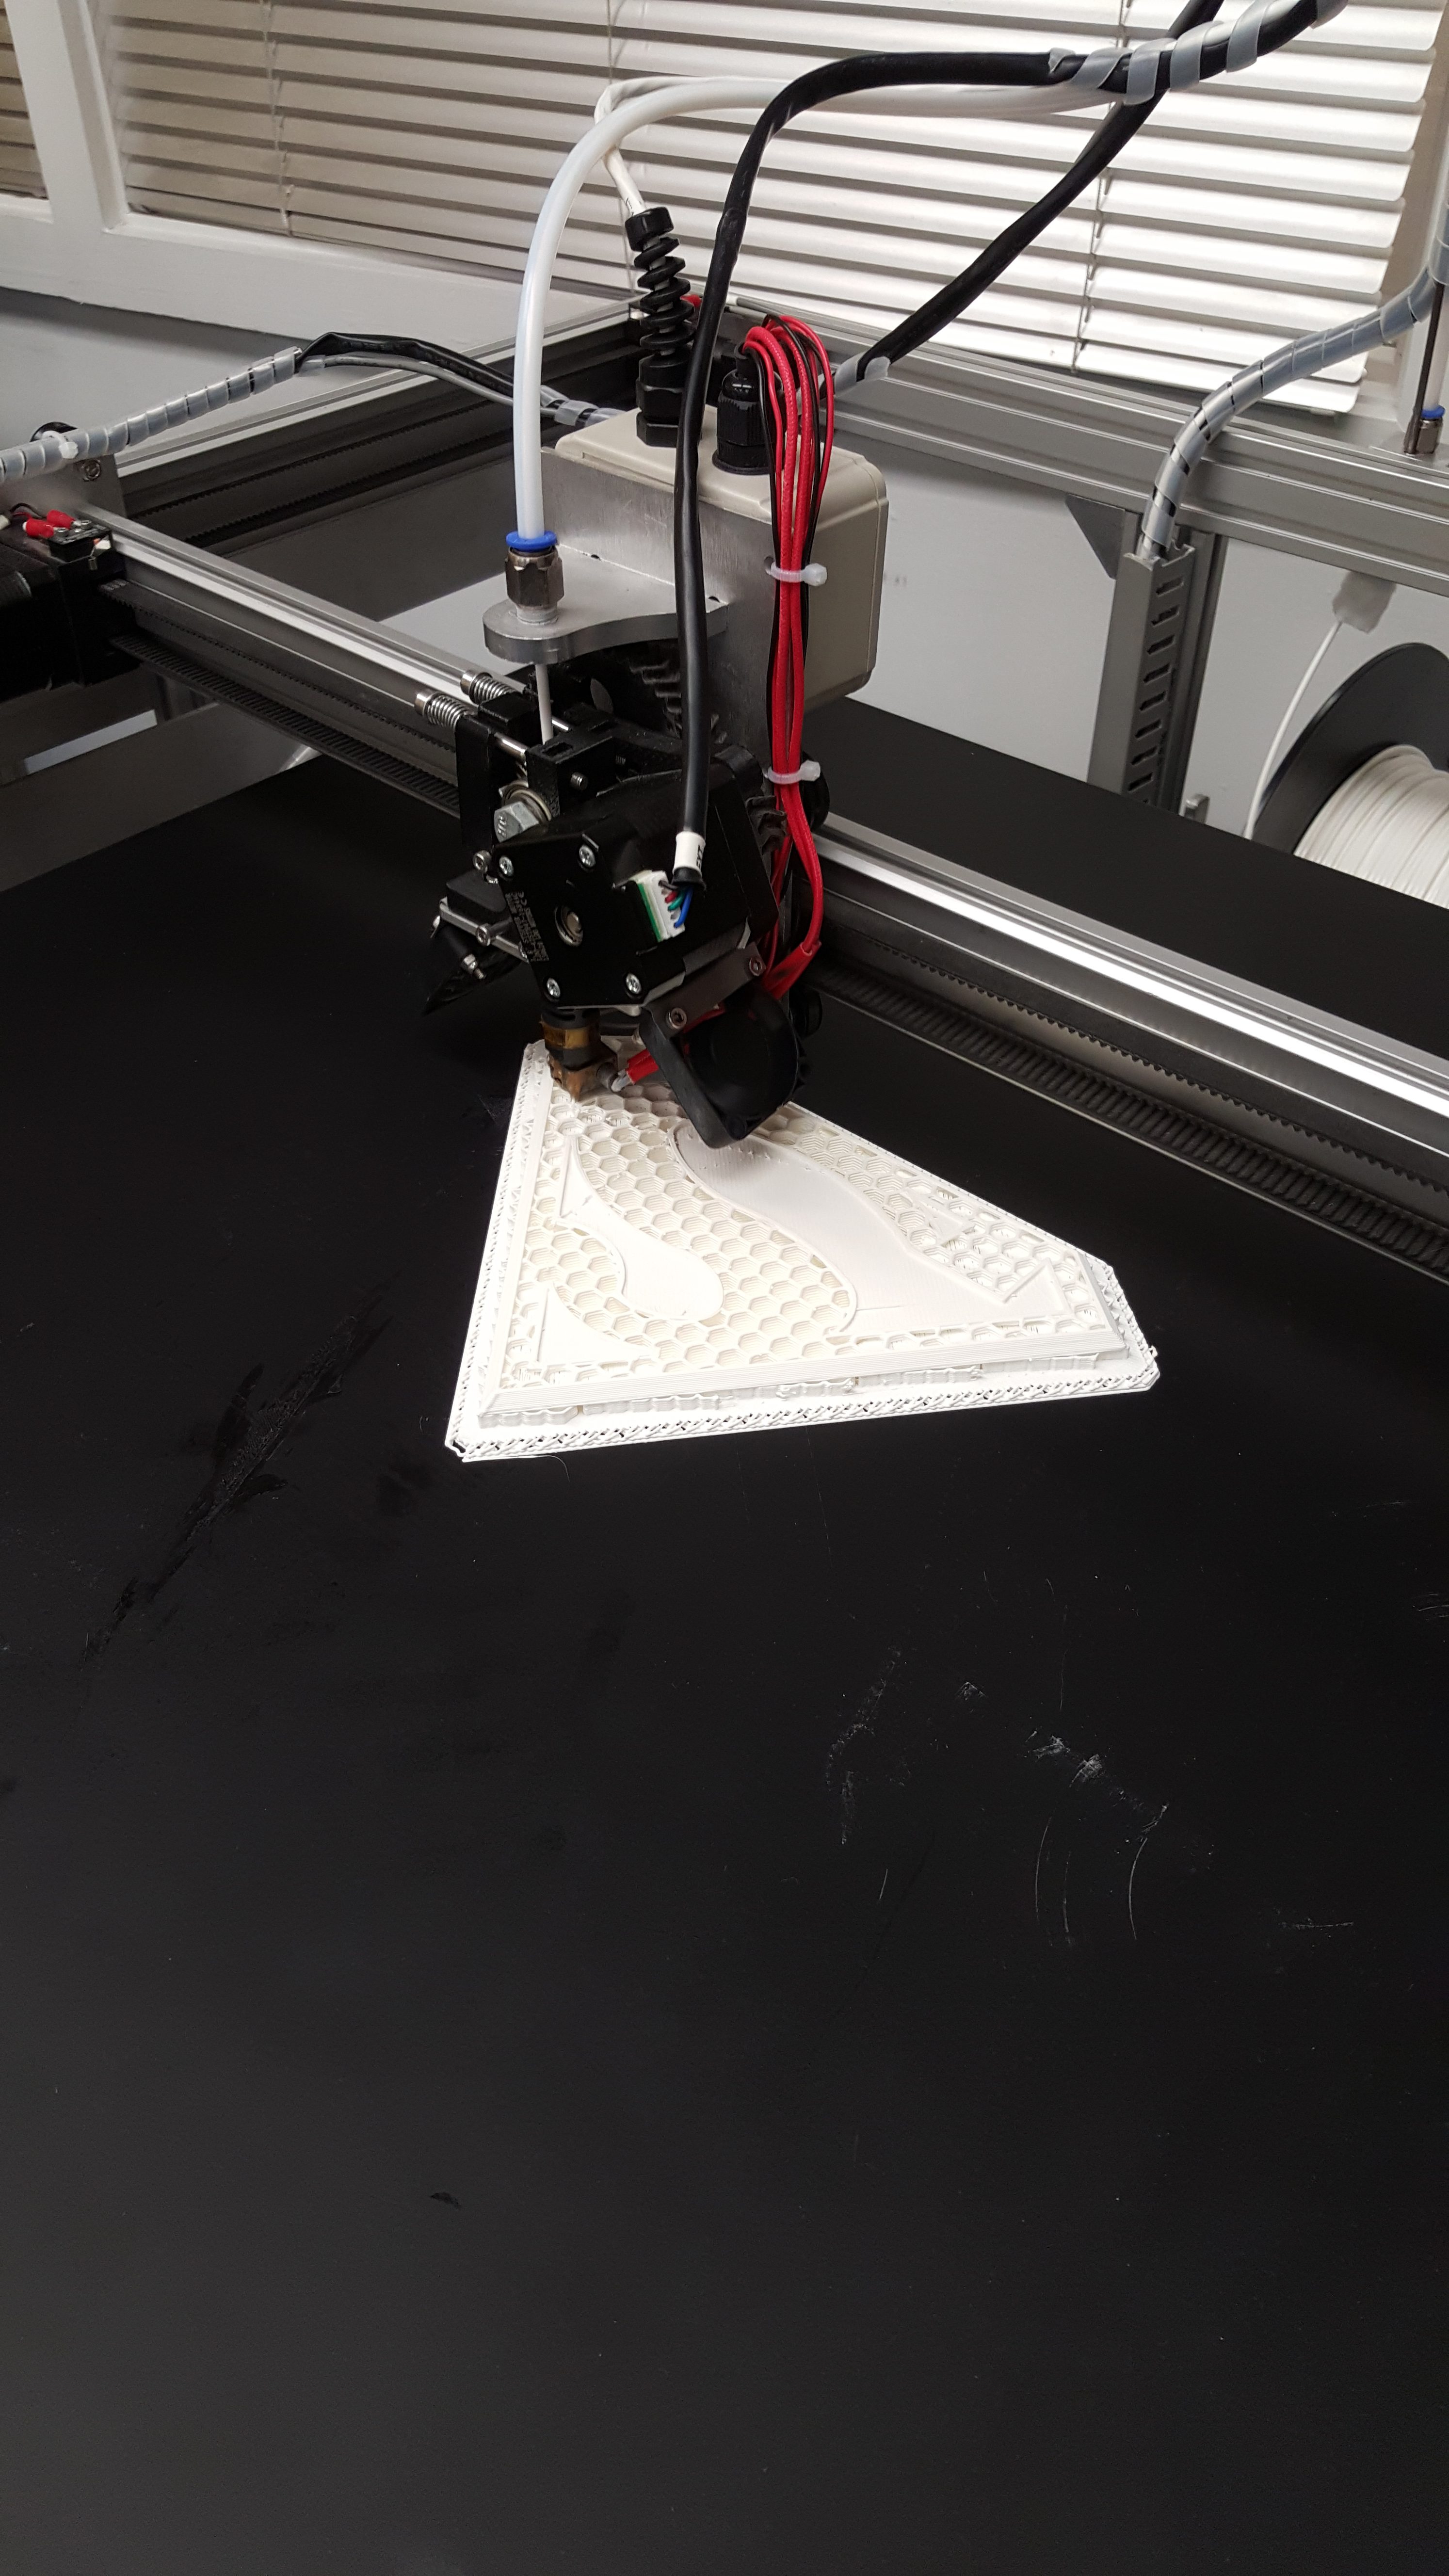
After slicing the file for printing, we put it on the Gigabot and watched it come to life!
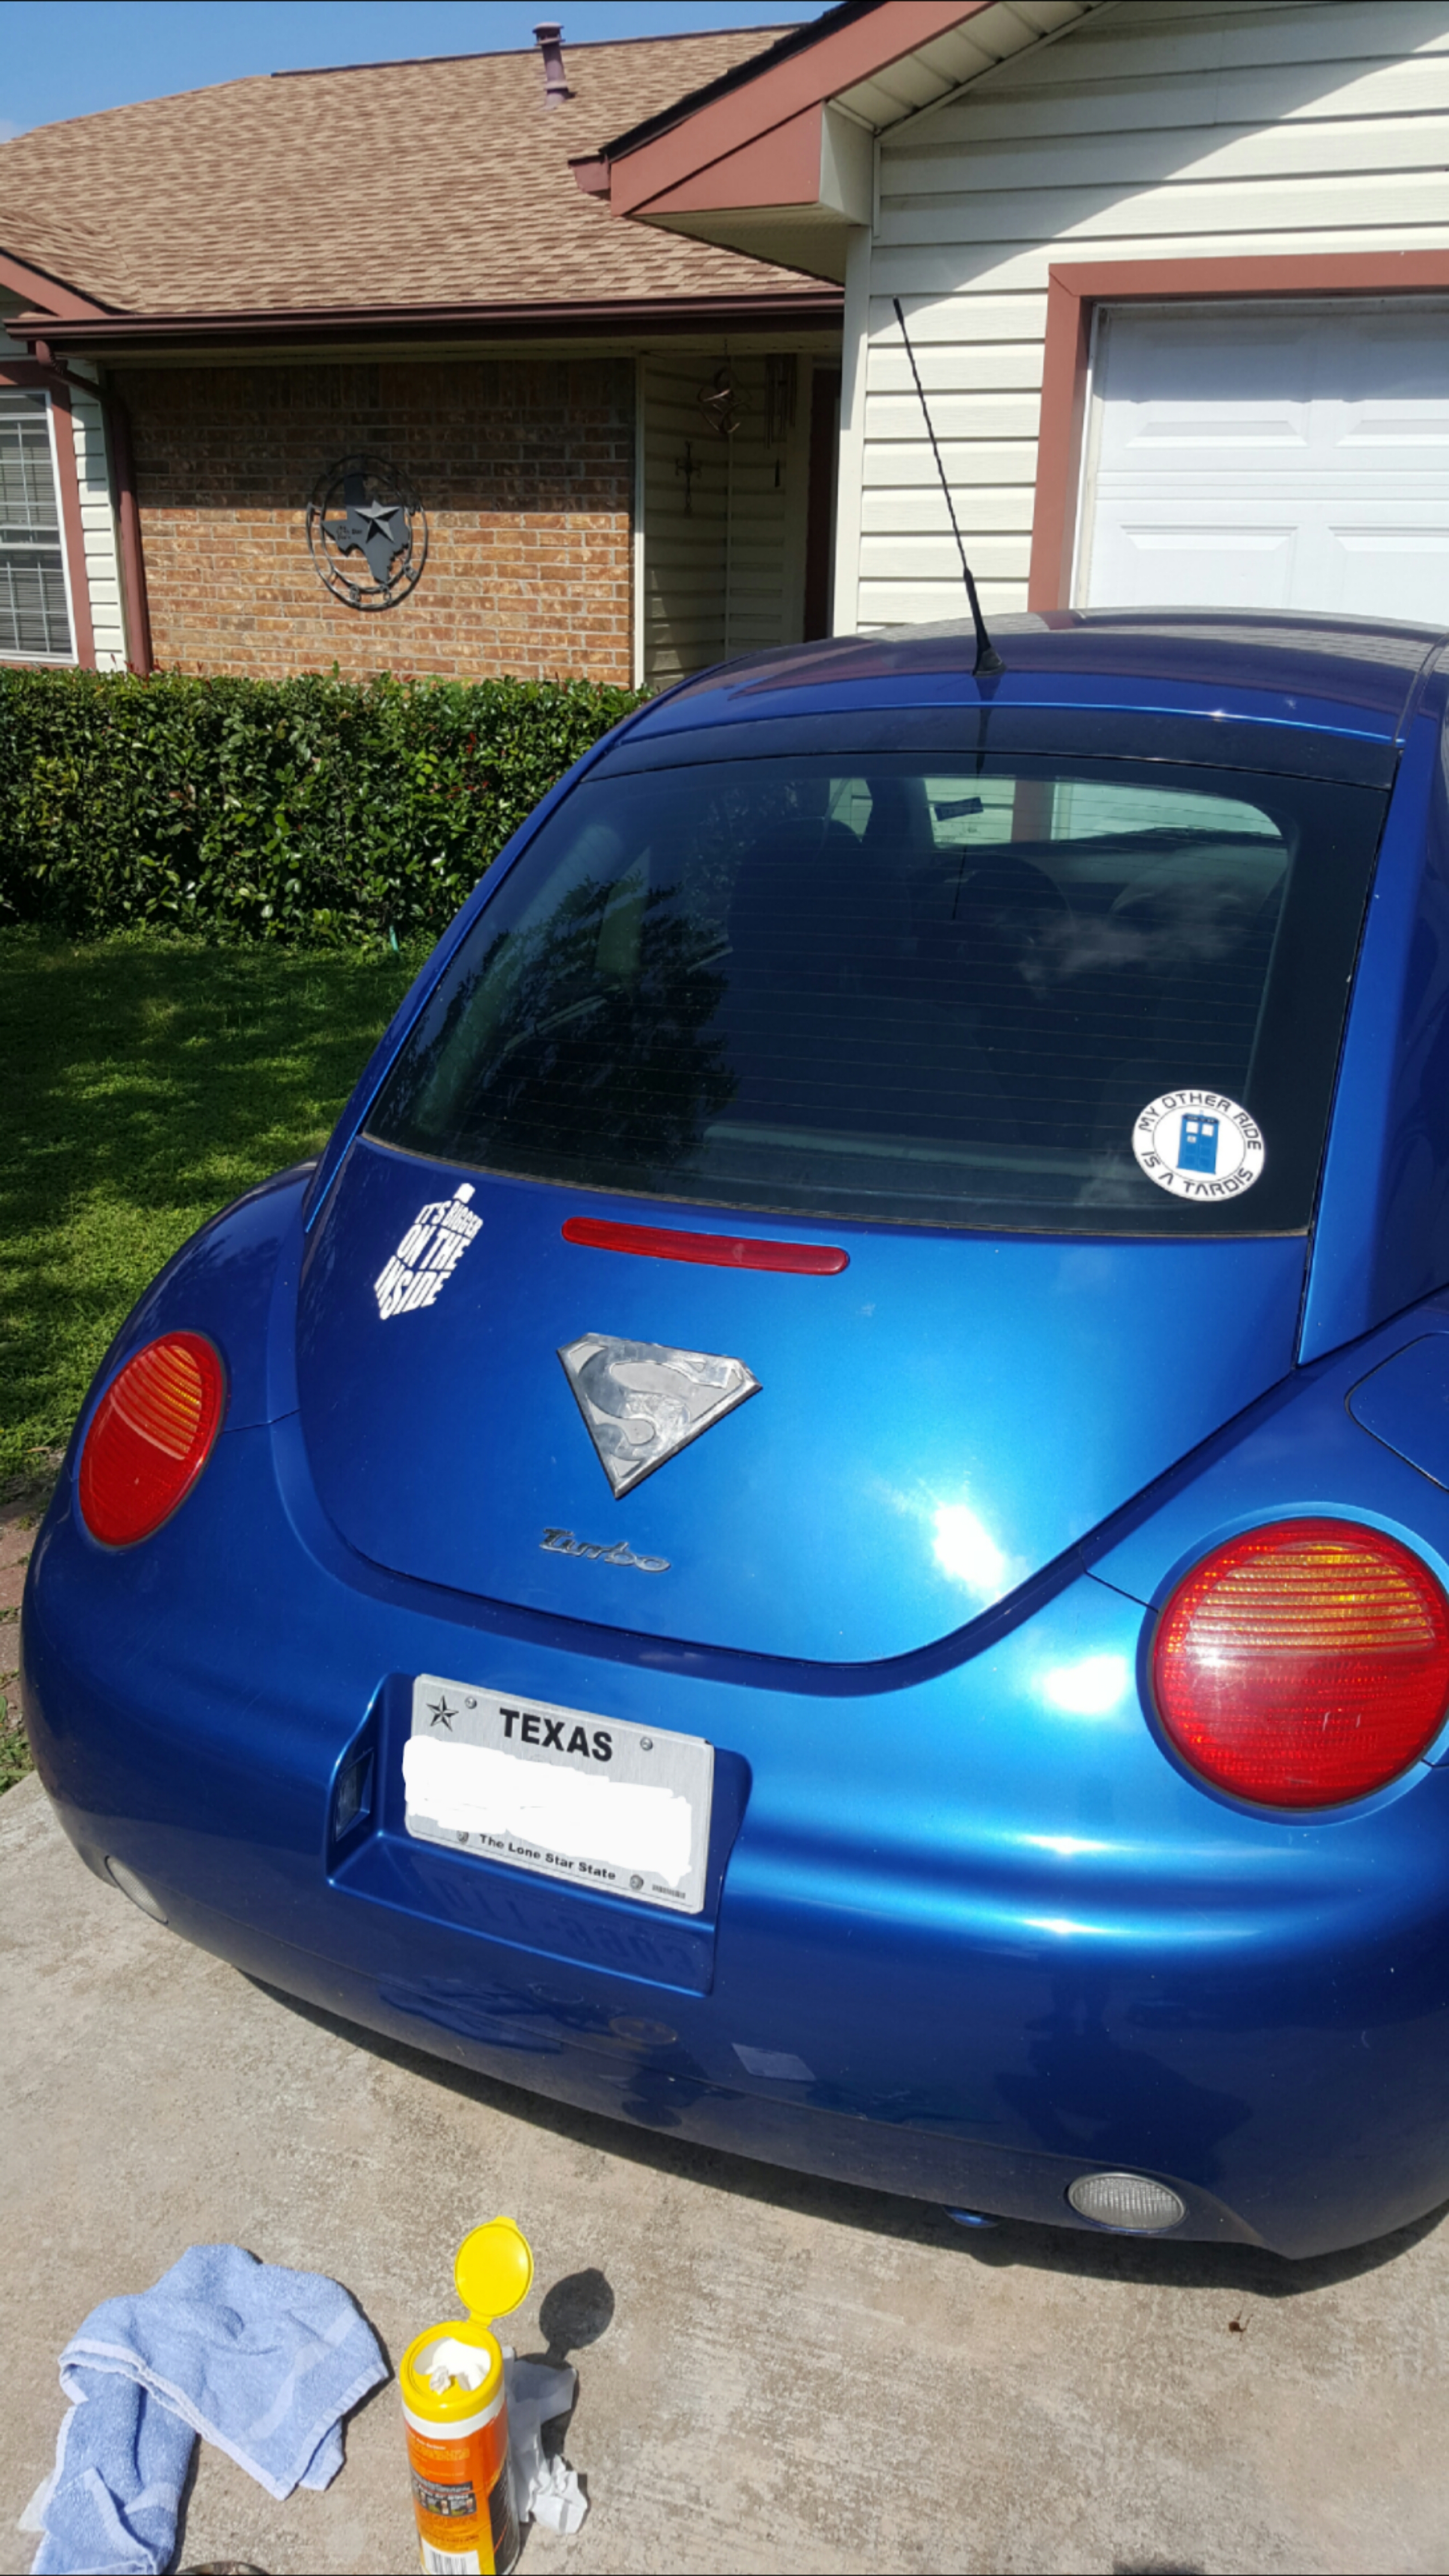
And then we tested it on my car. After looking at it closely, I decided I wasn’t happy with the size and printed a second to fill up the space better.

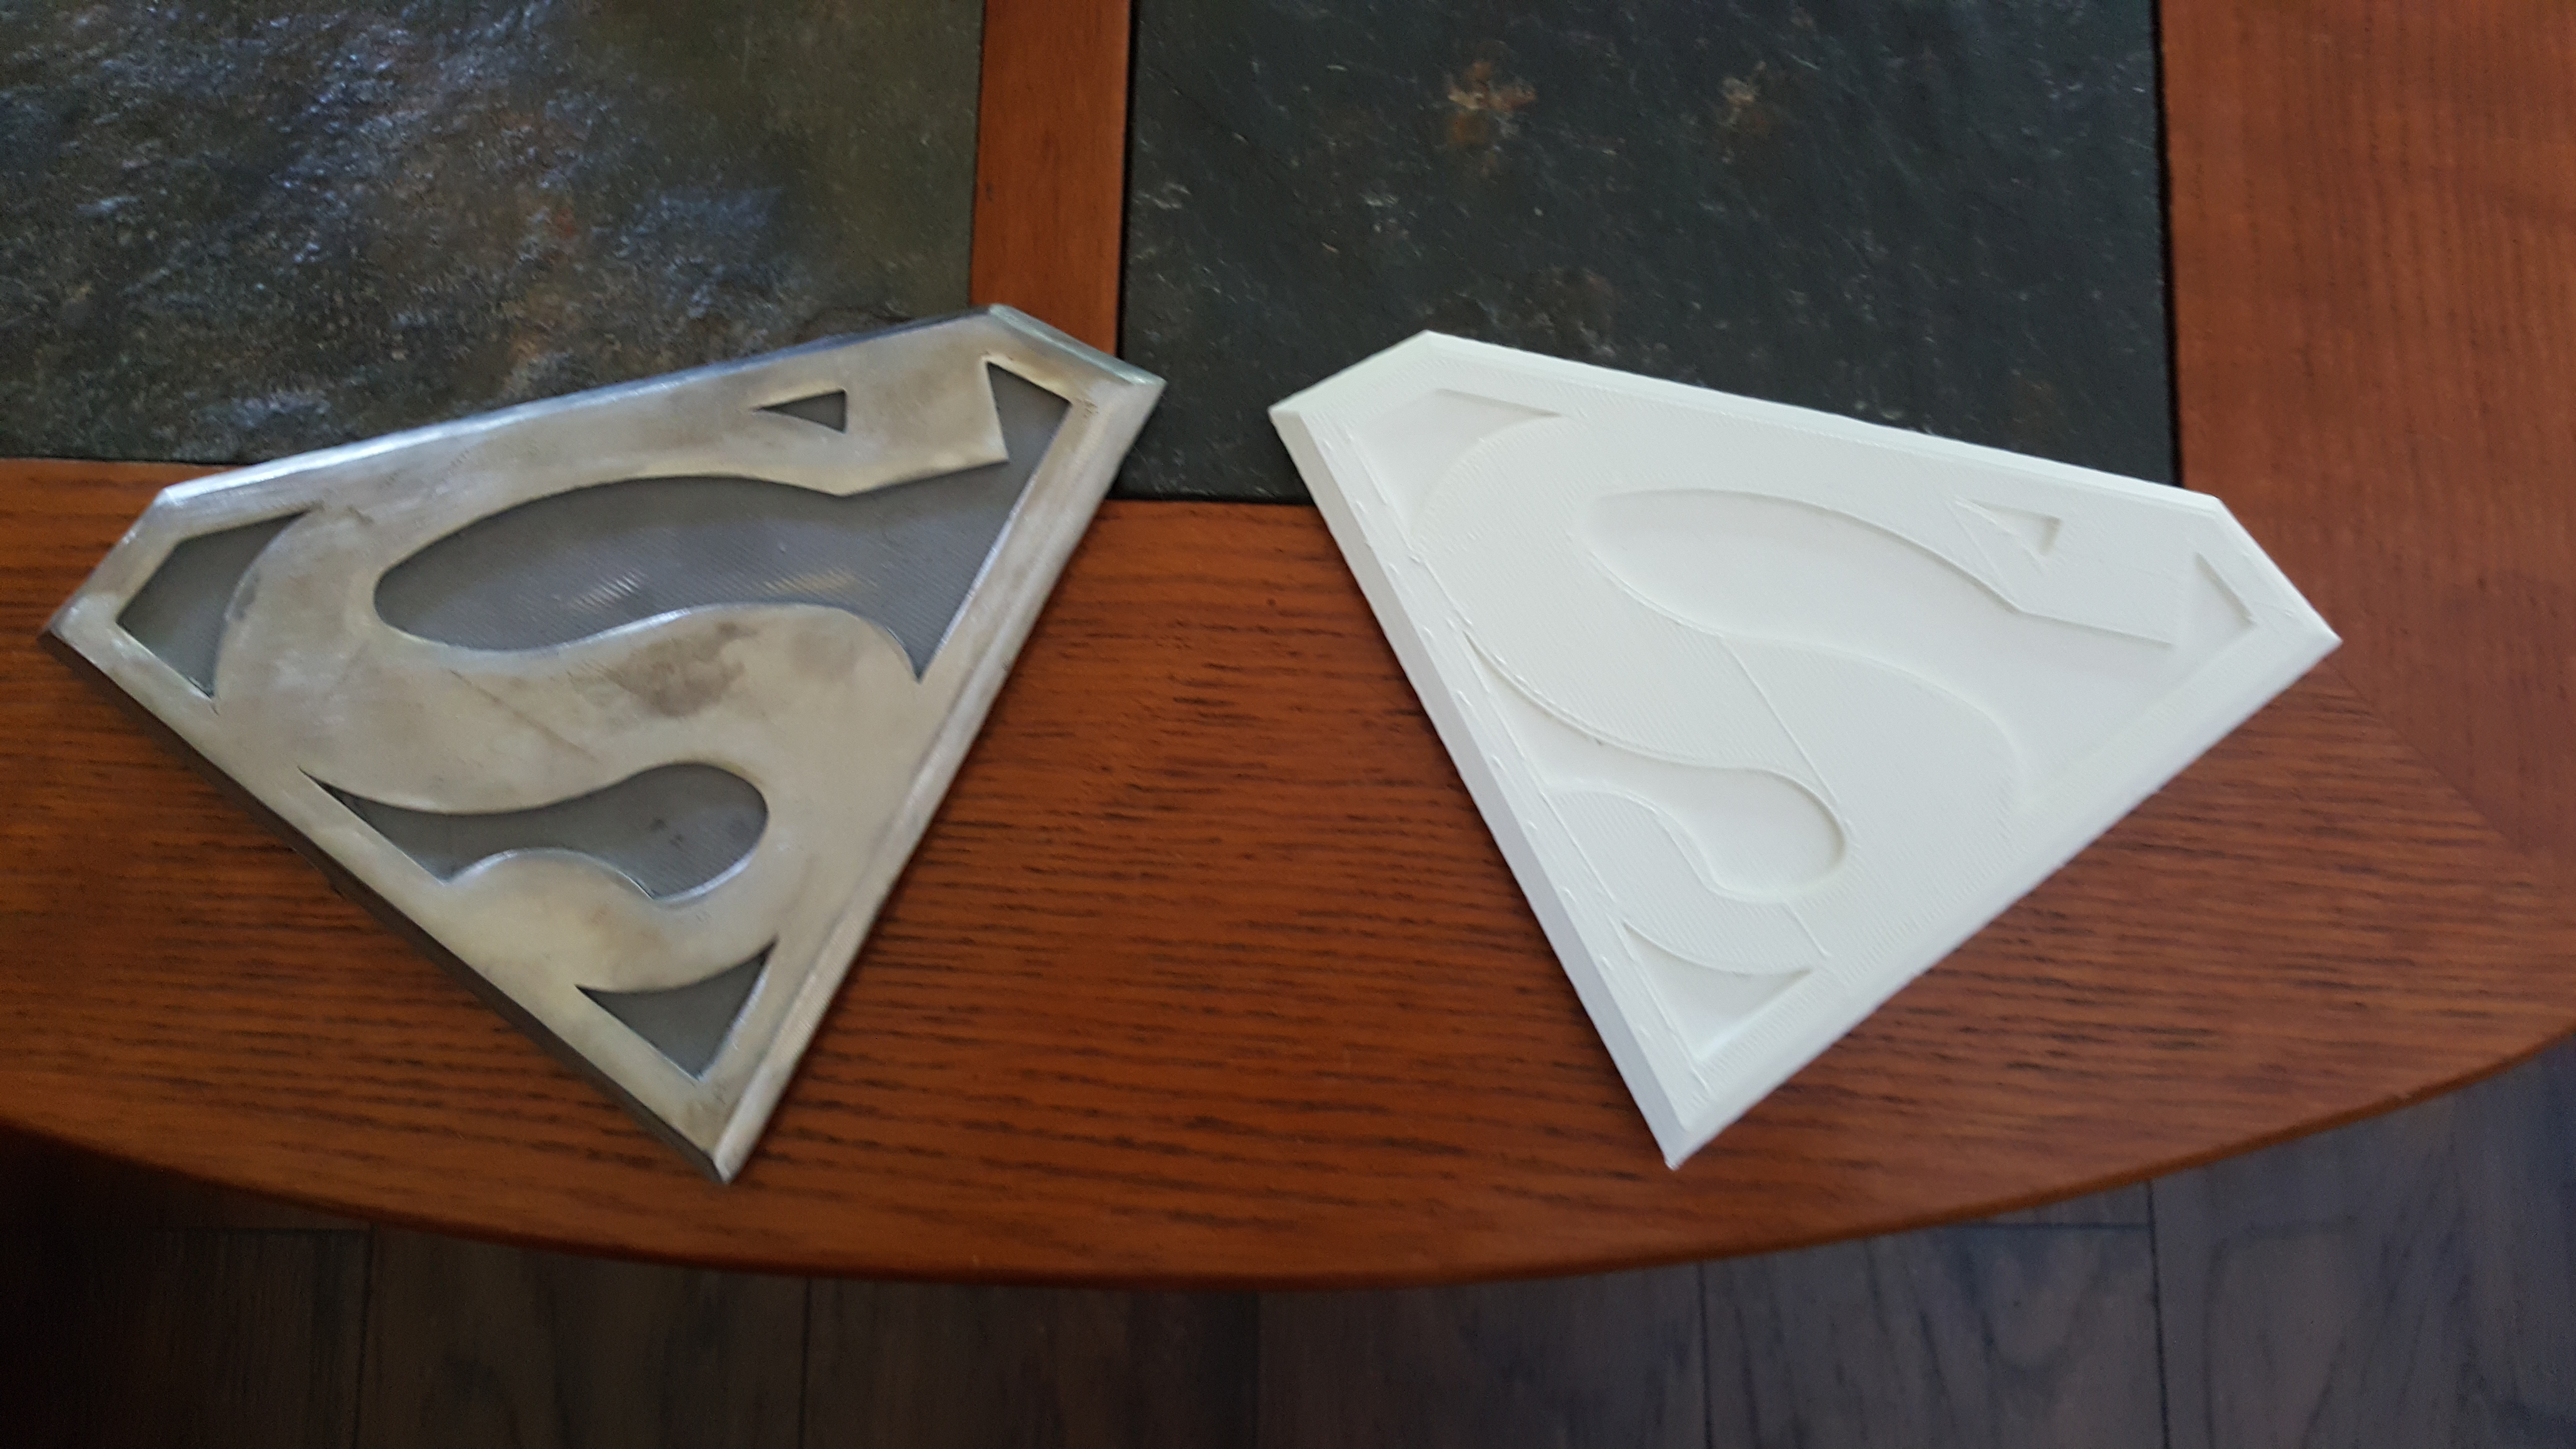
Before we started we knew that the final solution wasn’t going to be in PLA. In the Texas summer sun, thermoplastics such as PLA warp when left in a car, let alone on the boiling hood. Although this material is perfect for 3d printing because it melts at roughly 190+ Celsius, that very feature makes it hard to use outdoors, inside of engines, or pretty much anywhere that gets hot.
Thankfully our friends at Deep in the Heart Art Foundry (who own some of our Gigabots and use them in their lost wax casting) were more than happy to help us cast an alternative. We originally wanted to cast the piece in bronze and patina it, but they suggested that it would look better and be much lighter to cast it in Stainless steel. You can check out some of their amazing works of art here http://www.deepintheheart.net/. Here is the piece once we got it back (with a little bit of polishing).

And after I finished polishing and sanding the piece.

Here is the finished stainless steel piece next to the smaller PLA prototype.
Now all that was left to do was mount it on my vehicle. After cleaning the surface of my rear hood and the backside of the piece with some alcohol, and removing all the dust and grime, I placed some 3m double-sided tape on my car. NOTE: my bosses were concerned for my and other driver’s safety and have since purchased industrial epoxy.


Happy printing!
Jacob Lehmann
Blog Post Author
@jacobelehmann

Recently, one of our customers (and owner of Cruise Planners) invited us to support a 3D printing cruise. We are honored to participate and can’t wait to spend three days with you during this exclusive experience!

3D at Sea is the first of it’s kind 3D Printing Workshop and Seminar at Sea. This Workshop will feature 3D Printing Experts both teaching and speaking on a variety of relevant topics. There will also be opportunities for community impact work in Cozumel, in addition to general fun and networking!
Anyone with a passion for 3D printing is welcome to join us on the Carnival Liberty out of Galveston on 10/8/16! Pam, the organizer, is also accepting applications to speak or teach a class until May 5th. You can share your interest on Facebook at: www.facebook.com/3datsea/
Samantha snabes
Blog Post Author

Manufacturer: Black Magic 3D
Filament Diameter: – 2.85mm
Color Tested: Natural
Date Tested: 4/06/2016

Ease of use: Those new to 3D printing may want to budget extra time when printing with Scorpion as it takes a little manipulation to perfect the temperature & retraction settings.
Appearance: The natural filament was clean and consistent. Prints matched filament color & opacity.
Size consistency: Awesome, less than 0.1mm within the roll.
Color consistency: Great, consistent throughout the coil.

Print temperature: 230-235 C (suggested): nozzle / 60C : bed
Printer Used: Gigabot
Speed: 50 mm/s
Layer Height: 0.3mm
Infill: 15%
Type(s) of print surface used: PRINTnZ with 3M Blue Painter’s Tape and 2 coats of Elmer’s Glue Stick
List of test files printed: re:3D’s test files 1, 2, and 3 (logo, vase, and Benchy Torture Test)
You view watch a video summarizing our testing below:
Odor: None
Bed adhesion (1: terrible – 5: fabulous!)
Stringing (1: lots – 5: none!)
Shrinkage (1: lots – 5: none!)
Interlayer adhesion (1: terrible – 5: fabulous!)


Want to chat? Join our forum where we have initiated a thread about our experience!
https://re3d.zendesk.com/hc/en-us/community/posts/206375086-Testing-Scorpion-Flexible-Nylon-on-Gigabot
~Happy Printing!
Samantha snabes
Blog Post Author

Below is the solution to the Monthly Puzzler Chief Hacker presented in our February Newsletter. Want to play? You can sign up to receive our monthly publication by submitting your email address in the sign up at the bottom of re:3D.org. Proposed answers are presented on our forum at: https://re3d.zendesk.com/hc/en-us/community/posts/205859796-February-Puzzler
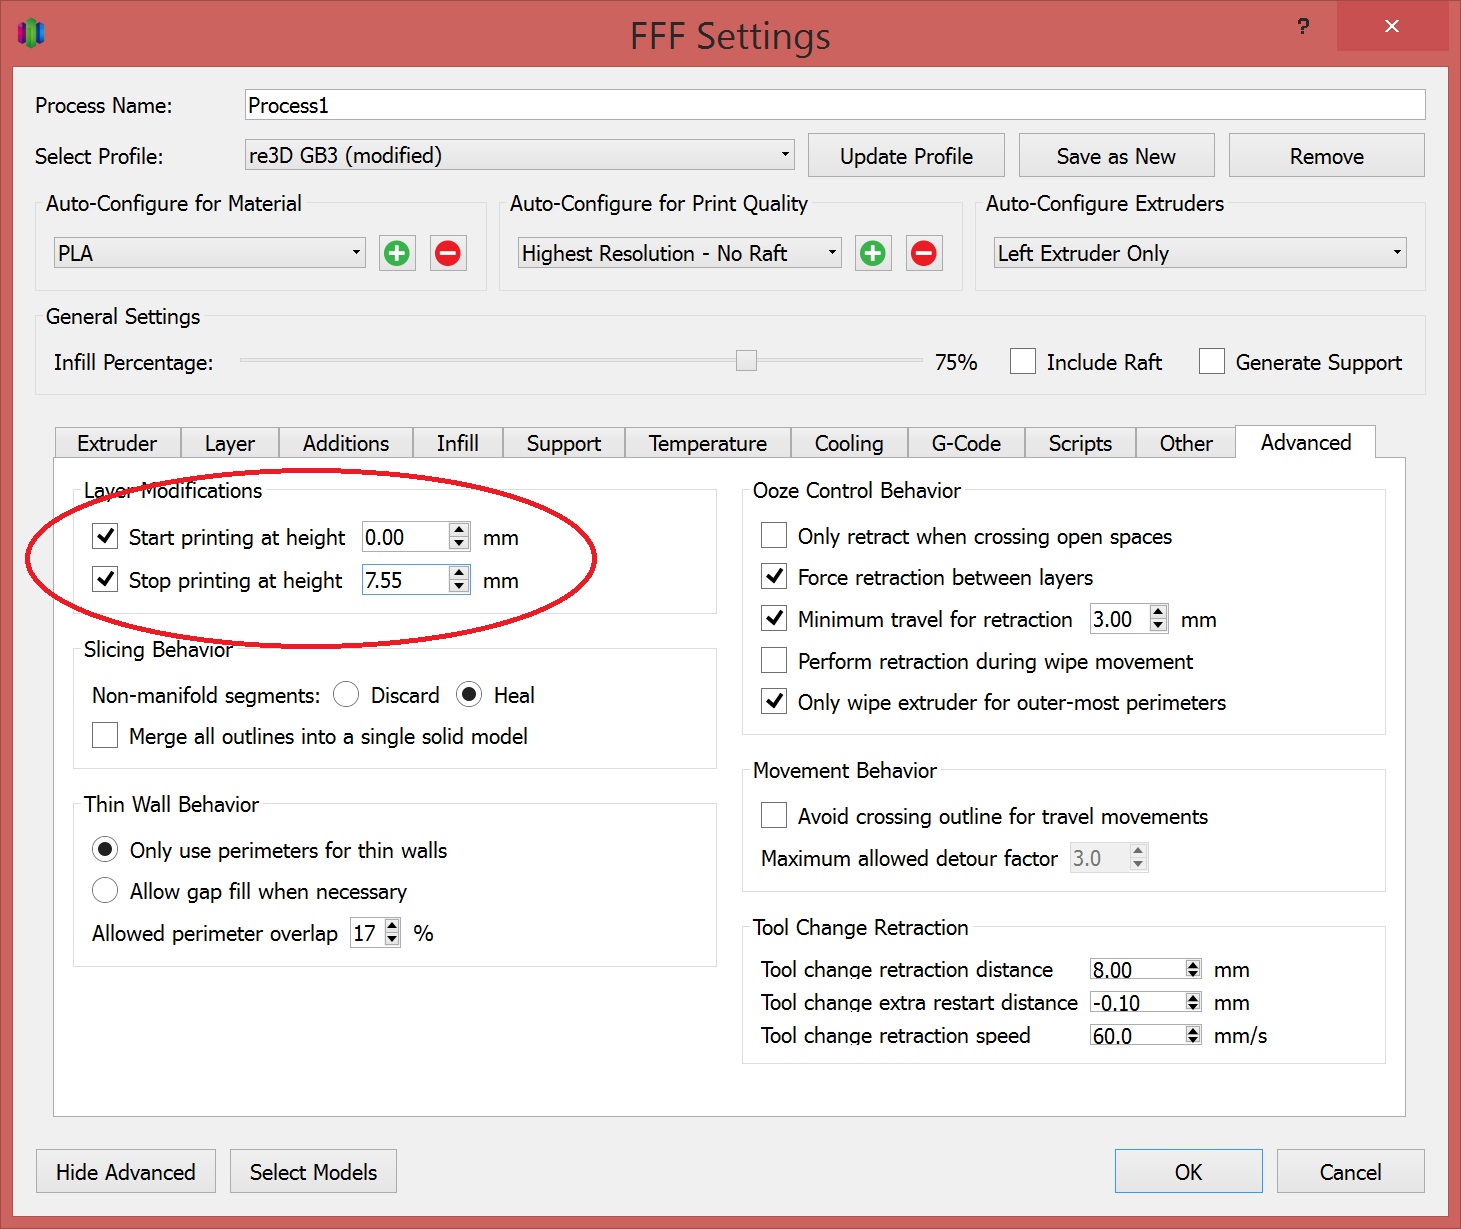
Here are the two reasons you will see a visible mark between processes.
Answer #1. If the SECOND process settings (upper part of the print) has “First layer height” that does not match the layer height for the FIRST process there will be an odd layer thickness visible on your print. Make sure the first layer height and first layer speed for the SECOND process are set to 100%
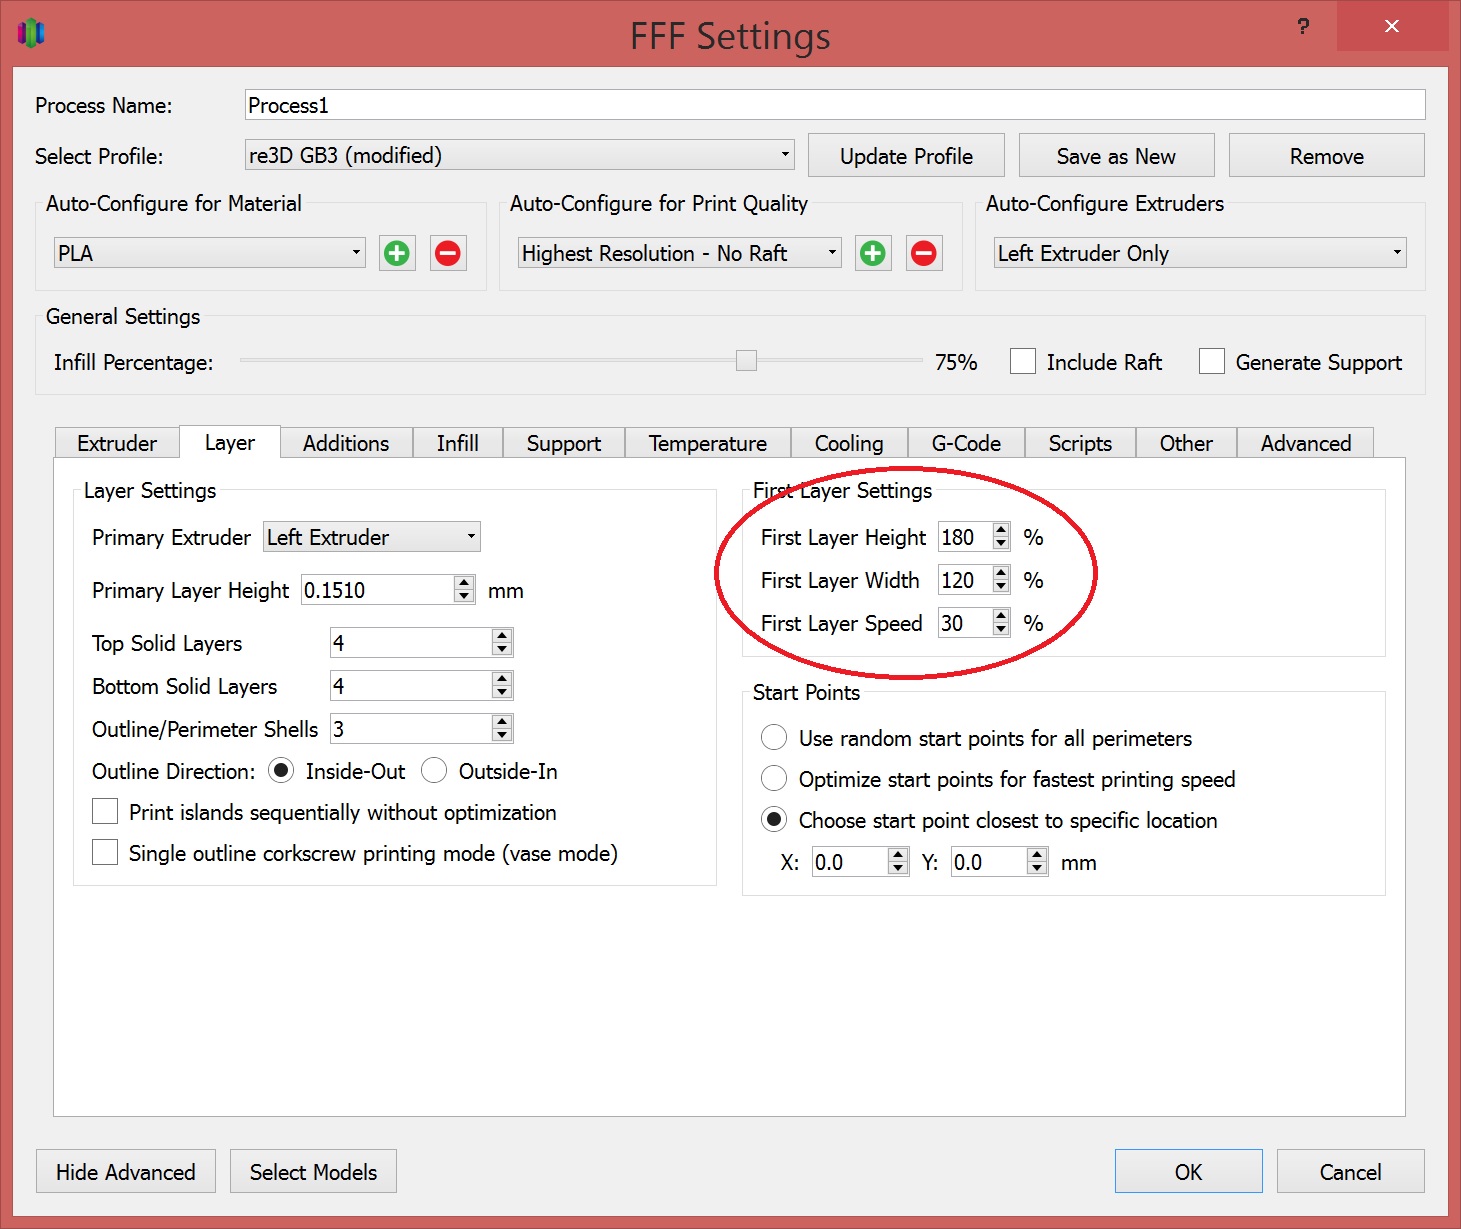
Answer #2. When setting the “Stop Printing at Height” make sure the dimension is an even multiple of your layer height. Don’t forget to account for any changes in layer height if you enter a value other than 100% for the FIRST process “First Layer Height”!
Since Darrel had one of the two correct answers we will be sending you half a spool of filament 🙂 Just kidding Darrel! Thanks for playing and keep an eye out for next month’s puzzler.
Happy Printing!
Matthew Fiedler
Blog Post Author
@chief_hacker

Manufacturer: Algix3D
Diameter : – 2.86mm
Color Tested: Slightly green/brownish
Date Tested: 2/28/2016

Ease of use: A little tricky due to the brittle nature of the filament, however, once you get started you are good to go!
Appearance: Aesthetic, reflects sustainability, “rough texture”, definitely not smooth!
Size consistency: Average, within .1mm within roll.
Color consistency: Great, consistent throughout roll.

Print temperature: 175 C (nozzle) /55C (bed)
Printer Used: Gigabot
Speed: 30mm/s
Layer Height: 0.3mm
Infill: 35%
Odor: Earthy, smells like algae
Type(s) of print surface used: Print n Z
List of test files printed: re:3D’s test files 1, 2, and 3 (logo, vase, airplane gear piece)
You can watch a video summarizing our testing:
Bed adhesion (1:terrible-5:fabulous!)
Stringing (1: lots -5: none!)
Shrinkage (1:lots-5: none!)
interlayer adhesion (1:terrible-5:fabulous!)

Not all users may appreciate the aroma, however if you are looking for a more sustainable 3D printing alternative and doesn’t require a smooth surface, this materials may be for you!
Want to chat? Join our forum where we have initiated a thread about our experience!
https://re3d.zendesk.com/hc/en-us/community/posts/206091996-TESTING-3D-FUEL-ALGAE-FUEL
~Happy Printing!
Samantha snabes
Blog Post Author

Below is a re-post of a blog women-owned small business Acoustics First wrote about their Gigabot experiences in Virginia. More information about Acoustics First is available on their website. We’re also honored to feature them on the stories tab of our website. The original post can be accessed here.
As the summer of 2015 winds down, we here at Acoustics First thought we’d share our latest acquisition with our readers.
Meet the Gigabot™ (or as we call him “Gigglebot”).
This amazing large format 3D printer was developed by re:3D, an outstanding company whose principals come from varied backgrounds which include experience working at NASA, among other things.
The eight cubic foot build volume of this beast makes it ideal for the rapid development and prototyping of our industry leading sound diffusers! We look forward to using this wonderful device on many projects in the years to come.
Watch this short video we made during one of our trial runs. For this calibration test we chose to print a scaled down version of our patented Model D Art Diffusor®.

Our head of sales, Morgan, recently caught up with CJ Bryant, the Advanced Technologies Teacher and Coordinator for Phoenix Charter School, a 190 student high school in rural Oregon. Their program features Gigabot and has quickly become a hot item at the school. CJ tells the story below.
I’ve been here for about nine years. I started off as the transitions teacher, gearing students to be job- or college-ready when they graduated. It was about making sure that they wanted to go to college and had all the necessary things completed to do so. Then our technology coordinator left, and I moved into that position. I was teaching a few technology classes, but quite frankly, Microsoft Office is really boring to teach.
I talked to our Executive Director about getting a virtual reality simulator. We taught the class as a computer-based graphics and a programming class, and then you’re also designing buildings, which is geometry. Then about four years ago, when drones were in their infancy, I went to our Executive Director and said, “This is really cutting edge stuff. Soon there’s going to be hundreds or thousands of these things around; we could teach students to do useful things with them.” We were ahead of the curve.
Being in western Oregon, our school has long-standing partnerships with the US Forest Service, and before I knew it, our quad rotor was in the woods with agency staff and students to learn if we could assist with tree vole nest surveys high up in the tree canopy. That experiment led to changes we needed to make in our quad rotor: it needed to be bigger, faster, smoother, and more stable. We thought, “If we had a 3D printer, we could print a new body and use all the components that we have.” I went to a couple different teacher workshops, and they had all these really small 3D printers, and to me, that was useless. I don’t want to make miniature chess pieces, I want to do something useful. I saw the Gigabot and went, “That’s it! Two feet cubed? That’s what I want.”
In Oregon, charter schools get about 64 cents on the dollar for every dollar that public schools get. We have a lot less per student. But we are fortunate to have a 30 year reputation that has built up many generous community donors, and our staff writes lots of grants. I wrote up a proposal for the Executive Director, listed all the things Gigabot would enable us to do, and we got it. One of the reasons we get some of the grants we get is that we’ve shown a pattern of success and increasing use of different technologies in learning, service, and employment — it’s a virtuous cycle. When you show what you’ve done and you’re able to demonstrate that over and over again, that opens the doors to more support.
For us, Gigabot was the gateway technology. The first piece of technology we had was the VR simulator. Next was the quadcopter. When we wanted to expand the size of our quadcopter, we got Gigabot. Since Gigabot we’ve gotten a CNC vinyl cutter, a large-format 2D printer for blueprints and posters, and we’ve built a vacuum former. Our next piece will be a CNC laser cutter. There’s not much we can’t do right now.
What we’re doing here has opened doors for our students that I never expected. We are building partnerships with different businesses. The Fixed Base Operator at our local airport, a trailer manufacturer, a metal fabrication shop, as well as local startup businesses are coming to us looking for students who can use AutoCAD and run a CNC machine or a 3D printer. The owner of a local trailer manufacturing company cannot find employees who can operate the high-tech equipment — there is one person in his shop who can run their CNC plasma cutter. One. Our CNC vinyl cutter works on the exact same principles and uses the same design software, so any of my students could go and run his process.

The most exciting thing I think we’ve done was when the symphony had a fundraiser at the school, the culinary arts department came to us wanting us to make chocolate molds for the fundraiser dessert. We printed out musical notes on Gigabot, and students built a vacuum former so we could make the molds in-house. It was a learning process. When we can do things like build a vacuum former, now we’ve taken what we can do with our Gigabot to the next level.
We call this project-based learning. Kids may be sitting in an algebra class thinking, “What would I ever need this for?” Then they come to my class to create something and go “Whoa, how did you do that?” In teaching them the math behind it, it clicks — this is what the math is for. What we are doing is using a real-world application to teach math. It’s far more engaging.
To get into teacher lingo: every state has standards that students have to meet. Rather than teaching standards using a textbook, worksheets, and tests, I cover the same standards with projects. Students can check off several standards in one project. Do the students know that they’re polishing off standards? Not so much. When do they find out? When they go through the list that they need in order to graduate, and they realize they’ve already checked all the boxes. Project-based learning has several distinct advantages, the largest being that students can take you step-by-step through their project. This ownership of their project makes education real, relevant, and lasting.
We are a charter school, and our target is to help with the community’s at-risk students — students at risk of not succeeding academically for whatever the reason. We have students who have not had success in any of the other schools in the county. What we do is teach them to be successful, to create that pattern of success. By the end of it, you’ve got juniors and seniors who are taking community college classes at the same time that they’re here. 75% of the students who graduate here go up to the community college and enroll.
This is enabling them to be successful. The job readiness skills they learn, the communication skills, the attention to detail, following instructions. The process is entertaining for us, it’s fun for them, and project outcomes make a meaningful difference in our school and community.

One of my students asked me why we got the Gigabot. I told him, “Think outside of the box for 30 seconds. Now I want you to trample the box, because we’re never going back. Look at it. What if we expanded it to the size of our classroom? What could we print at that scale?”. He just froze in his tracks. That’s why we got the Gigabot. What if we could take that giant printer down to New Orleans to the 9th District to people who still don’t have houses, and we print — using 5000 lb spools of filament the size of your arm — a house, complete with the conduit and the drain lines and everything, in 4 days?
The student said, “But nobody is doing that!”
Exactly! Why would we want to do something that everyone else is doing? It’s been paramount to getting students to think outside the box, to think about needs that need to be met, and where to go to solve big problems on a big scale.
I truly believe that we’re still in the infancy of 3D printing. 3D printing is still a toddler. What we can do with a 3D printer is going to so quickly expand, I think the size of it is going to be huge.
What Gigabot has done is much bigger than 3D printing, and that is releasing the imagination of students. Inspiring them to genuinely learn, solve problems, and not just do worksheets and take tests.
I feel my job as a teacher is not asking students what they want to be when they grow up or what job they see themselves doing; now I focus my students on problems they want to solve. What is the change you want to make, whose lives do you want to impact? If you could create anything, what would you create first, and why? Tools like the Gigabot allow students to enter this mindset confidently. This makes my job the best in the world.

Morgan Hamel
Blog Post Author
Are you ready for a new 3D printing adventure? Join the team! APPLY NOW