Innovating in The Time of Corona(virus)

The exponential spread of the novel coronavirus across the globe led to overwhelming demand on supply chains and disruptions to traditional manufacturing and distribution systems. Because of societal lockdowns and stay-at-home orders, a dire need quickly arose for locally fabricated, specifically focused and creatively sourced solutions to equipment shortages and emergency supplies. At home and across the globe, designers and engineers quickly mobilized into online, open-source prototyping groups to solve the challenge of a lack of personal protective equipment (PPE), ventilators and medical device accessories. 3D printing and additive manufacturing was an obvious go-to, with the ability to rapidly prototype and iterate on the fly, teams could utilize 3D printers to supply healthcare providers with equipment now, as soon as there were designs to print. The intention and needs were obvious and clear – to aid humanity and fill the gaps in supply chains – however, organizing volunteers and streamlining the process to avoid duplicate efforts was a daunting task.

As a company with a wealth of R&D project experience and long used to working as a distributed team, re:3D put out the call that we would prototype – for free – any life-saving devices or PPE in order to expedite review by medical professionals. We are conscientious contributors to the open source design community for COVID-19 response. We take a First, Do No Harm approach to any design work we do for this effort, meaning that it needs to be designed with input from, and in partnership with, the individuals who will utilize any equipment we prototype. We will not create anything that gives a false sense of security, but is ineffective or harmful. Our medical providers on the front lines are in need, and we are honored to take on the challenge.

Face Shields

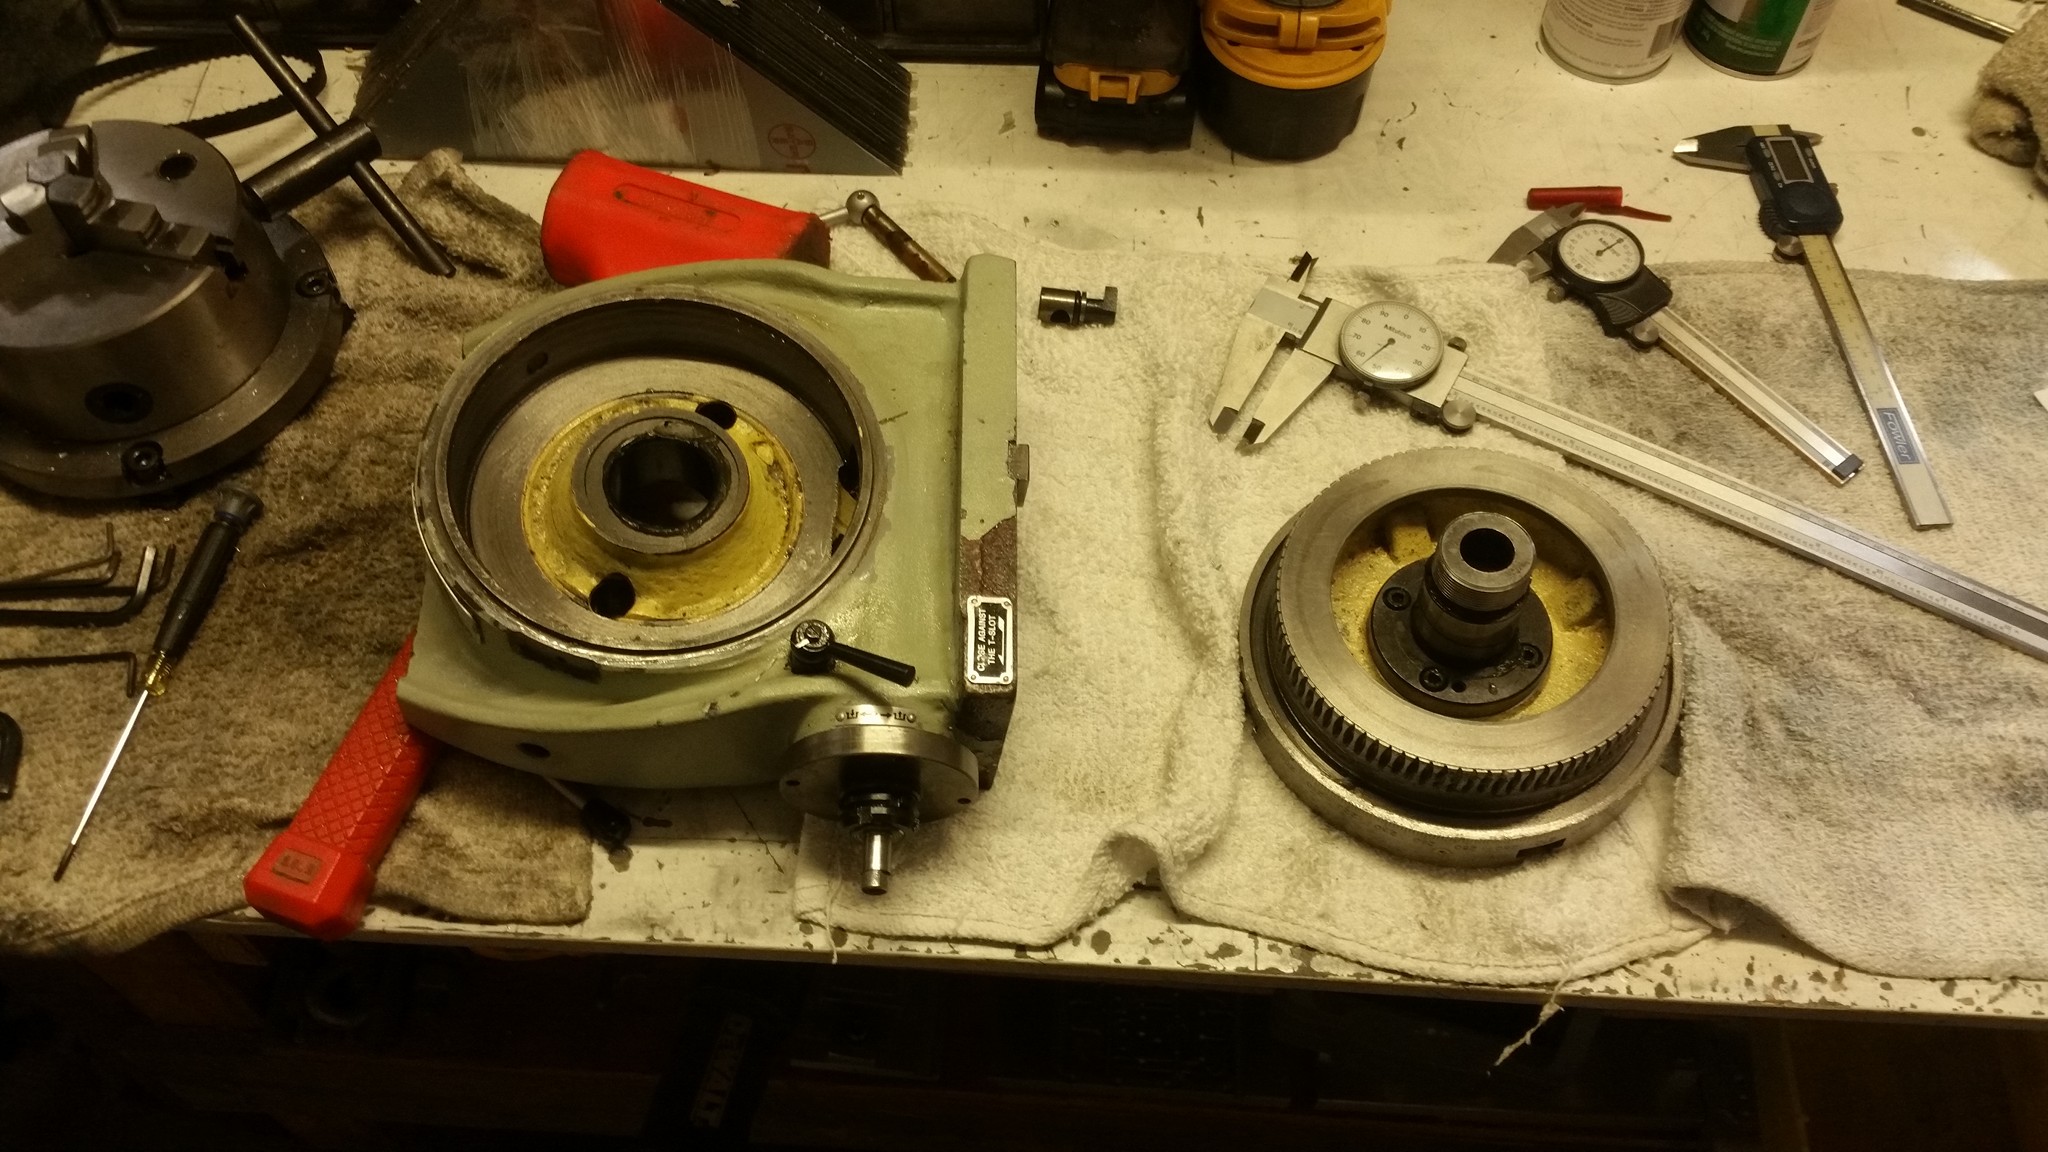
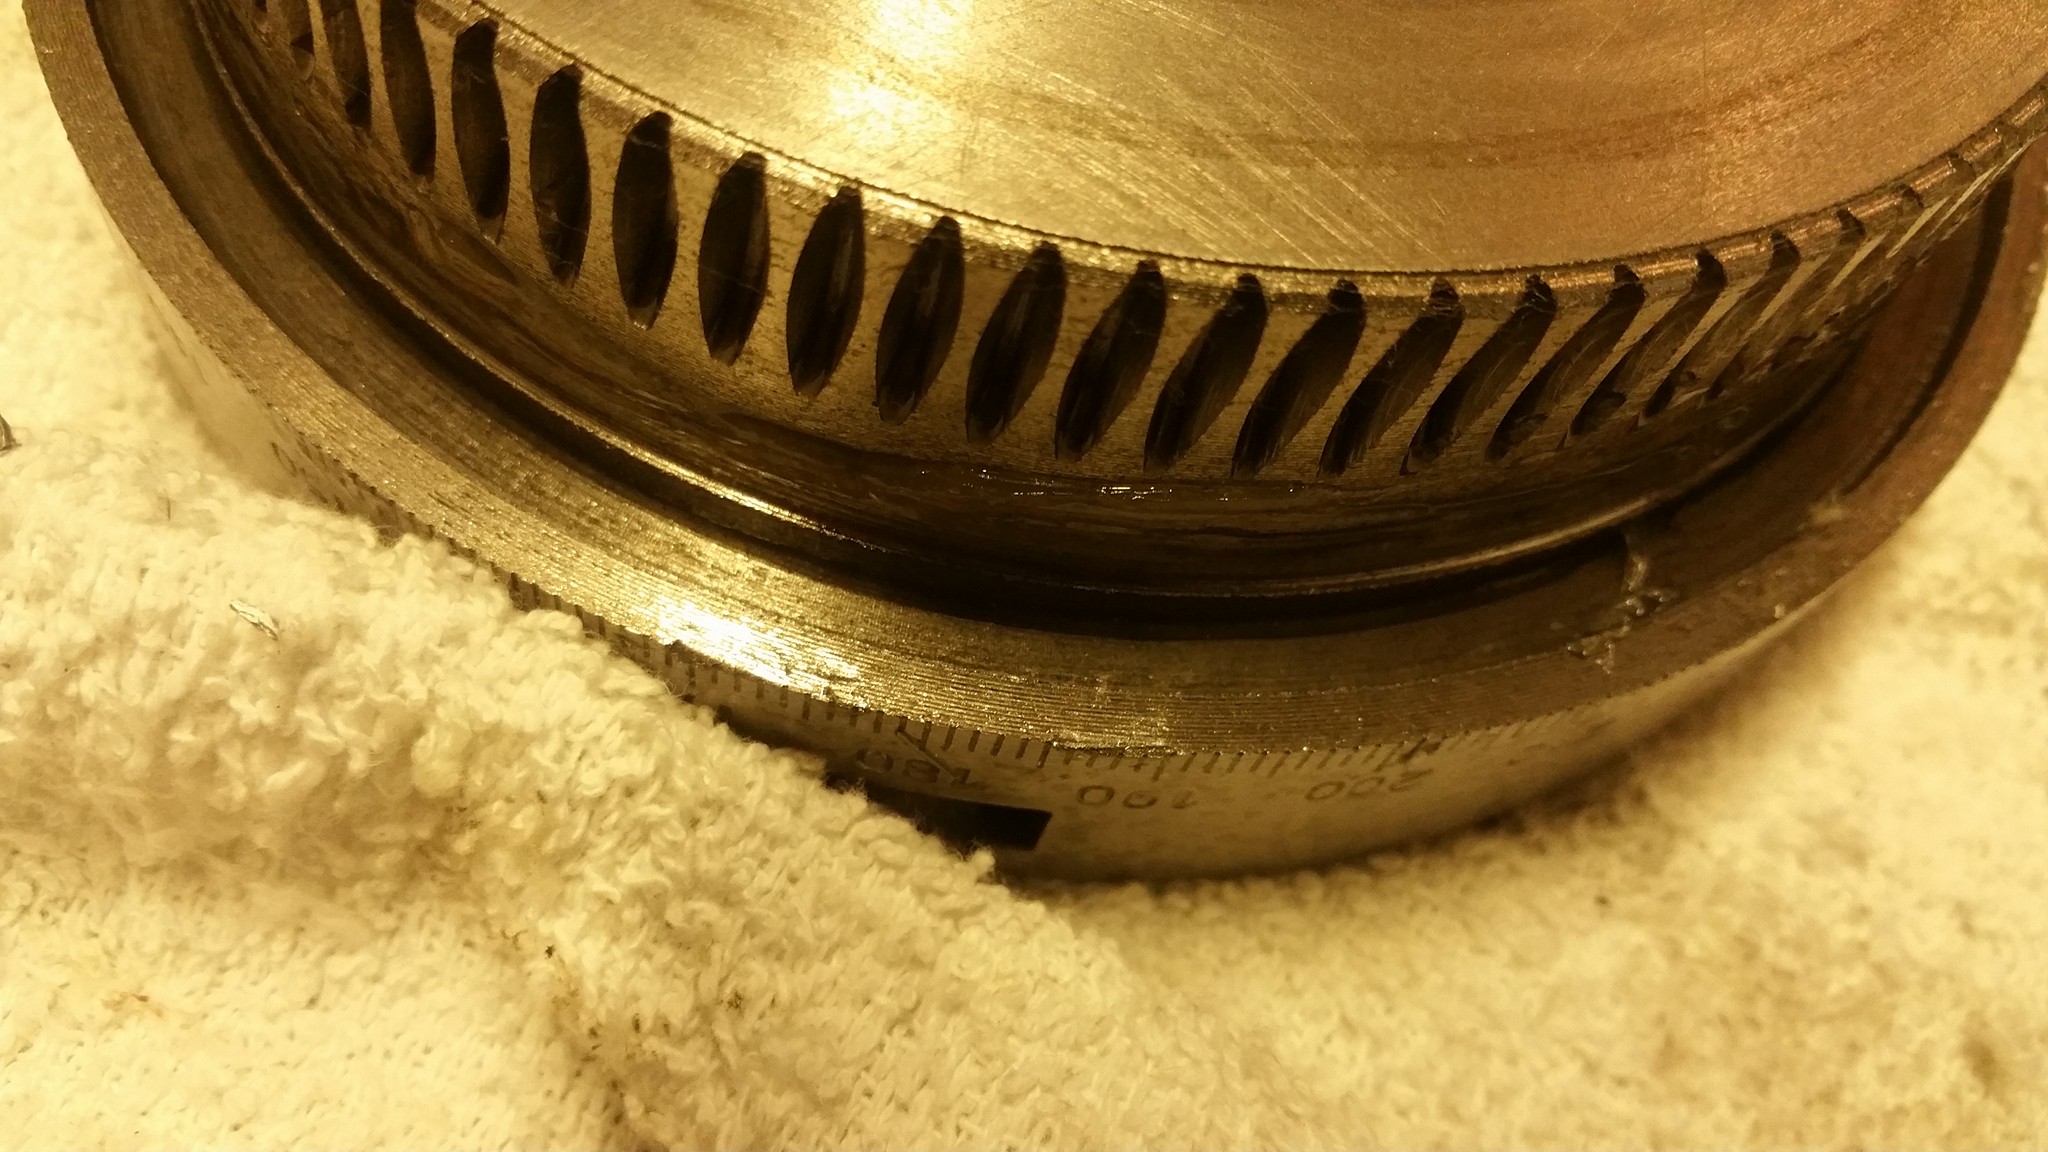
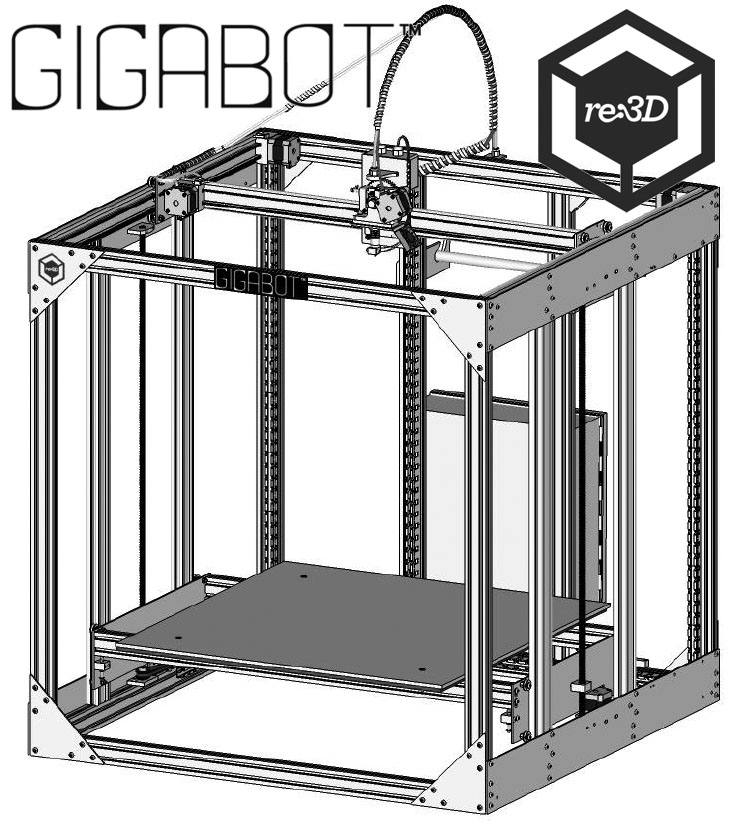
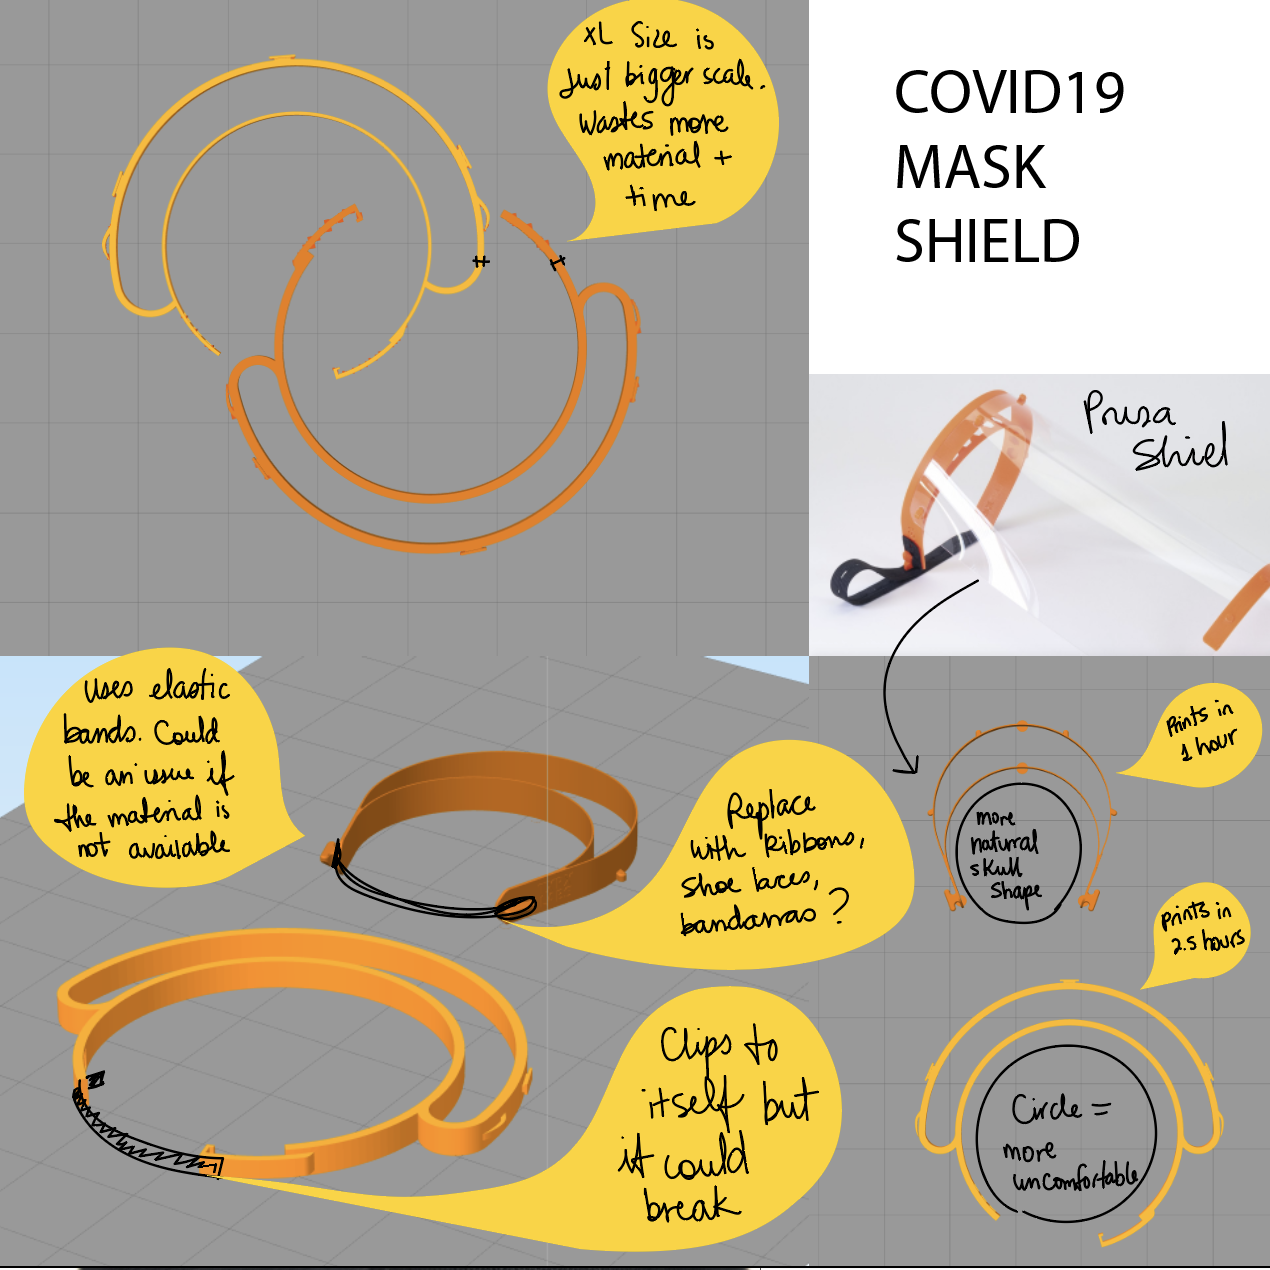
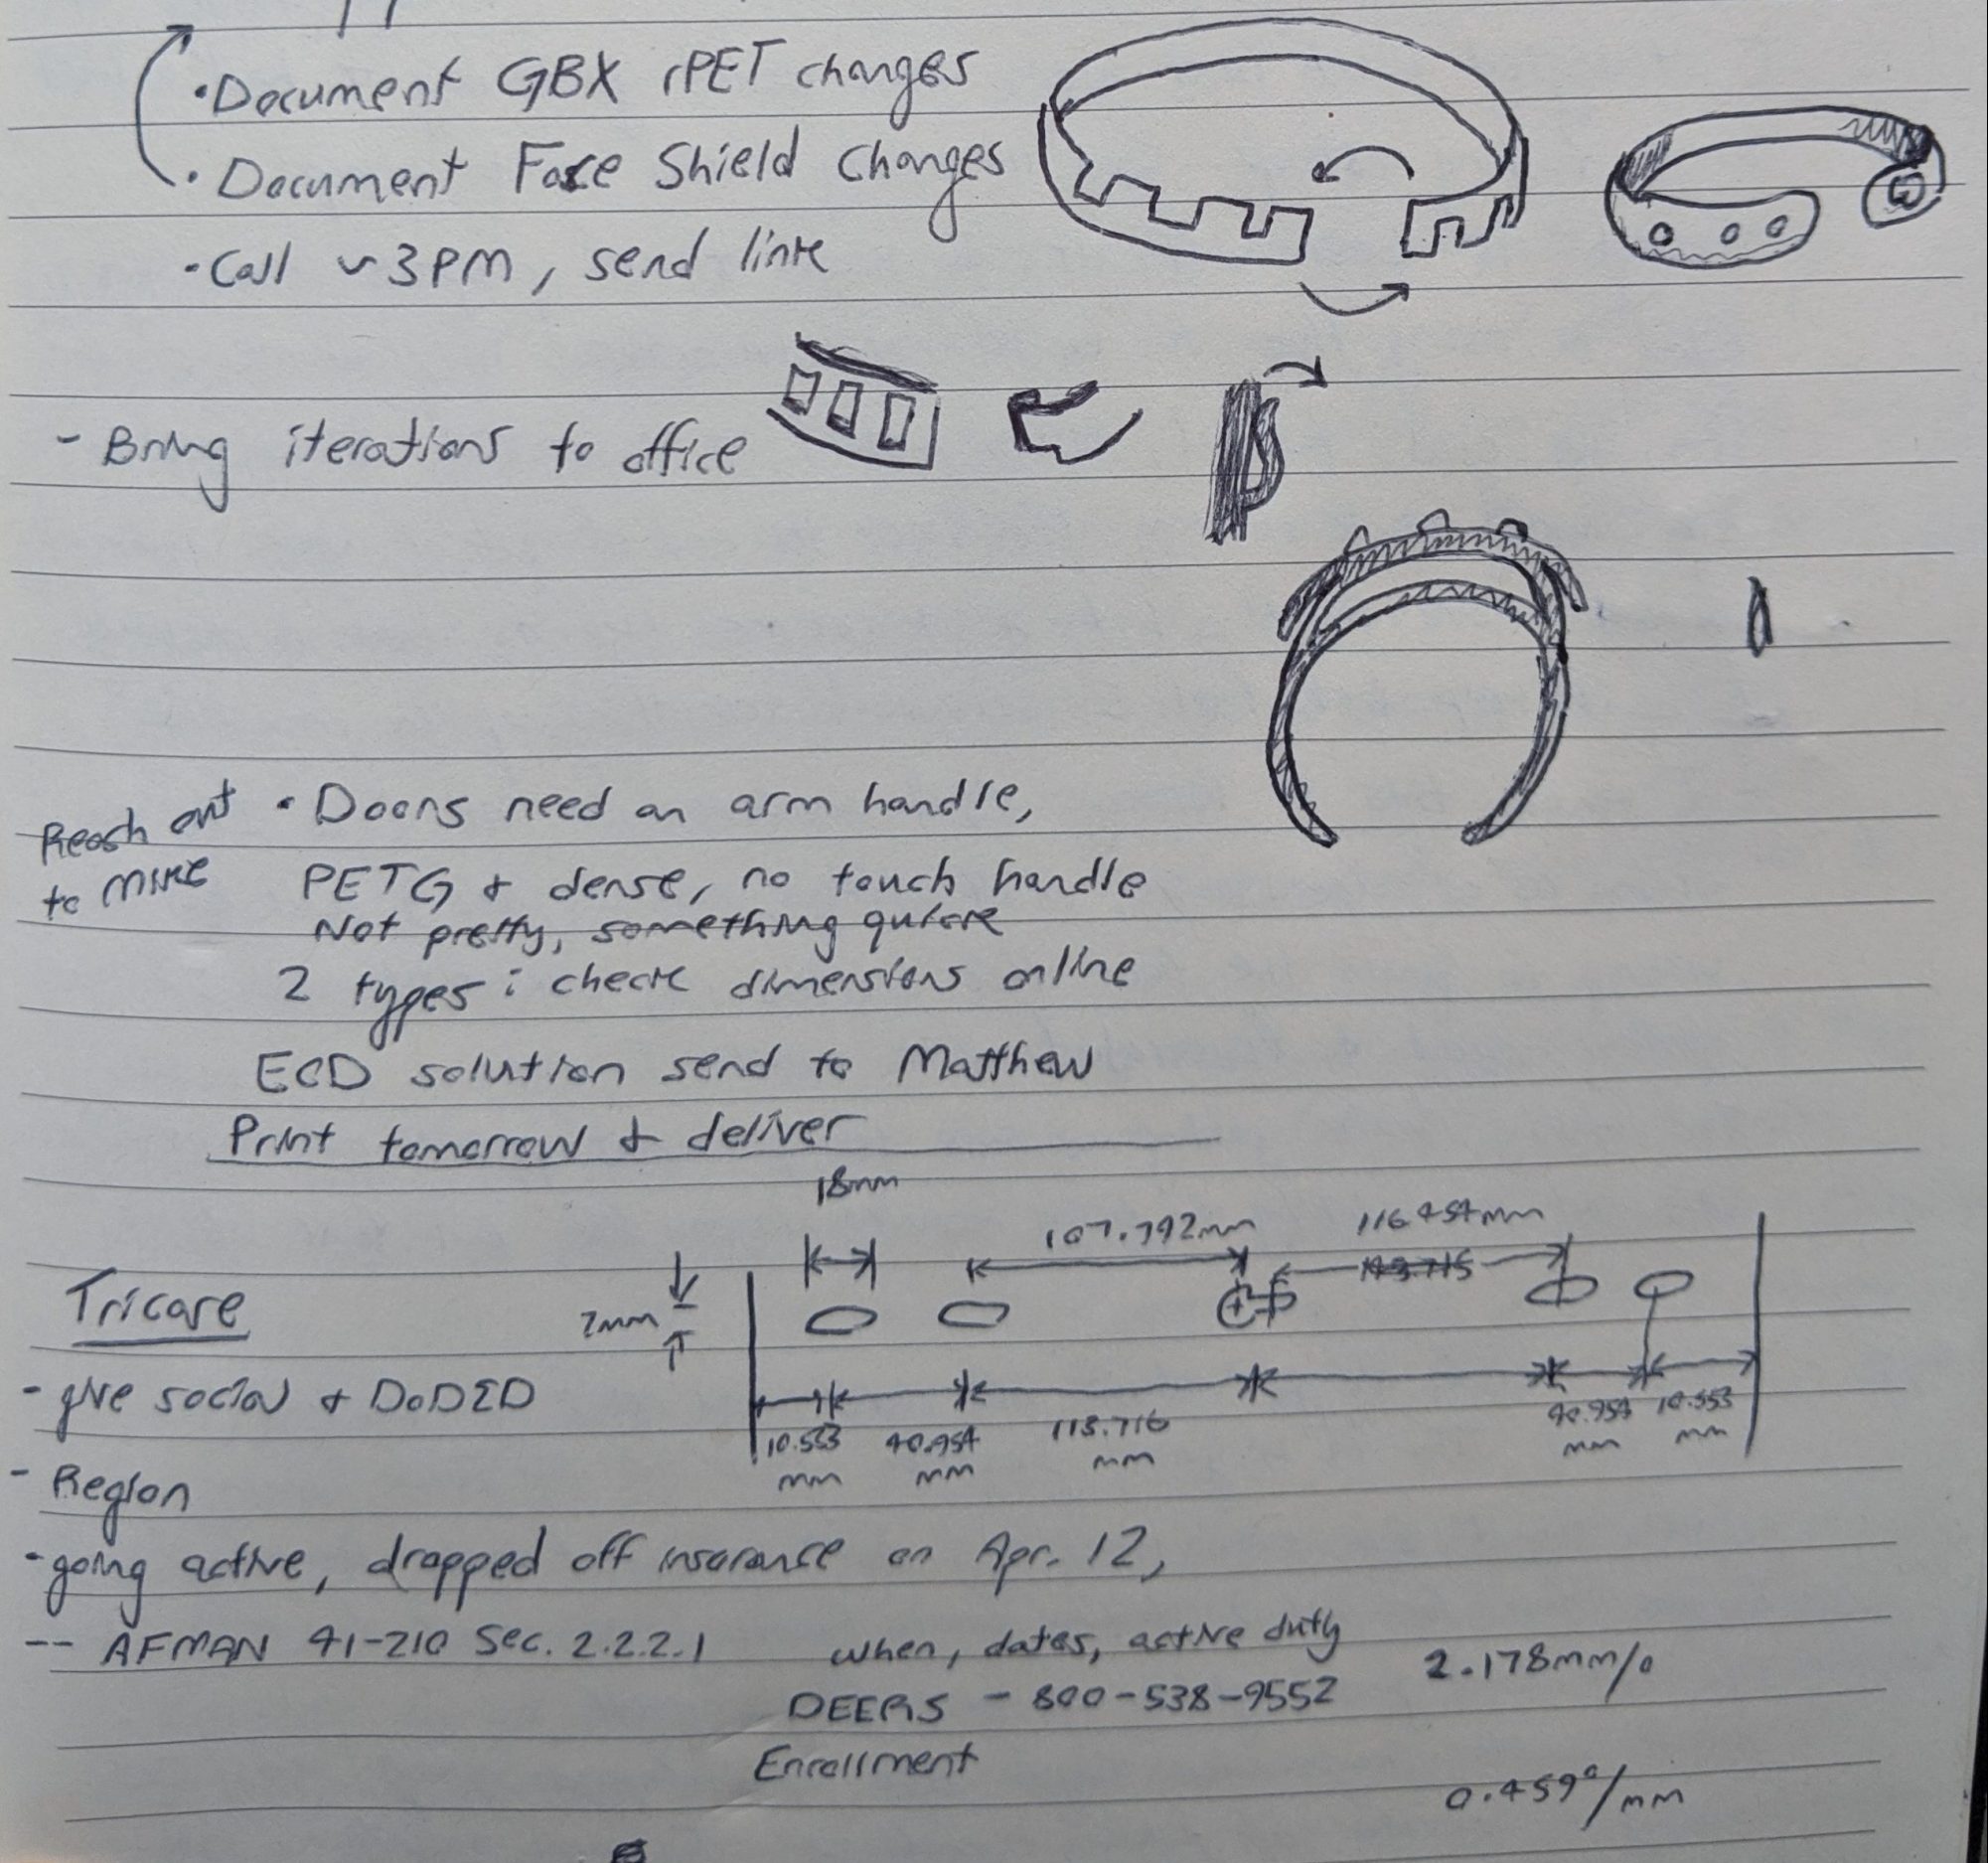
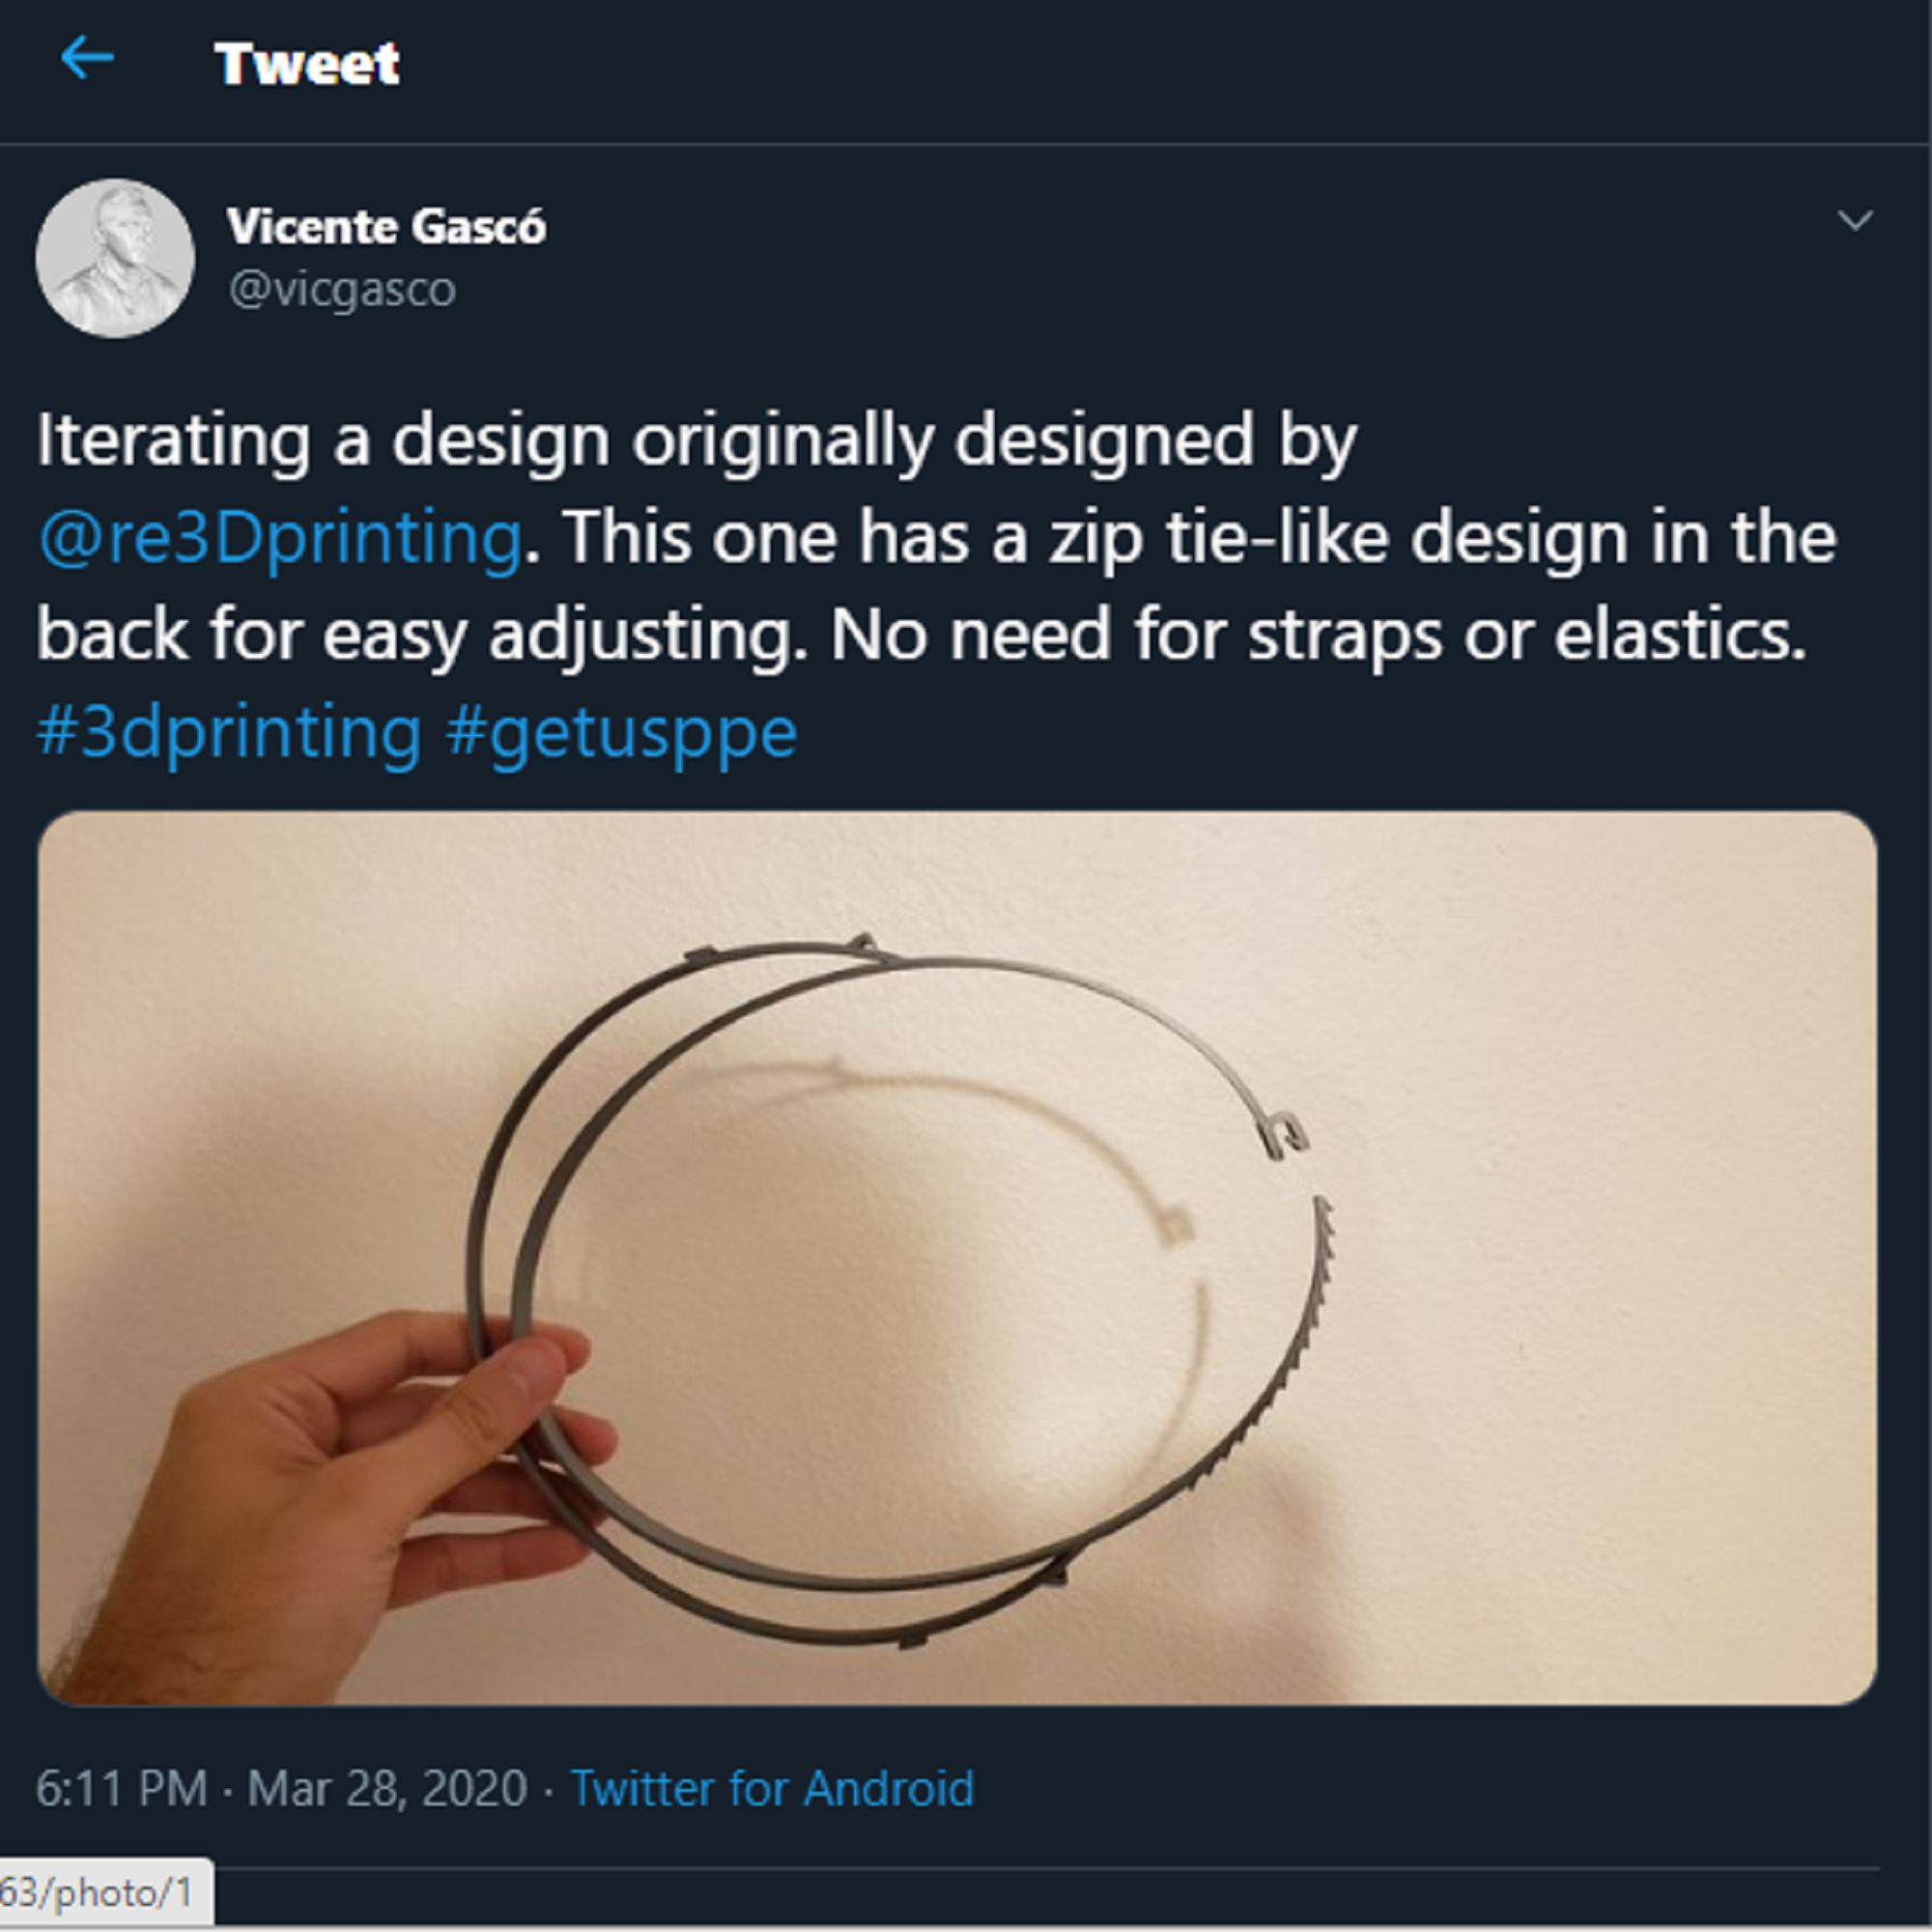
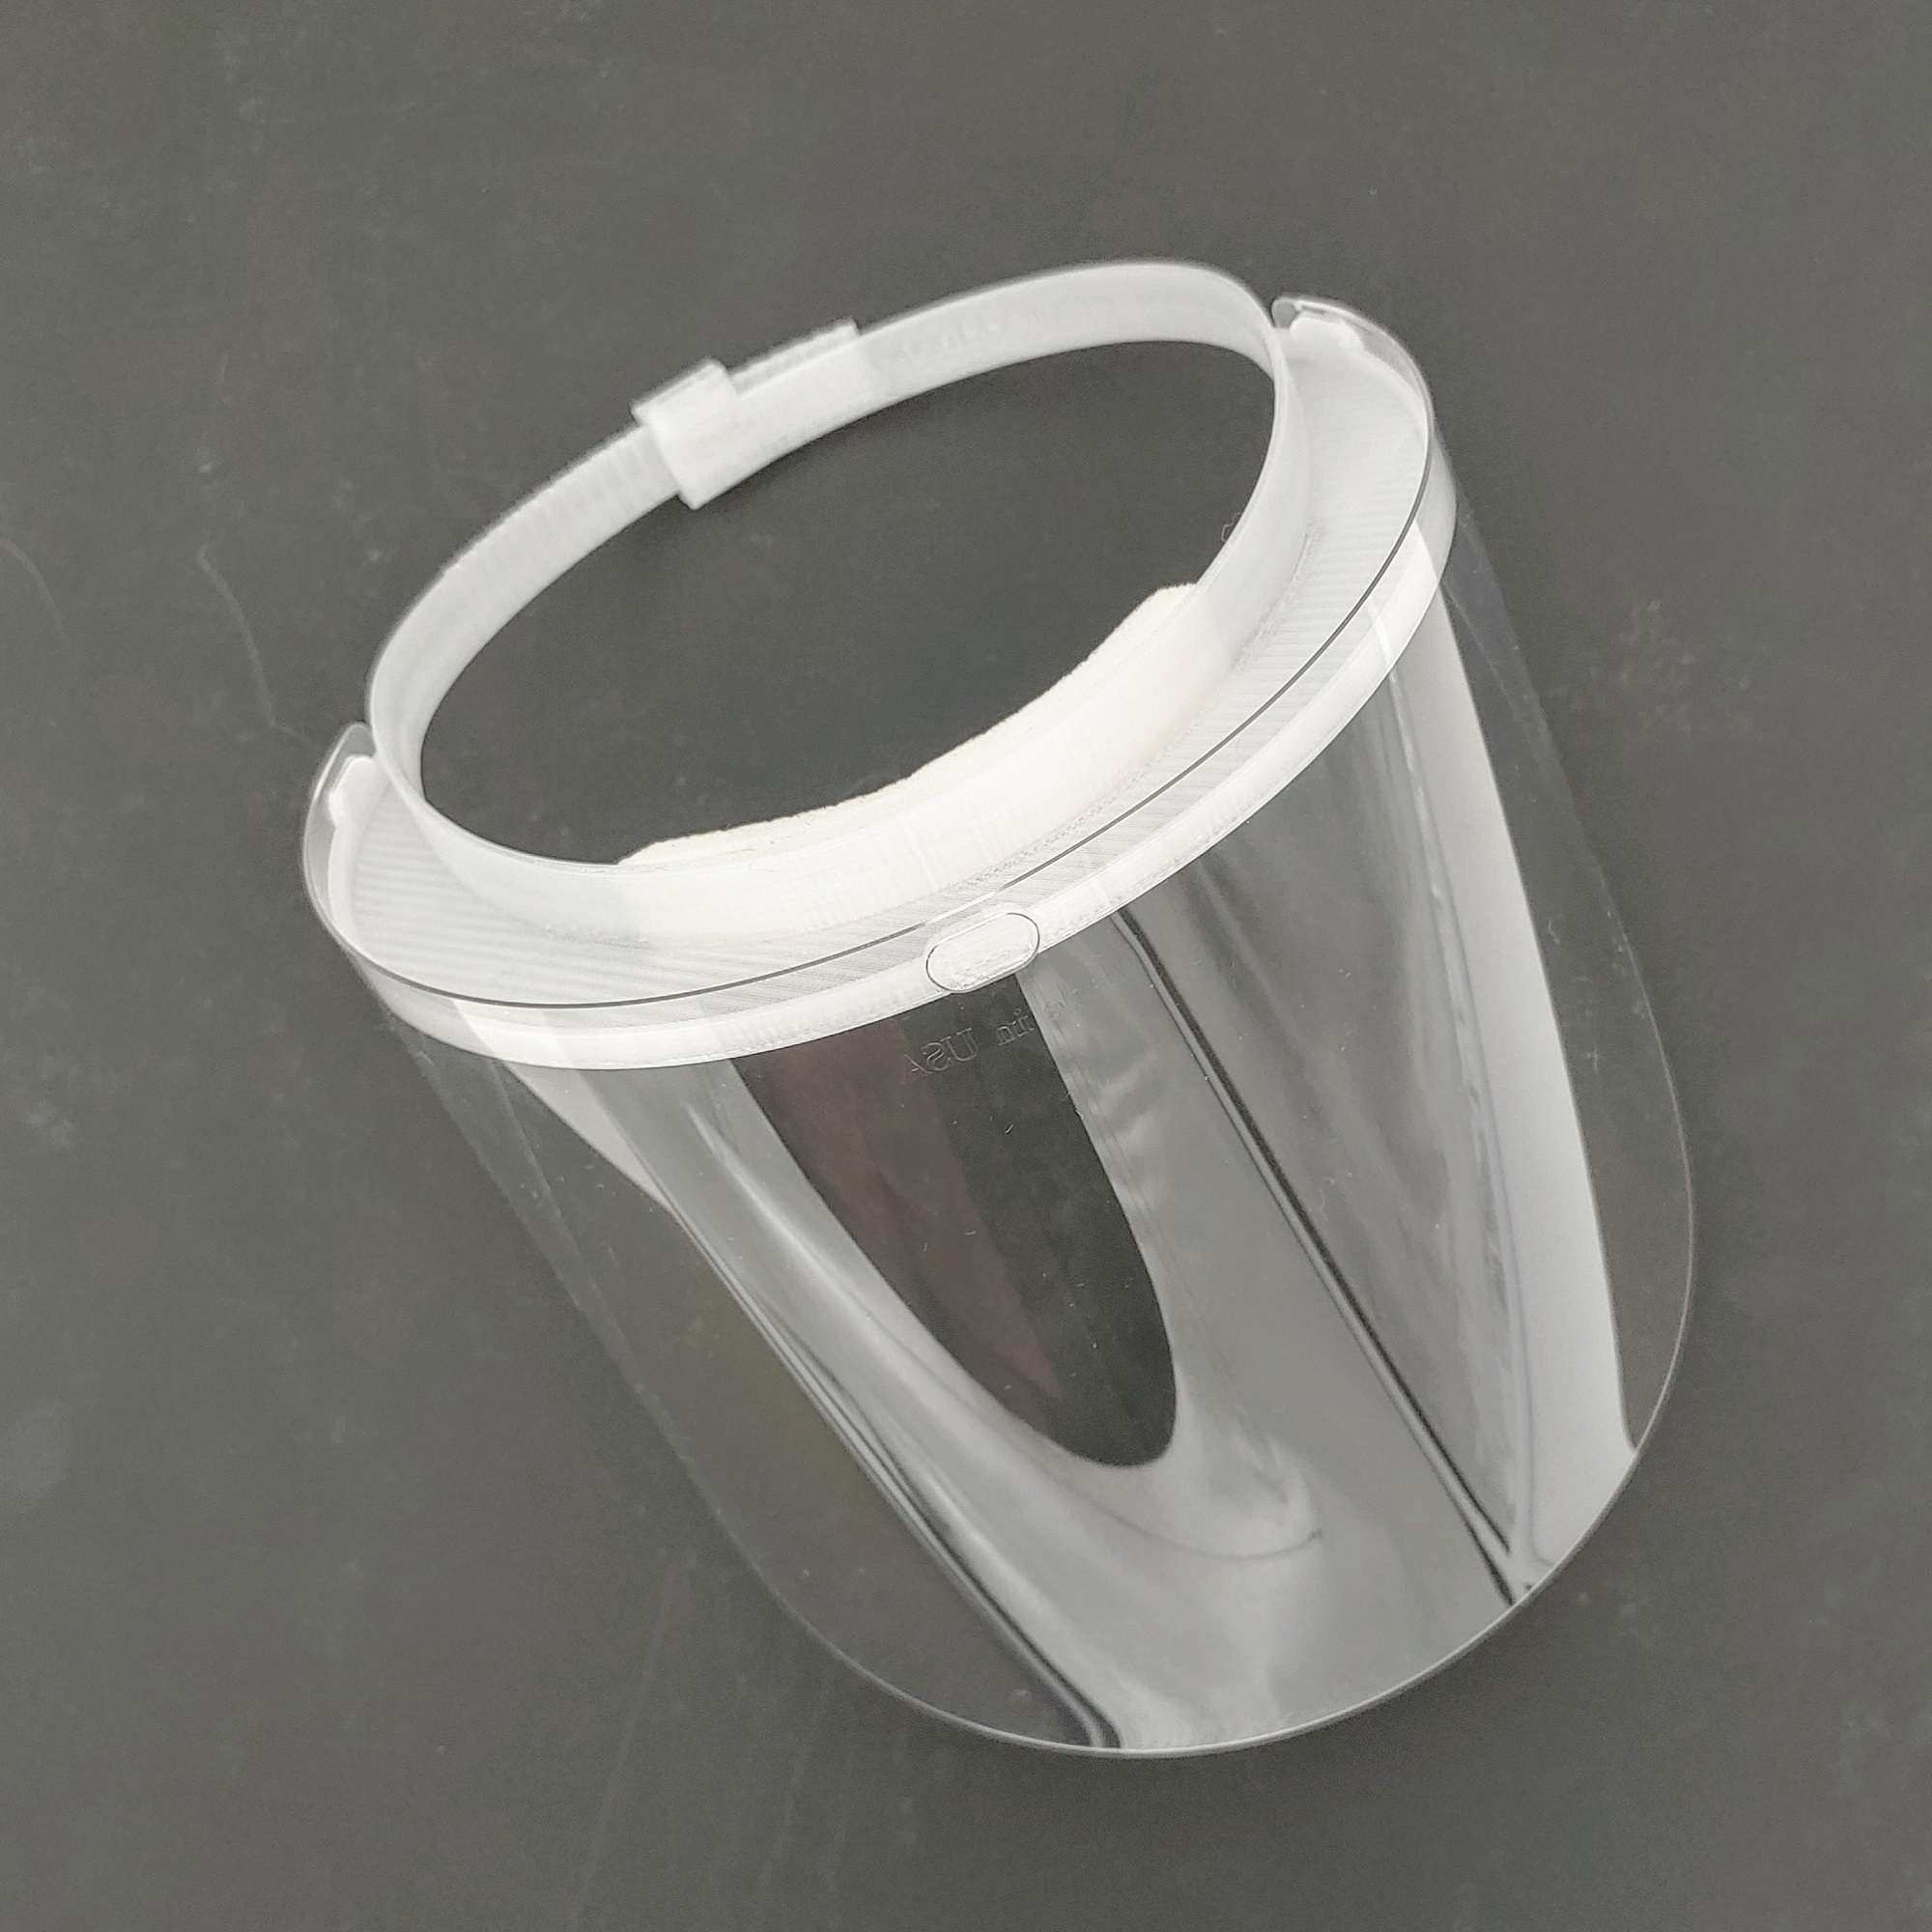
In two overlapping efforts, we prototyped a design for a 3D printed face shield with full visor coverage and an adjustable zip tie style latching mechanism. The inquiry started in Puerto Rico. Vicente Gascó, our friend and colleague from Tredé and Engine-4 shared he had a supply of 4000 clear plastic lenses for face shields, but no visor to which they would attach to the head. Armed with only the measurements of the lenses and aided by an idea from assembly guru and NASA technician Andrew Jica in Houston, Brian Duhaime, our mechanical engineer in Austin, and Alessandra Montano, our graphics designer in Puerto Rico, pumped out five different iterations of a face shield in only 48 hours.

Vicente and Luis Torres, co-founder of Engine-4, pulled our Puerto Rico Gigabot out of Parallel-18 and added it to the existing Gigabot at Engine-4. Gigabots in Austin and in Puerto Rico printed out iterations of the designs for testing.

In Houston at the same time, CTO Matthew Fiedler, mechanical engineer Helen Little and community liaison Charlotte Craff were meeting with doctors from a local hospital to discuss their needs for a face shield. Knowing that vetted, open source face shield designs were already available, the group reviewed designs by Prusa, Lazarus3D, Budmen and Professional Plastics. The Houston team 3D printed existing options for the doctors to test, but the designs didn’t meet all of the doctors’ needs:

  • Lightweight, fully closed top
  • Reducing the air gap between lens and chin
  • 180 degree lens coverage
  • Limit number of parts to reduce need to source materials in short supply

Knowing that supply chains were disrupted and very little raw materials were available in a timely manner, re:3D conferred with Professional Plastics and determined that plastic sheeting supplies were well behind schedule, but that there were excess pre-cut face shield lenses available. Again, re:3D opted to prototype to existing, local supplies, keeping stress off of traditional supply chains and getting creative with what was available.

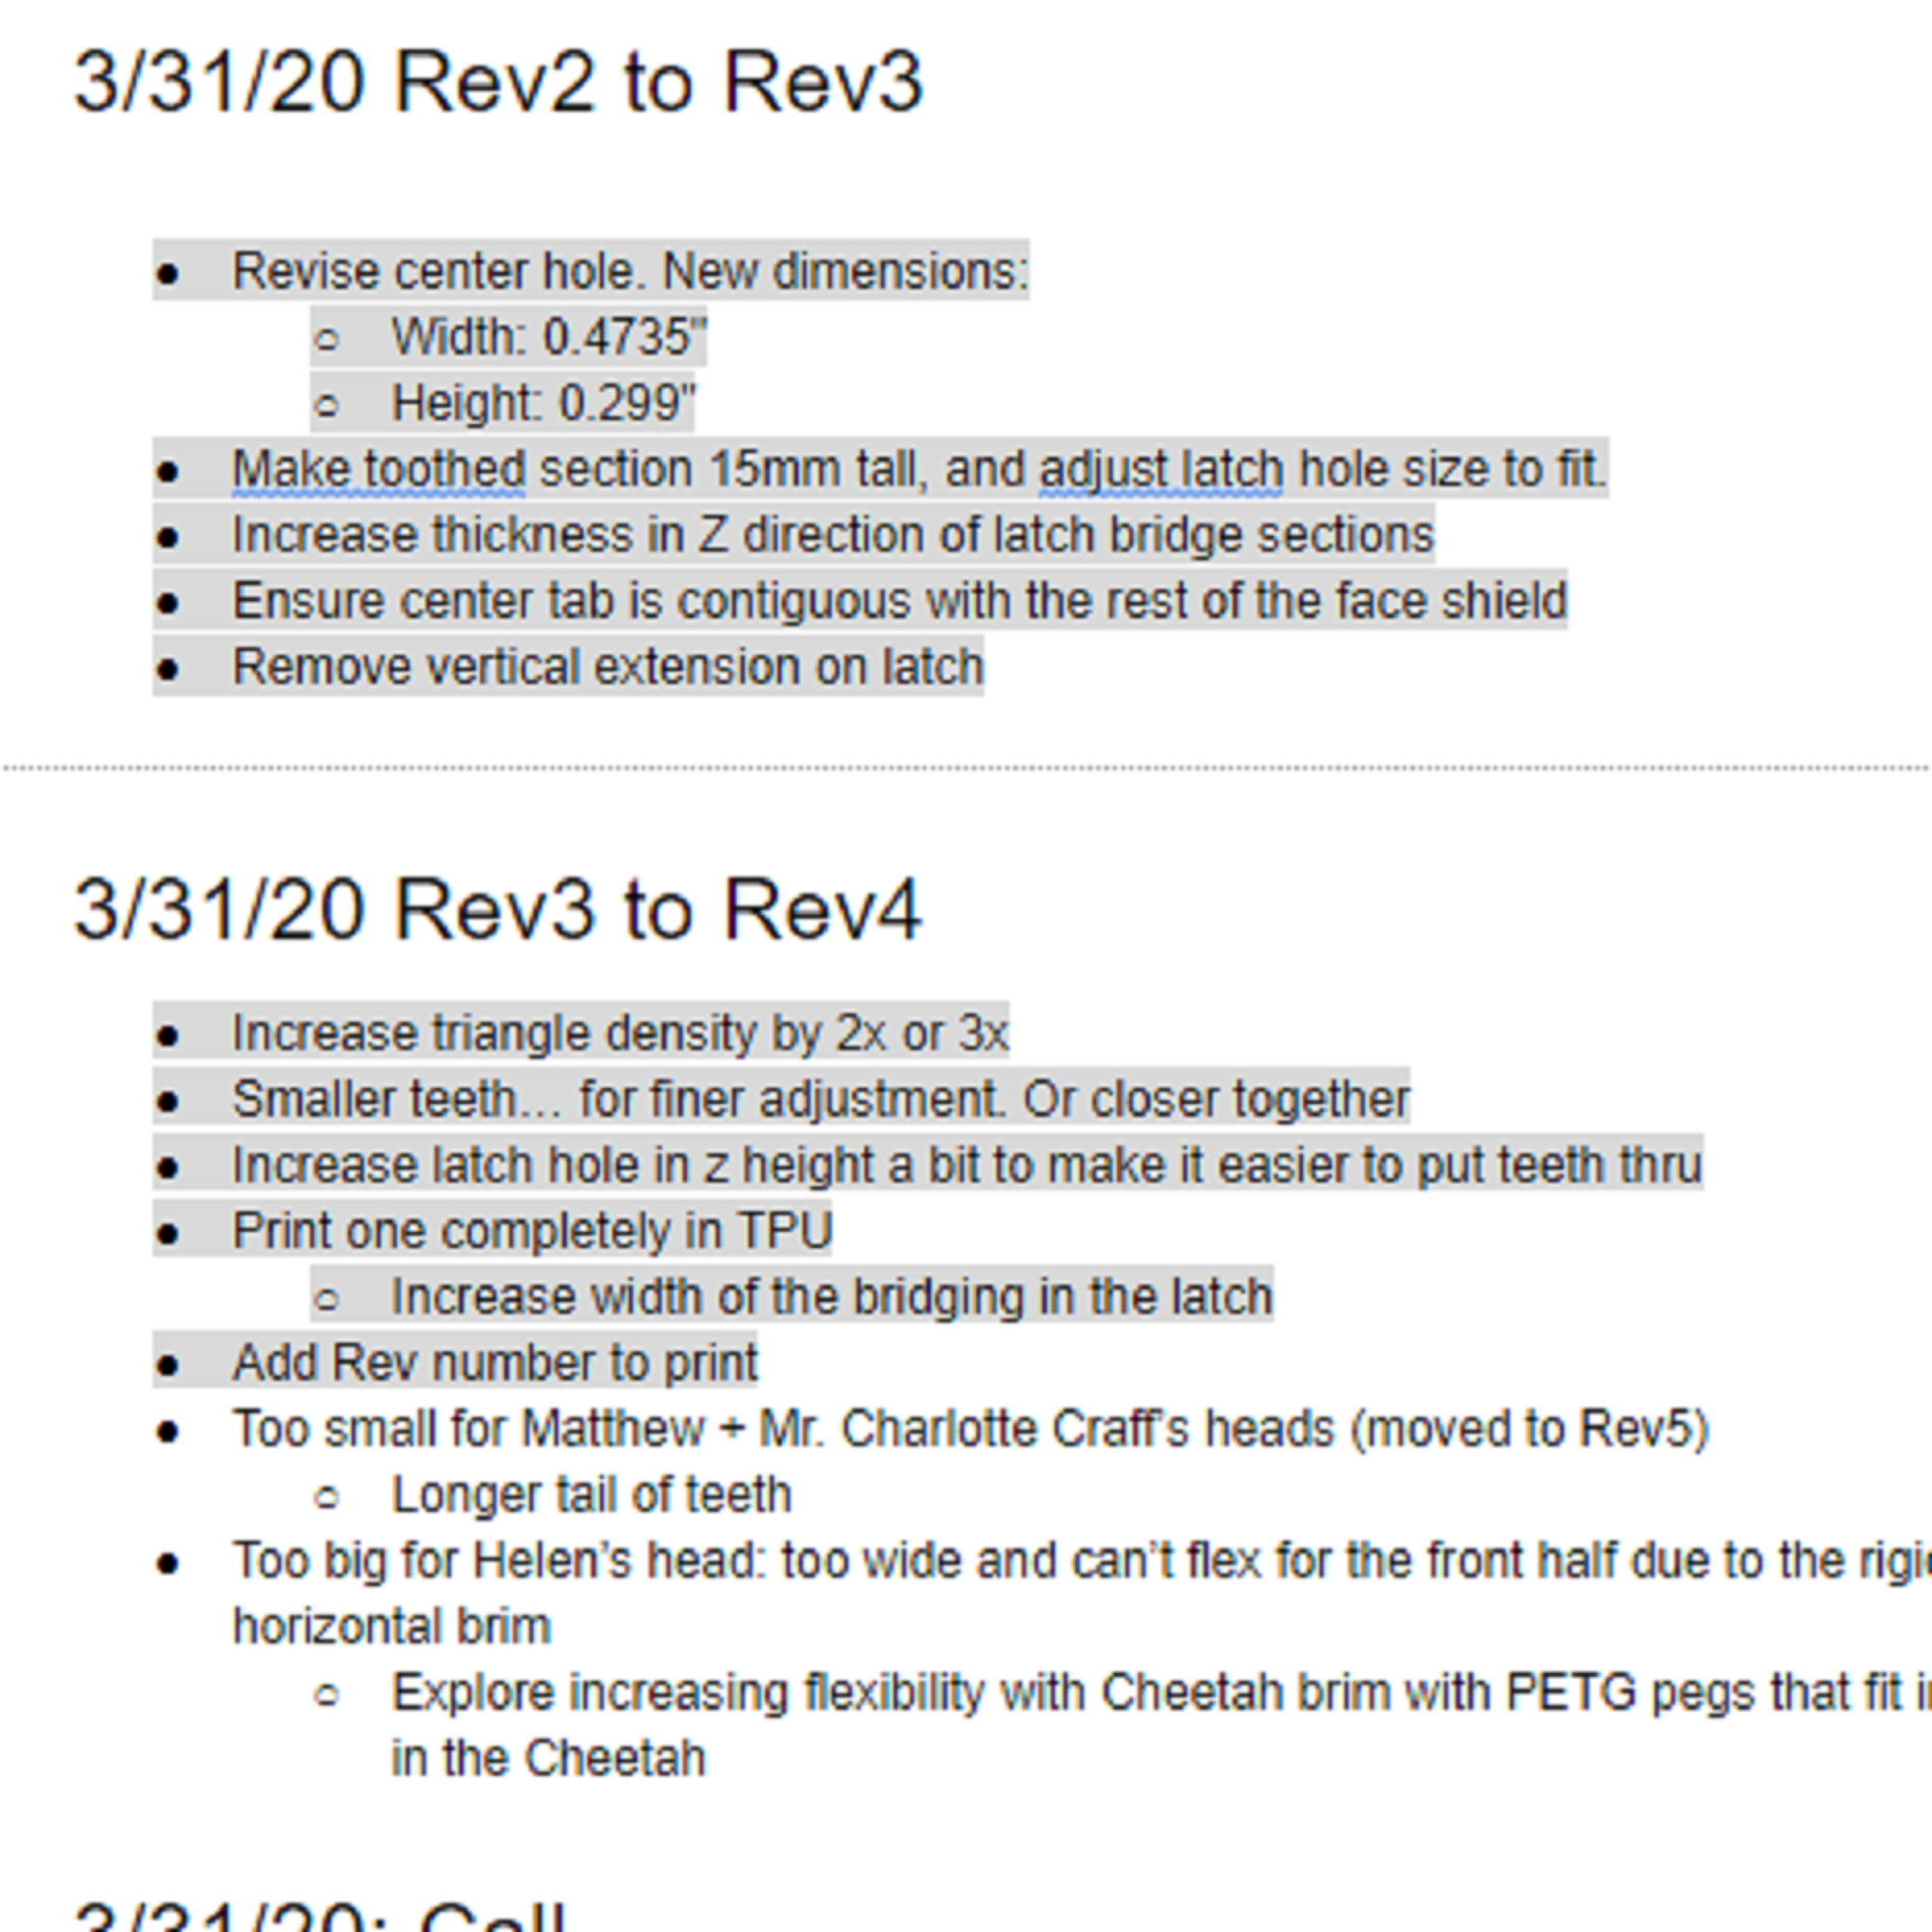
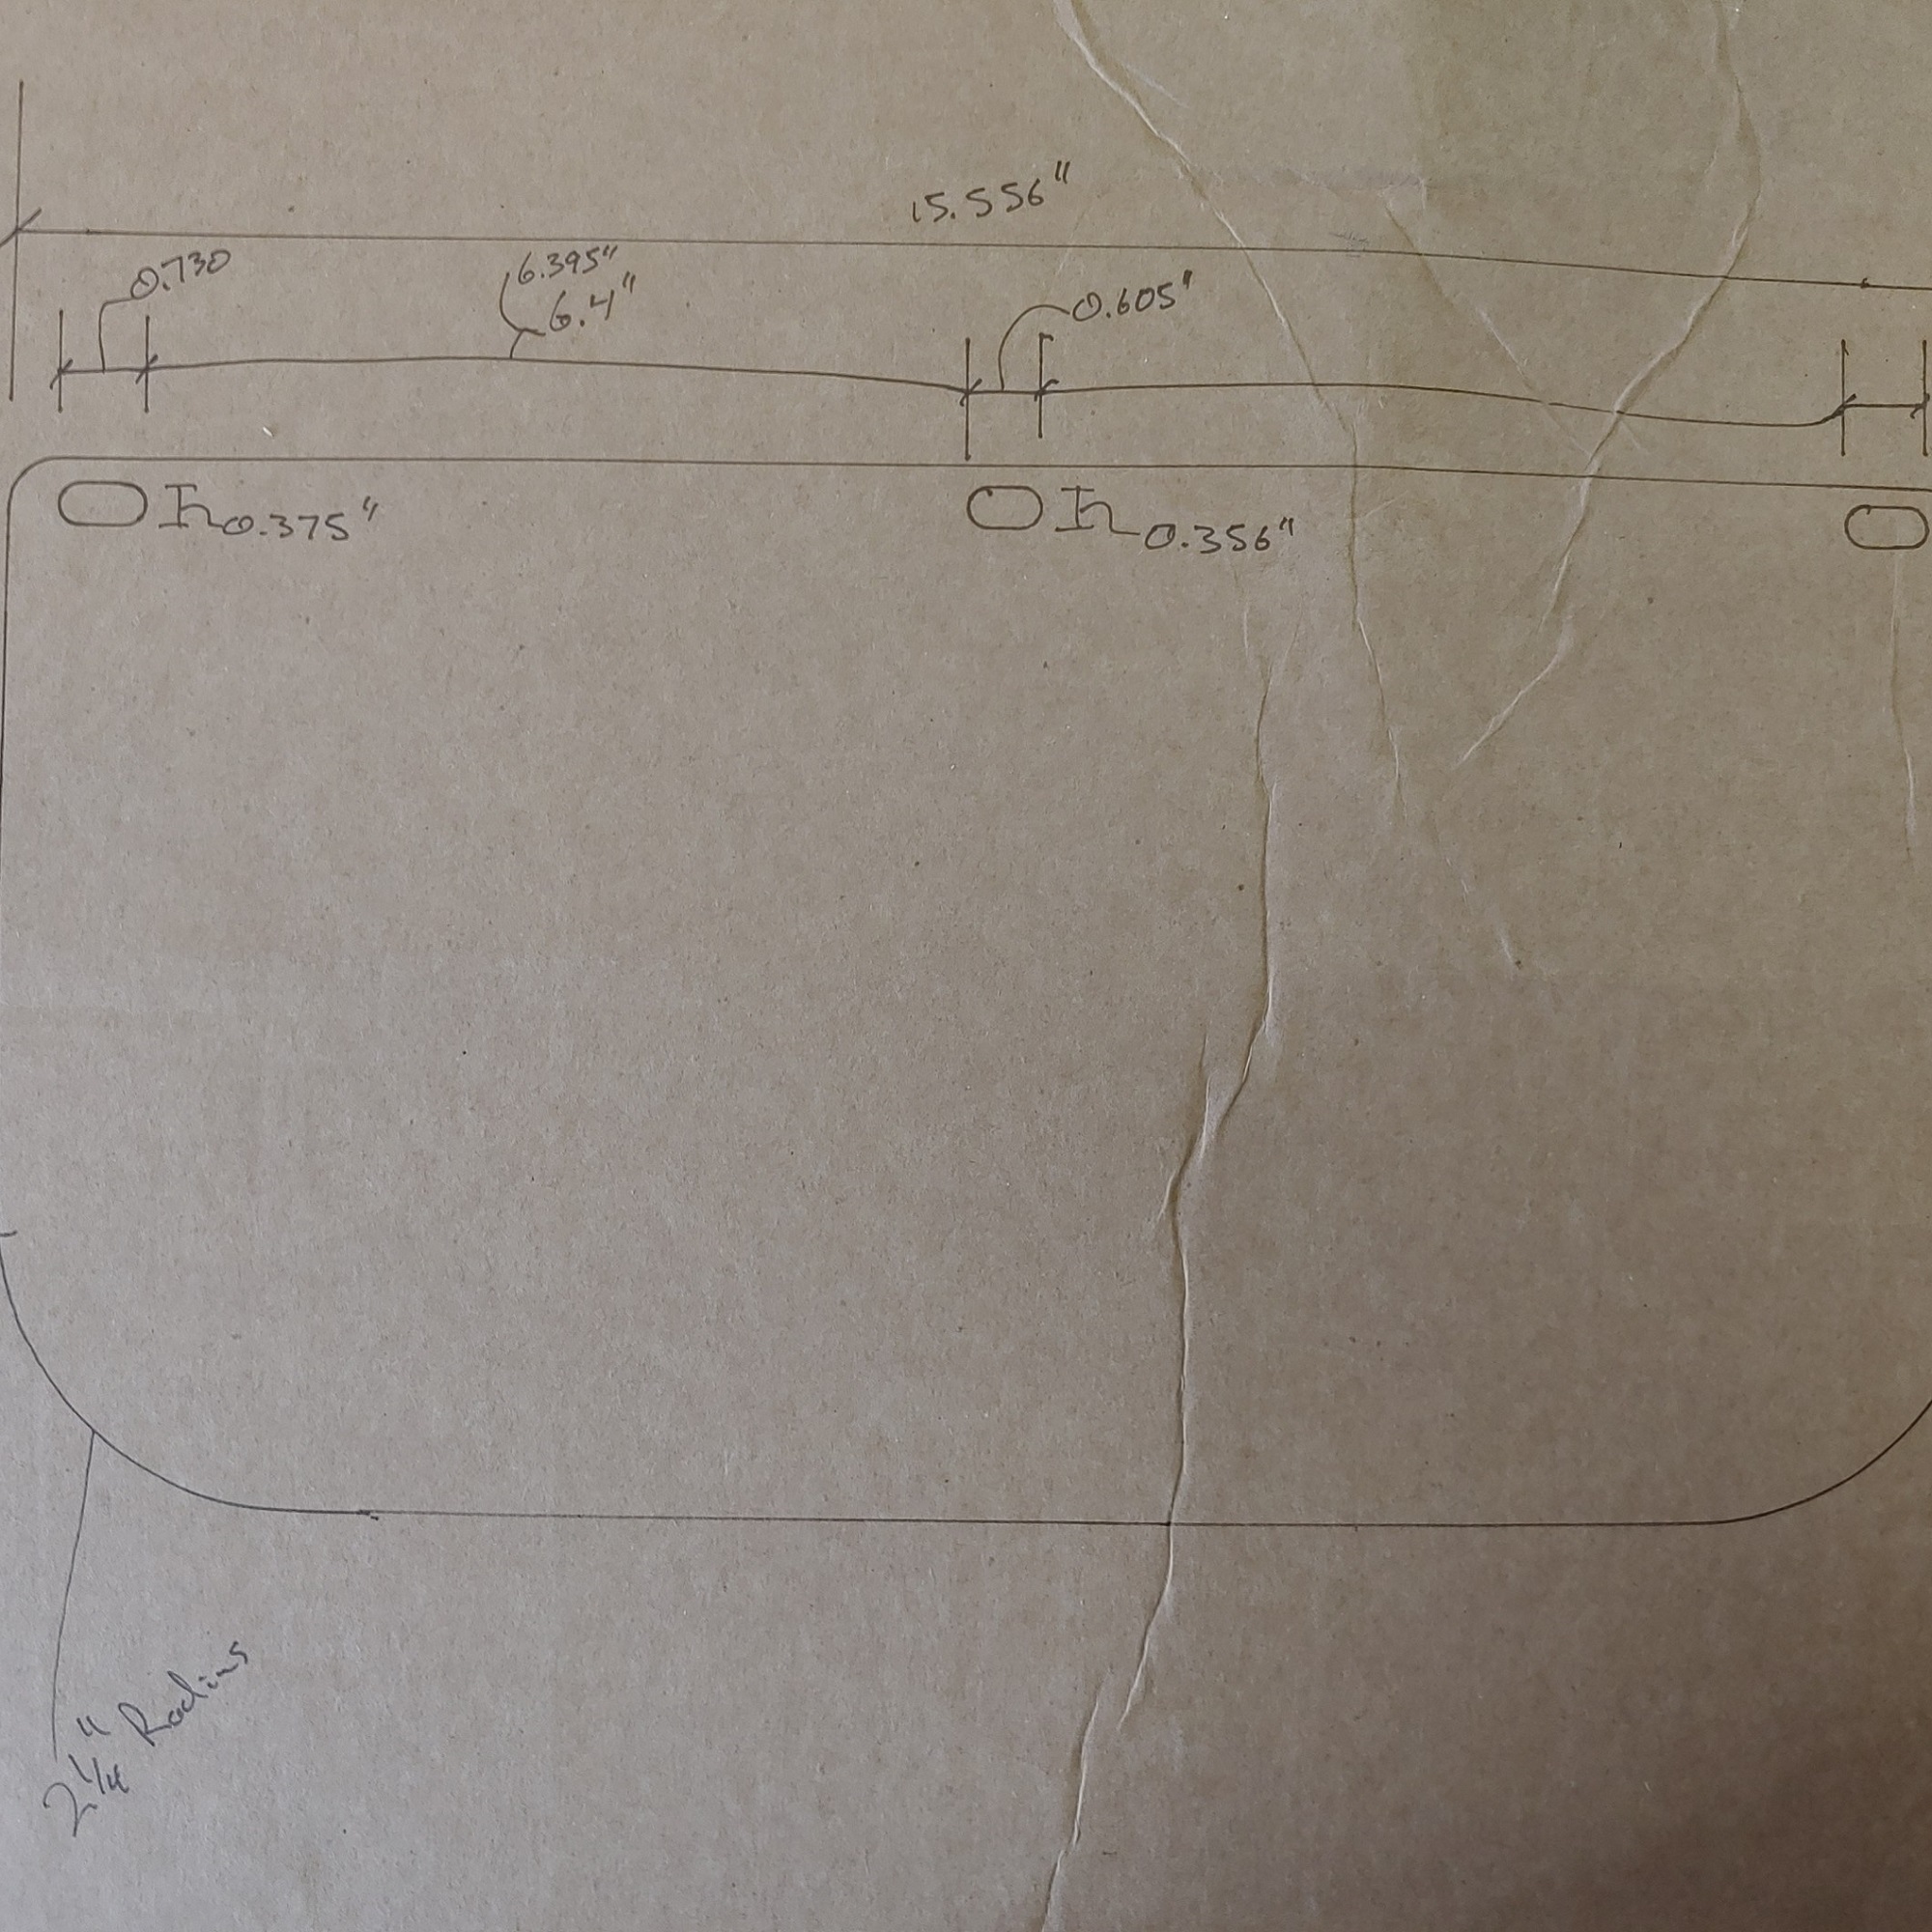
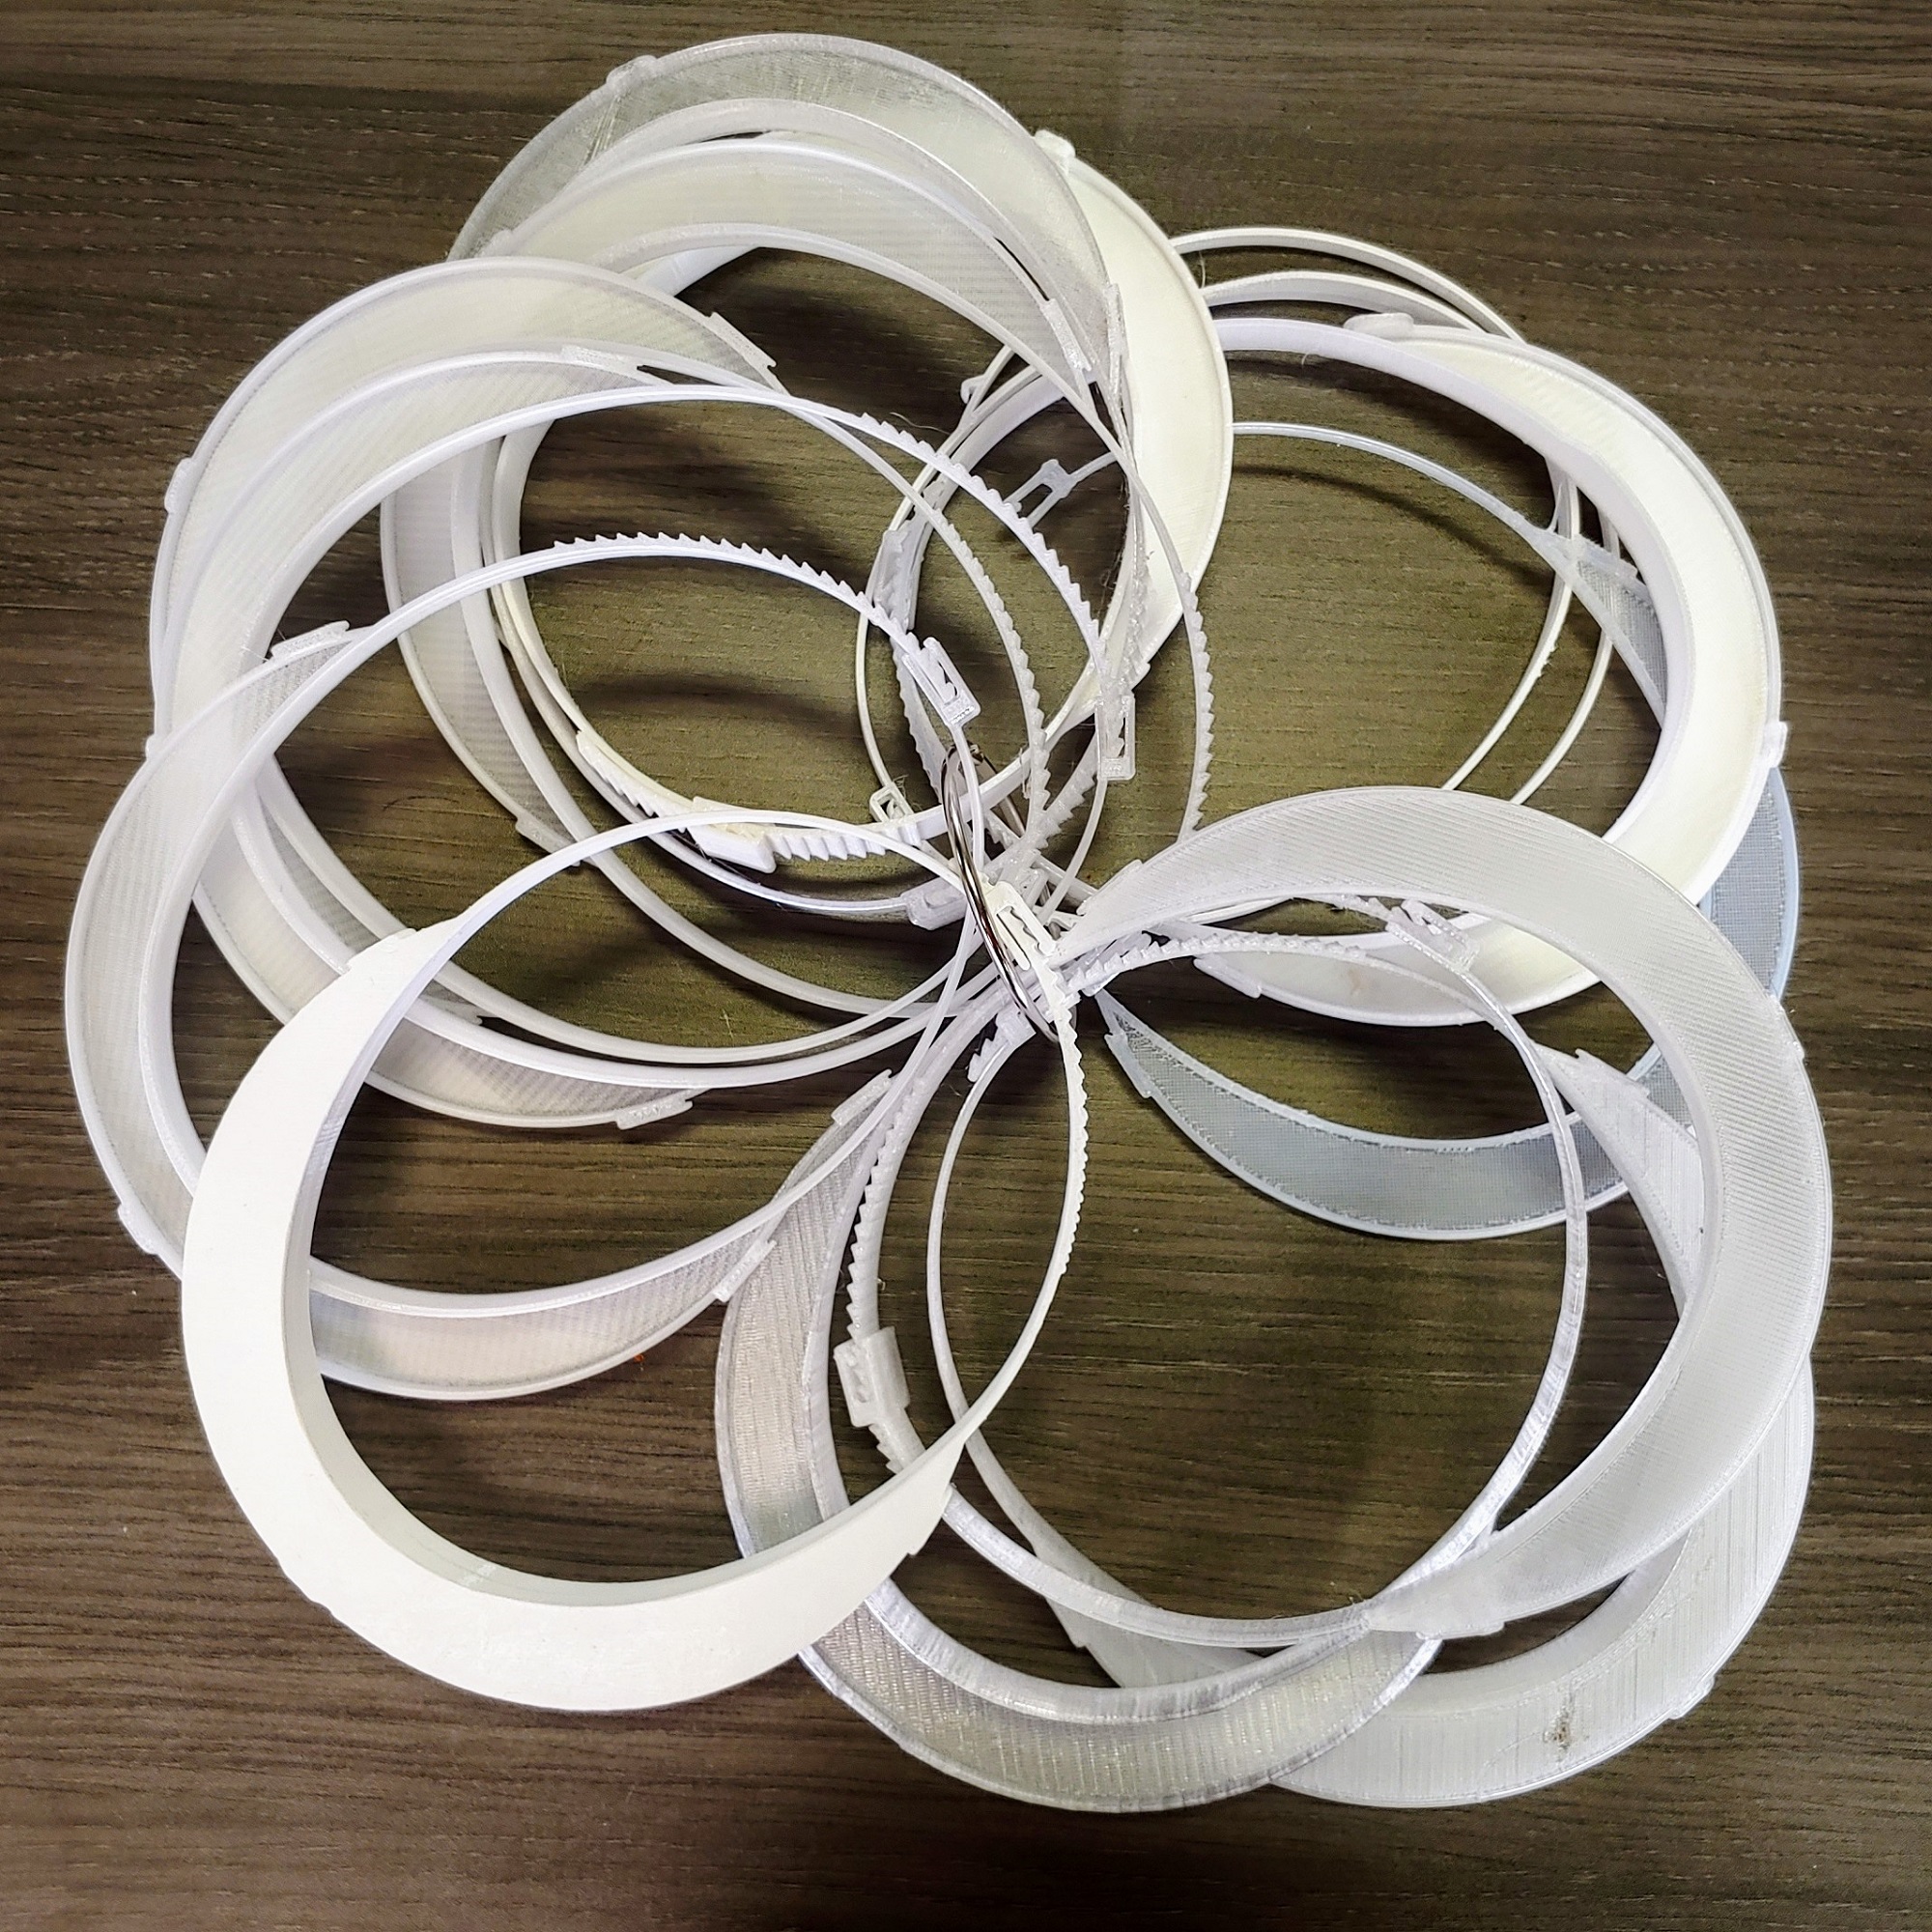
Over the next week, Helen built on the work done for the Puerto Rico design, integrated the needs of the doctors and iterated ten different versions of the face shield while working from home and rarely getting to hold a print in her hands. The result is a single print, face shield with an adjustable latching mechanism. It’s designed for 180 degrees of protection and comfort without the addition of foam padding.  It has the approval of the hospital’s Infection Control and  is currently available at the National Institutes of Health 3D Print exchange for COVID-19 Response. https://3dprint.nih.gov/discover/3dpx-013504

Hands-Free Door Pulls

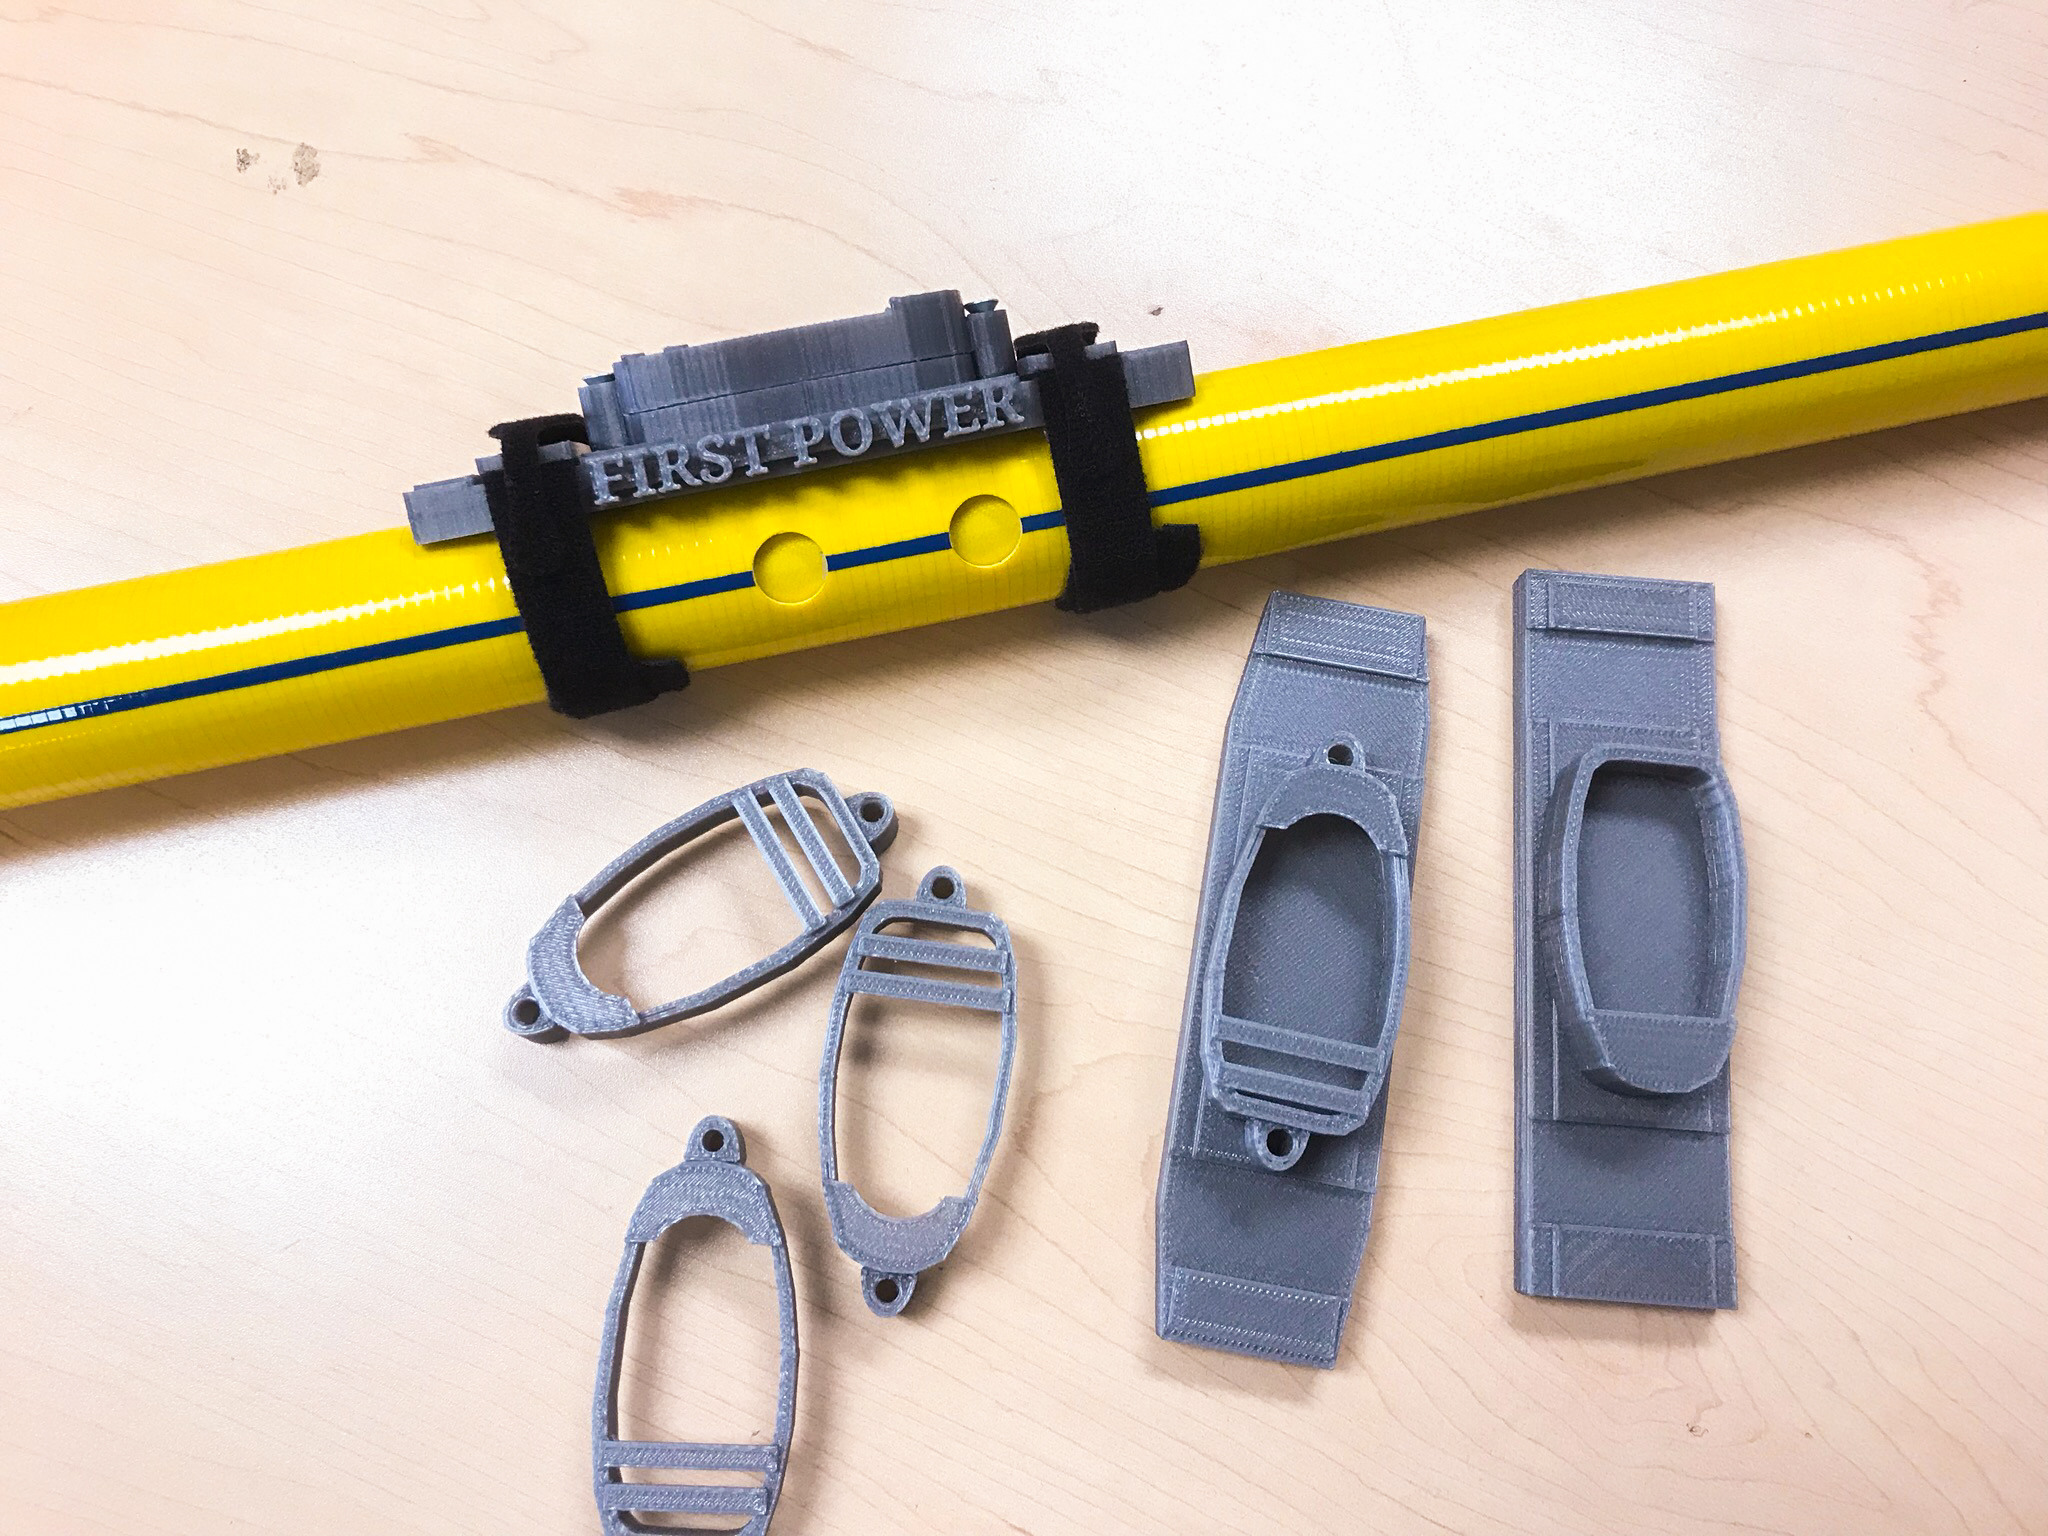
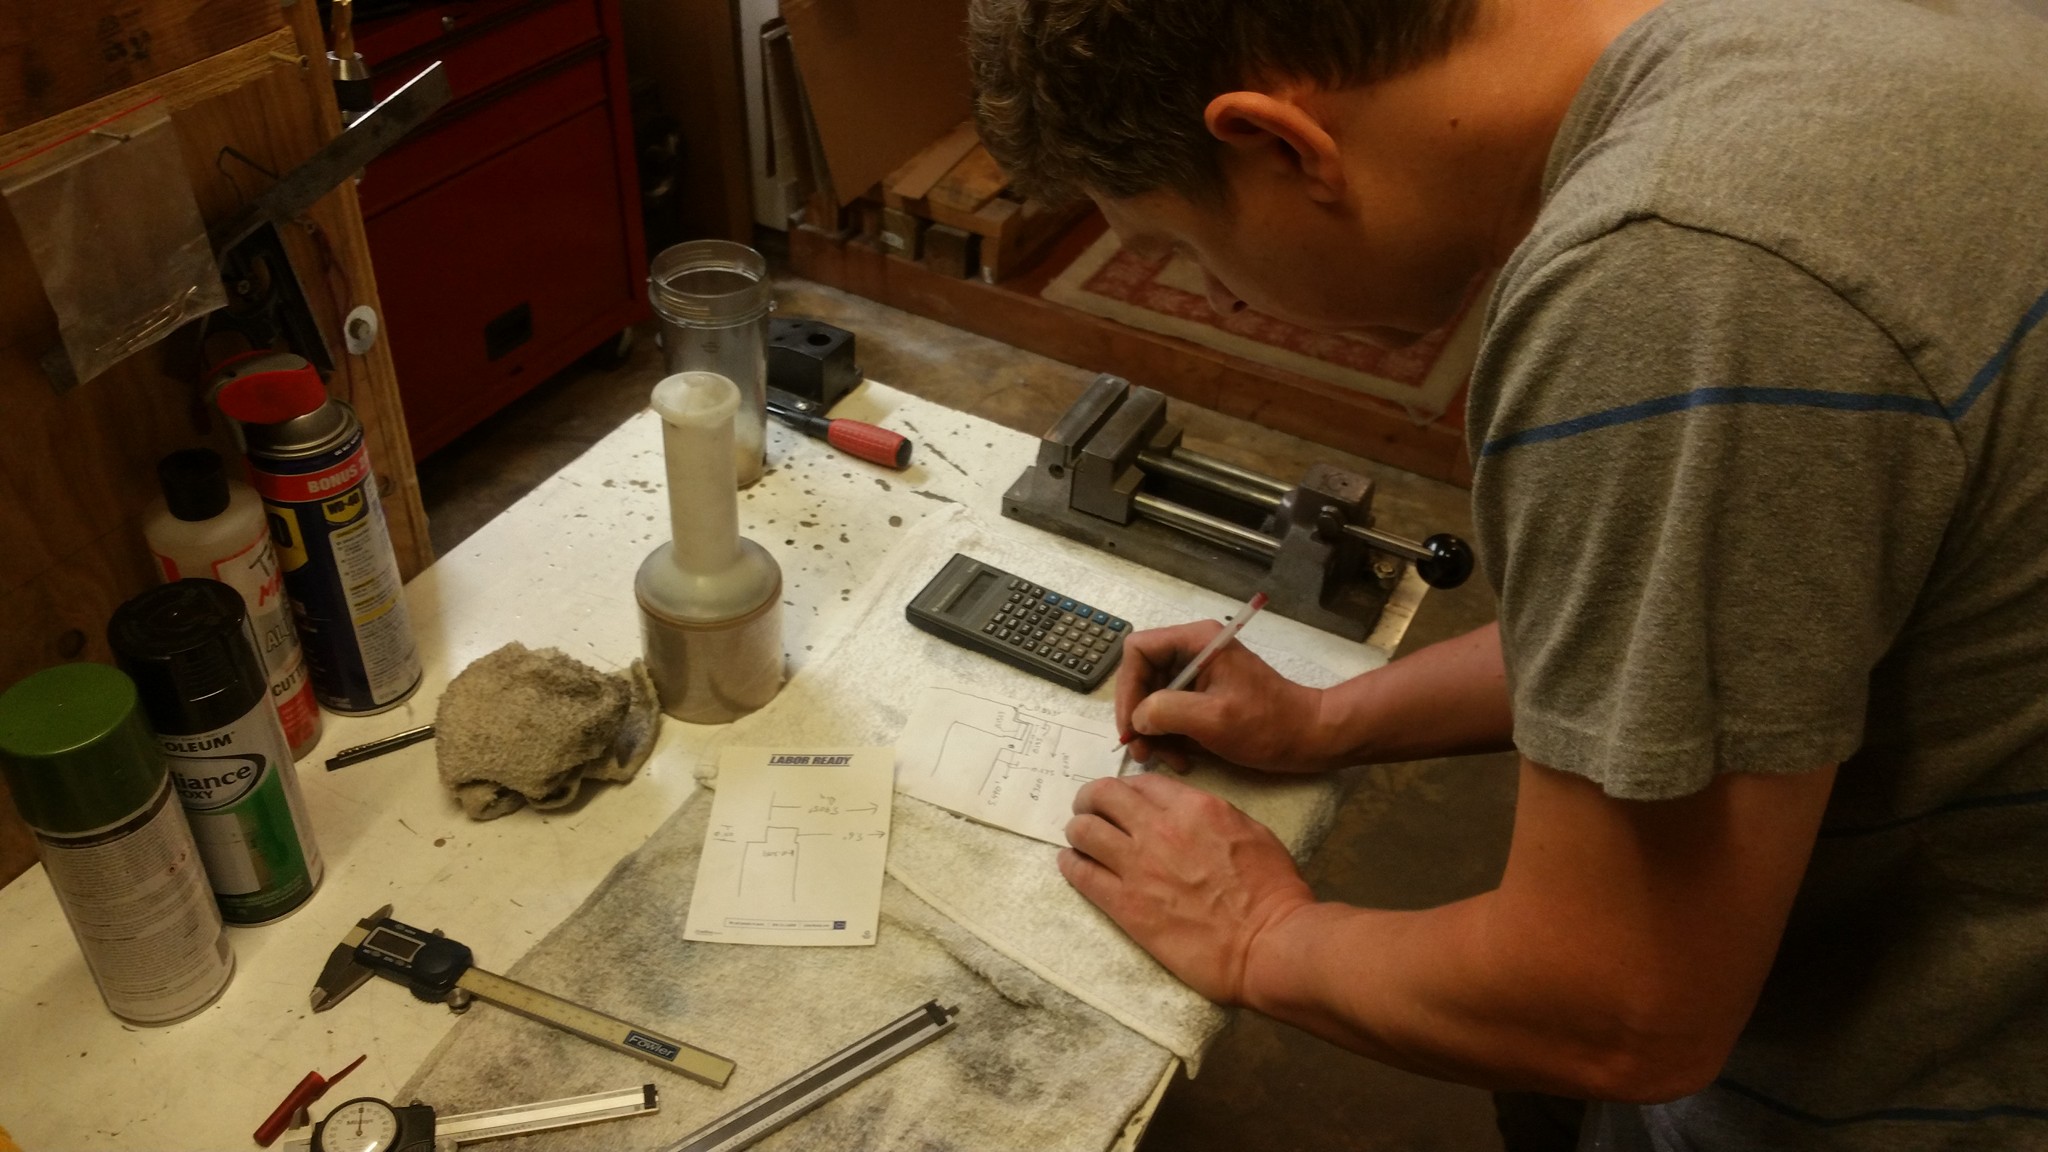
Eliminating unnecessary shared contact surfaces is imperative, especially in buildings where essential workers are operating to continue necessary services. Our team includes multiple military service members. One of our reservists was activated when she sent out a call back to our team to make some hands-free door pulls to use on the base. Aided by Matthew Fiedler, Mike Battaglia, our designer in Austin, and Brian Duhaime went to work prototyping hands-free door pulls for lever-style and bar-style door handles.

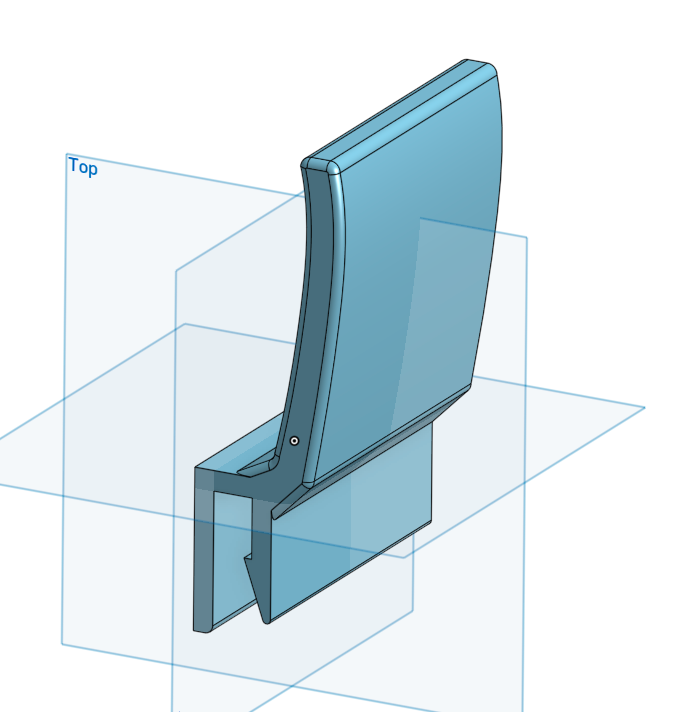
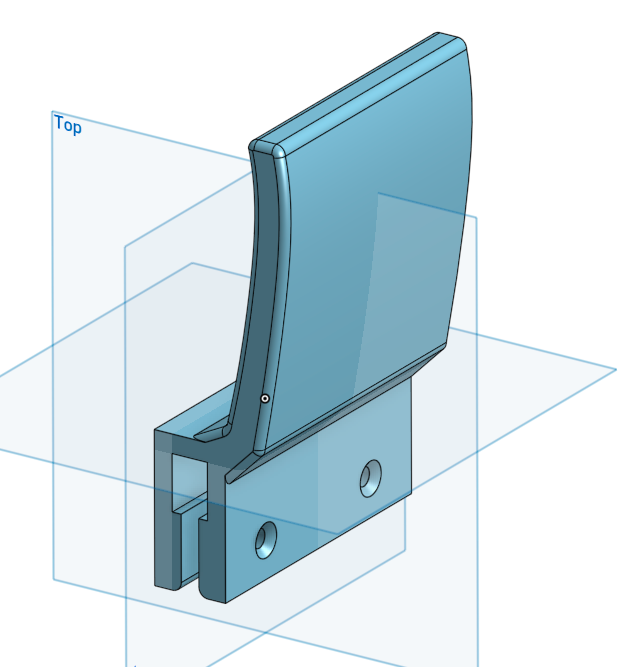
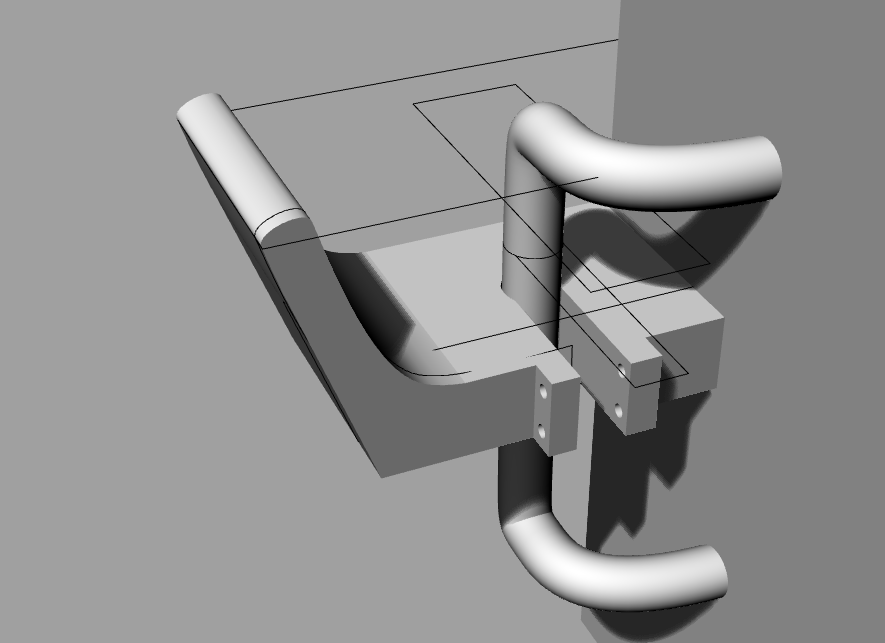
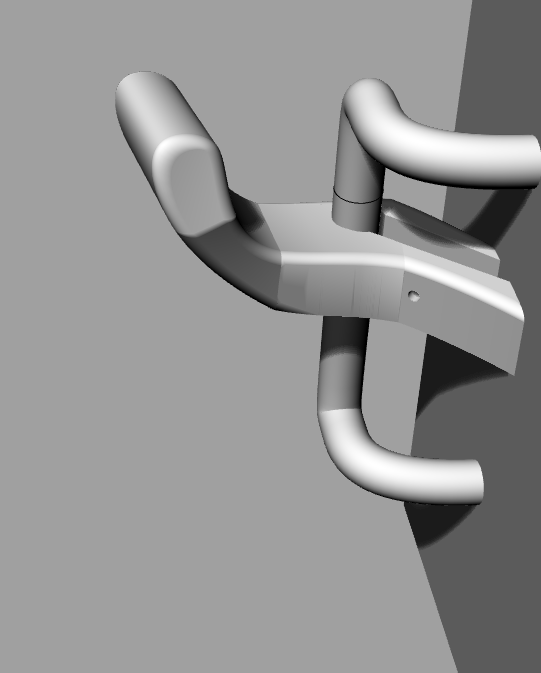
These designs were drafted before we had dimensions for either of the door styles, so had to be modeled in such a way to enable incremental dimensional adjustments while preserving the models’ shapes. During her free time, the service member sent feedback on the first versions via pictures and notes, and Brian and Mike iterated the changes remotely, melding organic shaped and attachment options into single print solutions.

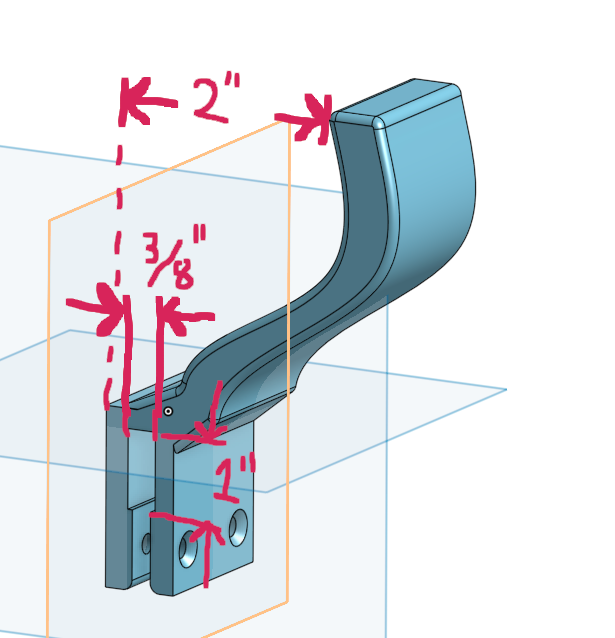
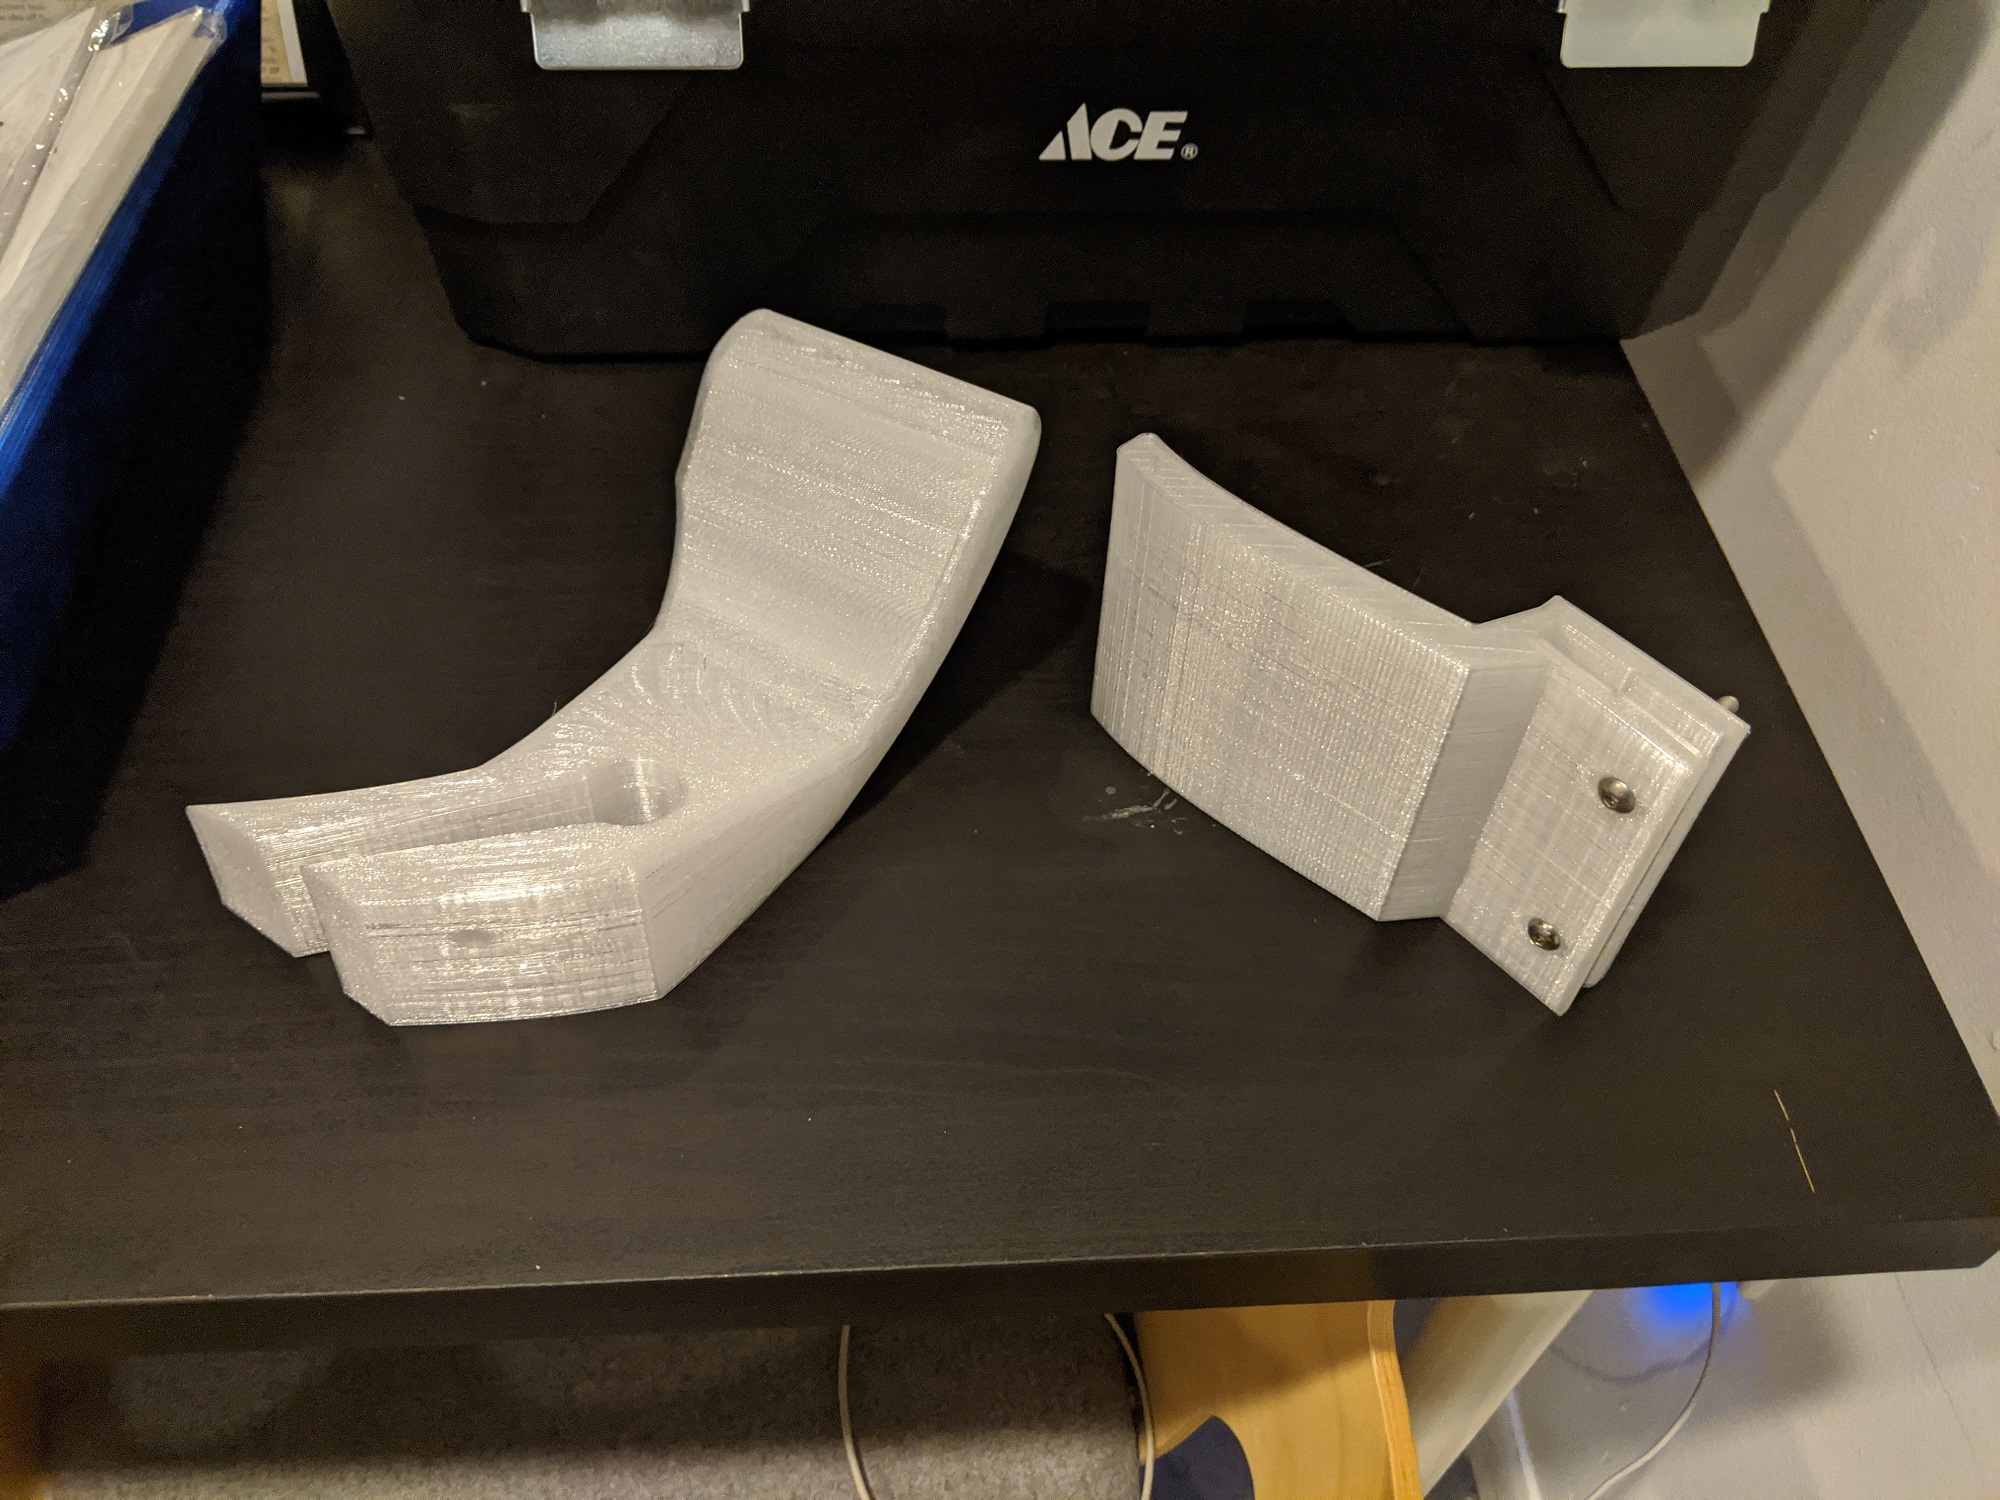
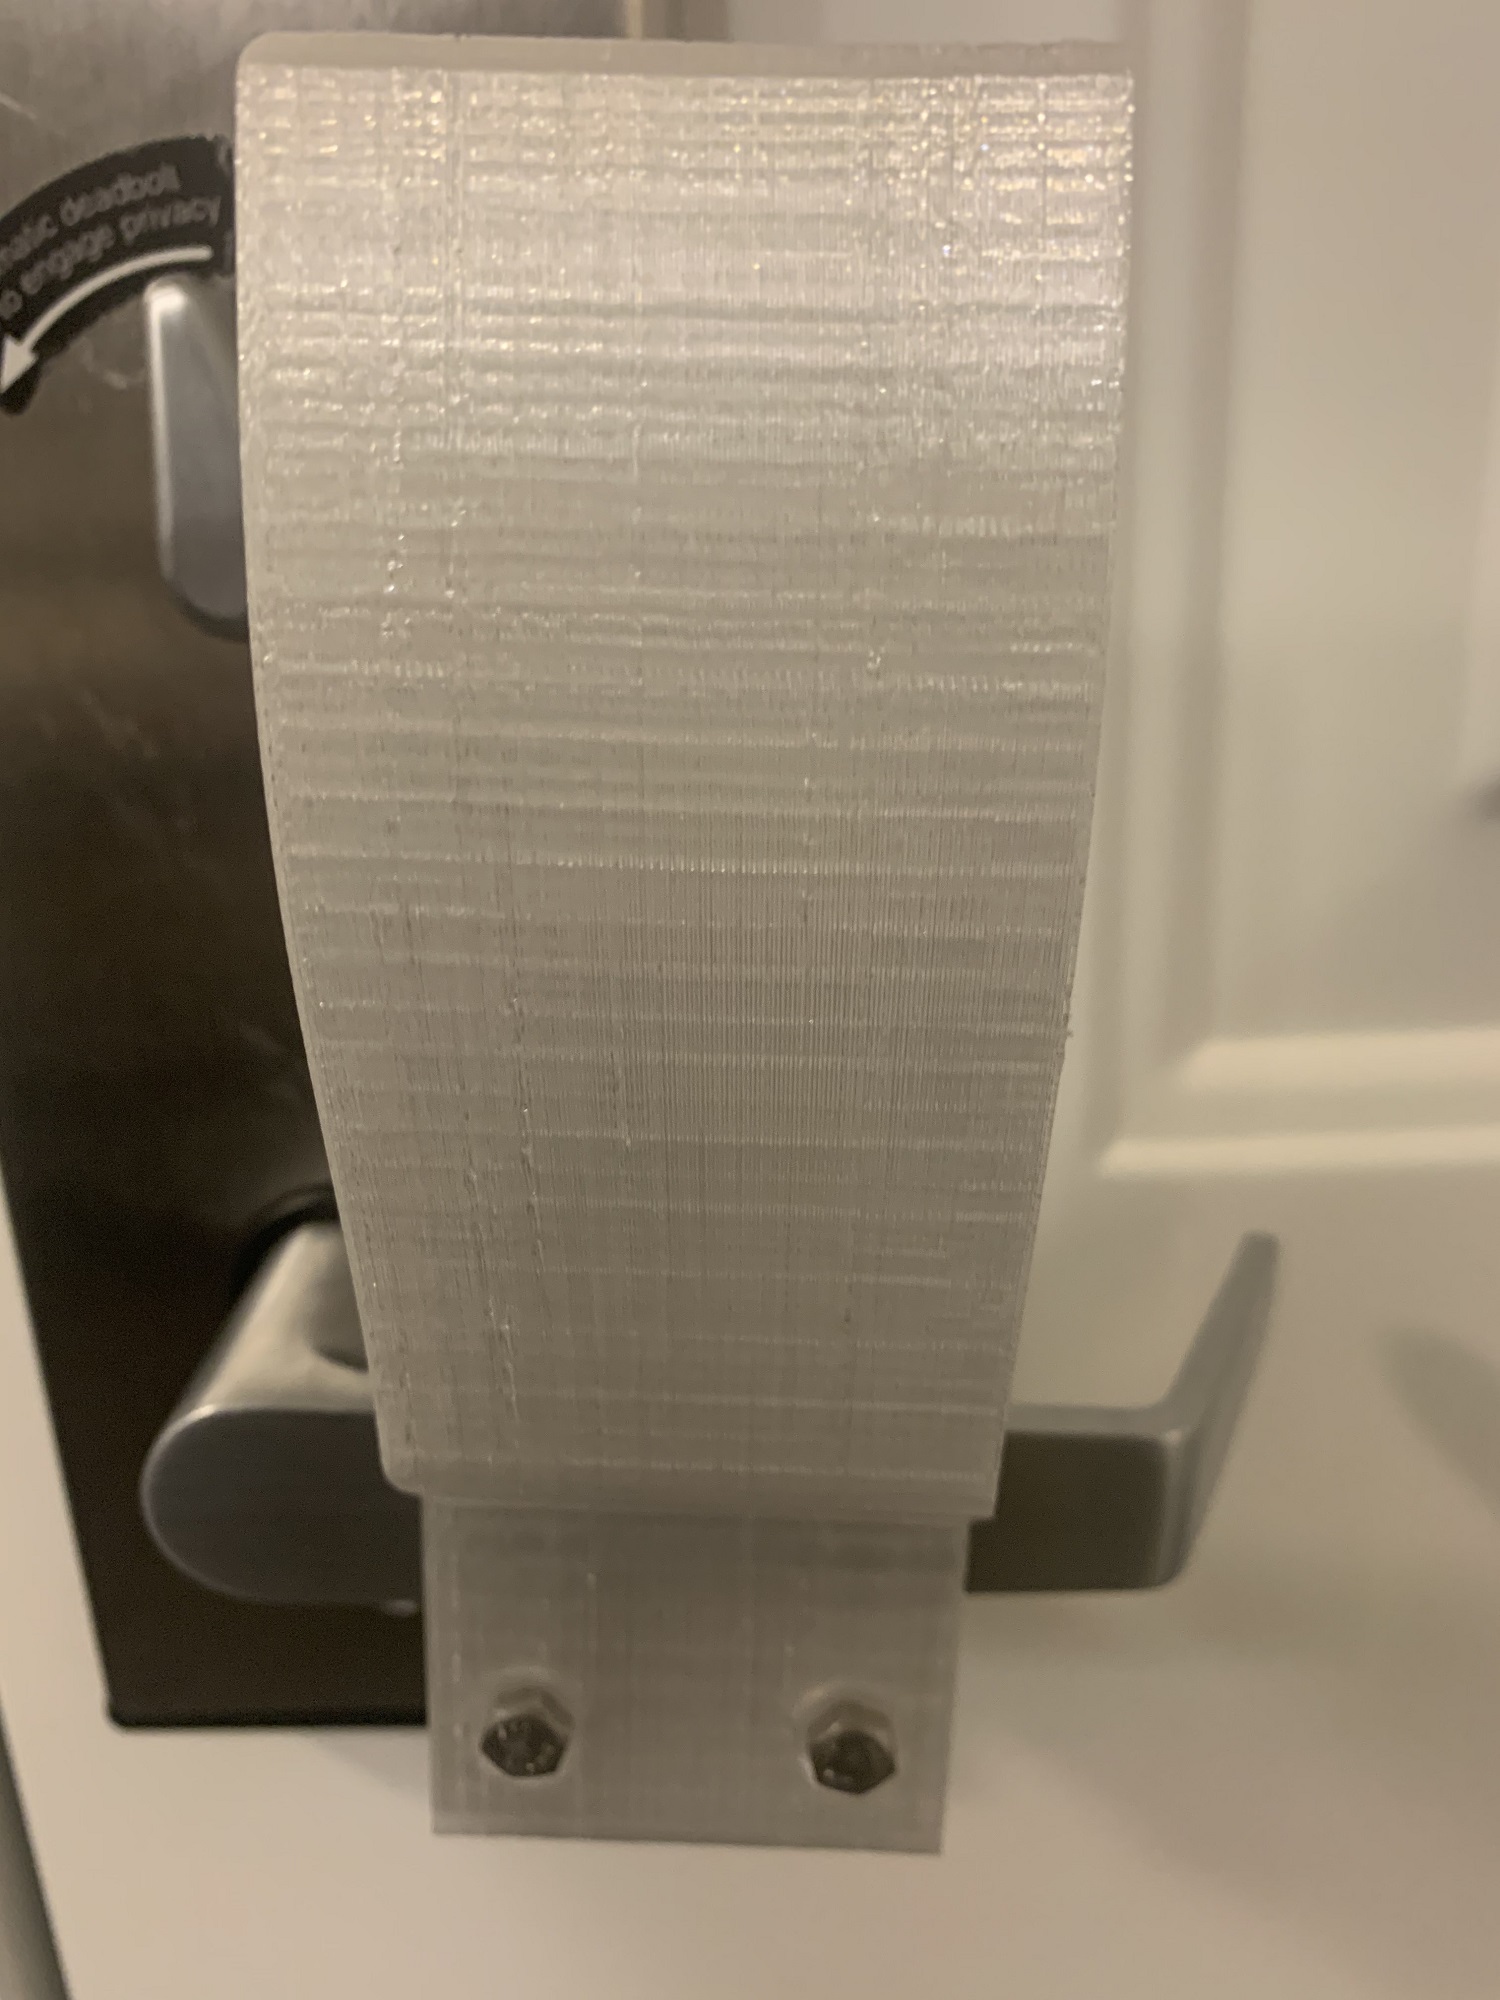
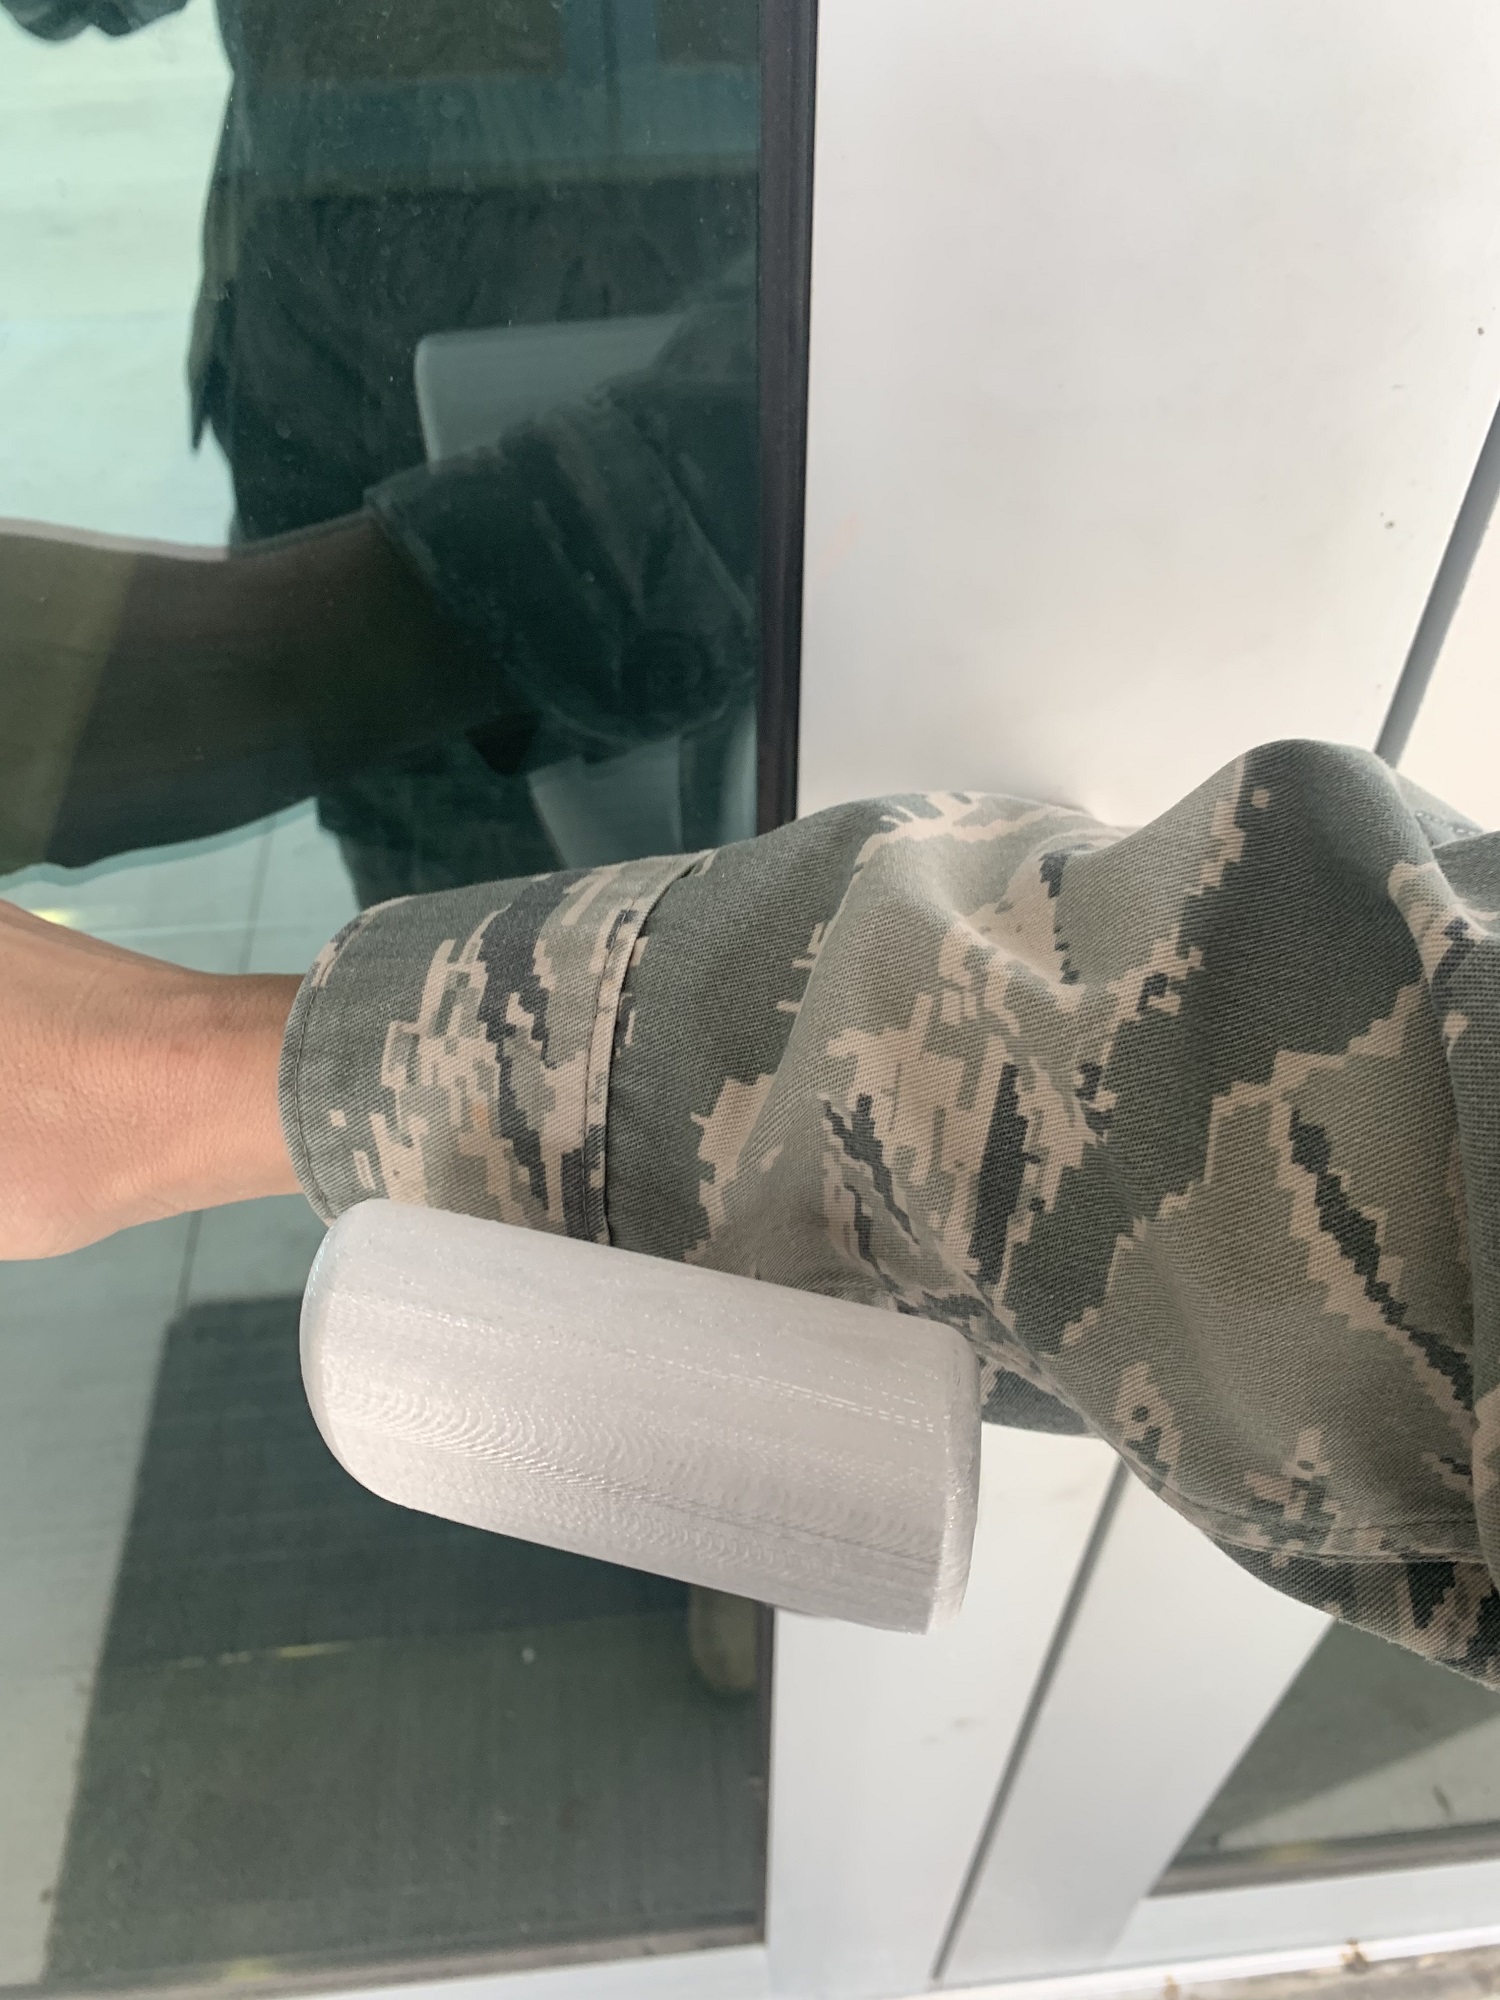
The hands-free door pulls are now successfully in use on base, protecting our military personnel as they work to respond and aid COVID-19 efforts. These models are available for download here https://3dprint.nih.gov/discover/3dpx-013825 and here: https://3dprint.nih.gov/discover/3dpx-013822

From Intubation Box to Drape Stands

As a 3D printer manufacturer, we are understandably advocates of 3D printing use in manufacturing. However, we recognize that not all innovations require, or are best served by, an exclusively 3D printed solution. As we do much of our manufacturing in-house, including machining parts on our CNCs, we can apply rapid prototyping principals to traditional manufacturing methods. Take the example of an aerosol or intubation box:

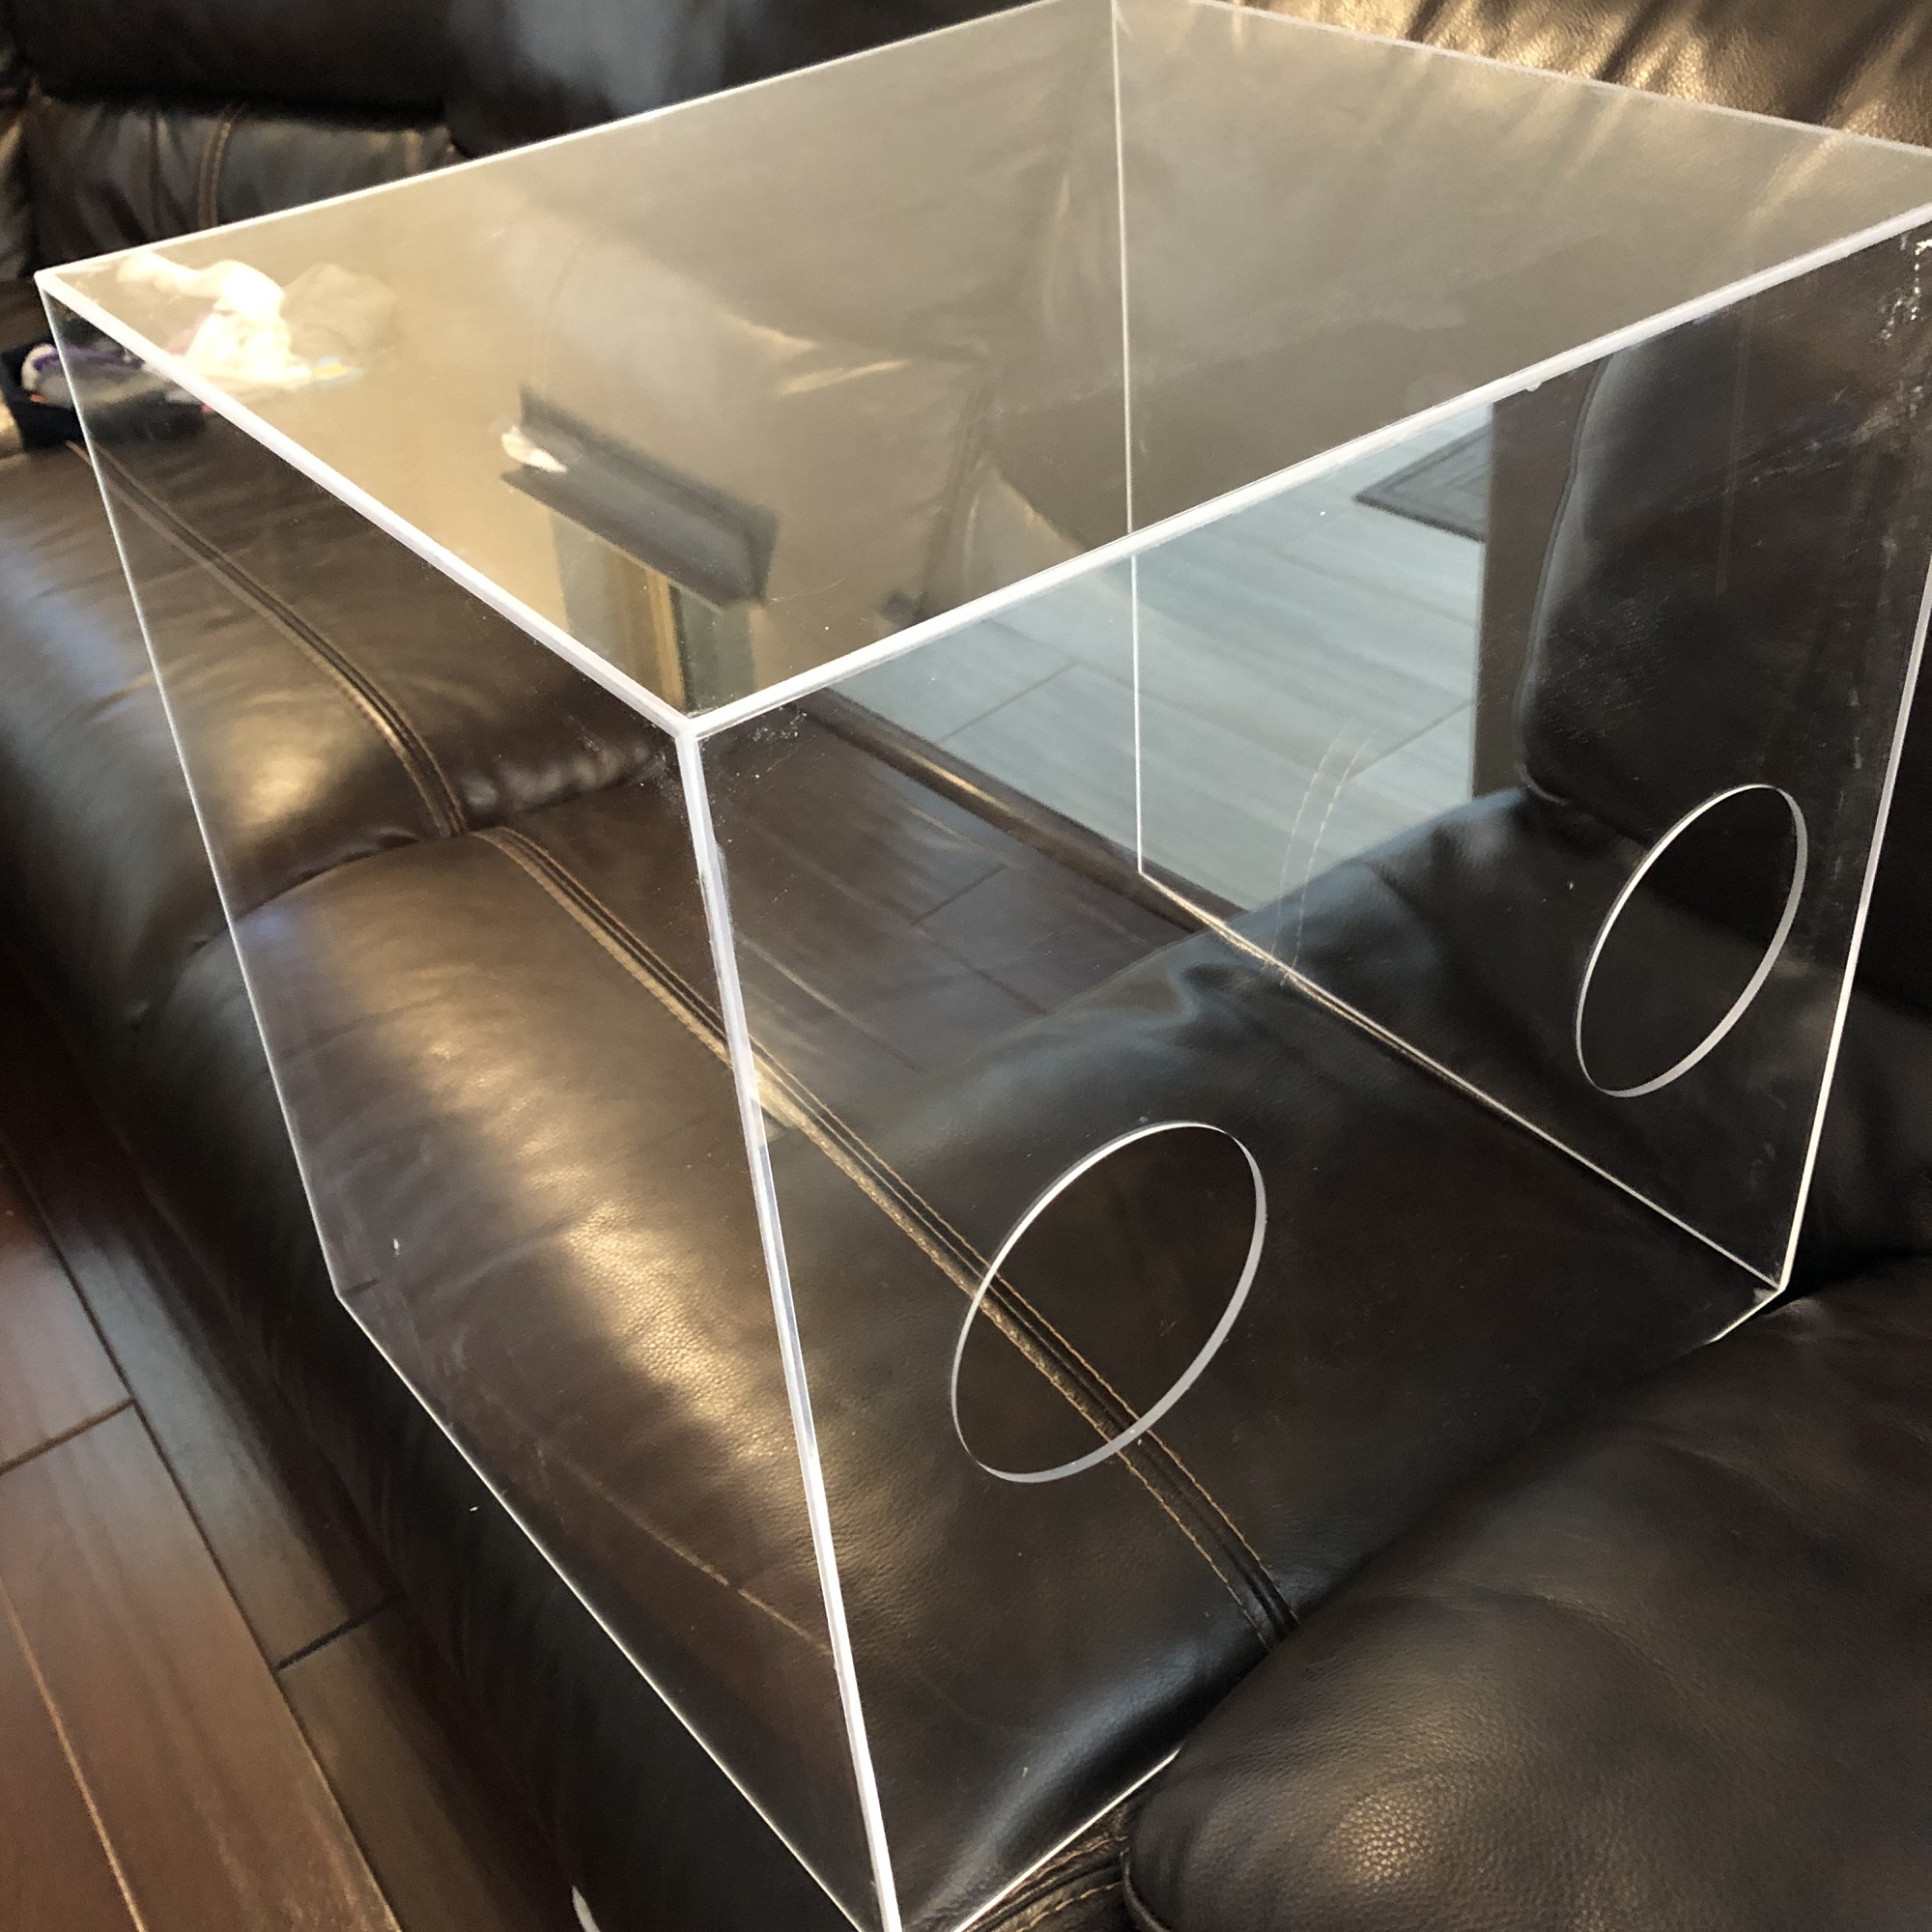
We were contacted by an anesthesiologist based in Austin about modifying such a box, used to protect doctors and nurses from aerosols released when intubating a patient. The doctor’s main concerns were ability to clean and the need for a “helper” hole. This equipment needed a curved, clear surface rather than sharp corners where germs could hide. We offered to prototype using polycarbonate sheeting and an aluminum framework available in our machine shop.  In this case, the request for aid evolved before we produced a prototype. The anesthesiologist reported that the existing boxes were unwieldy and took up too much space, so instead requested a solution for supporting clear plastic drapes to achieve the same purpose and be easy to store. Matthew Fiedler proposed a combined 3d printed base and a bent aluminum frame for the project. Design work is ongoing and we will update this post as the prototype develops.

Are you a healthcare professional needing a COVID-19 related equipment solution? Please reach out to us at info@re3d.org to begin coordination. Should you wish to purchase any of our COVID-19 designs. They’re available in our online store: https://shop.re3d.org/collections/covid-19

Interested in supporting existing efforts to fight COVID-19? See below for how to help in Austin, Houston and Puerto Rico.

There is a huge maker community that has sprung to action to support the 3D printing of PPE here in Austin and the surrounding areas.  One of the largest efforts is being run by Masks for Docs (masksfordocs.com), who are actively soliciting donated face shield prints, assembling the shield, and distributing them to hospitals, health clinics, nursing homes, etc – all around the Austin area.  To help with this effort, re:3D will be collecting donated 3D printed face shields in drop-boxes at two locations, Brew & Brew and the Draught House Pub.
 
If you have a 3D printer at home or work & want to help out in the Austin area, you can access the Face Shield Design here.
 
Recommended Print Settings:
  • PETG is preferred, but PLA is completely acceptable if you don’t have PETG or are not able to print with it.
  • 3-4 solid top/bottom layers
  • .3mm layer height
  • 5 Perimeters (AKA Shells or walls)
  • 0% Infill
 
Drop off boxes can be found at:
 
Brew & Brew
500 San Marcos St #105, Austin, TX 78702
 
The Draught House
4112 Medical Pkwy, Austin, TX 78756
TXRX and the amazing maker-community continue to organize face shield collection around Houston.  We are donating 3D printed face shields as well as hosting a community donation box for makers in the Clear Lake area who are printing the face shields at home.  At our factory, the batches are consolidated and sent to TXRX for assembly and distribution to hospitals and first responders in the Houston area.  To date, over 1600 face shields have been donated from the Clear Lake area –  keep it up!
More information and the design file is available here.
 
The Clear Lake drop off box can be found at:
re:3D, Inc.
1100 Hercules
STE 220
Houston, TX 77058
The maker community, including a few Gigabots have done a fantastic job collaborating in San Juan & beyond. We are currently collecting requests for those in need of PPE and sharing opportunities to connect with Engine-4 and Trede’s efforts in Bayamon and additional efforts. If you live in Mayaguez and would like create face shields to be assembled with sheets that have been donated to Engine-4, a drop off box has been established. A UPRM student has also initiated a Slack channel to share other needs. Email info@re3d.org for access.
 
The Mayaguez drop off box can be found at:

Maker Chris’ house at:
76 Calle Santiago R Palmer E, Mayaguez PR 00680


If you live outside of these areas and/or are seeking ways to contribute, A Form to Volunteer is Available Here. We will be responding to inquiries this weekend and doing our best to facilitate introductions:)

Charlotte craff

Blog Post Author

COVID-19 Update: Operations, Serving Educators & Joining the Fight

3D printed mannequin using a 3D printed face shield

2022 Update

Dear Gigabot Family,

re:3D still has about 200 face shields available for free anyone who needs them to keep your team safe. please fill out the form at https://houston.impacthub.net/getppe/

re:3D has returned to normal operations and are excited to be welcoming back groups of visitors to the Houston factory for tours and classes along with continuing our virtual tours. We are pushing forward on many of our R&D projects that began during the pandemic, and are building bigger with Gigalab, a shipping container sized manufacturing lab. We’re printing with even more trash plastic on Gigabot X and are hard at work on developing the next version of Gigabot, the Gigabot 4. Please reach out to us at either 512-730-0033 or info@re3d.org. We’re always happy to hear from you.

~ Team re:3D

2021 Update

To our Customers and Friends,

Since the latter half of 2020, re:3D has continued to support 3D printed PPE efforts in our local communities and beyond.

With a generous grant from Unreasonable Impact with Barclays, our program PPE for the People has expanded to provide PPE to those in need anywhere. Should you or a group you know have a need for face shields, ear savers, door pulls or splash guards, please fill out the request form at https://houston.impacthub.net/getppe/

We are heartened that vaccine distribution  continues to ramp up and look forward to when we will be able to re-open our Houston Factory to in-person guests. Until then, we’ll keep making printers and PPE to protect those who can’t get it elsewhere, and you are always welcome to sign up for a virtual tour by visiting https://re3d.org/community/

Happy Printing!

~the re:3D Team

Update May 29, 2020

It’s been a month since our last update, and our COVID-19 response is still going strong! On May 12, we were honored to receive an honorable mention in the America Makes Fit to Face – Mask Design Challenge.  Designer Mike Battaglia and Engineer Samantha Reeve submitted a mask in two sizes designed to be printed with NinjaTek Cheetah. We continue to collaborate with projects for supplying PPE and consulting on new solutions for face shields to ventilators because we understand that effective face protections is essential for keeping our employees and the general public happy and healthy.

Our Houston factory is still closed to the public, but our team remains committed to building your Gigabots and filling your supply orders and service needs.

Gigabot customers around the world are tirelessly supporting their communities and we are honored to share their stories. If you have been doing COVID-19 work, we’d love to hear from you!

AUSTIN UPDATE
Thanks to the efforts of so many groups in the city, the PPE needs for healthcare workers there have been met and we have wound down our collection boxes for 3D printed PPE.

HOUSTON UPDATE
As the city begins to open back up we have teamed up with Impact Hub Houston on PPE for the People, an effort to provide PPE to workers in minority and under-served communities who are at greater risk of critical illness from COVID-19. Please support this project by sharing, donating and letting local businesses know about the opportunity.

PUERTO RICO UPDATE
The PPE support work in Puerto Rico continues and the Gigabot collaboration at Engine-4 keeps churning out supplies for the island.

If you’d like to be connected to any local effort we would be happy to make introductions and provide resources. Please reach out to us at info@re3d.org.

Update: April 25, 2020

It’s hard to believe that two more weeks have past since our last post! We continue to aggregate and collect your PPE donations in Austin, Houston and PR. We also (just met the deadline for the America Makes Mask Fit Challenge). The final design will be posted to our NIH 3D print exchange tomorrow:)

We continue to be inspired by YOU, and welcome your pics and videos for future stories!

For those of you looking to help with PPE shortages near Austin, Houston and Puerto Rico, details can be found below:

AUSTIN
There is a huge maker community that has sprung to action to support the 3D printing of PPE here in Austin and the surrounding areas.  One of the largest efforts is being run by Masks for Docs, who are actively soliciting donated face shield prints, assembling the shield, and distributing them to hospitals, health clinics, nursing homes, etc – all around the Austin area.  To help with this effort, re:3D will be collecting donated 3D printed face shields in drop-boxes at two locations, Brew & Brew, Capital Factory and the Draught House Pub.
 
If you have a 3D printer at home or work & want to help out in the Austin area, you can access the Face Shield Design here. Recommended Print Settings:
  • PETG is preferred, but PLA is completely acceptable if you don’t have PETG or are not able to print with it.
  • 3-4 solid top/bottom layers
  • .3mm layer height
  • 5 Perimeters (AKA Shells or walls)
  • 0% Infill
 

Drop off boxes can be found at:
Brew & Brew
500 San Marcos St #105, Austin, TX 78702
The Draught House
4112 Medical Pkwy, Austin, TX 78756
Capital Factory
 701 Brazos St, Austin, TX 78701
(located in the parking garage, next to the loading dock:)
 
HOUSTON
TXRX is winding down its collection of its 3d printed face shield as they have been able to move to injection molding; a move we fully support! We are keeping our drop box open for community PPE donations and will make sure they get donated to those in need. Currently we can accept: assembled face shields, ear savers and Montana Masks. As we get more requests we will post opportunities here.

The Clear Lake drop off box can be found at:
re:3D Inc
1100 Hercules STE 220 Houston TX 77058
 
PUERTO RICO
The maker community, including a few Gigabots, have done a fantastic job collaborating in San Juan & beyond. We are currently collecting requests for those in need of PPE and sharing opportunties to connect with Engine-4 and Trede’s efforts in Bayamon, or other groups mobilizing. If you live in Mayaguez and would like create face shield to be assembled with sheets that have been donated to Engine-4, a drop off box has been established. A UPRM student has also initiated a Slack channel to share other needs. Email info@re3d.org for access.
 
 
San Juan face shield coordination:
Engine 4 Co-working Space: donation3dprinting@outlook.com
 
Mayaguez Drop-off: 
UPRM Transit and Security, Tránsito y Vigilancia:
Enter UPRM Campus through main gate, and guard will direct you

Update: April 10, 2020

What a week! You all have done an amazing job helping our neighbors & the community at large!

While we continue to iterate this face shield design for the Texas Children’s Hospital (you can view the design on the NIH 3D Print Exchange), as well as hands-free door pulls, we have been blown away by the many Gigabots around the world who are helping with the fight. We’ve started collecting some stories. If you would like to be added, please feel free to share your pictures, details and video with info@re3d.org!


Some of you have also asked how you can use Gigabot and/or other printers to support the local movements near our offices. For those of you looking to help with PPE shortages near Austin, Houston and Puerto Rico, details can be found below:

AUSTIN
There is a huge maker community that has sprung to action to support the 3D printing of PPE here in Austin and the surrounding areas.  One of the largest efforts is being run by Masks for Docs (masksfordocs.com), who are actively soliciting donated face shield prints, assembling the shield, and distributing them to hospitals, health clinics, nursing homes, etc – all around the Austin area.  To help with this effort, re:3D will be collecting donated 3D printed face shields in drop-boxes at two locations, Brew & Brew and the Draught House Pub.
 
If you have a 3D printer at home or work & want to help out in the Austin area, you can access the Face Shield Design here. Recommended Print Settings:
  • PETG is preferred, but PLA is completely acceptable if you don’t have PETG or are not able to print with it.
  • 3-4 solid top/bottom layers
  • .3mm layer height
  • 5 Perimeters (AKA Shells or walls)
  • 0% Infill
 

Drop off boxes can be found at:
Brew & Brew
500 San Marcos St #105, Austin, TX 78702
The Draught House
4112 Medical Pkwy, Austin, TX 78756


HOUSTON
TXRX and the amazing maker-community continue to organize face shield collection around Houston.  We are donating 3D printed face shields as well as hosting a community donation box for makers in the Clear Lake area who are printing the face shields at home.  At our factory, the batches are consolidated and sent to TXRX for assembly and distribution to hospitals and first responders in the Houston area.  We’ve received up to 300 donations in 6 hours- keep it up!
More information and the design file is available here.
 

The Clear Lake drop off box can be found at:
re:3D Inc
1100 Hercules STE 220 Houston TX 77058


PUERTO RICO
The maker community, including a few Gigabots, have done a fantastic job collaborating in San Juan & beyond. We are currently collecting requests for those in need of PPE and sharing opportunties to connect with Engine-4 and Trede’s efforts in Bayamon, or other groups mobilizing. If you live in Mayaguez and would like create face shield to be assembled with sheets that have been donated to Engine-4, a drop off box has been established. A UPRM student has also initiated a Slack channel to share other needs. Email info@re3d.org for access.
 
 
San Juan face shield coordination:
Engine 4 Co-working Space: donation3dprinting@outlook.com
 
Mayaguez Drop-off: 
UPRM Transit and Security, Tránsito y Vigilancia:
Enter UPRM Campus through main gate, and guard will direct you


If you live outside of these areas and/or are seeking ways to contribute:

A Form to Volunteer is Available Here. We will be responding to inquiries this weekend and doing our best to facilitate introductions:)

Update: April 3, 2020

re:3D is working on a number of different projects related to 3D printing and COVID response.  Our Houston factory is helping to support two efforts.  The first is supporting the efforts of TXRX and the amazing maker-community organizing taking place around Houston.  re:3D is donating 3D printed face shields as well as hosting a community donation box for makers in the Clear Lake area who are printing the face shields at home.  At our factory, the batches are consolidated and sent to TXRX for assembly and distribution to hospitals and first responders in the Houston area.  Second, the re:3D design team is prototyping a custom face shield design, in conjunction with doctors from Texas Children’s Hospital.  The new design incorporates a pre-cut clear plastic face shield with a 3D printed holder/headband.

In Austin, re:3D is rallying the local maker community.  While there are a number of people working on the 3D printed PPE issue in the Austin area, re:3D is hoping to help organize these efforts.  The Austin team is designing hands-free door pulls and intubation boxes, and we will be releasing all of the 3D printable open-source designs that we have created, including face shields, door pulls and anything else we develop, free of charge. We are opening Austin community drop boxes at multiple locations where anyone who 3D prints can donate their COVID-19 parts. location information will be released as soon as it’s finalized.

In Puerto Rico, re:3D is supporting efforts led by Engine-4 on 3d printing face masks and ventilator splitters. Thanks to efforts by Parallel18, our Gigabot has been relocated to Engine-4 to print for this effort and we are hosting weekly calls for healthcare professionals, designers and makers to organize the community to support creating PPE unique to the needs on the island. We are connecting with every available Gigabot owner on the island to help them join the cause.

For anyone who wants to volunteer to help, please fill out this form.

Updated: March 25, 2020

To our Global Gigabot Family and Supporters,

We hope this message finds you and your loved ones safe and healthy. The 3D printing community is a talented, diverse and compassionate arm of the creative tech ecosystem. We are energized and inspired by the mass mobilization of 3D printing to tackle COVID-19 head-on by providing protective gear to medical personnel, medical equipment to aid victims and filling gaps in supply chains. Every day, you are proving that this technology changes the world for the better. Keep at it!

re:3D IS OPEN FOR BUSINESS!

We have been closely following COVID-19 developments in our areas and listening to the recommendations from local and federal authorities. The small yet mighty re:3D team has always been mobile and adaptable, and we are continuing our regular operations while keeping the health and safety of our team at the forefront of all considerations. Here’s how:

    • Your Gigabots® are being built and shipped on their regular schedule.
    • Your supply orders are being fulfilled with minimal delay.
    • Your 3D printing, design and 3D scanning services are moving forward as planned.
    • As an essential business, the Houston factory is open and fully operational. In-person visits are restricted to deliveries and pickups only to respect guidance on social distancing.
    • Meetups, walk-in tours and in-person classes are suspended until further notice.
    • Classes will move to online-only as format and demand allows.

$100 SERVICE CREDITS FOR EDUCATORSThe education landscape has dramatically changed in the last few weeks and as many educators gamely adapt to new methods of teaching, you have awed us with your adaptability, tenacity, and positivity. In recognition of your herculean efforts, now through April 10th we are offering to educators a $100 credit, with no minimum purchase required, for re:3D printing, designing and scanning services.

For all those schooling from home, we are extending a 20% off discount on all services (scanning, design, printing, materials testing) for any effort supporting distance learning.

Service quotes can be requested at re3d.org/services

HELPING THE EFFORT TO FIGHT COVID-19

re:3D’s Houston factory is equipped with a printer farm of large-format industrial Gigabot® 3D FFF and FGF printers, a metrology-grade 3D scanner, a full machine shop that includes two CNCs, manual lathe, drill press and cutting tools. This equipment and our team of 25 engineers, designers and technicians is available to fabricate equipment for healthcare providers that has been reviewed for viability and safety by medical professionals. Please reach out to us at info@re3d.org to begin coordination. We are happy to prototype any life-savings device for free in order to expedite review by medical professionals.

For those looking for ways to put your 3D printing know-how to work in the effort to fight COVID-19, we are collecting contact information to share further developments and opportunities to 3D print for those in need.

 A Form to Volunteer is Available Here 

Additionally, a great list of other projects has been curated by our friends at the non-profit Women In 3D Printing.

Stay Healthy and Keep Printing!

  ~Gigabot & The re:3D Team

High-Voltage Innovation: Creating Tools and Training Models with a Utility Company

Here’s a question: when was the last time you thought about what happens when you flip on a light switch?

We take for granted this everyday miracle without much thought to what goes on behind the scenes to make the lights turn on. Only once the power goes out do people suddenly take notice of this invisible luxury that our daily lives rely on. Lighting our homes, charging our devices, refrigerating our food, powering hospitals and public transportation and the nation’s economy – life as we know it hinges on the seamless, invisible flow of electrons we call electricity.

But, perhaps, everyone once in a while, you have taken note – maybe while driving on the highway past towering transmission lines stretching as far as the eye can see – of the massive system around us that goes mostly unnoticed on a daily basis, and how little you know about how that system functions.

Today’s story may change that for you.

The electrical grid in this country is over a century old. The first commercial central power plant in the US – Pearl Street Station in Manhattan – opened in 1882 and served 82 customers.¹ Today, the US electrical grid is made up of over 7,300 power plants and 160,000 miles of high-voltage power lines, serving over 145 million customers.²

The focus of our story today is one of the largest of the roughly 3,000 utility companies keeping the lights on in the US. (Due to company policy they cannot disclose their name in external-company features and thus will remain nameless in this article).

Making safety a priority with hands-on training

Jim Patchen is a high voltage work methods specialist for said utility company. His job is to develop procedures on how to work safely around high voltage. His office is a veritable mini-museum of utility relics from a bygone era.

As equipment from the field has been retired over the years, he’s rescued treasures from a certain fate as scrap metal. Artifacts like ammeters, voltmeters, control switches, and molten and re-hardened piles of metal from errant tool mishaps start at the floor and line shelves up to the ceiling.

As for his collector’s habit, Patchen explains his motivation behind this essential preservation of history. “It is important to understand the legacy of this industry,” he says. “Early on, work methods and tools were quite primitive, but over time they have evolved. It’s good to know where you came from so that you know where you’re going.”

The job of every utility company is to generate electricity and transport it to customers. This is, of course, a highly simplified explanation, but the general flow is as such: electricity is created at a generator – taking the form of power plants, hydroelectric dams, solar panel arrays, or wind turbines – transported along transmission lines, and distributed to communities for end use.

Along the way are substations – the large, somewhat hectic-looking clusters of wires and electrical equipment you may notice while driving on the highway – which transform the electricity into high voltage for fast transport along transmission lines and into lower voltage for its final use in homes and businesses. Far from the chaos that they can appear to be to the untrained eye, substations are meticulously-organized, well-oiled machines that are crucial components of the electrical grid. And while designed for maximum safety of workers, they are also extremely high-voltage environments, which inherently pose a unique set of dangers to those in the vicinity.

“Working in a substation is difficult,” explains Patchen, “because it’s many, many circuits coming into one small location, so the high voltage environment is really concentrated. We have to work really [safely] around that to prevent injuries and incidents that could affect the grid.”

This particular utility company has over 1,000 substations in its service territory. As a work methods specialist, Patchen’s current role revolves around creating procedures to ensure the safety of workers in addition to the integrity of the grid and the power they’re providing to consumers. “If you make a mistake in a substation, you can impact thousands of customers,” he explains. “If I drop a screwdriver in a substation, I can take out 90,000 customers. So, everything we do is critical.”

Workers at the company go through a roughly three-year apprenticeship of rigorous training on how to work safely in such an environment. “Traditional training involves PowerPoints and lecturing,” explains Patchen. Unfortunately, he continues, the retention rate of knowledge taught in these sorts of settings tends to be abysmal. Their goal is to incorporate more tactile learning to keep students engaged throughout lessons.

There is always hands-on training out in the field for all students in the apprenticeship program, but the company wanted the ability to bring this type of learning into classrooms on a daily basis. They saw the value of using scale models of real-world equipment on which students could practice skills like protective grounding in a safe, unenergized environment. The models give students the opportunity to test their proficiency, and teachers the ability to confirm that their lessons are getting through and sticking. “They’re able to practice and prove their understanding of what they’re being taught,” explains Patchen, “and then you’re able to validate knowledge that way.”

Patchen began by building these training models by hand. He estimates that he created his first substation model in 1999, using components that he found at the hardware store. Cardboard tubes and spark plugs come together to form a miniature substation on which students can practice, with no danger of a deadly misstep.

When Patchen caught wind of the powers of 3D printing, its potential to be applied to his work was immediately apparent. “When 3D printing came into the picture, we thought, ‘Oh man, we could really make these models much more realistic.’” He also saw the opportunity to start reproducing models for other locations at a pace that just wasn’t feasible when he was building each one by hand.

“If I was gonna buy a printer, I wanted one with a big print platform,” Patchen recounts. Their size requirements are varied, he explains. Sometimes their prototyping needs are small-scale, but other times they want the ability to create large objects that would dwarf the average desktop printer. “We wanted…a single purchase that would best fit both those kinds of parameters,” he says.

He did his research and found re:3D. “The Gigabot was amazing because of its large platform and the ability to print small and large, no matter what our needs might be.” Patchen is now in the process of 3D modeling his original substation in CAD and printing out its 21st century cousin.

Patchen explains that the company recently invested in a state-of-the-art training facility, where he sees abundant opportunities to use their Gigabot for educational purposes. “Our goal as a utility is to be a leader in our industry,” he says. “In order for us to do that, we have to lead in safety, innovation, and technology. We believe that 3D printing is gonna help us get there.” 

Tool creation from then to now

One challenge of the work is that, between different eras of design and the wide range of equipment manufacturers, a single type of equipment may have several different designs out in the field.

Because of this, there is not necessarily a one-size-fits-all tool for every job and every company. This can leave utilities to do their own tool creation when needed, to make the job safer and more efficient for workers and keep power flowing to their customers. Oftentimes, workers see areas for improvement, opportunities for a new tool that doesn’t exist that would make their jobs easier.

“When I first hired on, I was a high-voltage substation electrician. I worked in the field for many years,” explains Patchen. “If you had an idea for a tool that you wanted to create, you would have to draw it on a piece of paper or a napkin and bring it down to a local machine shop, and then they would do their best to build it.” That process, Patchen recounts, could take weeks to months – and that was just to get an initial prototype.

Anyone who’s been through the development of a product knows that the back and forth of the process – when not done in-house – can be quite costly in both time and capital. The first iteration comes back – often after a lengthy lead time – and design flaws become apparent. Revisions are made and submitted, and the process is repeated. More waiting, more money.

“Today with 3D printing, you can take your ideas and concepts and prove them out,” Patchen explains. “The average person can change the industry.”

3D printing cuts down on the tool design process in both the time and cost departments. A design can be printed and reworked on repeat until all the kinks are ironed out. “Then,” Patchen explains, “I could go spend the money at the mill or the machine shop, and it’s actually effective spending at that point.”

It goes without saying that this also slashes a massive amount of time from the process. They can internally turn around dozens of 3D printed iterations and settle on a final design in less time than a machine shop could get a first version back to them. “It’s a very cost-efficient way to change the industry using the field employees’ input.”

The challenges of tool development

Nowadays, Patchen’s tool creation process typically involves a manufacturer, so that when a design is finalized it can be mass-produced and made available on the market to any utility company who may also have a need for it.

There are several challenges that Patchen is confronted with when he’s approached with a tool idea from a field employee.

The first is the broad range of equipment designs that they’re making these tools to service. “In these substations, there’s stuff that was built in 1920, there’s stuff that was built last month,” he explains. This means that the same device with the same function can take different forms depending on what era it’s from. “When we have to build something, we want to make it fit all of those,” he says. “We want to be able to make one product, one time, and do it right.”

The second challenge is their partner in tool creation: the manufacturers. Patchen starts the process by approaching a manufacturer with a tool concept, they come back with an initial design, and the utility workers trial it out in the field. This, Patchen explains, can be tricky with manufacturers who aren’t in their line of work. “A lot of times, when the manufacturer’s trying to understand what your needs are, they’re not in the field, they don’t work in your environment,” he says. “They make tools, [but] they don’t understand how you’re using them.”

This can result in tools that are inconvenient or awkward to use and therefore difficult to actually put into practice, defeating the purpose of creating them in the first place.

With 3D printing, Patchen found a solution to this flaw in their design process. “When you get an end-user involved in creating prototypes, you’re really closing the gap on the amount of time and the cost it takes to create useful tools.”

Now, he and his team handle the early stages of the process, modeling CAD files and printing initial prototypes in-house. By the time they approach a manufacturer with a tool concept, they have a 3D printed prototype that’s already been put through the ringer out in the field. This allows them to leapfrog several steps ahead in the production process. “3D printing has enabled us to improve our innovation when it comes to creating new tools or specialized tools across a very diverse line of equipment,” he explains. “We’re able to come up with concepts, print the prototypes, and trial them out in the field, so when we communicate back to our manufacturer, the data is more accurate.”

Rather than discovering a design flaw after something has been expensively injection-molded, Patchen and his team can work out the kinks on their end and ensure the design they send to a manufacturer is accurate from the get-go. All that’s left to do at that point is create the tooling to mass produce it. Says Patchen, “It saves [the manufacturer] money, it saves us money in the long run, and lots and lots of time.”

At the 2019 ICUEE conference in Louisville, Kentucky – the largest utility and construction trade show in North America – four tools Patchen and his team helped design were on display. It’s a big honor at such a lauded industry event, but his focus remains on safety and sharing innovation so that other utilities across the nation can benefit. “I’m not trying to make money,” says Patchen. “I’m just trying to make it better for the employees in the field.”

Sparking industry innovation through new tool creation

Where taking a tool from concept to a purchasable physical product used to be a months- to years-long process, Patchen explains that 3D printing has given them the ability to slash that development time down into the weeks. “That’s huge when it comes to our type of work where we’re in such a high-voltage, dangerous environment.”

Much of the challenge and danger of the job stems from the simple fact that a utility company’s singular focus is keeping the lights on.

When equipment needs maintenance, they do what they can to keep the power flowing. This means that workers are almost always working near energized, high-voltage equipment – hence the necessity of Patchen’s job. And although there is always an inherent level of risk to a job which necessitates working in close proximity to high voltage, Patchen’s aim is to protect workers through the development of new tools, training, and work methods.

“Technology is changing our industry,” says Patchen. “Every six months, there is something new.” The blistering pace of innovation lifts the industry as a whole, but the challenge, Patchen explains, is staying on the forefront of that.

“We don’t want to sit back and just watch that happen. We want to be a leader in that,” he explains. “3D printing gives us the ability to be part of that process – to lead innovation.”

One ubiquitous tool used in the field is a live line stick, commonly known in the business as a hot stick. The lengthy, fiberglass poles allow utility workers to perform a variety of tasks on energized equipment, insulating them from the electricity and keeping them at a distance from machinery in the case of a malfunction or electrical arcing. The end of the stick operates as a mount for a variety of different accessories that serve a wide range of purposes, like pulling fuse and operating switches. 

One hot stick variation that Patchen’s team uses is a switch lubricator. Workers were struggling to open sticky switches, often having to use a stick to forcibly hit at a switch five or six times. They remedied this with a hot stick that dispenses lubricant onto a switch so that it can be opened easily with one knock.

Part of the design is a control unit, mounted on the opposite end of the hot stick, with a button for the user to dispense the lubricant. The unit the manufacturer sent was large and clunky: a worker had to remove a hand from the stick in order to get to the button, sacrificing dexterity.

Patchen designed a new mount with a slim profile – probably a quarter of the size of the original unit – enabling the stick operator to keep both hands on the pole and simply move a thumb to hit the button. “We were able to use our 3D printer to create this new prototype that’s much more ergonomic and gives the end user more control when working in an energized, high-voltage environment.” Printed on their Gigabot and mounted to the pole with velcro straps, the new unit Patchen created is being adopted by the manufacturer as an option on new purchases.

Gigabot has opened a door for Patchen and his team, and the tool requests are streaming in.

There was the gas cap to attach a generator to an extended time fuel tank, out of stock when they desperately needed it during a widespread emergency and power outage. Patchen 3D printed it.

There was the camera mount hot stick used to inspect energized equipment that carried a price tag of nearly $500. Patchen printed it. Their 3D printed version of the mount attaches to other sticks they already have, at a grand total of $1.67 apiece.

The list goes on.

“We were recently approached by several field crews to create a special plastic cover that would protect them in high voltage environments,” Patchen says. There was no product on the market that fit the bill, so he got to work on a design with a manufacturer.

The equipment that needed to be covered took a wide range of forms in the field, complicating the product development process. Patchen gave the manufacturer drawings of the equipment and their product idea. Eight months later they still didn’t have a workable prototype.

Patchen stepped in. “I used my 3D printer, made a prototype, and got the product finished within three weeks. Now it’s actually purchasable on the market.”

But perhaps Patchen’s most impressive project of all is a small, unassuming plastic hook.

He and his team were confronted with a scenario in which they needed to perform maintenance on a 500 kV substation. “In our system, the highest voltage that we have – and one of our most critical circuits – is the 500 kV,” he explains. “To clear that equipment or take it out of service, we’d have to de-energize the whole grid, which can be quite costly – tens to hundreds of thousands of dollars.”

A teammate came to him with an idea to circumvent the clearance with the help of a specially-designed plastic barrier which would allow them to safely perform maintenance without shutting down the system.

The solution came in the form of a rectangular-shaped, high-voltage plastic cover, which would enclose each of the 13.8 kV circuits that connect to the main 500 kV bank. The covers would be mounted from below and secured in place with rubber rope and plastic hooks. The hooks that the manufacturer sent with the covers, however, posed a problem.

Maneuvering from the ground at the end of a 14 foot hot stick, a worker had to insert one end of the hook into the eyelet of the plastic cover in order to fasten it. Workers were finding the hook’s design difficult to navigate into place at such an angle.

Patchen took the feedback from the field employees, reworked the hook’s design, and printed out a new version on their Gigabot. The slight tweaks to the hook’s form were a game-changer. Where workers previously had to fight the old hook into the eyelet at an awkward angle, the new design naturally wants to snap into place.

“This small, plastic hook took about three hours to print, and it cost around five dollars.” Patchen can’t underscore its value enough. “We were able to take that [3D printed] hook and share it with other crews, and we avoided many, many 500 kV clearances because of it. This small, five dollar device saved us hundreds of thousands of dollars.”

He smiles and gestures towards their Gigabot. “That’s paid for the printer quite a few times.”

Morgan Hamel

Blog Post Author

Grand Opening of the NYU Tandon School of Engineering Veterans Future Lab

On Monday of this week I had the privilege of attending the Grand Opening of the NYU Tandon School of Engineering Veterans Future Lab in Brooklyn, New York.

A very special lineup of speakers graced the event, including New York State Lieutenant Governor Kathy Hochul, Dean of Engineering at NYU Katepalli Sreenivasan, New York State Assemblyman Joseph Lentol, Barclays Group Chief Executive Officer Jes Staley, and one of the the engineering school’s namesakes, business-leader and humanitarian Chandrika Tandon.

23472866_1149832045151934_7769888938055487519_n

Housed in Industry City on Brooklyn’s “Innovation Coastline,” the lab will be an early-stage startup incubator for United States military veterans.

More than a third of all returning military veterans have entrepreneurial ambitions, speakers at the event remarked, but just under 5% launch their own businesses, according to the Bureau of Labor Statistics. With some 18 million veterans in the country, that’s a lot of unrealized business ideas.

Lieutenant Governor Kathy Hochul told a story about a moment that left a profound impression on her on a visit she made to an American military base in Afghanistan. Sitting around a table with a group of soldiers, she asked them about their greatest fears. And in that tent in the barren, almost lunarscape-esque terrain of Afghanistan, in the heart of Taliban territory, the soldiers’ response stunned her. They were worried about finding a job when they returned home.

The Veterans Future Lab addresses exactly this fear.

The goal of the program is to provide business support and mentorship to a group of people who have given so much to serve their country, to enable them to be successful in this next mission in their lives.

23561282_1149832018485270_8390396753698082240_n

With their first round of 15 companies starting in January, the program will offer participants 12 months of incubation, mentorship with New York City industry professionals and NYU faculty, and free legal services, among many more benefits.

One of the other perks of the program is the makerspace.

The businesses will have access to a bona fide buffet of prototyping equipment, from laser jets to water jets, injection machines to sewing machines, and – you guessed it – a Gigabot (among a list of other 3D printers).

As a veteran-owned company ourselves, we couldn’t be more excited to have a Gigabot available to the participants.

23472783_1149832011818604_590758024054638426_n

Split between the NYU Tandon School of Engineering Makerspace in Downtown Brooklyn and the Veterans Future Lab offices in Industry City, any physical design and prototyping needs the entrepreneurs may have are covered from all angles.

A big deal for not only veterans but also the city and state of New York as a whole, the lab was made possible with the support of Barclays and the Empire State Development Corporation.

As Lieutenant Governor Hochul put it, “This is a very good day in the state of New York.”

23561282_1149832015151937_2176488689371169523_n

Morgan Hamel

Blog Post Author

Improving Your Manufacturing Equipment with Gigabot

Below is Gigamachinist Steve Johnson’s second blog on 3D printing for re:3D’s Gigabot fabrication shop.

Improving Your Manufacturing Equipment with Gigabot

by Steve Johnson

Sometimes, you have a product that works, but there is a way to improve it to make it work better.

A few months back, we added a 4th axis rotary table to our mill at re:3D. It has allowed us to begin to capitalize on the full milling envelope of our machine, allowing us to mill as much as 8 times more parts per program cycle, and reduced the need for multiple operations on some parts.

We quickly found a weak spot in our rotary table though. The table was designed without any seals to prevent shavings from entering the gearbox. As a result, we have had to disassemble the rotary table twice now in order to clean out aluminum shavings that had bound up in the worm gear. We decided this time, that we needed to find a solution for this issue, to keep our mill up and running longer between needed maintenance.

Once we had the rotary table apart, we found the area where the shaving were getting into the gearbox. There is a groove in the back of the table section, and a boss on the rotary body that rides inside the groove. But the fit between the two, once assembled, is very loose, and will allow anything smaller than .1 of an inch to pass through. Obviously we needed some type of o-ring, or gasket in order to seal this gap, without creating unwanted friction.

A few quick measurements, and Matthew headed to the computer to create a short profile on Solidworks, that would fill the gap. Using Ninja semi-flex filament from www.ninjatech.com, we made a first print of that profile on Gigabot, and took it to the shop to test fit. It was a little tight, so back to the computer to adjust a couple dimensions, and another short profile print. Once we had the right fit, we revolved the profile into a full circle on Solidworks, and 15 minutes later, we had a custom made flexible gasket that seals the rotary table from chips without creating drag on the axis motor.

gasket4

We found a problem. We imagined a solution. And with Gigabot, we made it a reality today.

gasket5

Now we are back up and running so that we can manufacture the parts for YOUR new Gigabot.

Happy Printing!

Steve Johnson

Blog Post Author

Made in America: Rapid Prototyping with “GiggleBot”

Below is a re-post of a blog women-owned small business Acoustics First wrote about their Gigabot experiences in Virginia. More information about Acoustics First is available on their website. We’re also honored to feature them on the stories tab of our website. The original post can be accessed here. 

As the summer of 2015 winds down, we here at Acoustics First thought we’d share our latest acquisition with our readers.

Meet the Gigabot™ (or as we call him “Gigglebot”).

This amazing large format 3D printer was developed by re:3D, an outstanding company whose principals come from varied backgrounds which include experience working at NASA, among other things.
The eight cubic foot build volume of this beast makes it ideal for the rapid development and prototyping of our industry leading sound diffusers! We look forward to using this wonderful device on many projects in the years to come.
Watch this short video we made during one of our trial runs. For this calibration test we chose to print a scaled down version of our patented Model D Art Diffusor®.

Who said manufacturing was boring?!?!

~Acoustics First

info@acousticsfirst.com

How to take your Gigabot Off-the-Grid

One of our values at re:3D is to provide 3D printing technologies to communities around the globe, many of whom don’t have the resources we take for granted.  Access to plastic feedstock, a consistent power infrastructure, and reliable shipping services have always been a requirement to play in the 3D printing space. We want to change that. One of the microsteps in this direction is to find other ways to power our 3D printer, the Gigabot, while still allowing multi-hour (and sometimes multi-day) prints to emerge from our 600mm X 600mm (2ft X 2 ft) build platform.

I started experimenting this past week using a 40W solar panel and a car battery, and had some success printing a small test print. I’ve gotten some questions since then and wanted to explain a little more about my setup, and also find out if there were any other (successful or not) attempts to take YOUR 3D printer off-the-grid.

MY SETUP

Our Gigabot takes 110V or 220V mains power, but then immediately feeds that to a 24V power supply to power the motors, hot end, sensors, USB comm port, and display. The only part that makes use of the mains power is the heated bed (the one that can fry an egg).  Since using PLA as an input material usually eliminates the need for a heated bed, I started there.

Disconnecting the power supply completely, I wired the 12V battery directly to our controller board and internal cooling fan. I later learned that this cooling fan was a great audible indicator of voltage levels – but more on that later.  12V is at the very low end of what our controller board can take in, but the real question was how long could it print for?

THE PHYSICS

I like to equate electricity to water coming out of a hose (like in this great tutorial from SparkFun), so to follow that analogy, I had to figure out if I could hold enough “water pressure” (voltage) to keep the controller alive, a large enough “holding tank” (car battery) to last for the entire print, while using solar panels to add enough “water” (power) to the system during the print.

After testing with a multimeter, I saw that the Gigabot draws about 5A at the most, and less than an Amp when idle (to keep the controller and comms alive), and on average about 3 or 4 Amps while printing (since the heating element cycles to maintain a constant temperature). Judging by the rating on my car battery of 70 Amp-hours, I could count on about 14 hours of power.

I should add that we often exchange Amps and Watts freely when comparing power levels. They are only interchangeable if the volts of the system remain constant (12V or 24V for Gigabot, 120V for USA Mains, etc.), since Power (Watts) = Current (Amps) * Voltage (Volts).

Or per the above analogy: Ability to Remove Mud From Car = Size of Hose * Water Pressure.

THE EXPERIENCE

The solar panel I bought from Fry’s was impressive, but at 40W I know it wouldn’t get to the levels I needed, and I could only afford to experiment with one. Plus, pausing a print when the sun goes behind a cloud just isn’t practical, since it would leave many marks of semi-melted plastic along the way, and the stepper motors would lose their homing location. I knew that the final solution would at least rely on some battery power.

We all know what happens when our car battery is suffering when you try to start it: the lights get dim, you turn off everything electrical, and pray that it turns over and you can get home that night. Instead of a gasoline powered motor and alternator to keep the battery alive, I had a solar panel – and it had to last the entire print. So I had some questions – and like any former space station flight controller, I took lots of data.

THE QUESTIONS

Would 12V be enough to power a system that we have been used to operating at 24V since the very early days? Would my Gigabot’s hotend pull down the stepper motors too far on battery power and affect the success of the print? Could I use all of the available power in the car battery to make a large enough object without any transient errors? Could I turn on and off the solar panel or battery charger during a print without interrupting it?

THE RESULTS

At first things looked (and sounded) gloomy. The first few attempts failed, and it seemed that the battery just didn’t have enough power to drive the hotend, motors, and electronics to keep the voltage levels high enough. Even the fan noise sounded sickly – a lot worse then when I had it set up without the multimeter.

firstpicoffthegrid

The multimeter! That was it!!

I had wired my multimeter in line with the positive line off the battery to read a super accurate space-rated amp-draw during the entire print. I had wanted to measure exactly how much was going in and out of the solar panel, and the battery. The measurement itself was actually resisting the flow of electricity (the equivalent of bending the water hose to hear if water is rushing past the fold in the line). Once I removed the multimeter and tracked only the voltage across the battery terminals, I was able to get over 13 hours of continuous printing time out of my Gigabot – enough to print this 300mm (12-inch) tall vase! Here are the (manually entered) data points for that one:

The solar panels are pretty straightforward, and work very similar to the battery charger I plug into the wall, so for the purposes of my experimentation in the garage, I’m alternating printing on battery power with a charger on/off, solar panel connected/disconnected, at varying voltage levels of the battery. I think I have found the limits, since my prints start failing at just about 11V on the battery now.

Also, ever since I automated my data taking process, I get much more sleep at once, without needing to wake up for data takes with pen and paper (and help from Google Sheets). Check out the new and improved version with a little help from plotly!

An interesting part of this method of gathering data is that you can start to see the cycling of the cartridge heater very clearly as the extra current draw pulls the battery voltage down each time the hotend is full-on. This will be useful in tweaking my PID values no doubt, and could also lead to better methods of insulating the hotend so it doesn’t need to heat up as much, thereby saving valuable amp-hours!

NEXT STEPS

Clearly there is a little more work to do before we have a brownout-proof or solar-ready Gigabot out of the box, but I think these experiments prove it’s within the realm of possibility to create 3D objects anywhere – given a robust enough printer, and a light bulb’s worth of energy and imagination.

Chris Gerty

Blog Post Author