
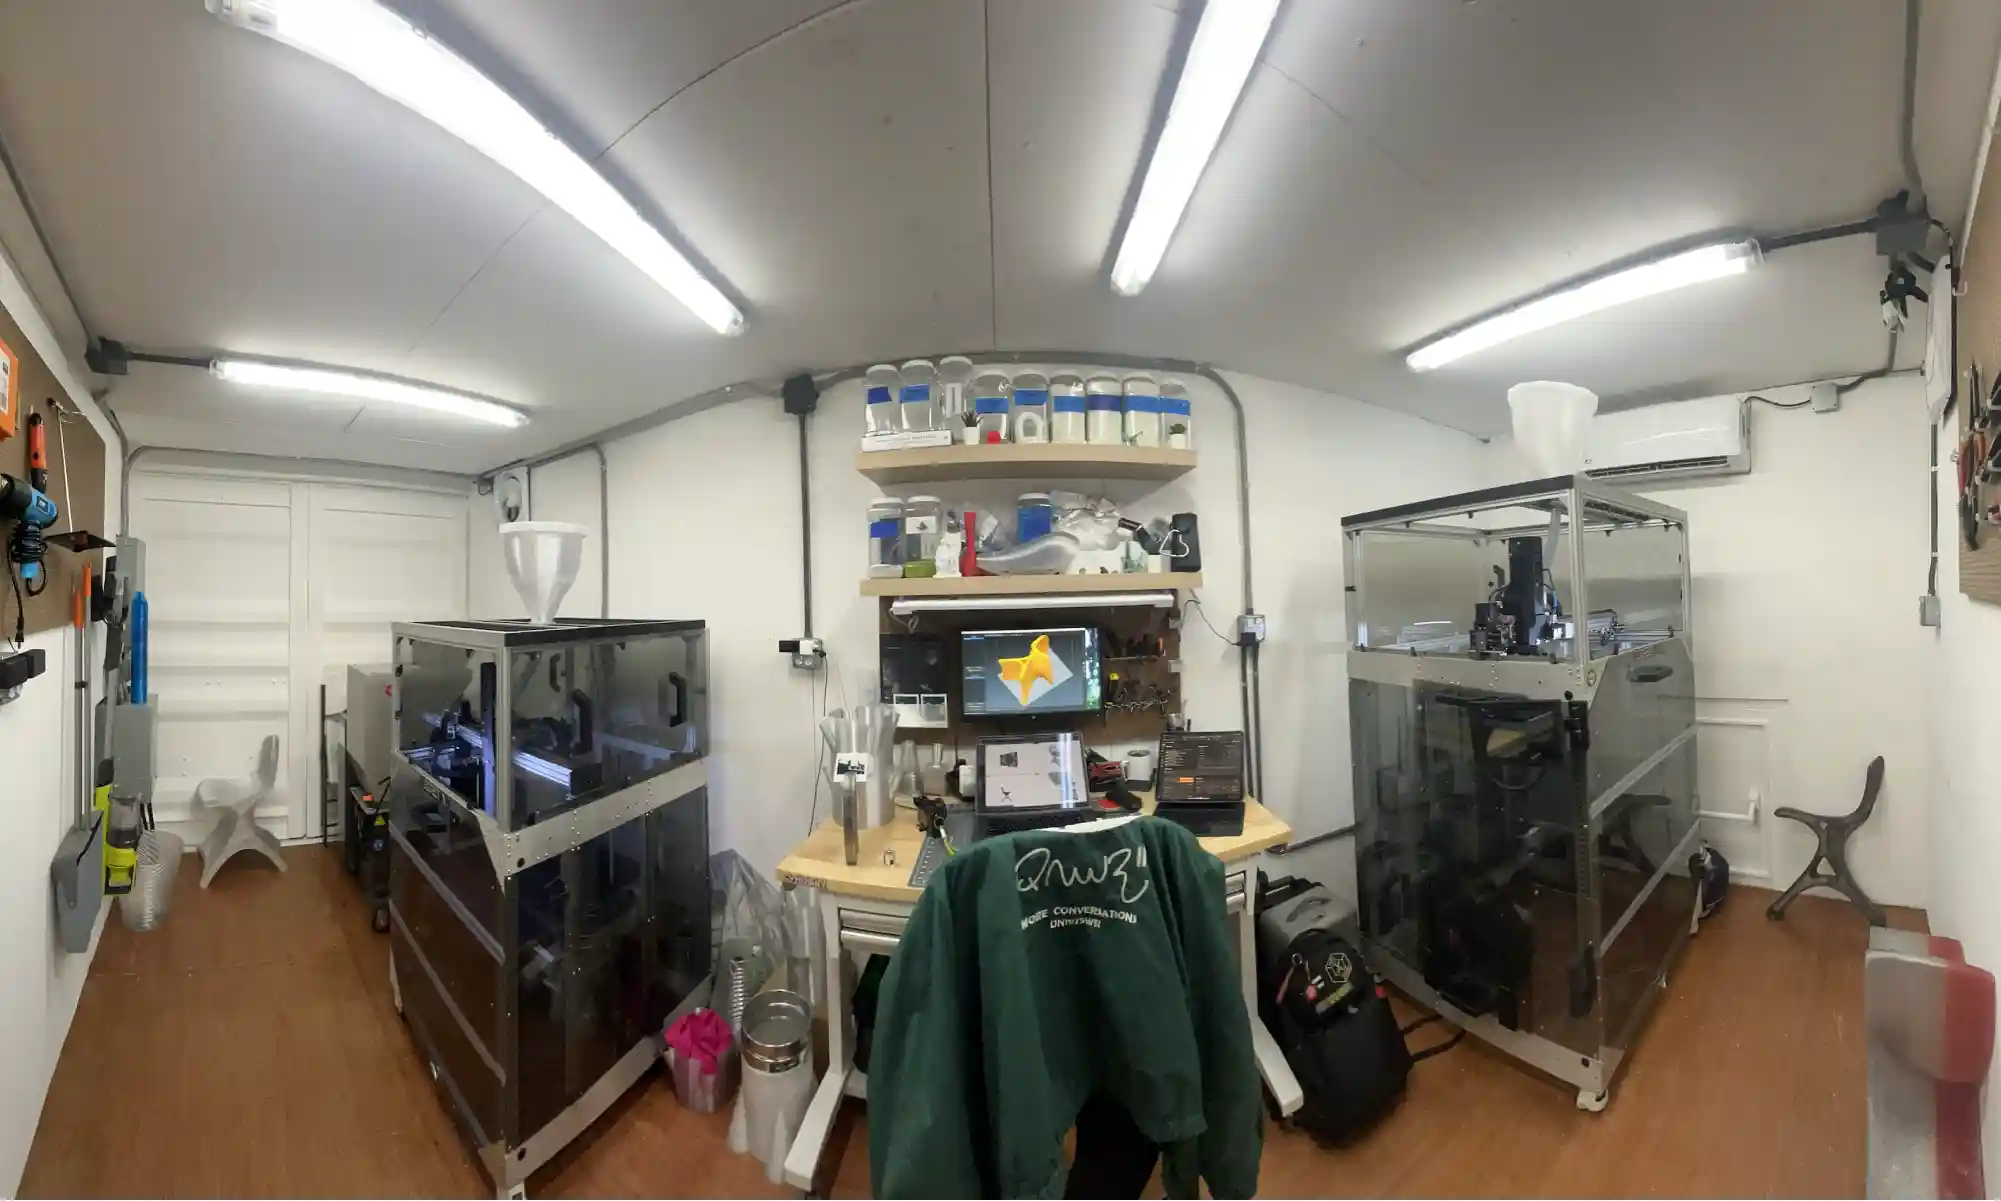

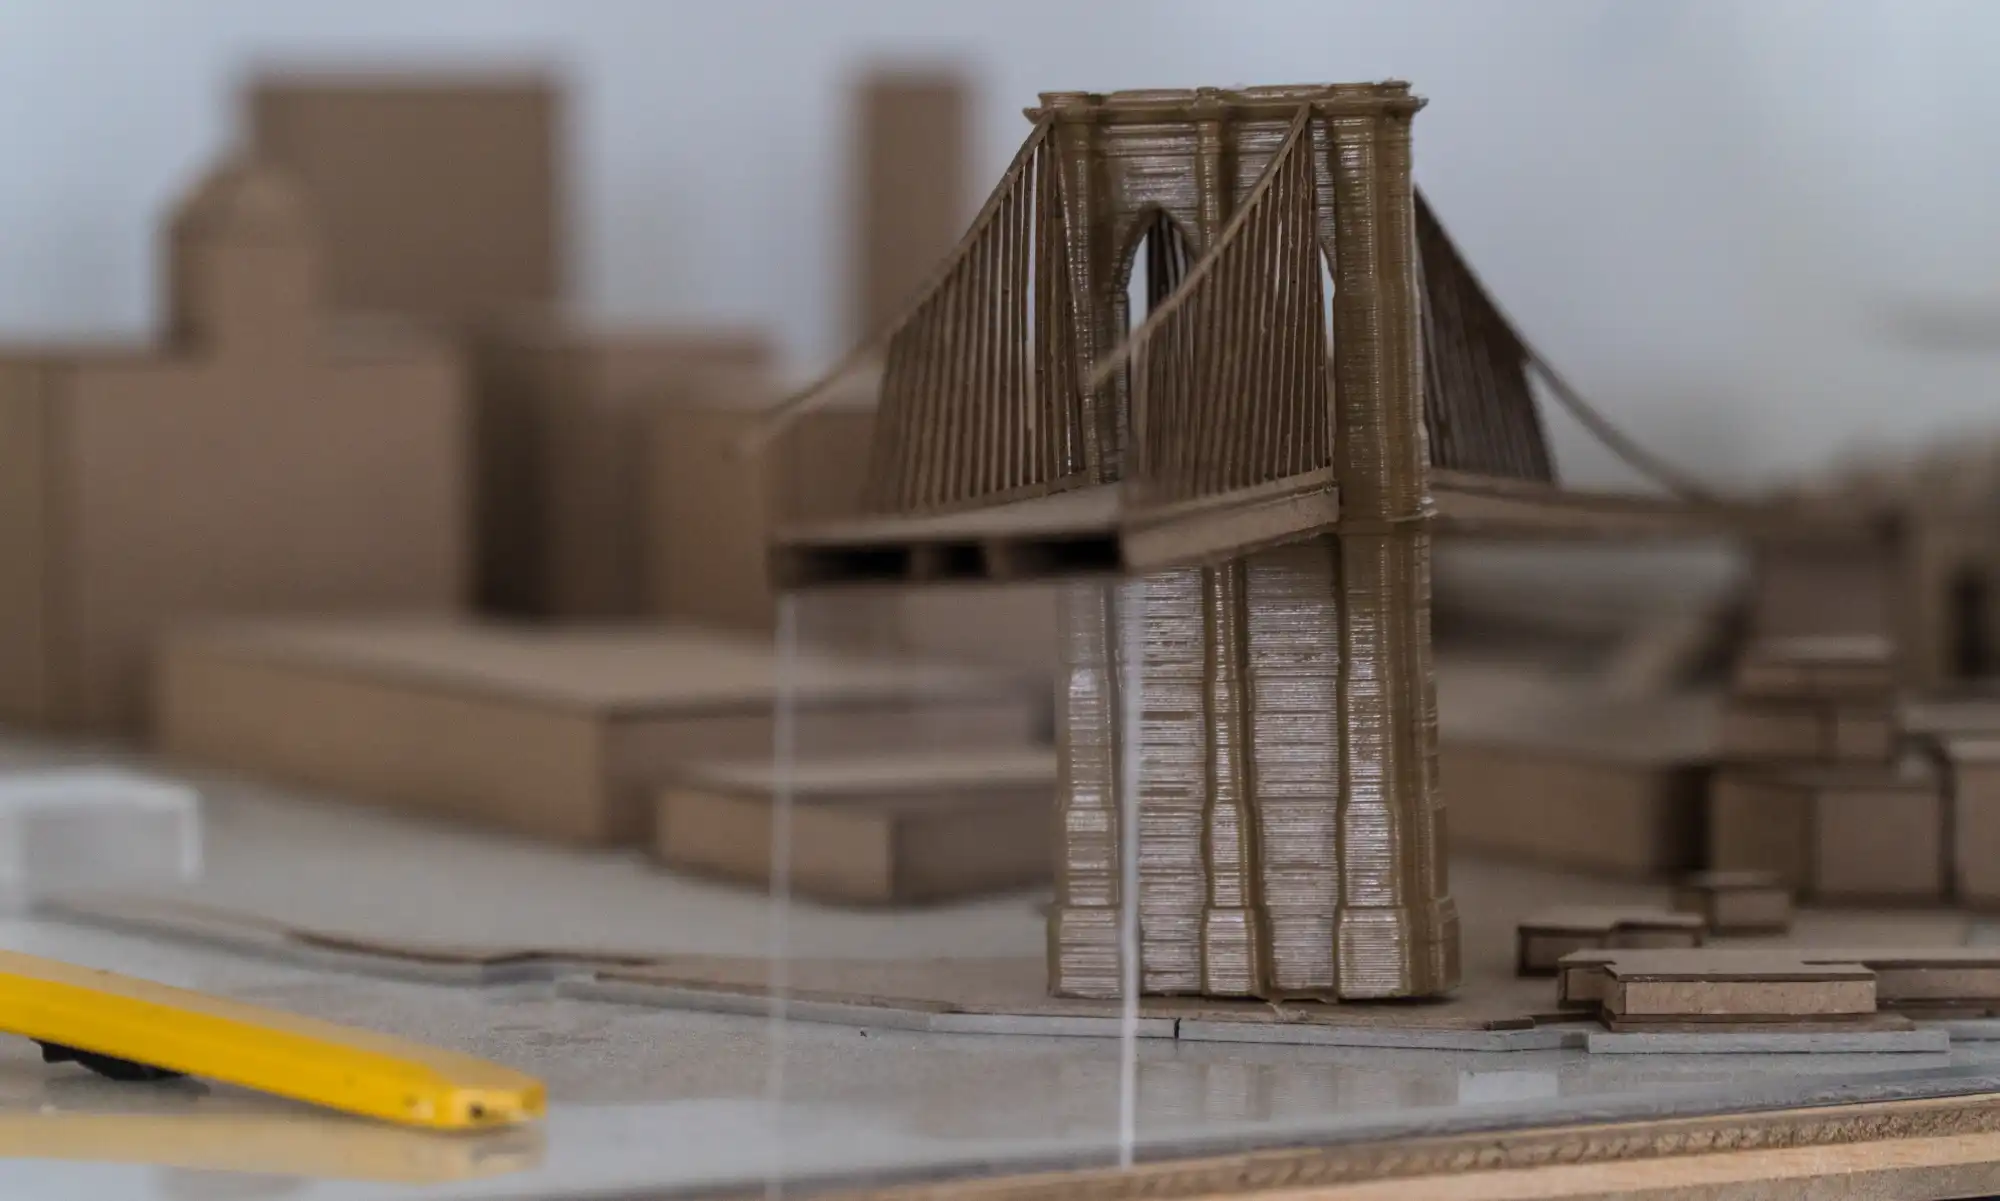
When we set up the Gigalab in Bayamón, Puerto Rico, alongside our neighbors and partners at Engine-4 Foundation, we weren’t just building a container lab. We were planting a seed, an idea that digital fabrication should be for everyone, and that creative tools should serve the people around us.
So we started small. One design, every Friday. Free. Useful. Sometimes funny. Sometimes experimental. Always open.
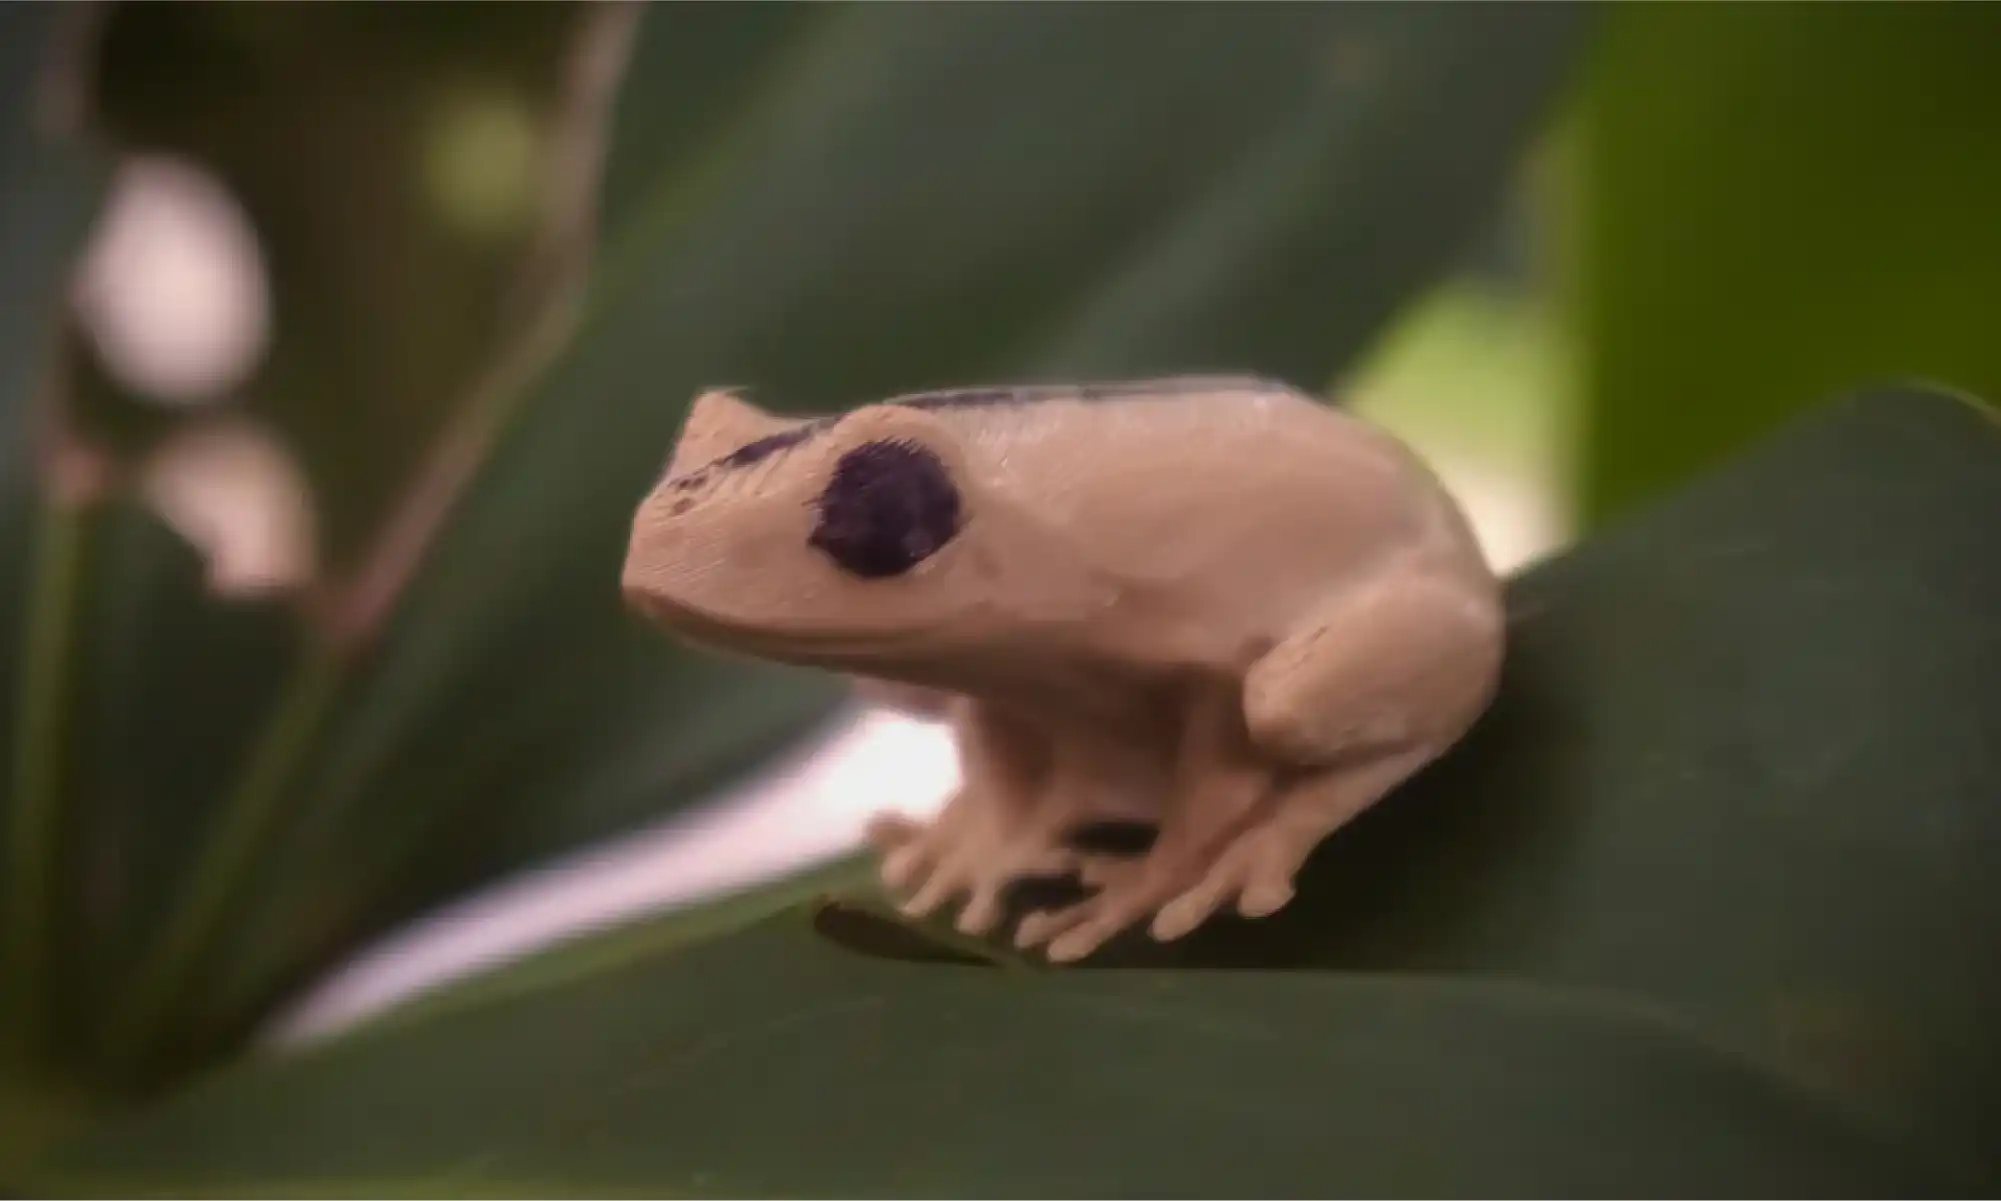
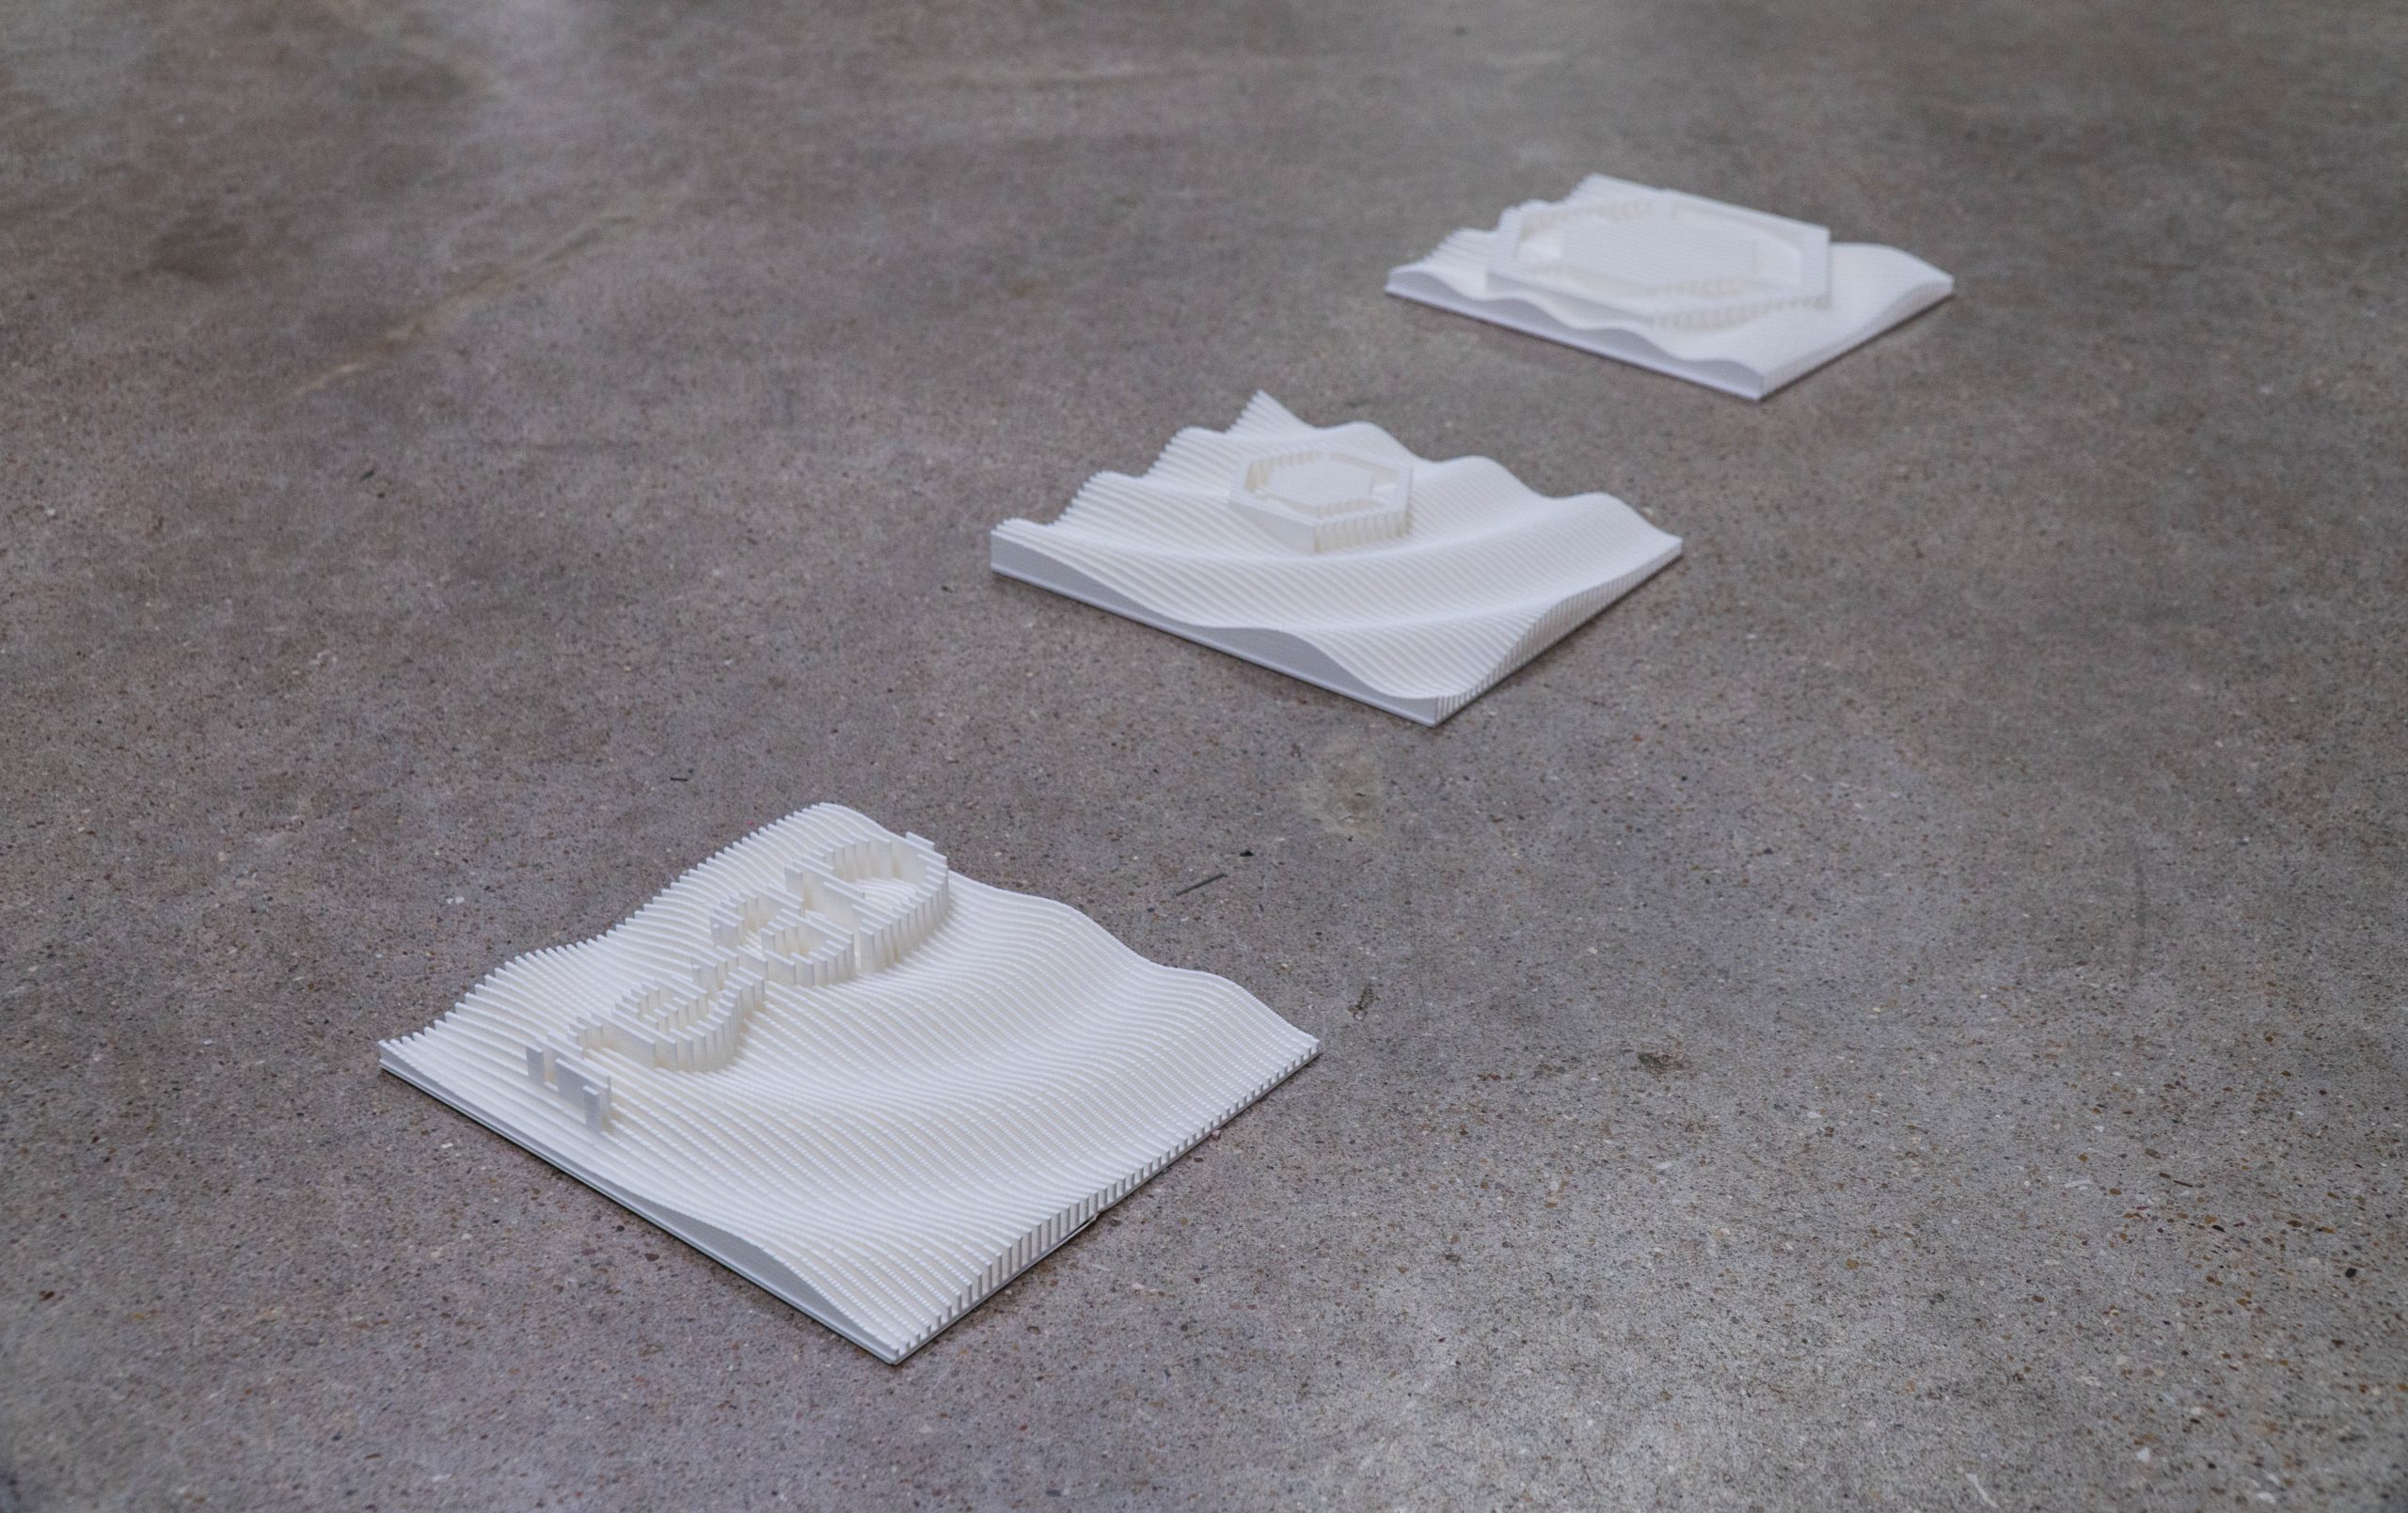
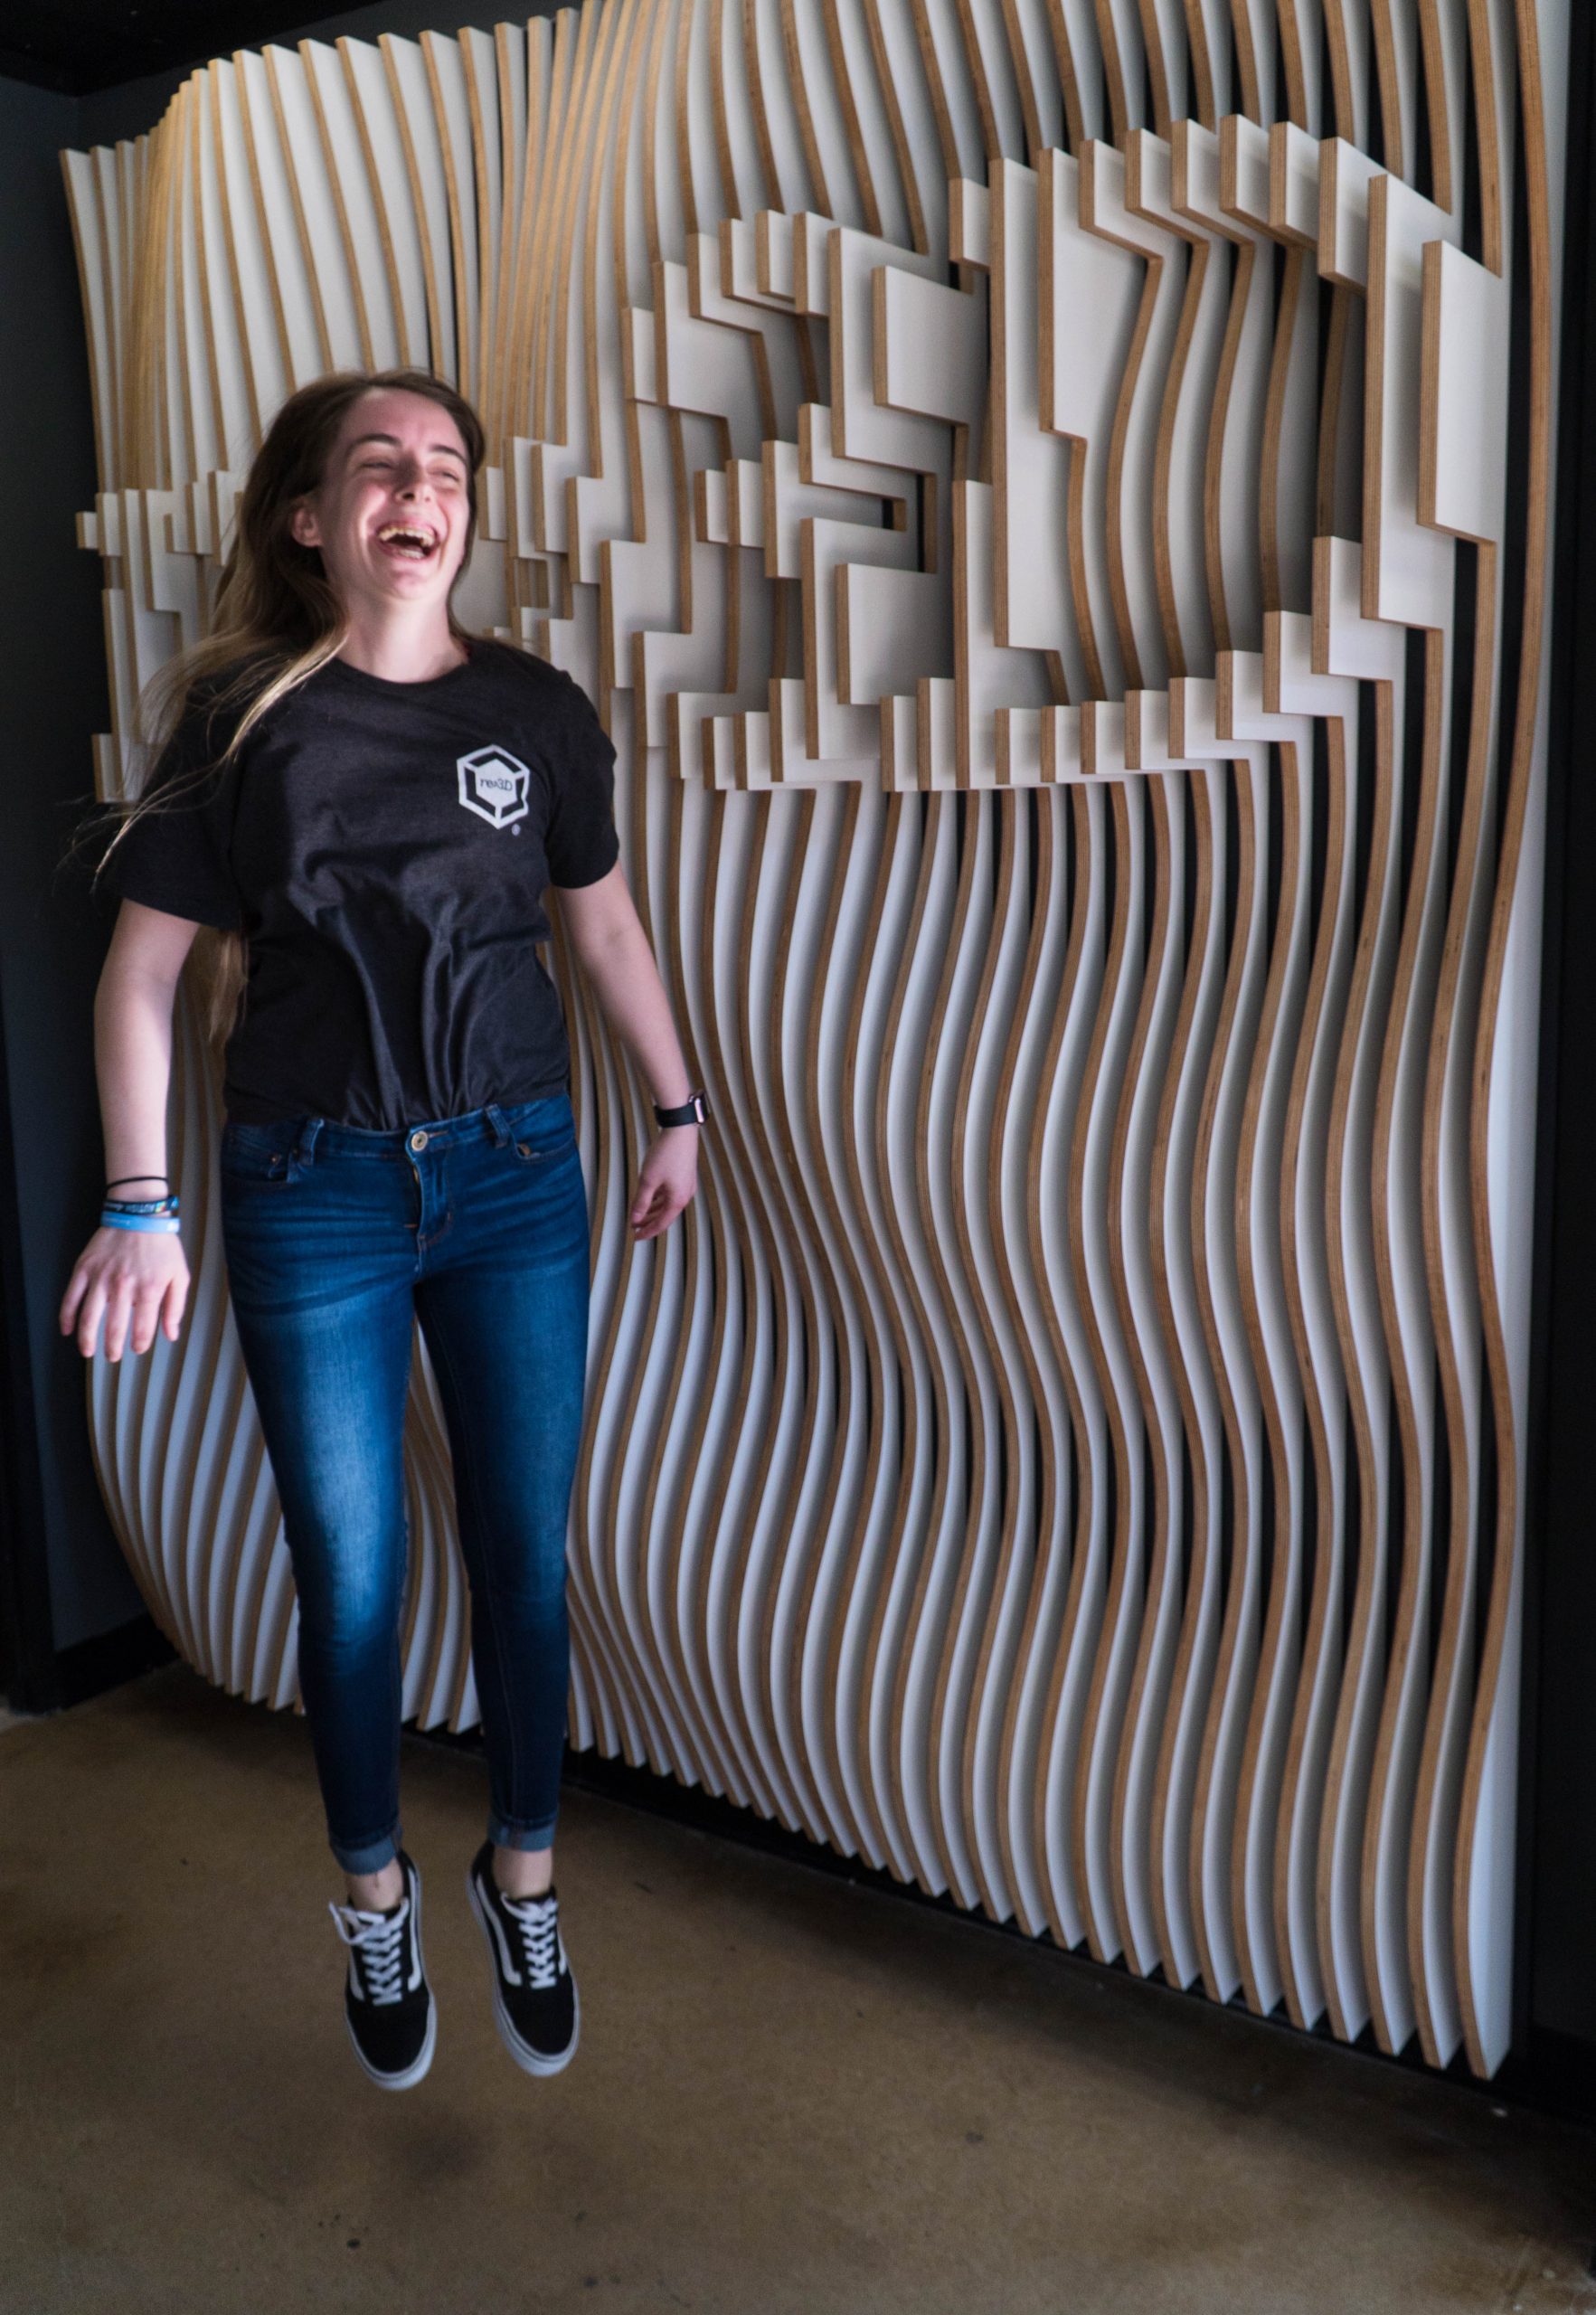
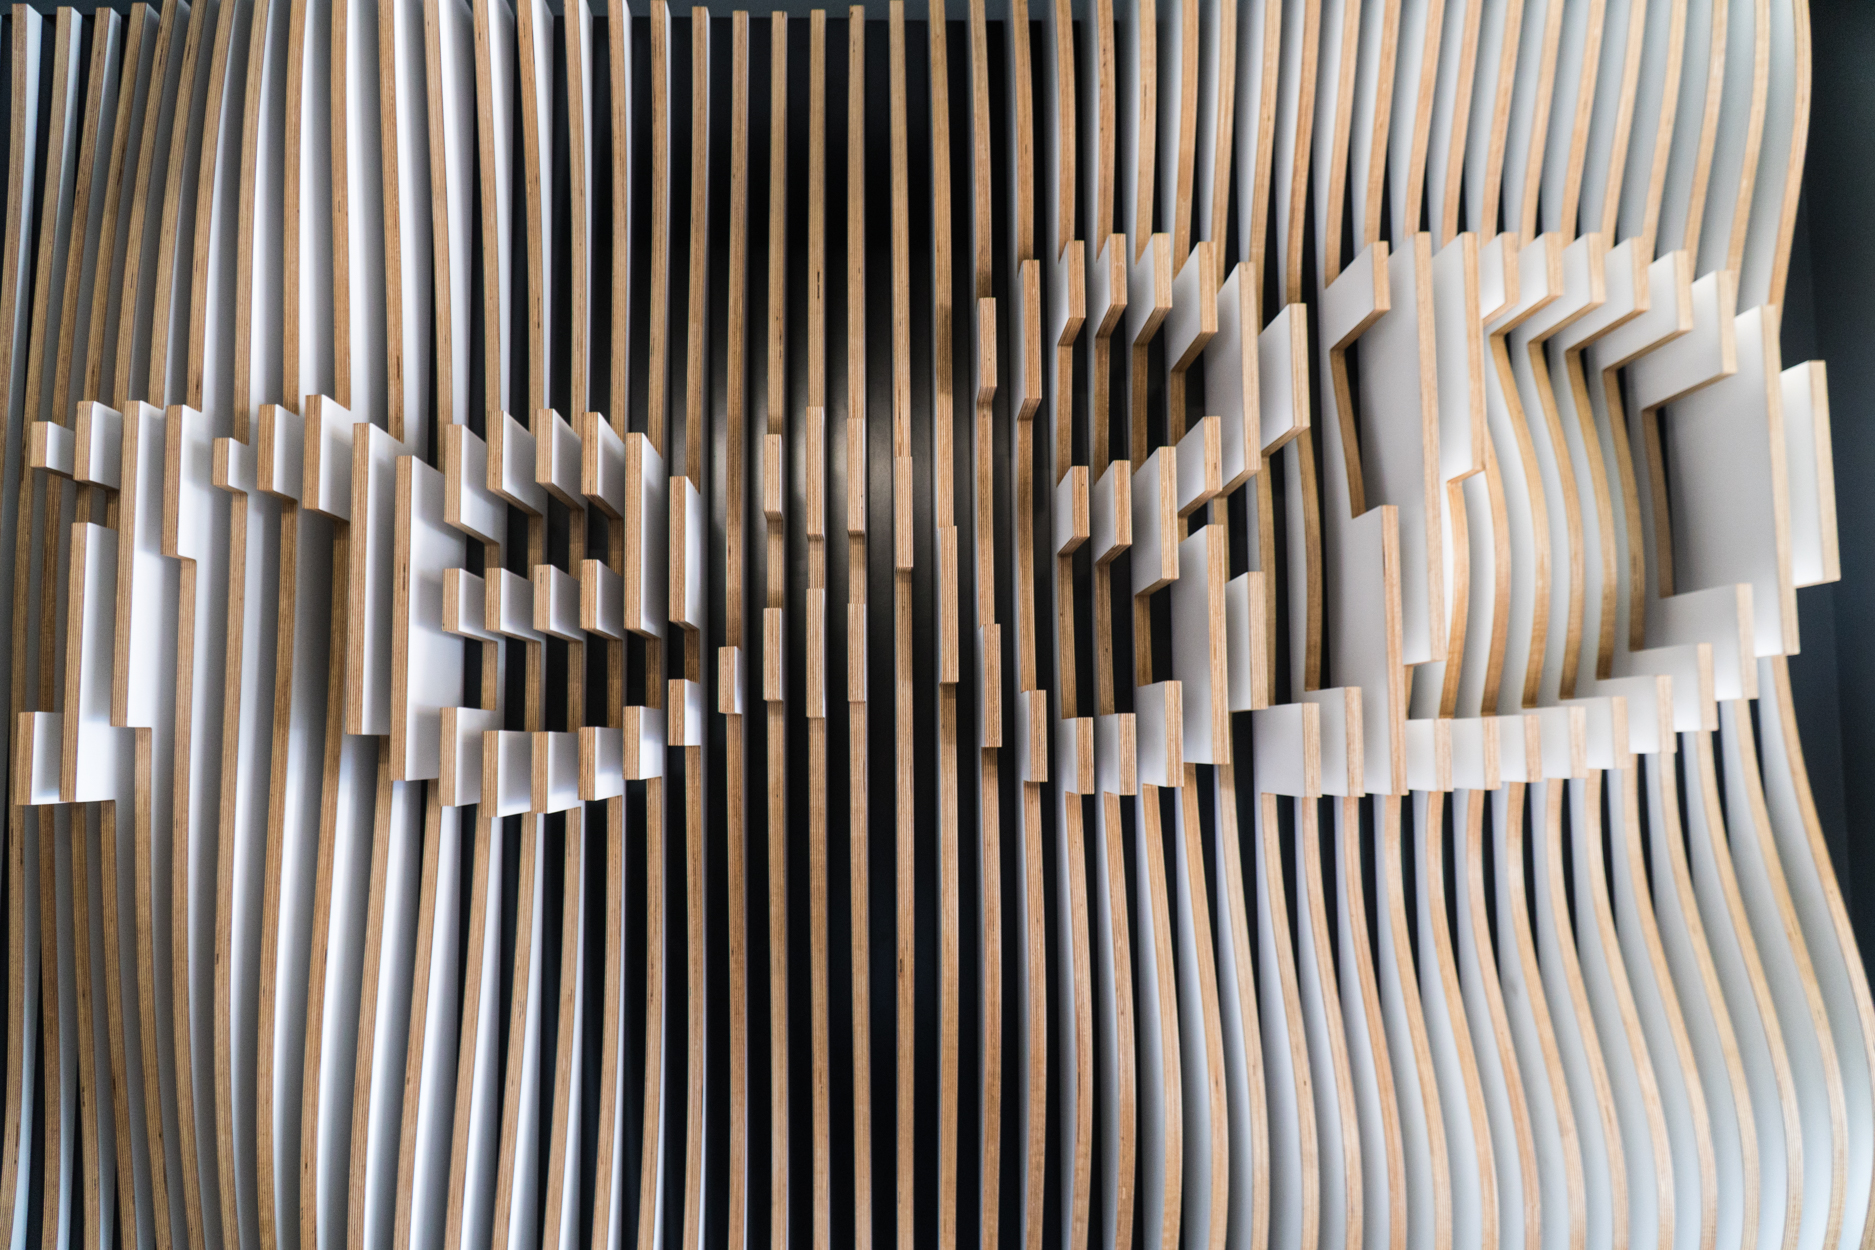
What started as a small weekly gesture quickly grew into something bigger, a rolling catalog of open-source designs, community responses, and whimsical one-offs that anyone can download, print, and build on. While we’ll be highlighting a few of our favorite moments here, there are plenty more where these came from. So if something catches your eye, or if you’re just curious, we invite you to dive into the rest of our #FreePrintFriday designs on Thingiverse and Cults3D.
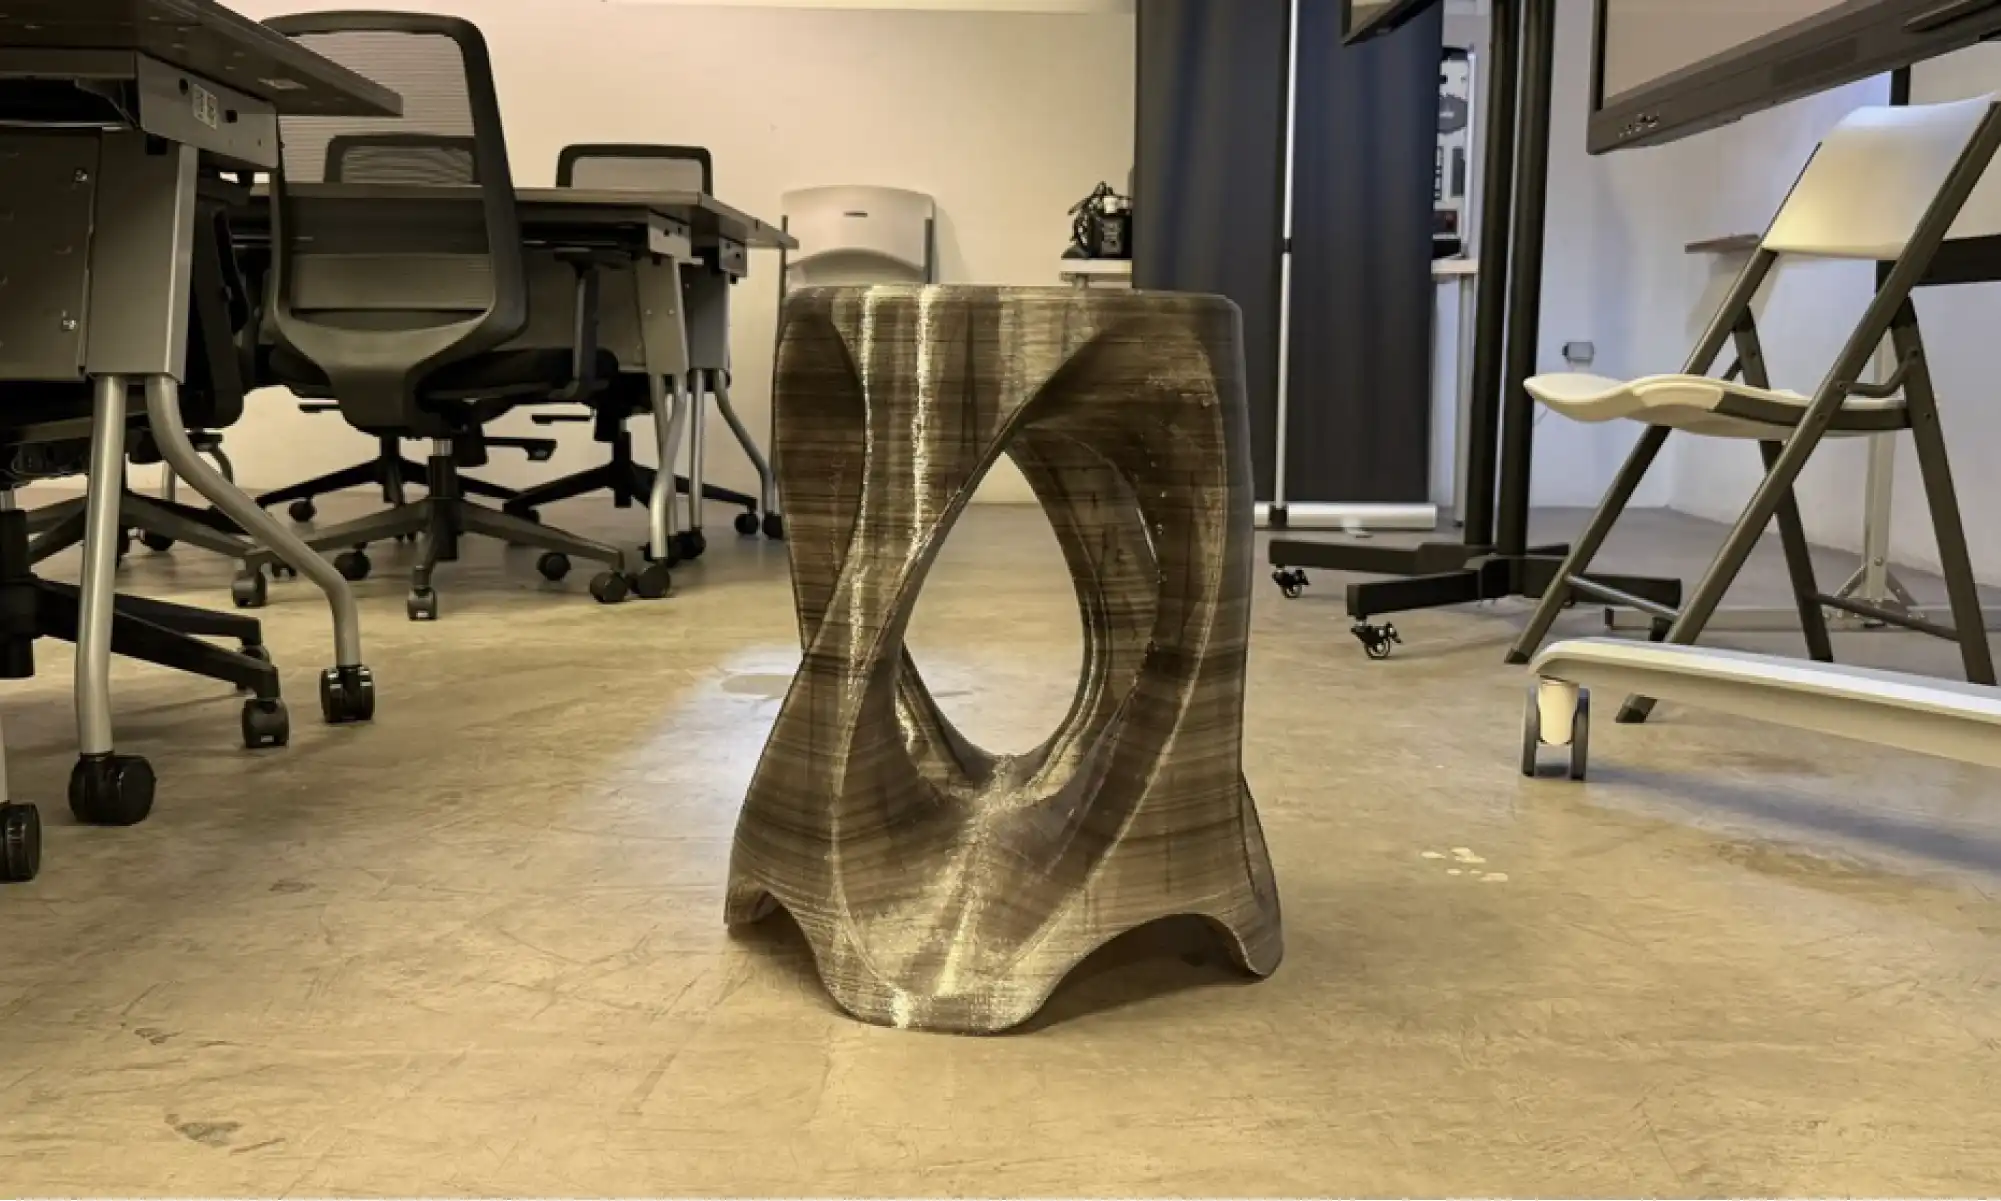
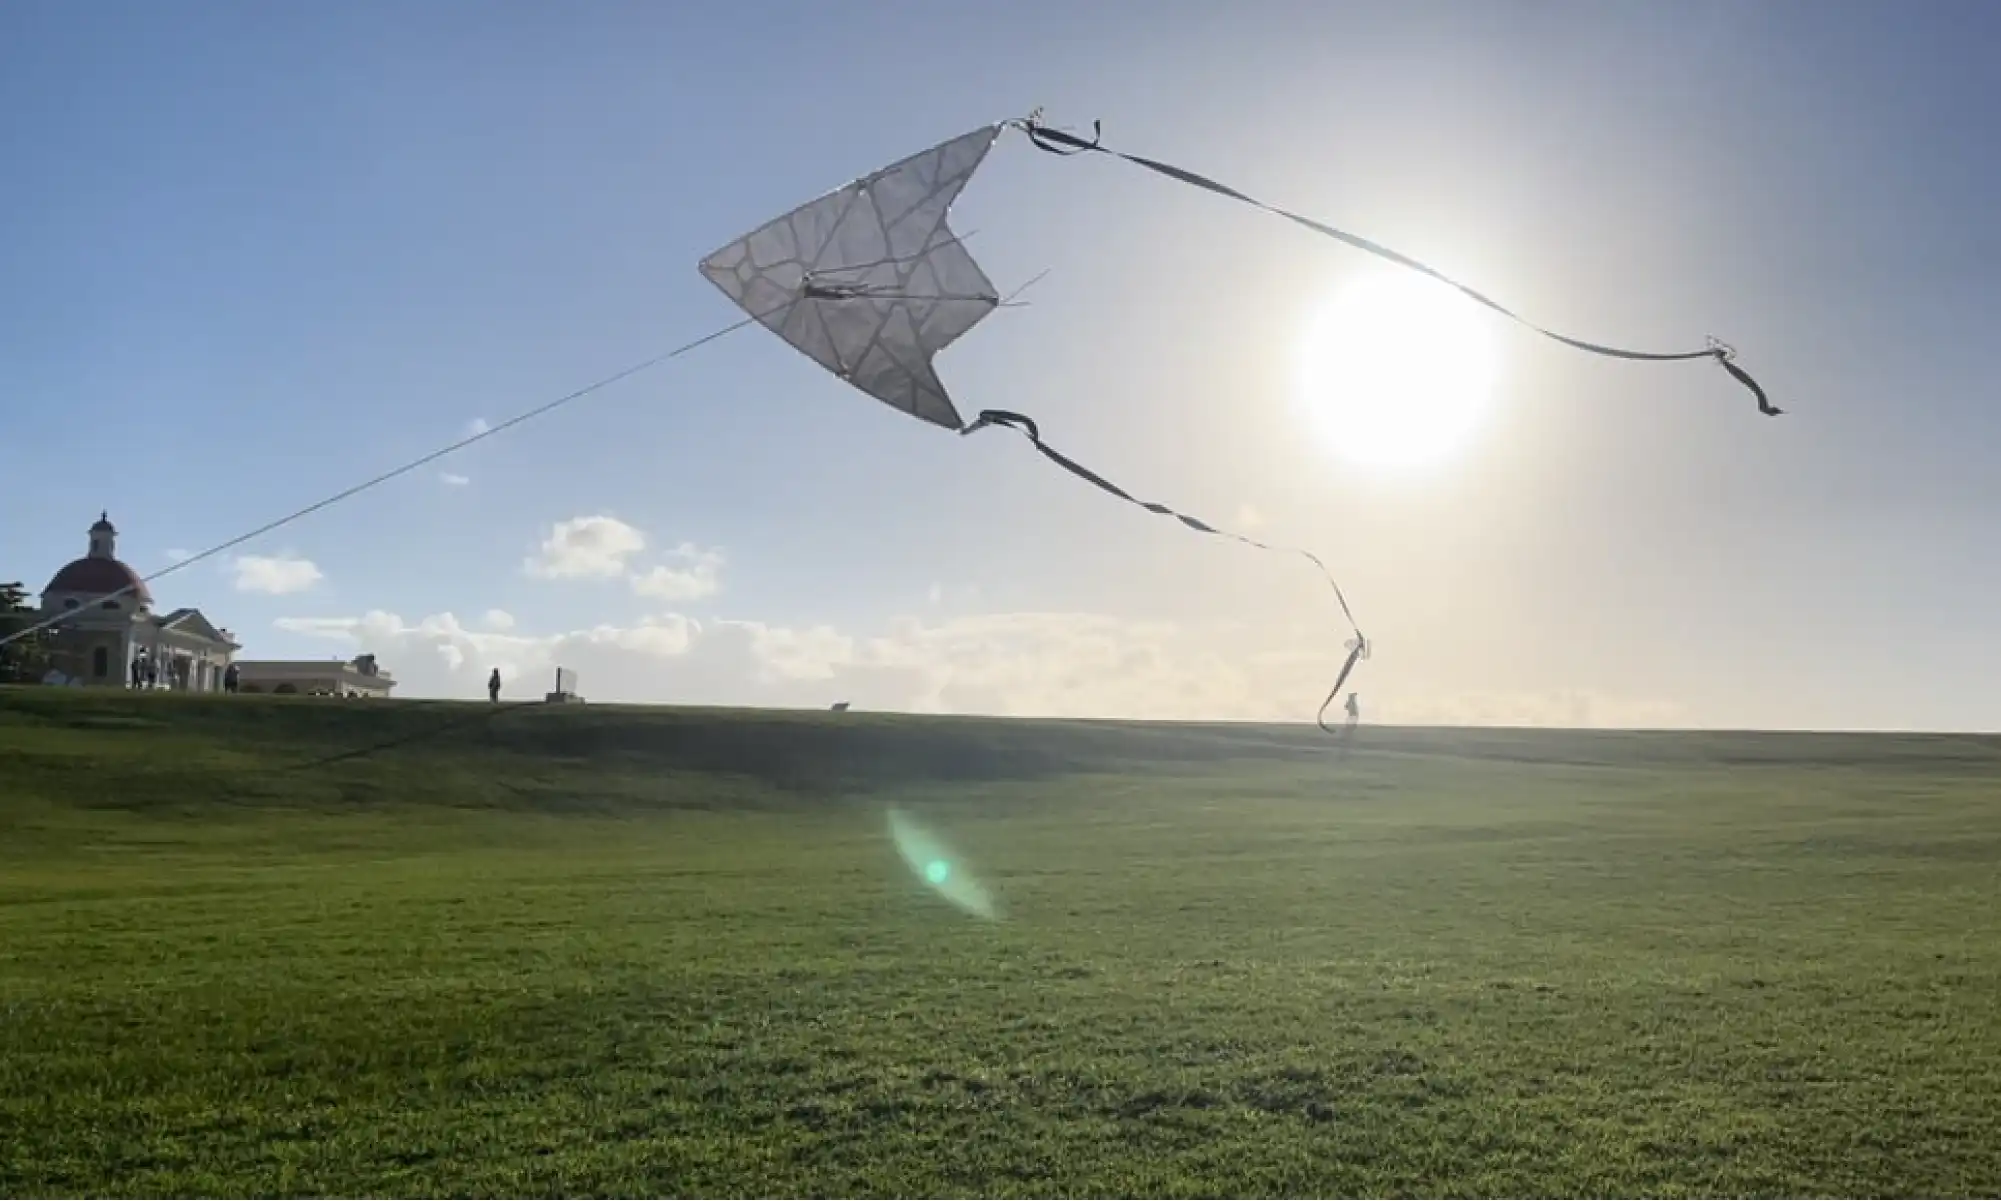
Our 3D printable kite experiment. Still very much a work in progress, but easily one of the most fun things we’ve ever designed. Building something that’s meant to flex, fly, and occasionally crash (gracefully) has pushed us to think differently about material use, weight, and structure—all while showcasing the beauty of recycled 3D printing.
Working alongside our neighbors at Engine-4 Foundation has been core to Gigalab’s mission. Many of the ideas we’ve printed came directly from conversations at Engine-4 with Co-Founder, Luis Torres, whether it was a passing comment, a workshop brainstorm, or someone pointing at a problem and asking, “Can we 3D print a fix for that?”
Some standout collabs include:
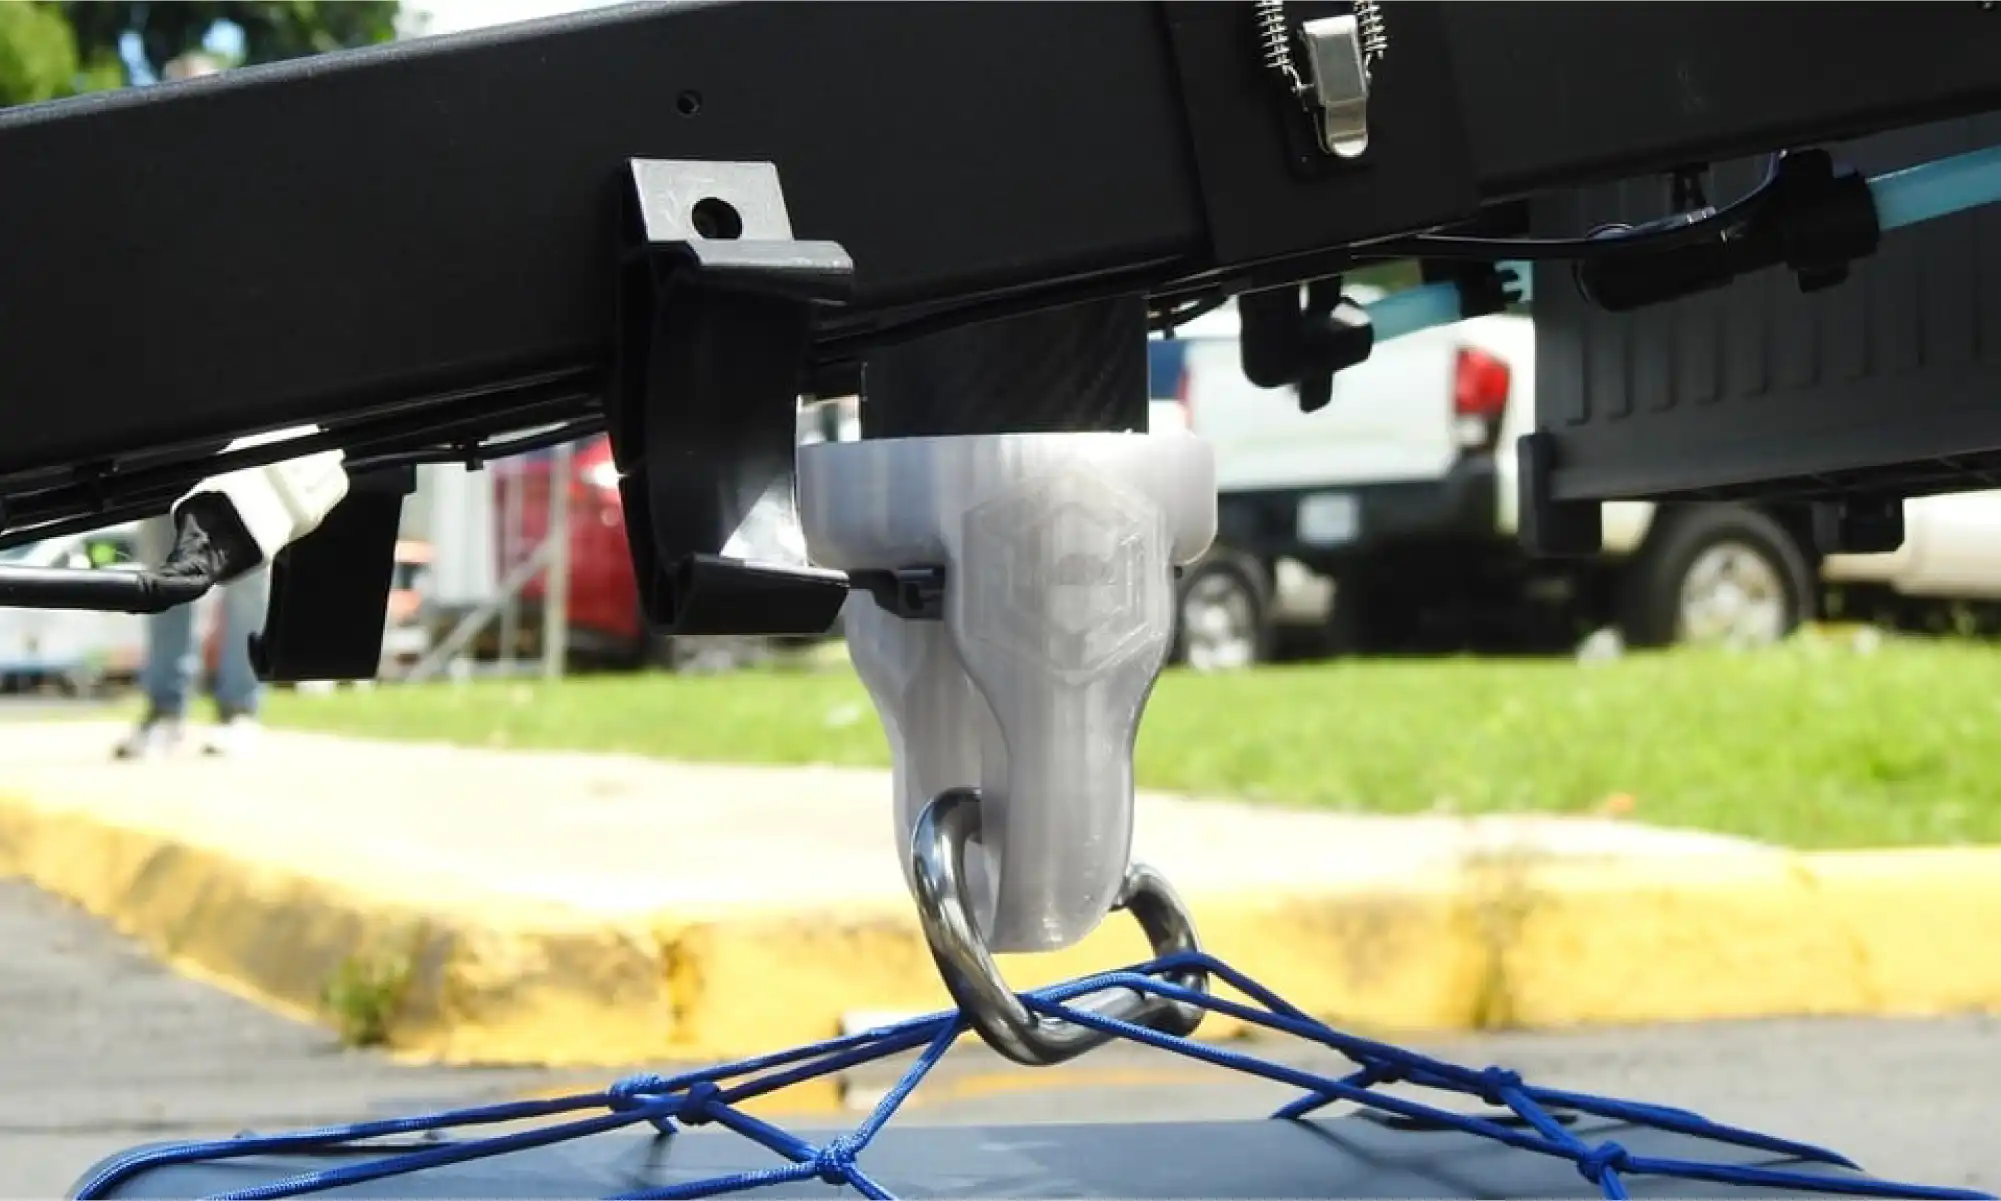
The drone care package hook, a collaboration with both Engine-4 Foundation and the Municipio of Bayamón, used in earthquake simulations to deliver supplies via agricultural drones.
More on the simulation from Puerto Rican local news:
Primera Hora | Telemundo
These kinds of projects remind us that when we design with our community, we design with purpose.
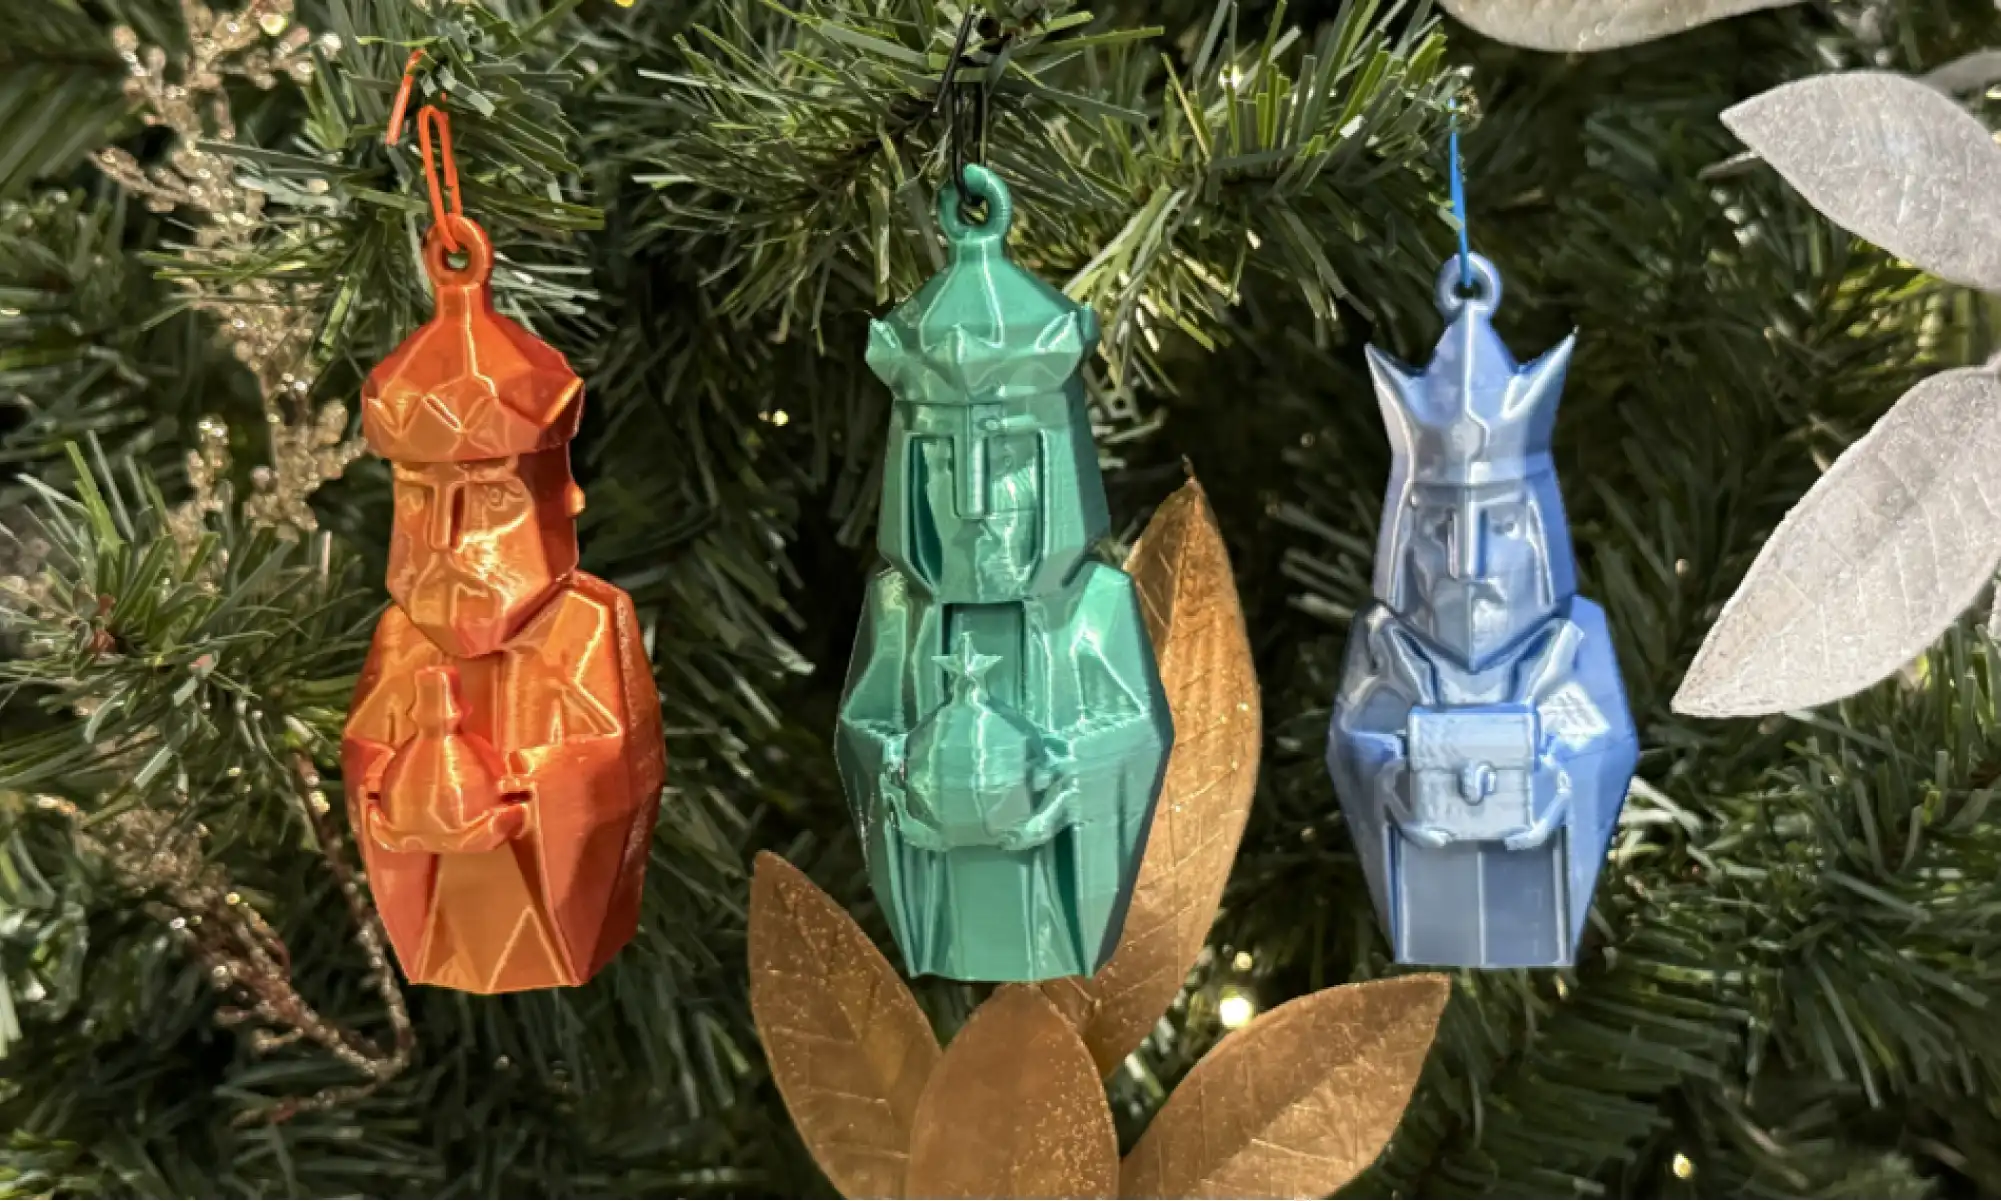
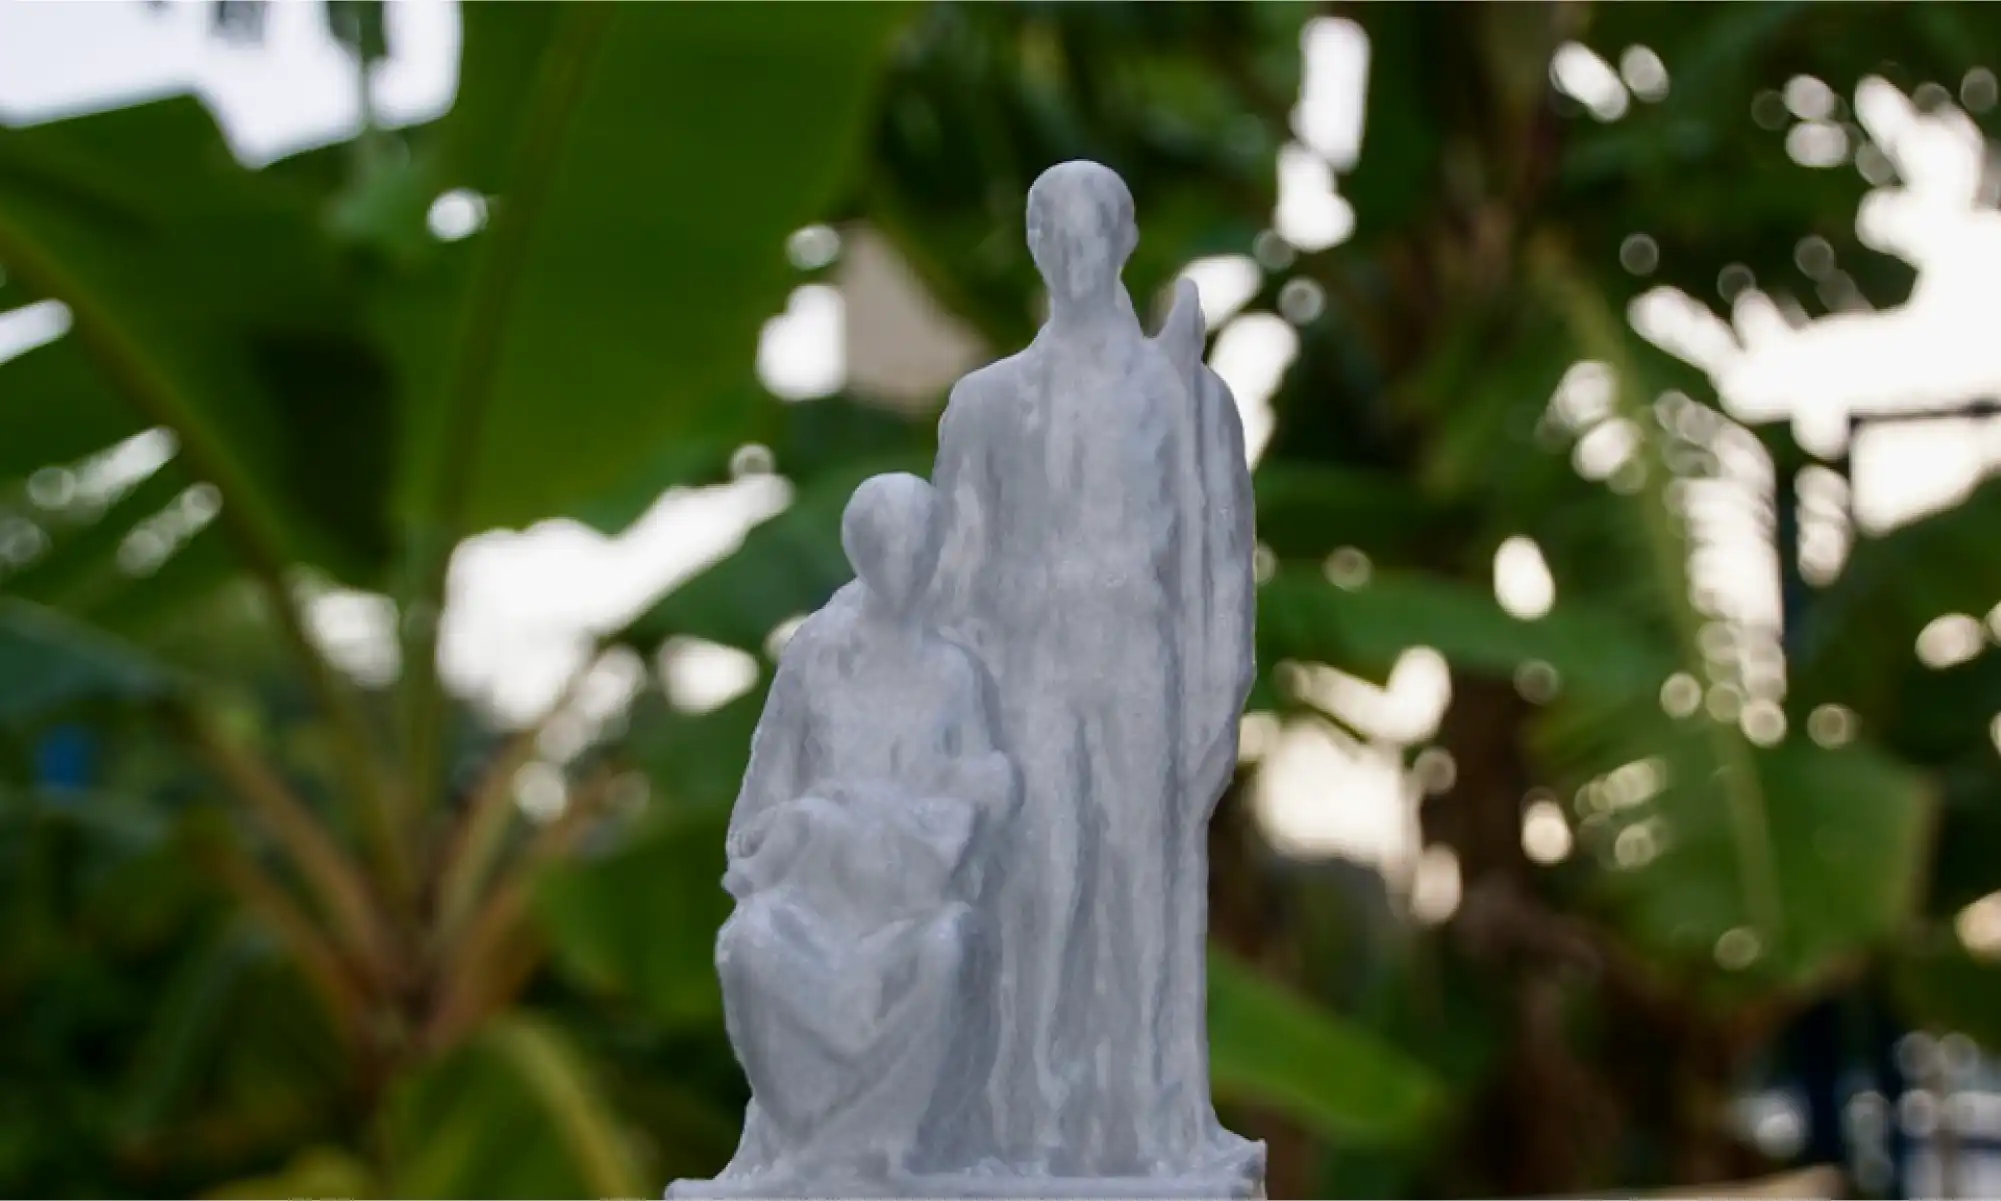
Some of my proudest open-source designs that connect with my Puertorrican identity:
Our photogrammetry model of the Monumento al Jíbaro Puertorriqueño, scanned, modeled, and shared to honor Puerto Rican heritage in a tangible way.
These designs always spark conversation, everything from an “aw” to an “I want one” to someone recognizing their own story in it, saying, “I used to drive past that monument every day. The view was breathtaking.”
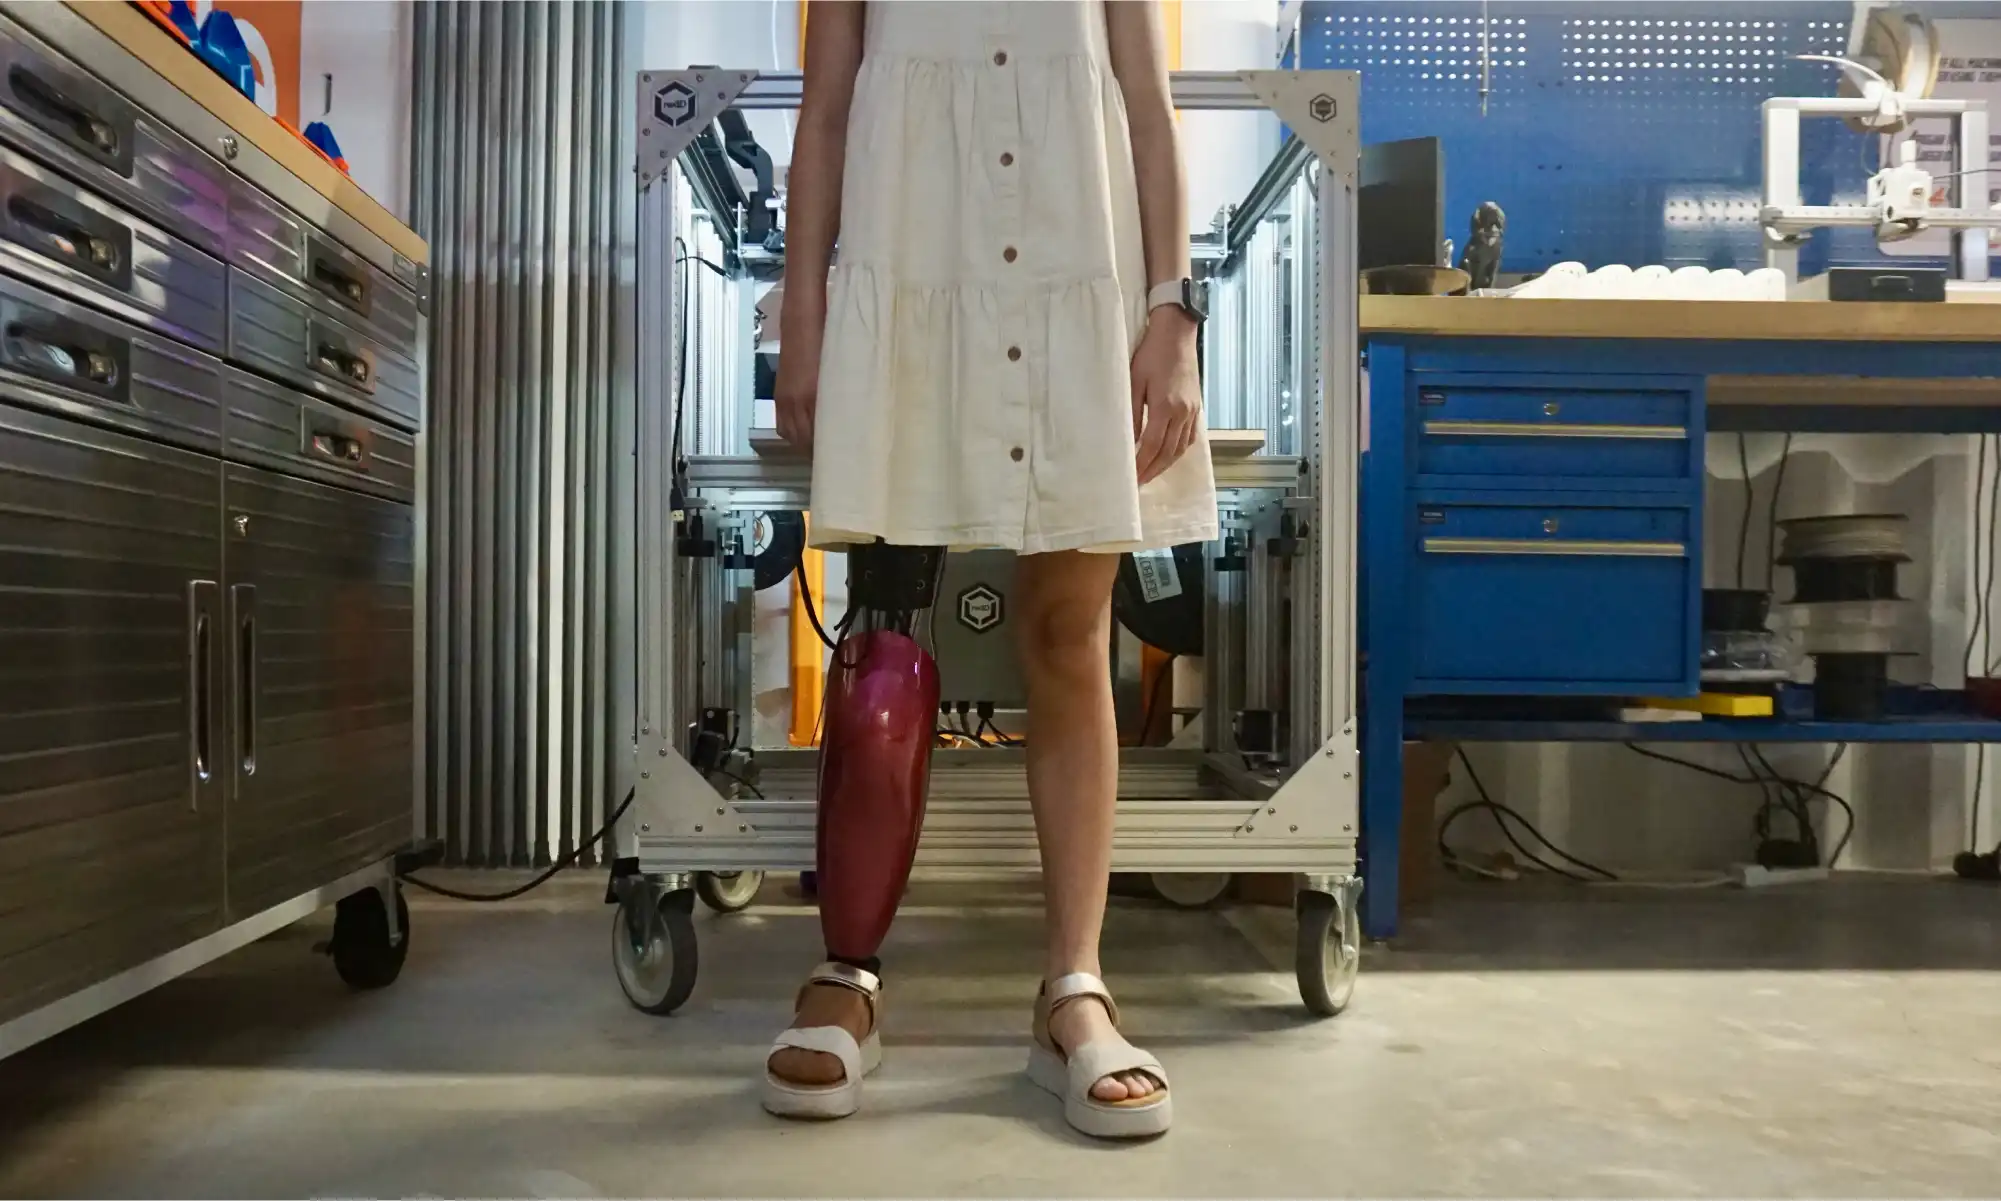
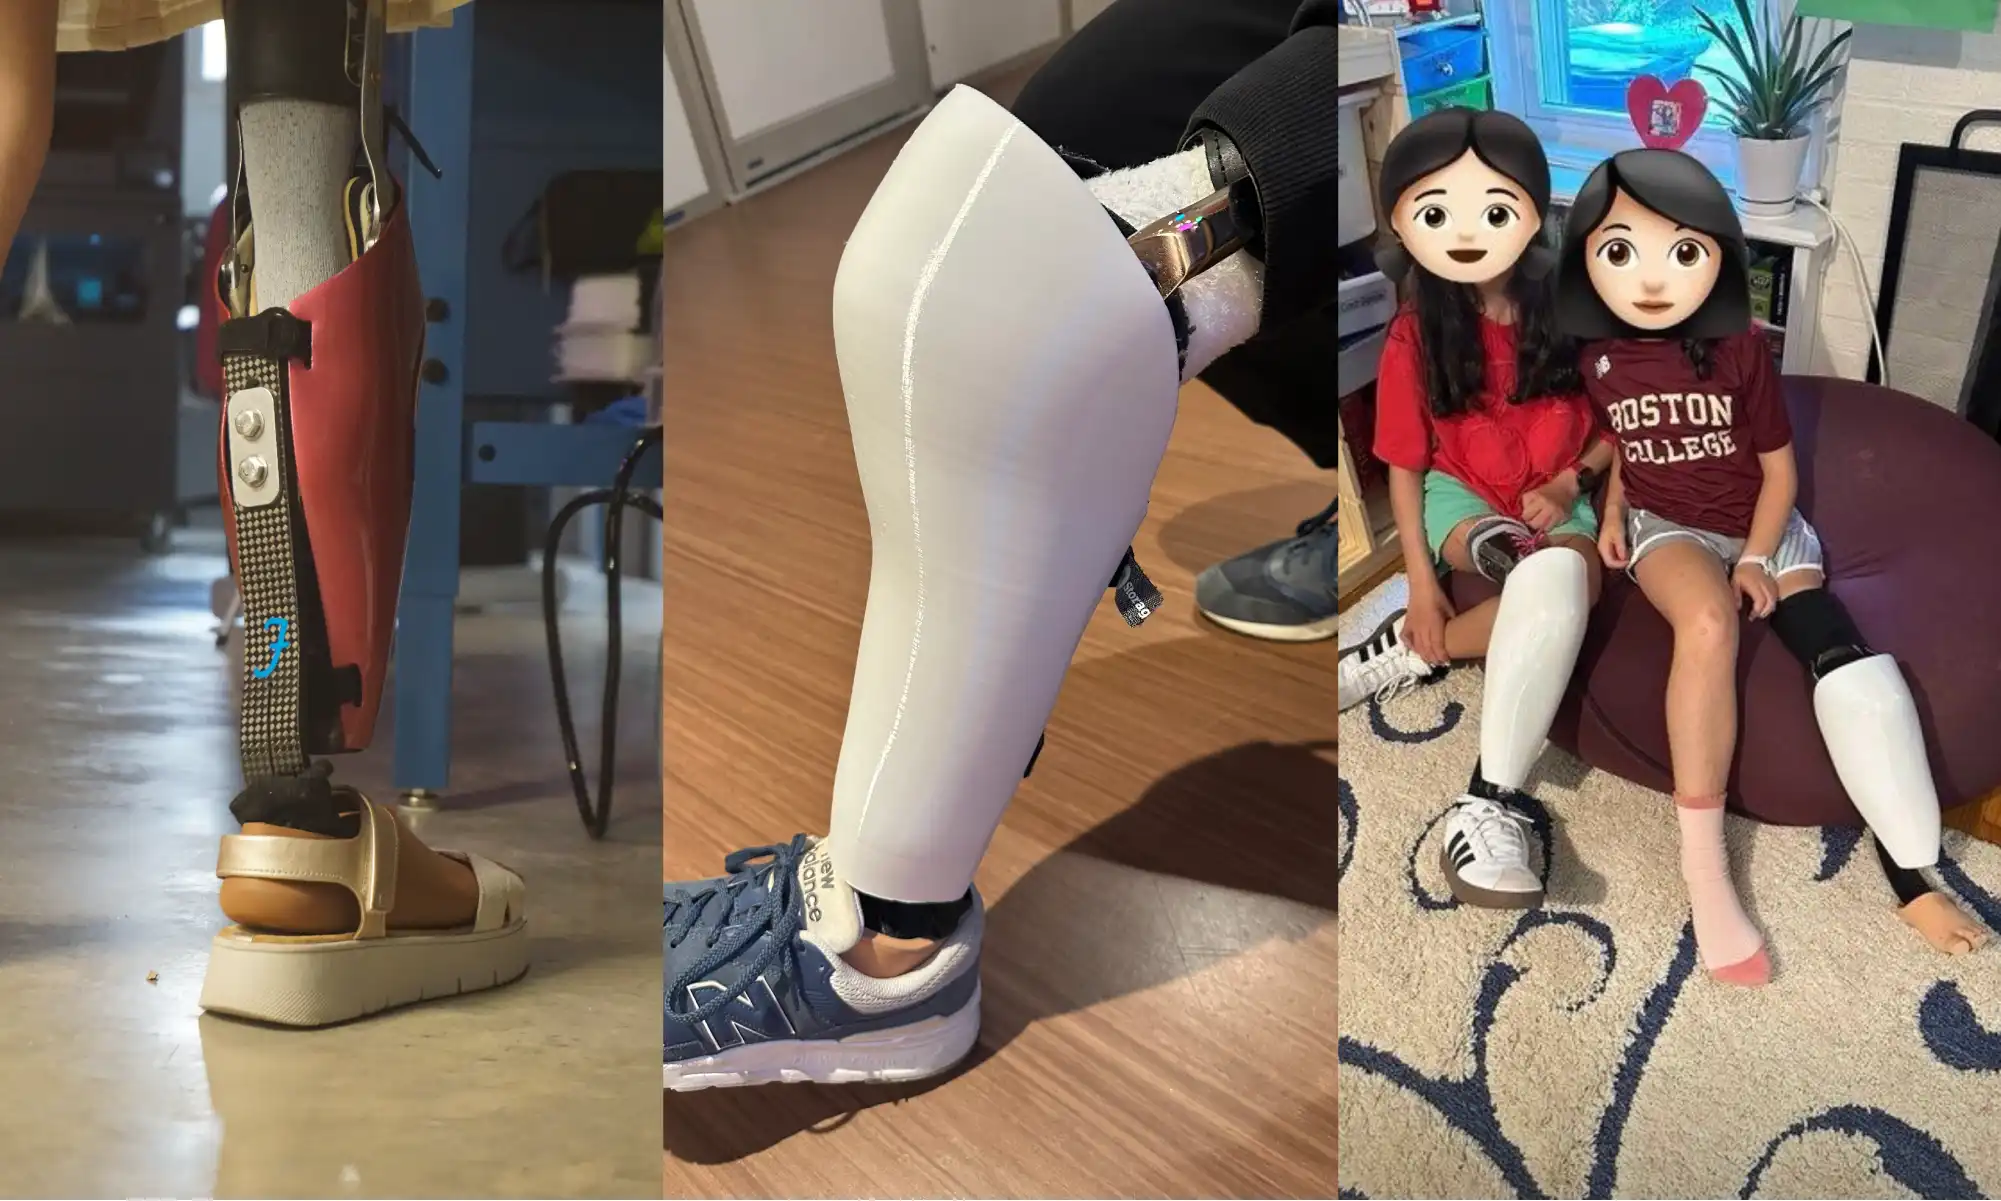
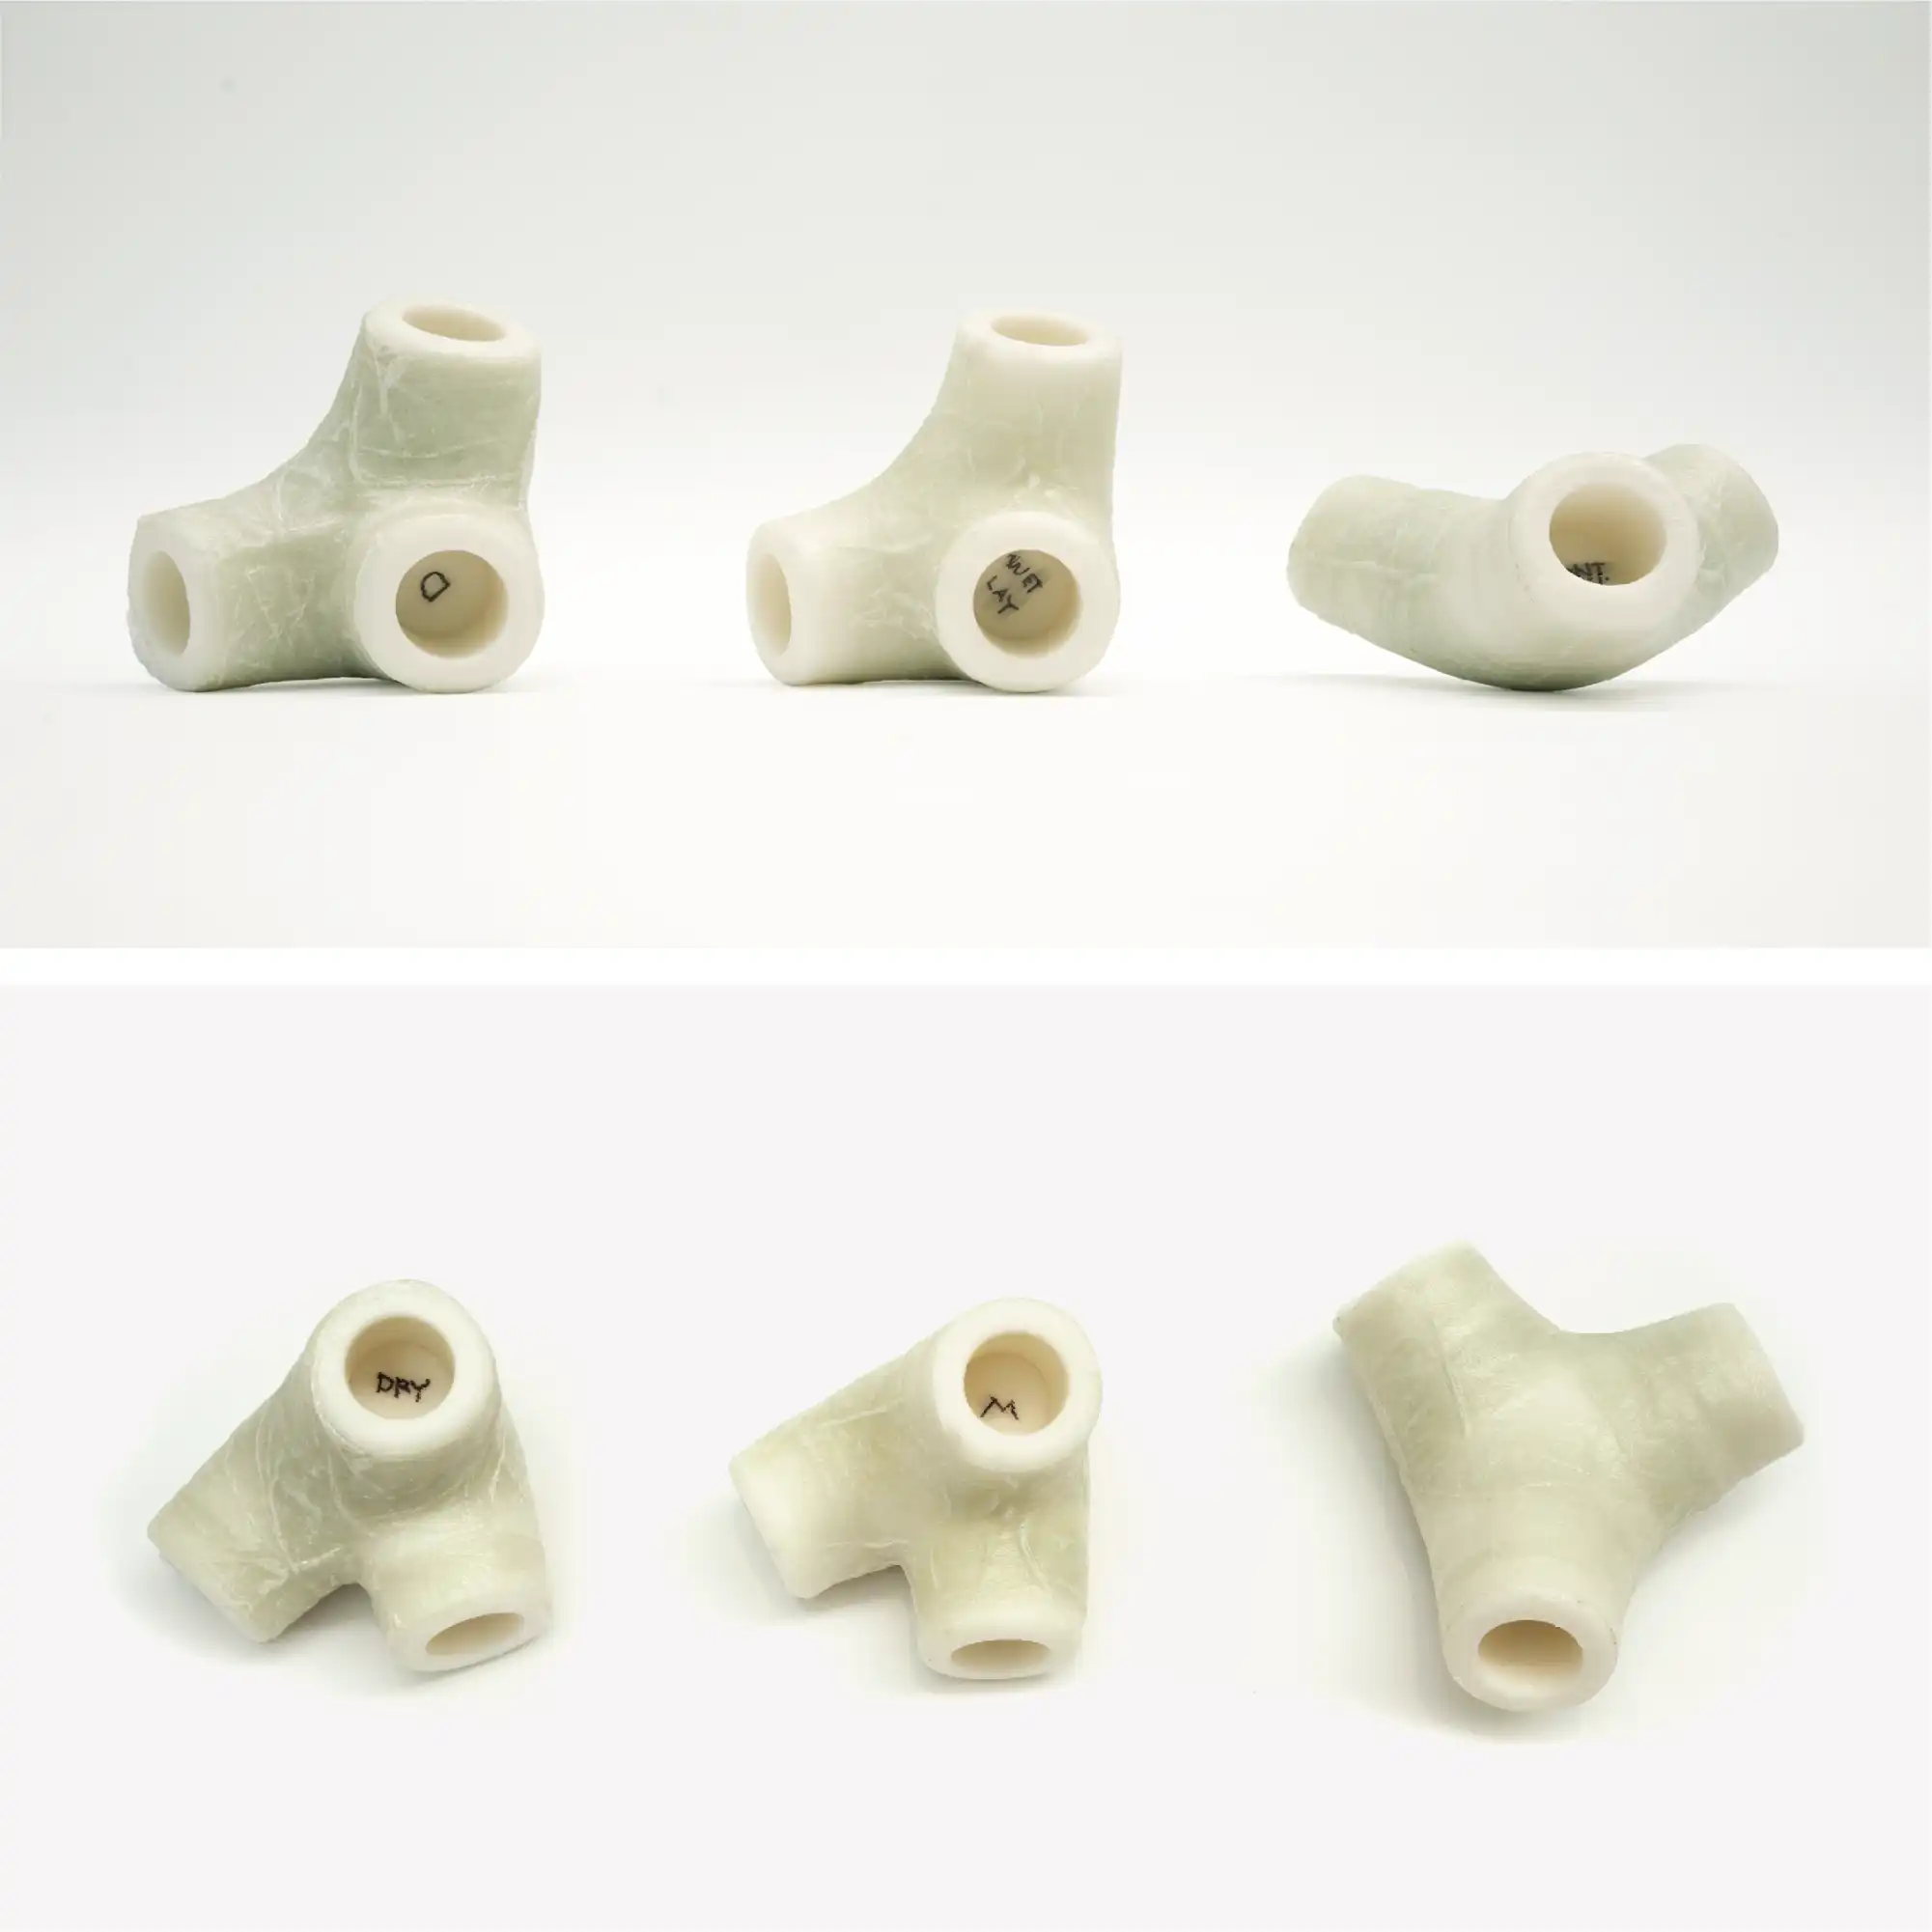
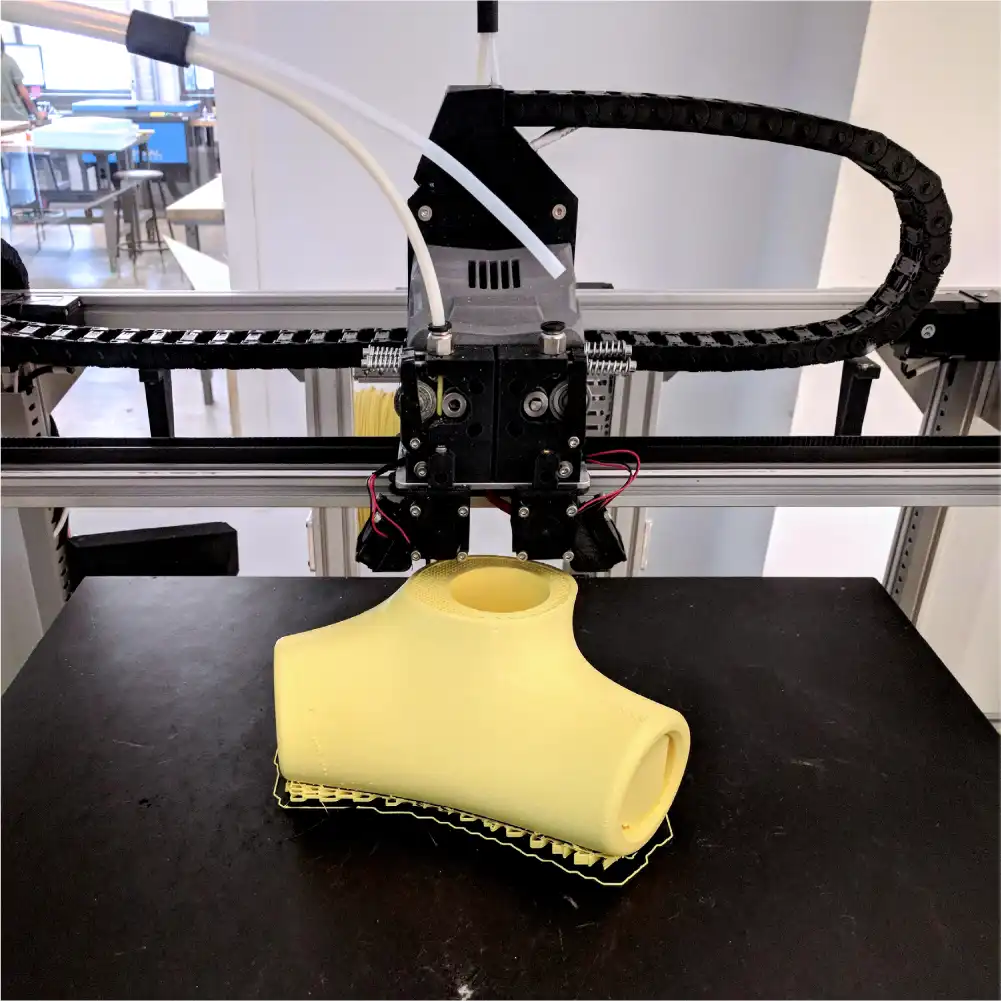
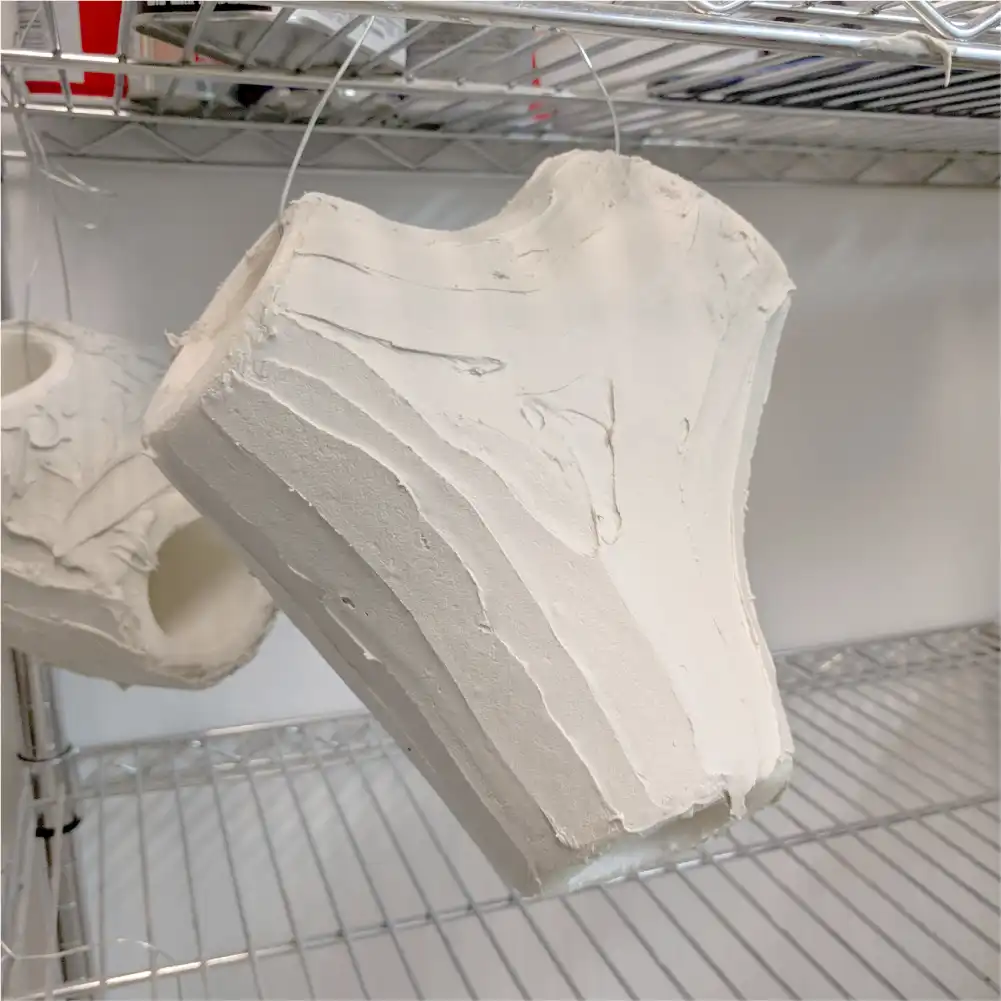
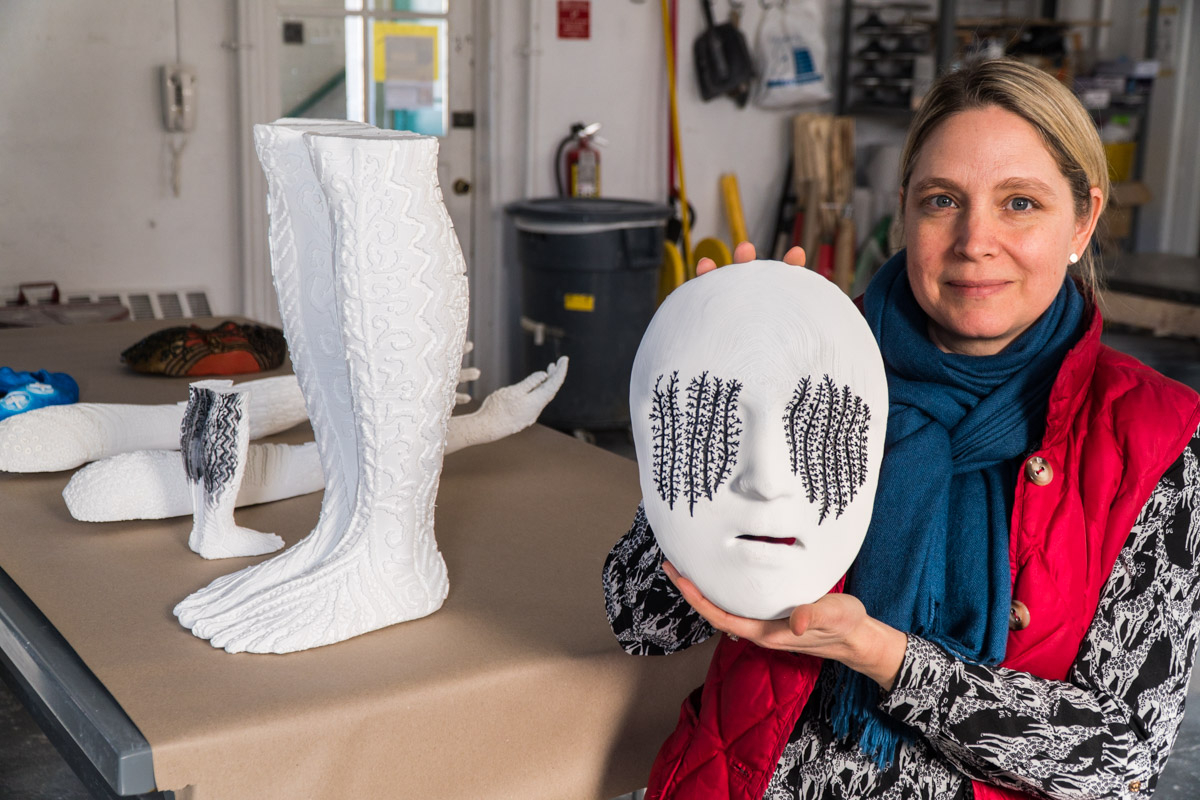
The most personal of our projects came through the Rotationplasty Prosthetic leg shell designs.
It started with a visit. Wilfredo Rodriguez and his daughter Emily came to Engine-4 with a bold question: could we design something that didn’t just cover for her unique rotationplasty prosthetic leg, but make it look and feel amazing? Something Emily could wear with confidence, something that felt like hers.
We scanned her leg using photogrammetry, modeled around it with Rhino and Fusion 360, and started prototyping with rPETG, Nylon, and TPU. Eventually, we found the right balance, lightweight, flexible, and durable enough for everyday life. The final shell was finished with automotive-grade paint for a smooth, protective finish.
But the story didn’t stop there.
Left is the back of Emily’s cover, middle is daniels cover and right is Emely and Anya
Emily’s friends Anya and Daniel, all the way in Boston, got scanned too. We designed and printed their custom shells right here at the Gigalab in Puerto Rico, and sent them north, each one uniquely shaped and styled for them.
This wasn’t just about aesthetics. It was about saying, with a smile, “I want that leg”
Located on the rugged coast of Deer Isle, Maine, Haystack Mountain School of Craft is a legendary space where artists, designers, and thinkers come together to push creative boundaries. We were lucky enough to be invited to spend a week there with the GigabotX 2 XLT for Haystack Labs, joining a wild mix of tinkerers and craftspeople for a creative tech residency.
At Haystack, we experimented with University of Maine’s wood pulp PLA feedstock, tested out sculptural forms, tricky overhangs, and parametric designs that challenged our printers and our imaginations. We had the pleasure of learning with Shelby Doyle, AIA, an Associate Professor of Architecture at Iowa State University and co-founder of the ISU Computation & Construction Lab. Her expertise in digital fabrication and design-build education brought valuable insights to our explorations, pushing the boundaries of what we could achieve with recycled materials and large-format 3D printing.
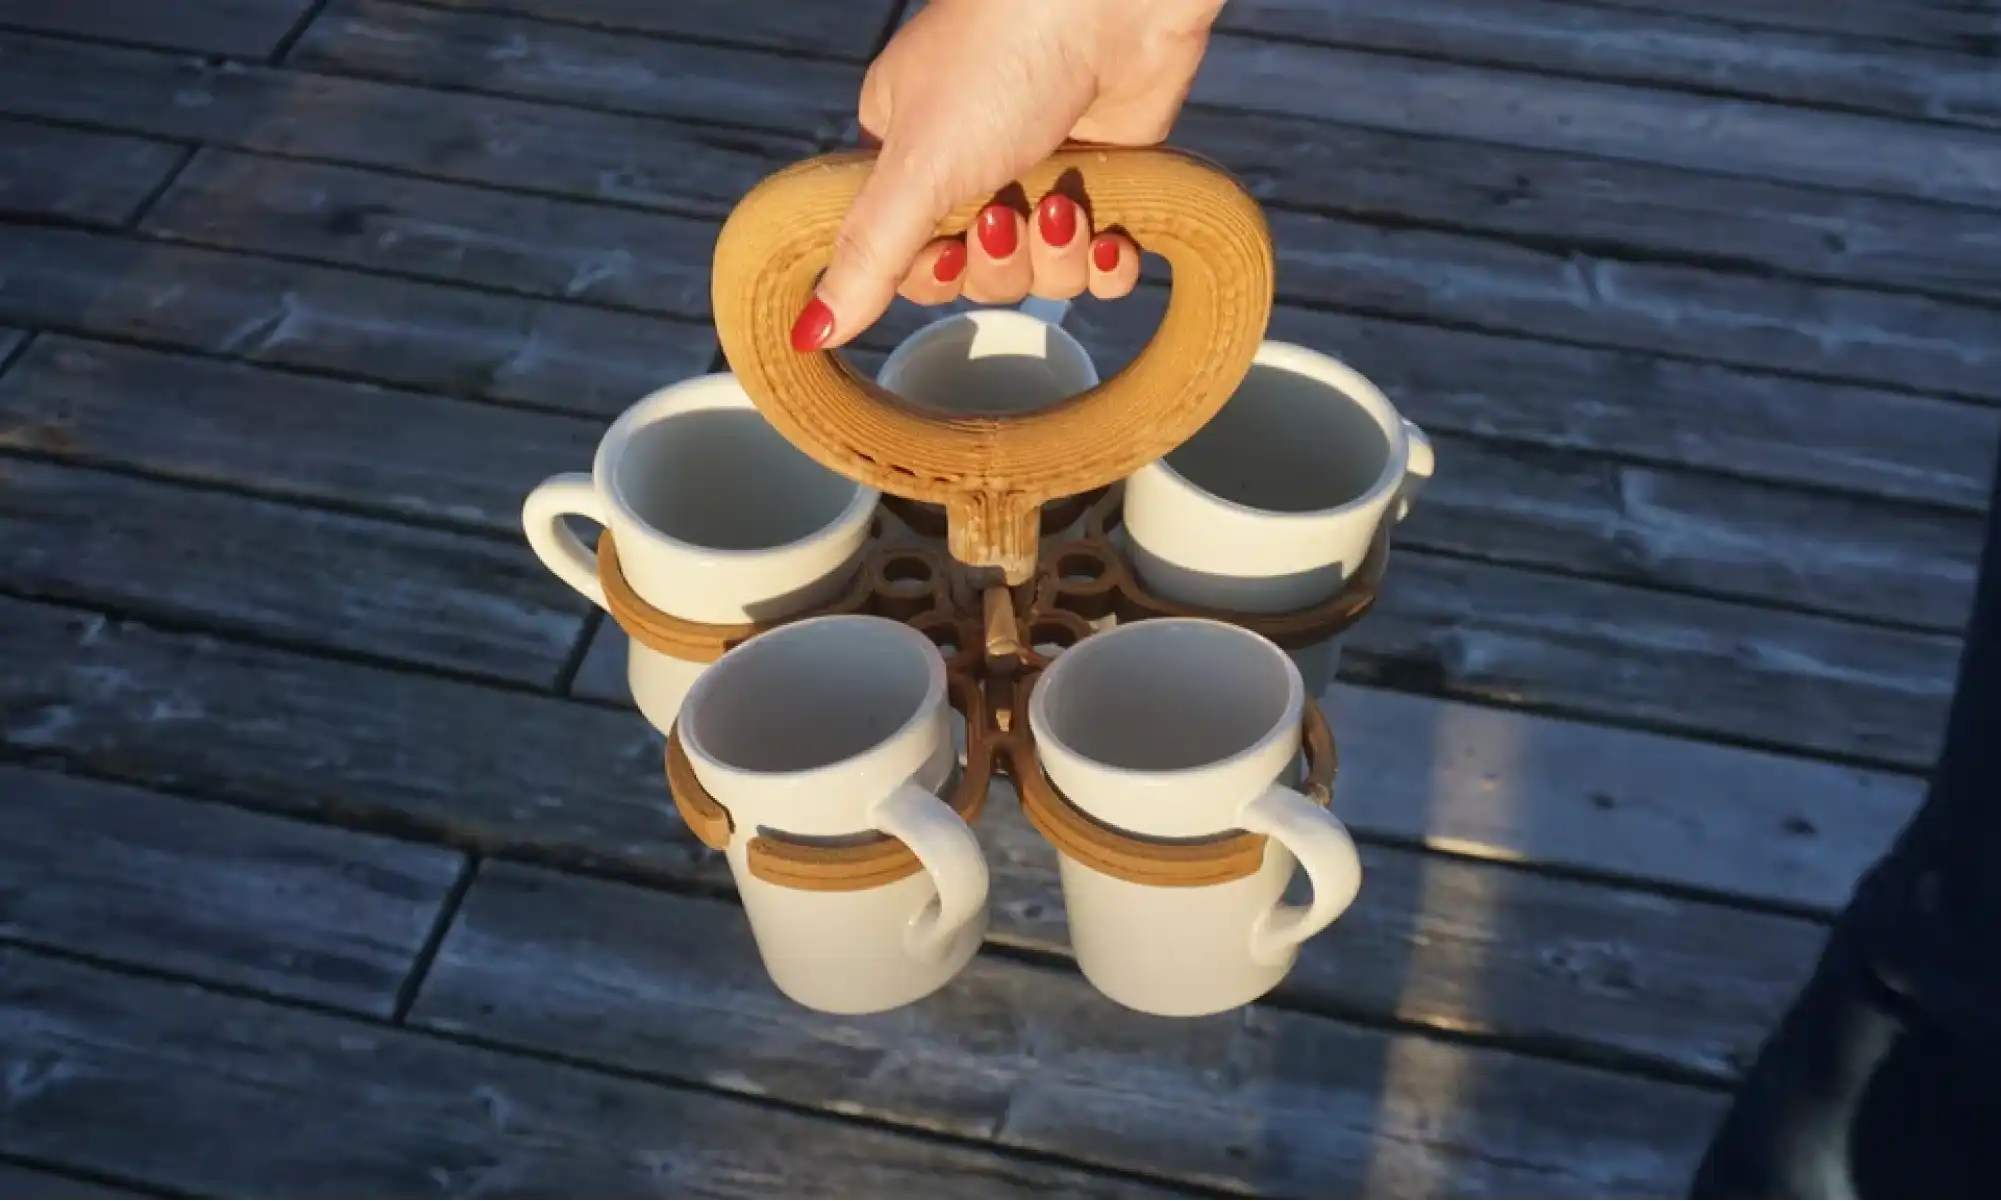
But one of our favorite prints? A five-mug coffee caddy we designed because we were too lazy to take our mugs back to the kitchen one by one. Turns out the kitchen staff liked it too as it’s a recurring problem!
A lot of our most downloaded open-source designs are little things that solve specific, everyday problems stuff that just makes life smoother:
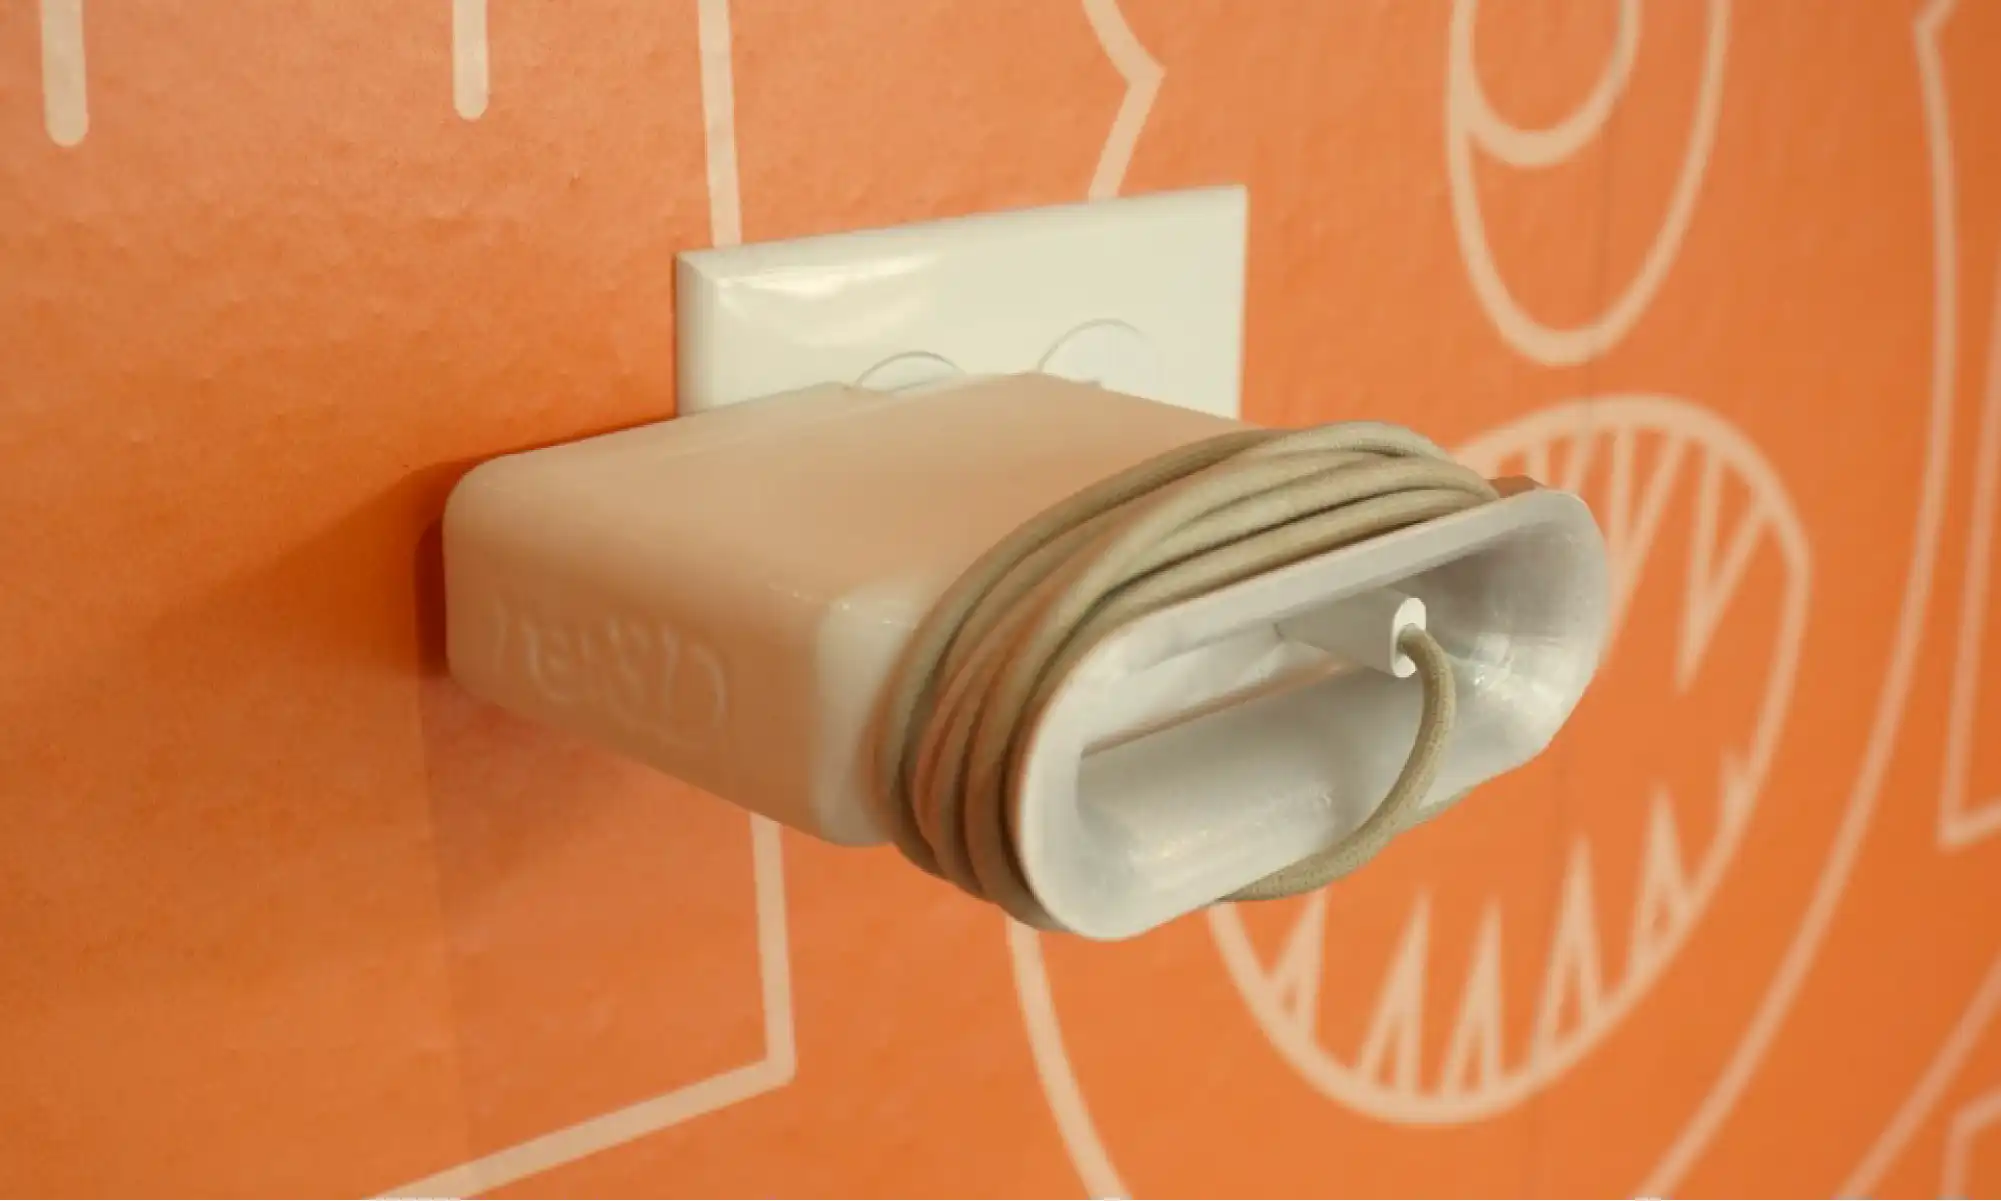
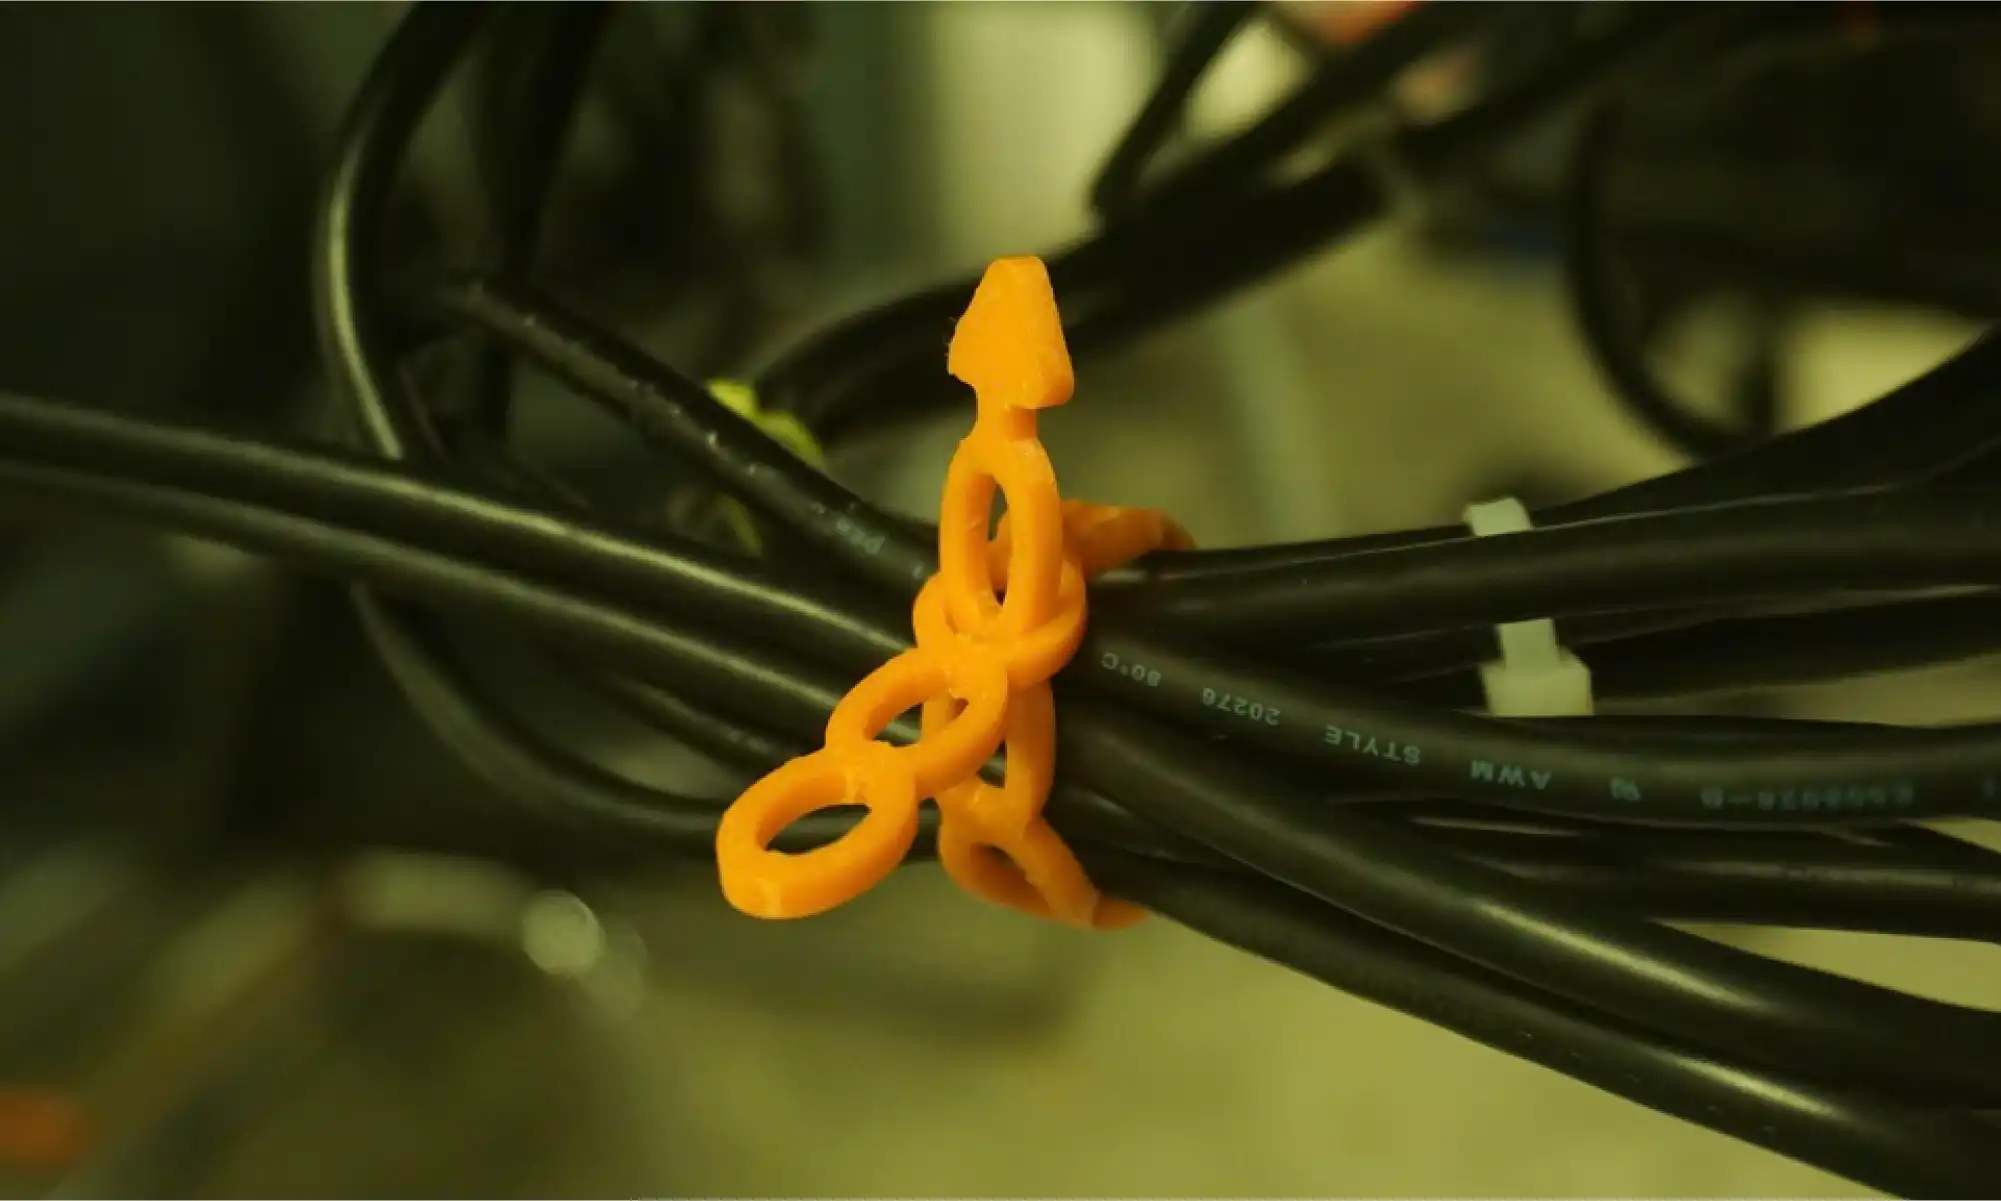
Inspired by SSgt Hart during our Gigalab demo at Cannon Air Force Base, she needed a better way to manage cables, had a great idea, sketch it out for us and we helped turn that need into a print anyone can use!
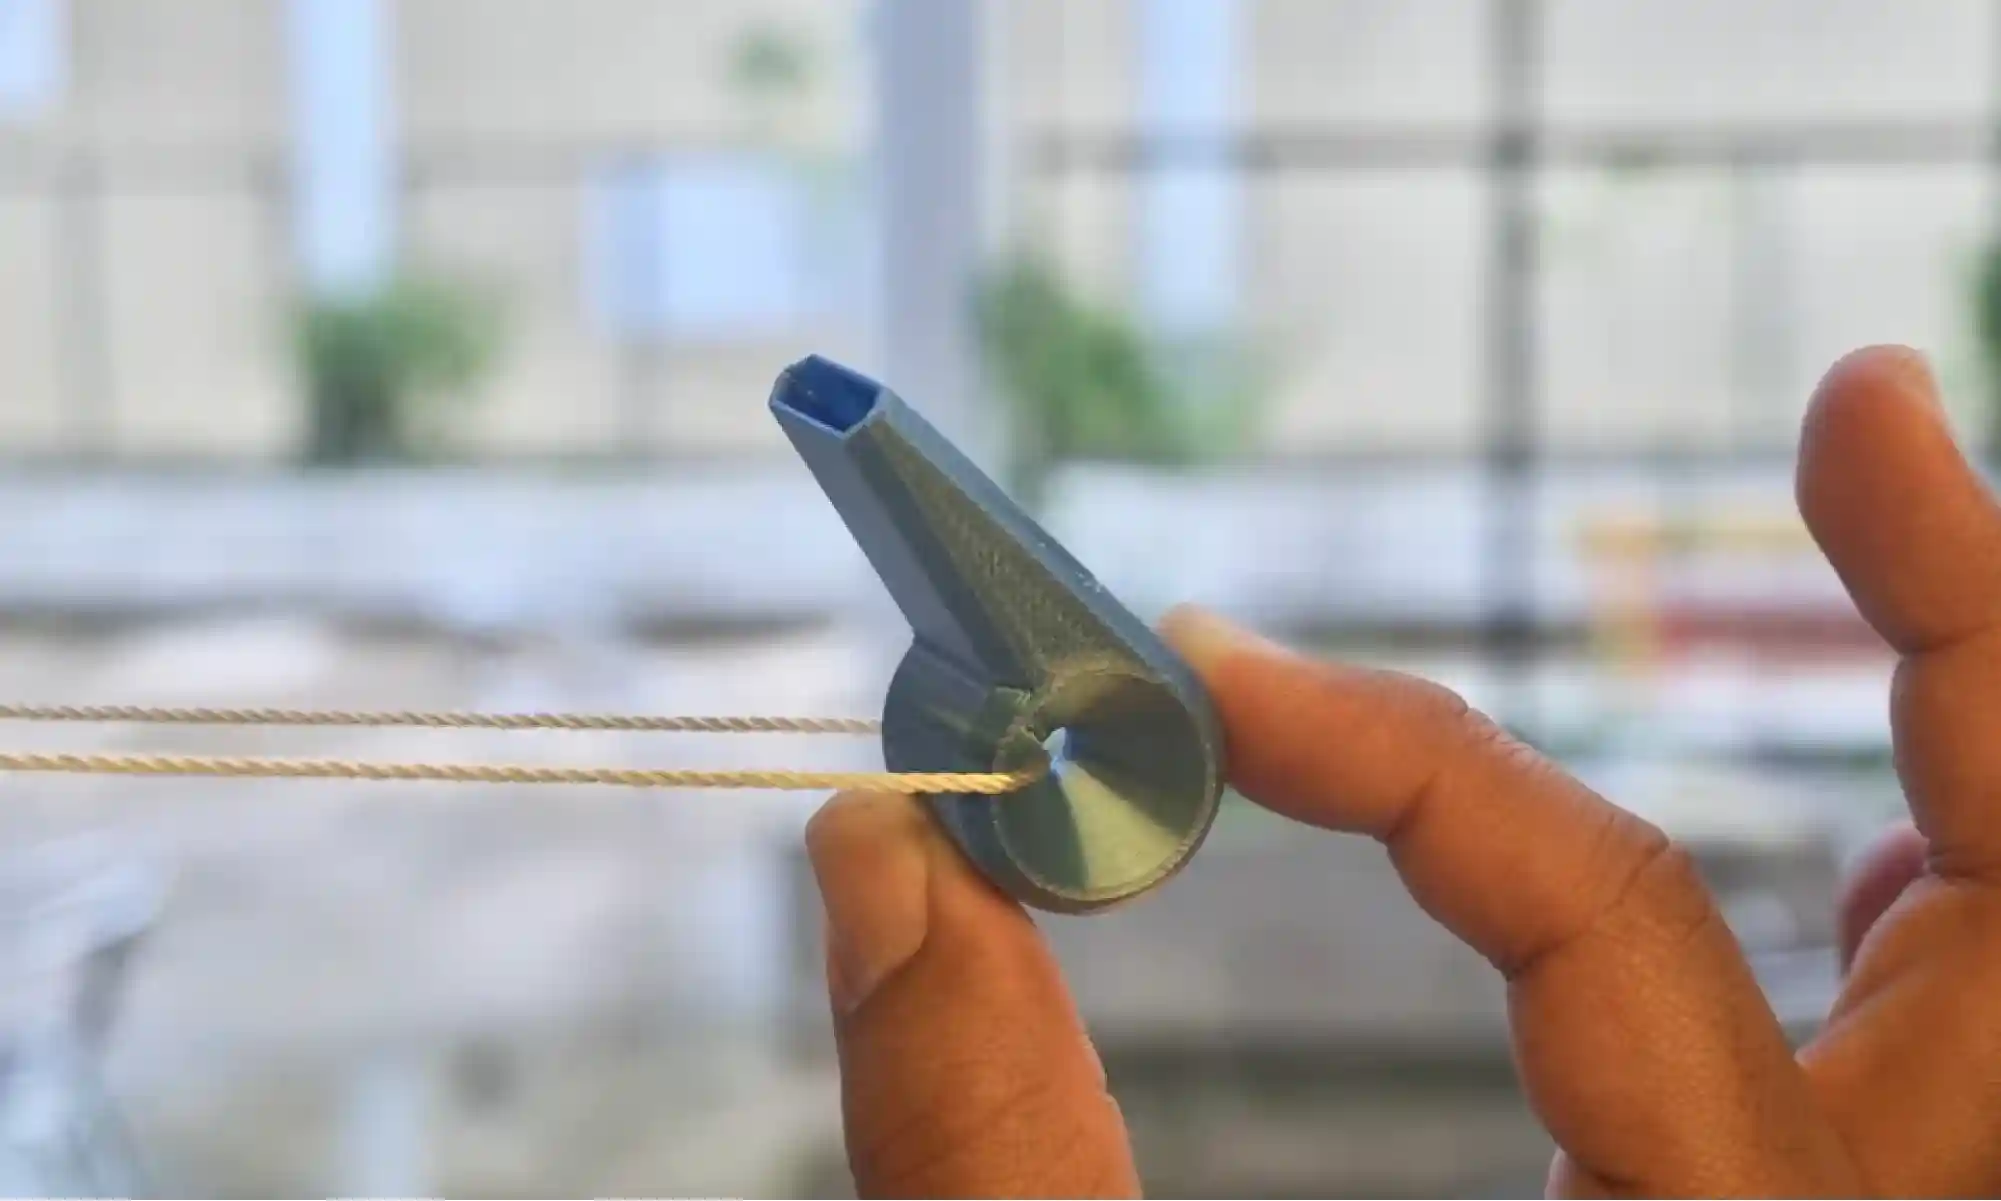
These weren’t built for retail. They were built for daily use, most came to life in under an hour, sparked by someone asking, “Hey, can you print something for this?” or even just a playful thought like, “What if we 3D print a whistle?”
Over the past year, we’ve shared over 50 open-source designs. Some are silly. Some are super niche. Some are actually really useful. Most are a little of all three.
What they all have in common is this: they came from the community, and they’re going back to the community. Free. Open. Ready to print.
Whether it’s a bookmark, a birdhouse, or a prosthetic leg cover, every design came from a simple idea: listen, learn, make, and share.
We believe 3D printing isn’t just a trend. It’s a tool for local problem solving, education, expression, and play. That’s why we do #FreePrintFriday .
We’ve still got a backlog of unreleased prints. Expect more cultural remixes, more functional tools, more weird stuff. Maybe even more community collabs!
Got an idea? Shere it with us by filling out our #FreePrintFriday form, we’d love to hear it!
Here’s to another year of printing what matters (and what’s fun). See you Friday and happy printing!
– Michael C. Pujols Vázquez and re:3D team
Michael C. Pujols Vázquez
Blog Post Author

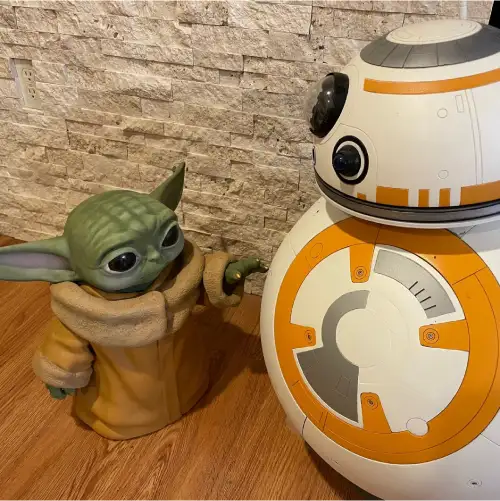
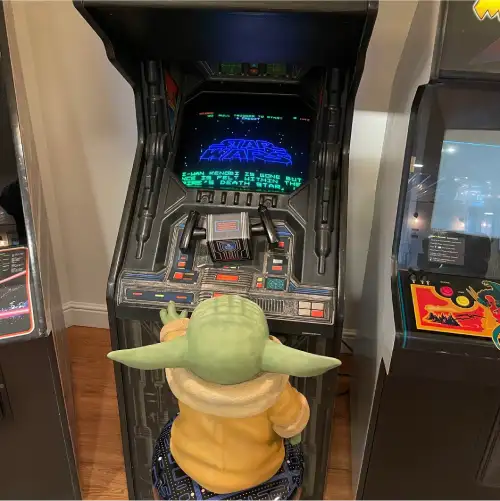
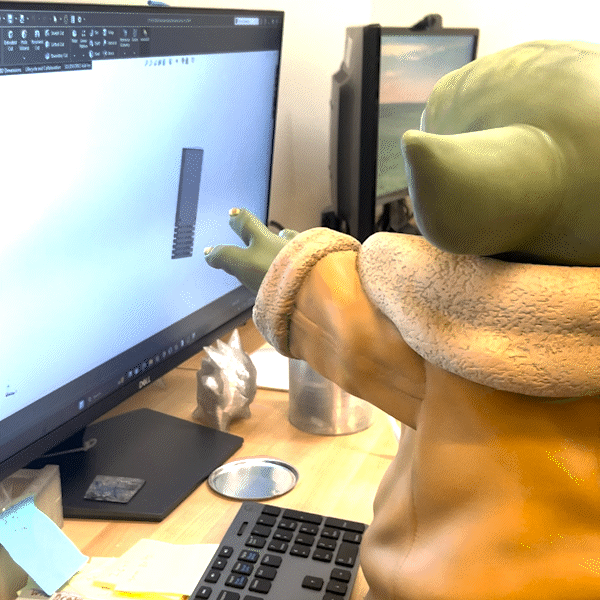
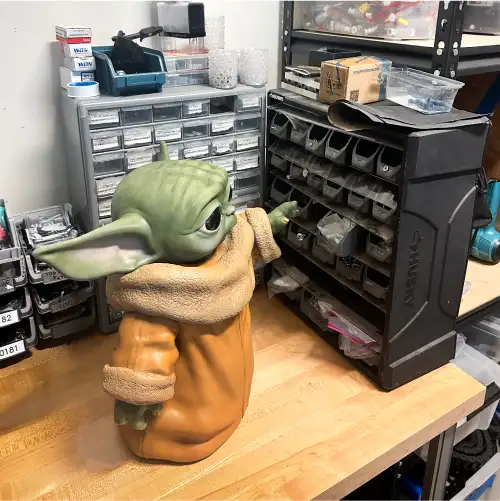
Mike Ogrinz is a maker through and through, deeply embedded in the re:3D community since backing the original Gigabot on Kickstarter in 2013. He originally purchased the Gigabot to 3D print the parts for his life-size replica of Robby the Robot. Over the years, Mike upgraded his Gigabot 2 to have a heated bed and dual-extruder capabilities. This has given Mike the ability to use the Gigabot for numerous projects, including making re:3D a life-size 3D printed Grogu (Baby Yoda) in exchange for our Series II All-Metal Body Extruder. You can read Mike’s blog post about how Grogu was created below, originally posted on his website, ogrinz.com.

I’ve had my Gigabot 3D printer for almost a decade now (wow) and every now and then the company behind it (re3D) have asked “Would you print something out for our in-house museum?” They’ve even offered to pay for the filament, shipping, etc. At one point, I *almost* sent them one of the spare heads from my Robby the Robot project, but the thought of all that sanding, priming, and painting scared me off.
Then a few months ago Jennifer from re3D reached out again. She asked if I’d be interested in making something, and even offered me some credit in their store. Well, I did have my eye on a set up fully-machined dual aluminum extruders as an upgrade for my Gigabot…. So I asked, “What would I have to make you in exchange for those parts?”
Jennifer almost immediately answered “Baby Yoda!” and the deal was struck. I figured with the filament cost probably coming in around $100, I was getting the better end of the deal. But of course, there was a lot of finish work required. And since Grogu has so many organic surfaces and details, it had to all be done by hand. I had to completely finish the replica too, which meant learning how to use an airbrush (well, it meant buying and airbrush and then learning how to use it). But I am extremely happy with how it came out. Now if I only could find the time to install those metal extruder mechanisms…
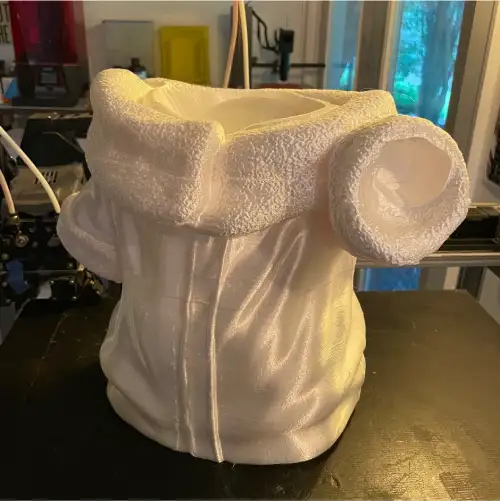
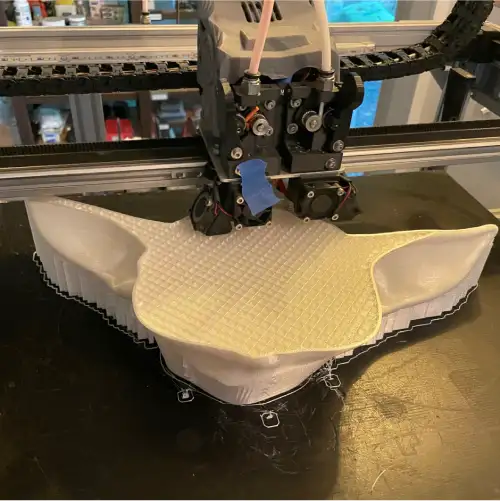

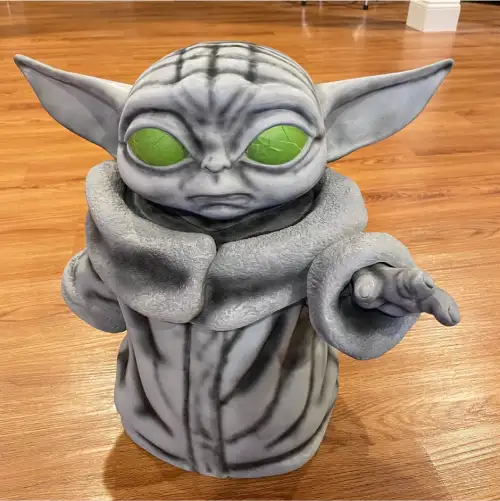

The 3D printed Grogu took 134 hours to print and used three rolls of PLA Silk filament.
The original Grogu file came from MarVin_Miniatures on Thingiverse. You can also follow them on Facebook, @MarVinMinis.
To learn more about Mike’s other projects click here. You can also check out Mike’s YouTube Channel, Ogrinz Labs, where he posts educational and informational videos on his awesome builds.
Jennifer Dennington
Blog Post Author

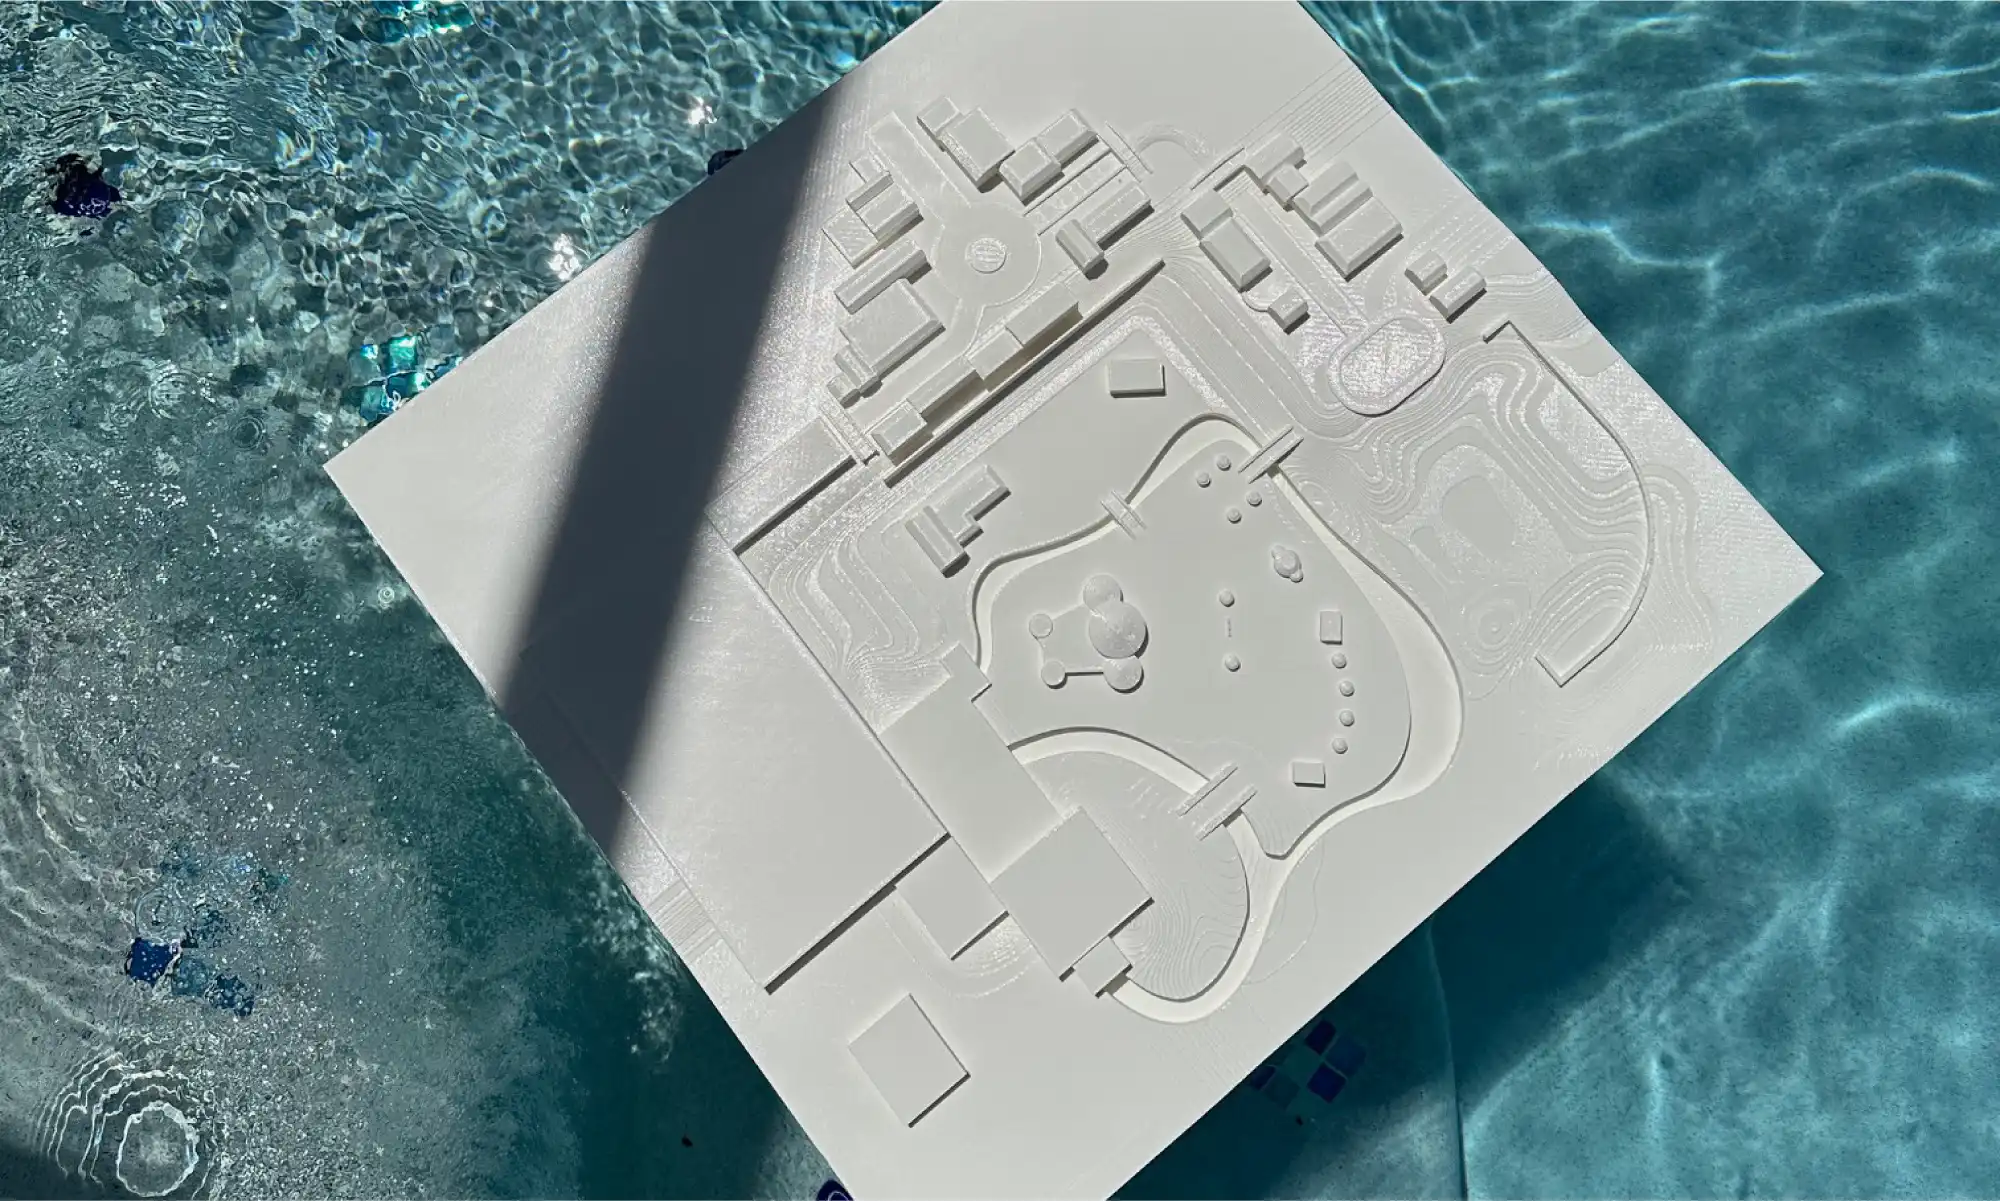
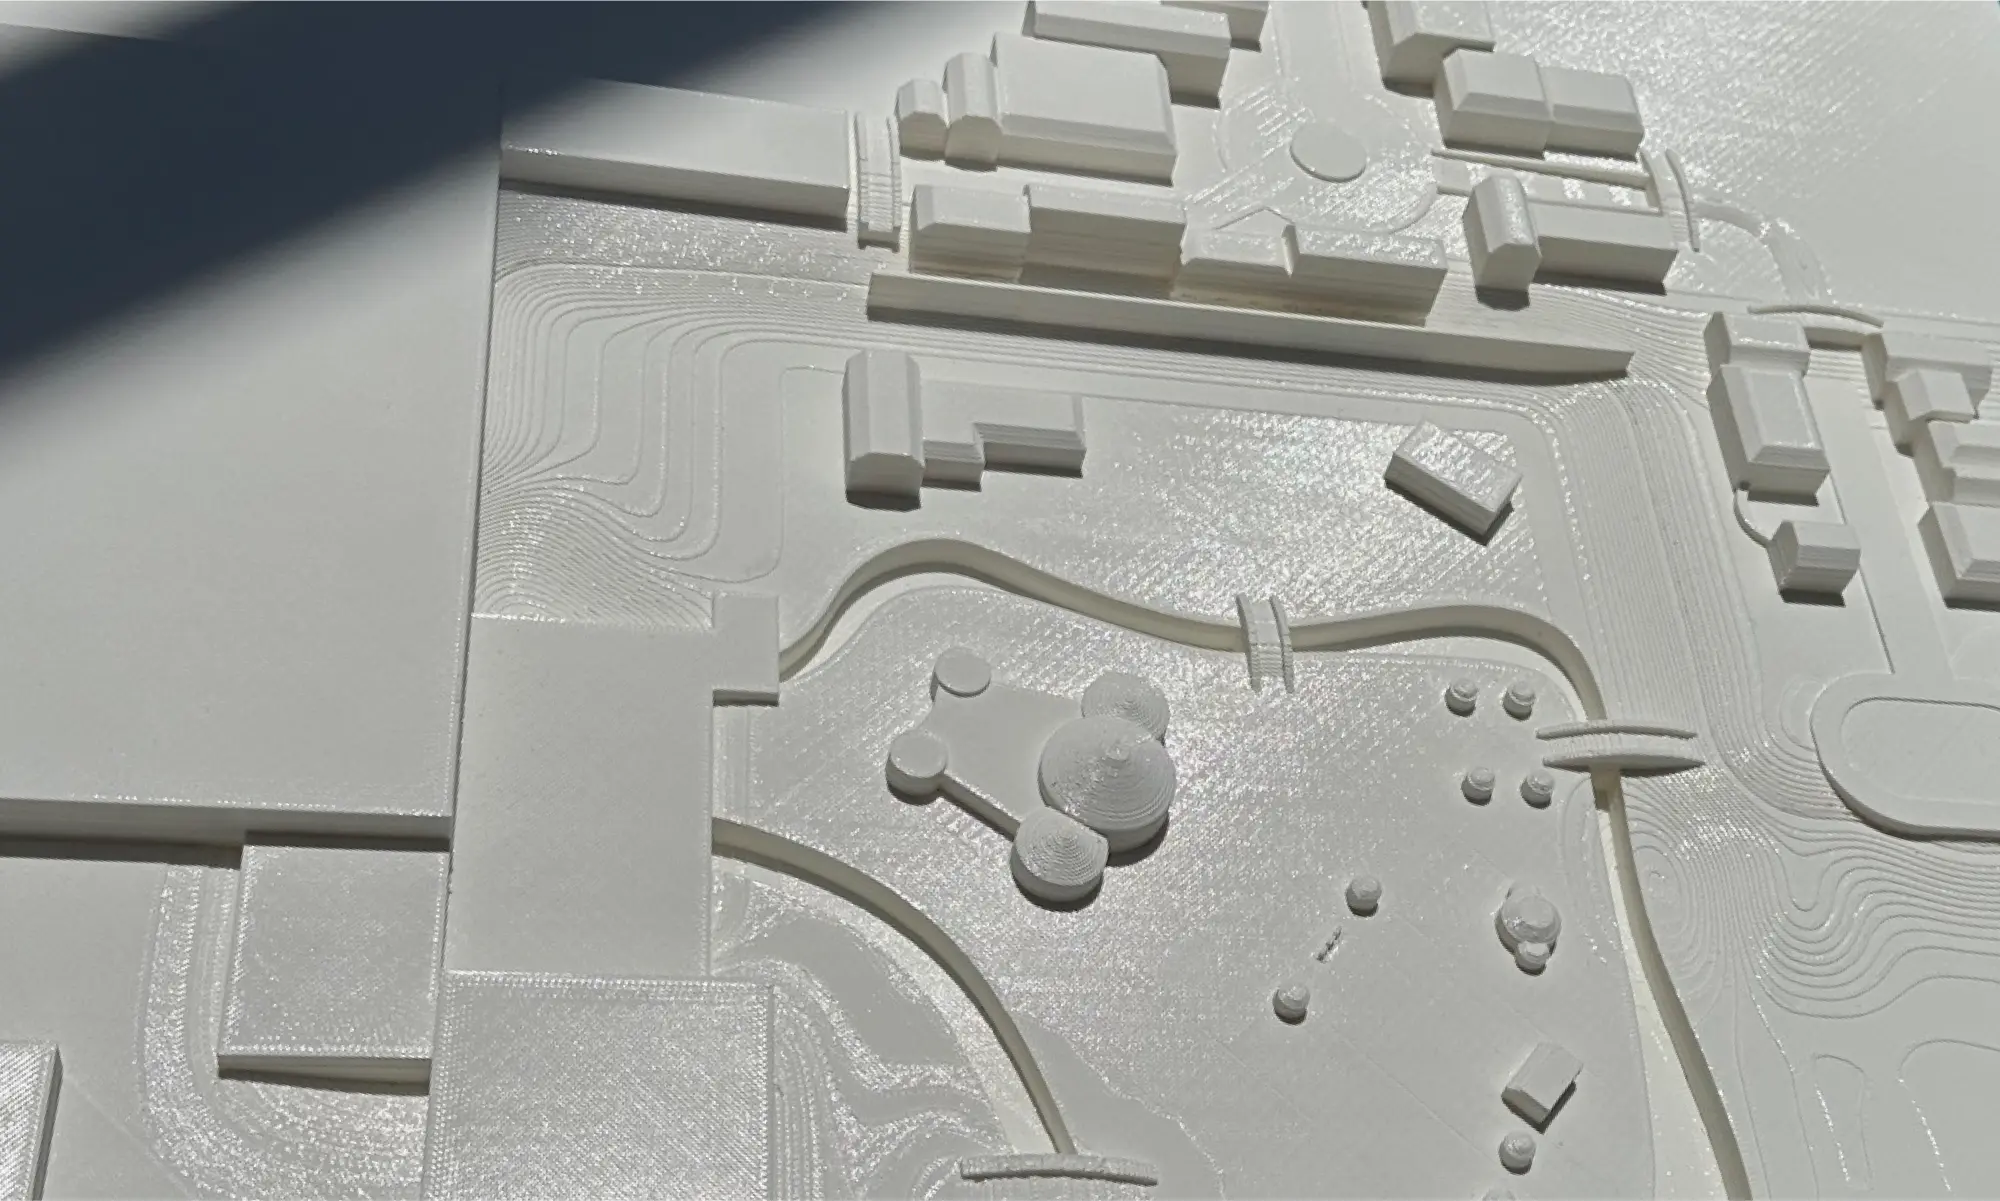
In the highly competitive realm of themed experience design, standing out requires not only innovative concepts but also the ability to present those concepts in a compelling and tangible way. This was the challenge faced by our project team at the University of Central Florida’s (UCF) Themed Experience Master’s Program. Our project, “Domain Bizarre,” aimed to revolutionize the theme park experience with a queueless land design. Key to our success was the utilization of a large-scale 3D printed massing model, generously provided by re:3D Inc.
In themed entertainment design, the devil is in the details. Traditional desktop 3D printers, while useful, often produce models that are too small to effectively convey the full scope and intricacy of a design. This is where re:3D Inc.’s large-scale 3D printing capabilities came into play, allowing us to create a 2ft x 2ft massing model of Domain Bizarre.
The ability to print a large model was crucial for several reasons:
Detailed Realism: Larger models capture finer details and provide a more realistic representation of our design. This level of detail is essential for themed entertainment, where every element contributes to the overall narrative and guest experience.
Comprehensive Visualization: A substantial model offers a more comprehensive view of the project, helping our team and the judges better understand spatial relationships, proportions, and the overall layout of Domain Bizarre.
Impactful Presentations: For our presentation, the large-scale model made a significant impact. It allowed the judges to truly grasp the scale and complexity of our design, enhancing their understanding and engagement.
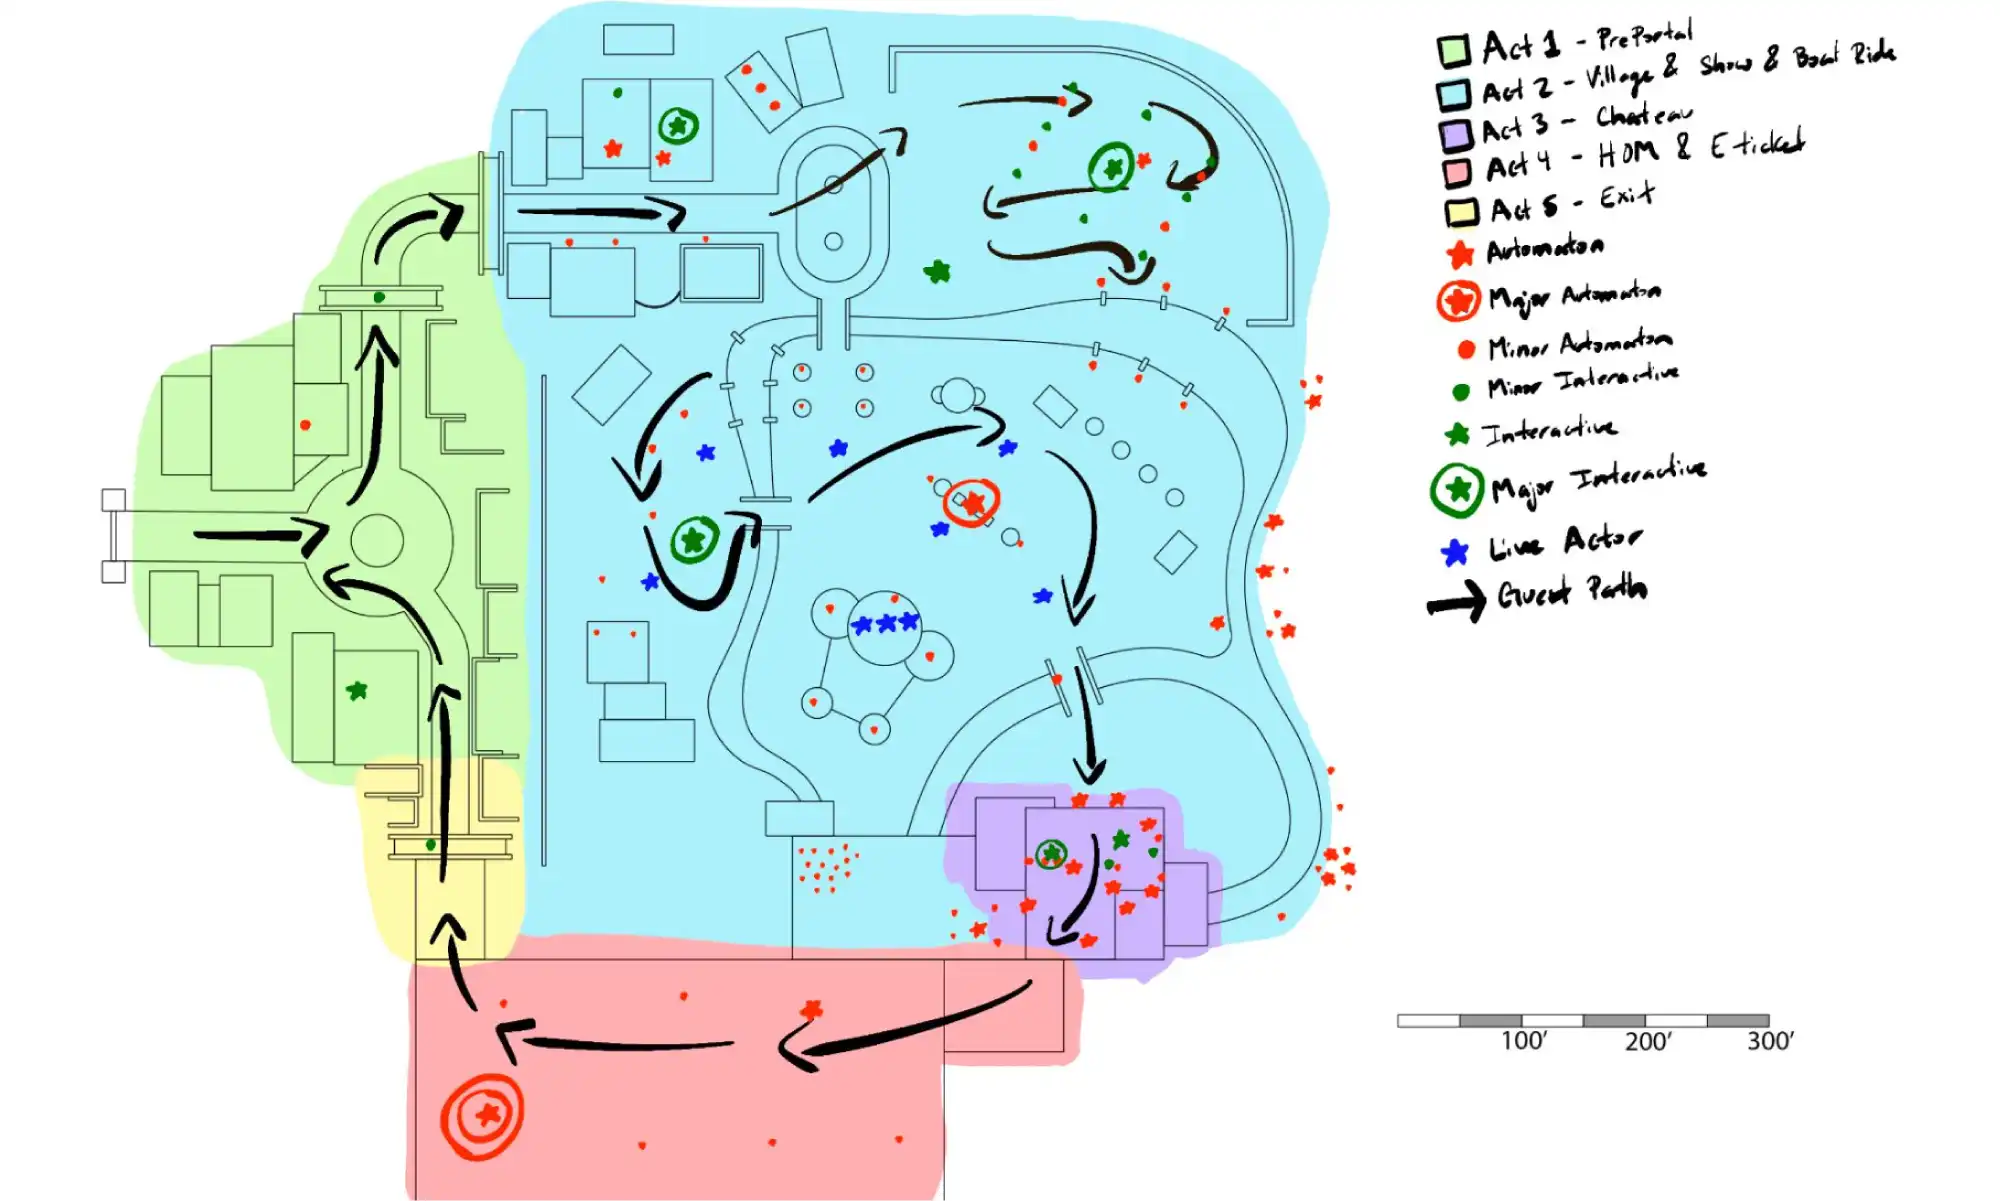
Domain Bizarre is a queueless land designed to be integrated into an existing theme park. Our goal was to create a seamless, immersive environment where guests could explore at their own pace without the constraints of traditional queues. Here’s how the large-scale 3D printed model facilitated this vision:
Design Breakdown: The 2ft x 2ft model allowed us to break down different areas of Domain Bizarre, illustrating how story beats unfolded across the land. We could clearly show where interactive elements, seating areas, and food stalls were ideally located.
Interactive Elements: By printing large, we could place and adjust interactive elements within the model, ensuring they fit seamlessly into the environment and contributed to the overall guest experience.
Optimized Layout: The detailed model helped us optimize the placement of various features, ensuring that every element—from food stalls to seating areas—was strategically placed to enhance the guest experience.
While UCF’s Themed Experience Master’s Program provided the platform for our project, it was re:3D Inc. that made our vision a reality. Their Gigabot 3D printer allowed us to create a detailed, large-scale massing model that was pivotal to our presentation’s success. The ability to “print HUGE” provided a level of detail and realism that desktop models simply cannot achieve.
The impact of our large-scale model on the presentation was profound. Judges were able to see our world in a tangible form, allowing them to fully appreciate the intricacies and thoughtfulness of our design. The model’s size and detail made it easier for them to visualize how Domain Bizarre would function in real life, enhancing the overall effect of our presentation.
The successful presentation of Domain Bizarre demonstrates the critical role that large-scale 3D printing can play in themed experience design. By collaborating with re:3D Inc., our project team was able to create a compelling and detailed massing model that brought our vision to life. This experience underscores the importance of innovative presentation tools in the field of themed entertainment, paving the way for future projects to push the boundaries of creativity and design.
For our team, the journey of Domain Bizarre was not just about presenting a project; it was about pioneering new methods of visual storytelling and spatial design. With the help of re:3D Inc., we showcased how large-scale 3D printing can transform abstract concepts into tangible realities, setting a new standard for themed experience presentations.
Blog Post Author

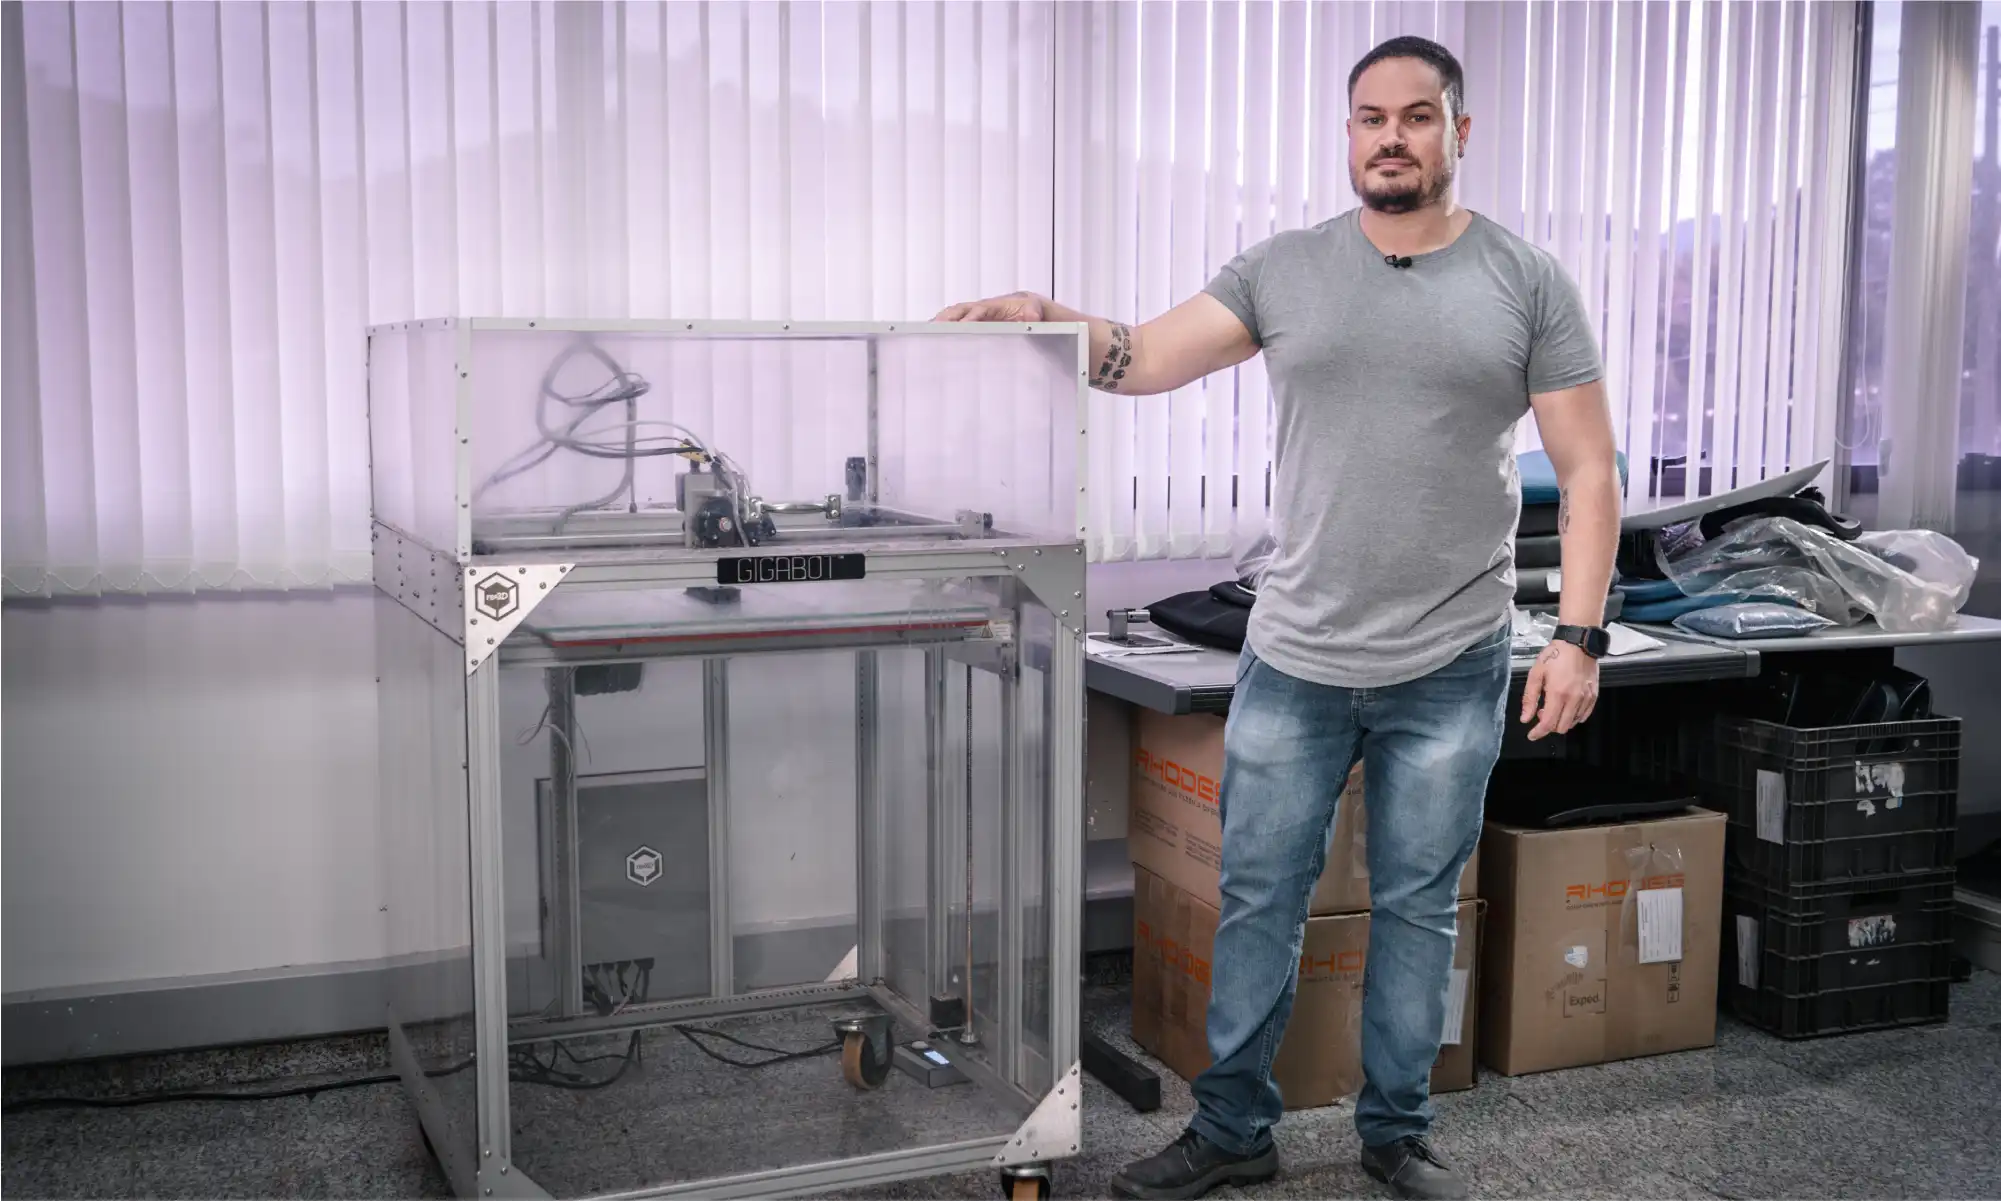
Have you ever considered how the chair you are sitting on right now was made? It’s a question that often goes overlooked in our daily lives, yet the answer reveals a world of innovation and creativity shaping the furniture industry. One of the notable players in this space is Brazilian manufacturer, Rhodes. Founded in 1964, Rhodes has been at the forefront of chair component manufacturing, producing around 5 million components annually for various seating solutions, from office chairs to public seating in airports and stadiums.

Rhodes plays a vital role in providing essential elements for operative chair lines. Key products include bases, columns, and mechanisms, which maintain Rhode’s strong presence as a component supplier. Despite market challenges, especially during Brazil’s economic crisis in 2013-2014, Rhodes has excelled. During the COVID-19 Pandemic, Rhodes expanded into the ready-made chair market, adapting to the growing need for home offices. Currently, Rhodes is a major manufacturer of chairs and chair components in Brazil and exports its products to other Latin American countries, the United States, and some parts of Europe.
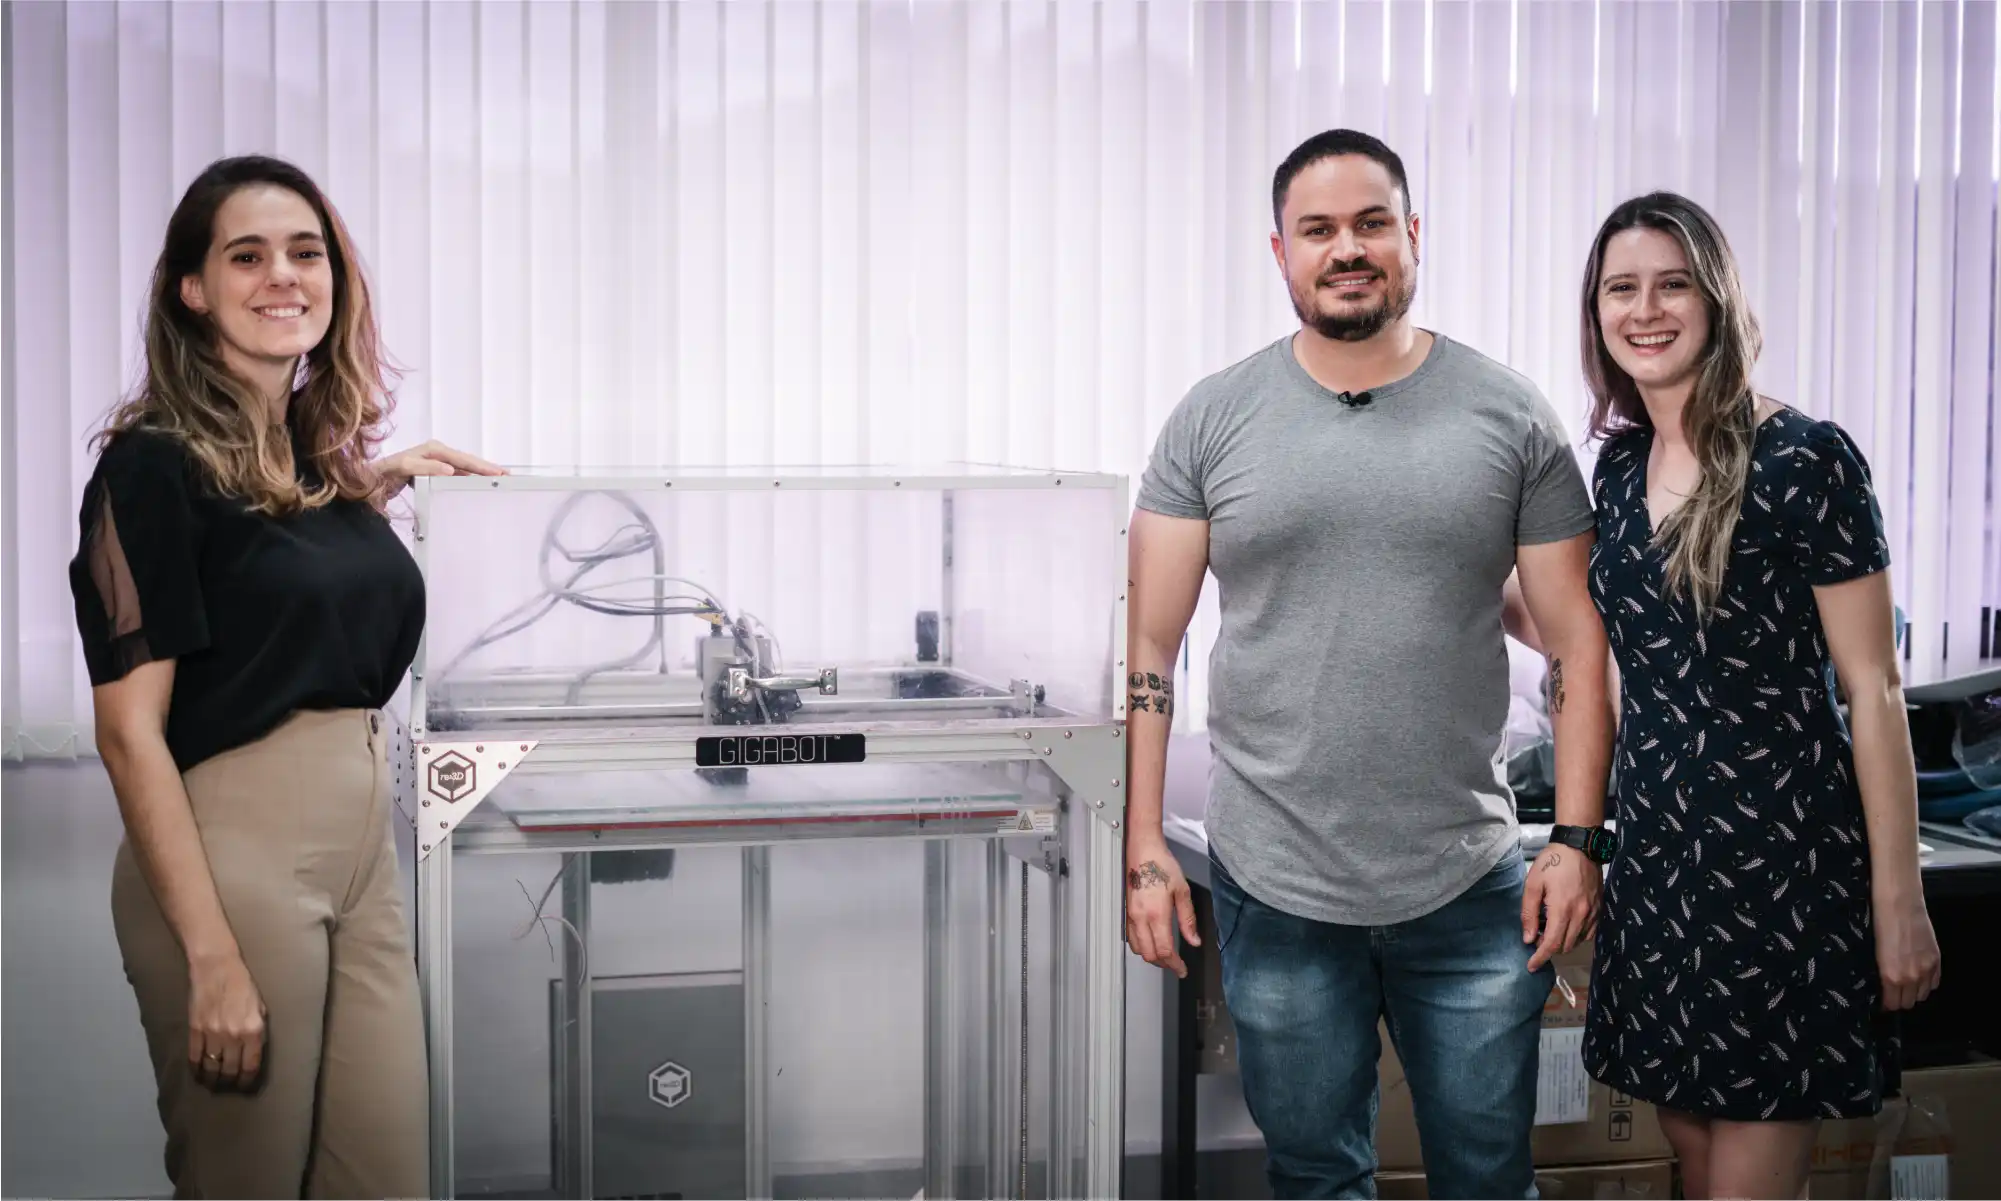
Rhodes’ integration of 3D printing played a crucial role in streamlining their manufacturing process and achieving global success. Initially, Rhodes outsourced their 3D printing needs. They would create a computer-aided design (CAD) file for their chair component prototypes, send it to a partner company in Italy, and wait for the 3D printed component to come back. The cost and time constraints prompted Rhodes to explore other alternatives. After a Google search led Rhodes to re:3D, the size and affordability of re:3D’s Gigabot cemented their purchase as Rhodes first in-house 3D printer for prototyping and design iterations. A decade later, Rhodes’ workhorse Gigabot 2 is still going strong, being used to 3D prototype every plastic component of their furniture lines.
Gigabot’s robustness and versatility has allowed Rhodes to seamlessly integrate 3D printing into their development processes. From mitigating design flaws to producing quick 3D prototypes for assessment, Gigabot has been a reliable companion, functioning almost continuously for a decade. But it wasn’t always that easy. It took Júlio a full year of experimenting and learning before getting quality prints from Gigabot, since he had no prior 3D printing experience when Rhodes decided to test the technology. Julio had to determine which material to print with and find a reliable national supplier. He ended up choosing ABS because of its durability, which was key to testing the prototypes before finalizing their design. Júlio built an enclosure for the machine to overcome temperature differences during different seasons and ensure ABS would print year-round. He has also tested every type of glue on the market, including hairspray, to make the prints adhere to the print bed, as re:3D’s original Gigabot 2 did not come with PrintinZ.
Júlio started small, prototyping components of chairs such as caster bases, columns, mechanisms, seats, and backrests. Rhodes also began to use Gigabot to print replacement parts for machines in their factory and has been contracted by their vendors to CAD other non-chair-related products. Because of their success with Gigabot 2, Rhodes purchased a Gigabot 4, which will be an upgrade from their current, single-extruder workhorse. Júlio anticipates enhanced ease of use and agility, allowing for increased prototyping and quicker project timelines. Júlio believes that 3D printing’s strength and effectiveness is well-established and expects the technology to continue influencing the furniture industry.
The integration of Gigabot at Rhodes exemplifies how innovative technologies can revolutionize traditional industries. Júlio’s insights showcase the profound impact of 3D printing on Rhodes’ development processes, fostering creativity, and enabling the exploration of new design possibilities. Looking towards the future, Rhodes is poised to take its manufacturing capabilities to new heights with the upcoming addition of the Gigabot 4. With its dual-extrusion print head, this advanced 3D printer will enable Rhodes to produce larger, more intricate 3D prototypes, pushing the boundaries of design creation even further. Moreover, by doubling their printing capacity with two Gigabots, Rhodes aims to accelerate their prototyping process, allowing for quicker iteration and refinement of their chair designs. As Rhodes continues to leverage Gigabot’s capabilities, it exemplifies a story of adaptation and innovation in the furniture manufacturing industry that is not slowing down.
Você já parou para pensar em como a cadeira em que você está sentado agora foi feita? É uma pergunta que muitas vezes passa despercebida em nossas vidas diárias, mas a resposta revela um mundo de inovação e criatividade que está moldando a indústria de móveis. Um dos nomes mais fortes nesse espaço é a fabricante brasileira Rhodes. Fundada em 1964, a Rhodes tem estado na vanguarda da fabricação de componentes para cadeiras, produzindo cerca de 5 milhões de componentes anualmente para várias soluções de assentos, desde cadeiras de escritório até assentos públicos em aeroportos e estádios.
A Rhodes desempenha um papel vital no fornecimento de elementos essenciais para linhas de cadeiras operativas. Os principais produtos incluem bases, colunas e mecanismos, o que mantêm a forte presença da Rhodes como fornecedora de componentes. Apesar dos desafios do mercado, especialmente durante a crise econômica do Brasil em 2013-2014, a Rhodes se destacou. Durante a pandemia de COVID-19, a empresa expandiu seu portfólio para o mercado de cadeiras prontas, adaptando-se à crescente necessidade do home office. Atualmente, a Rhodes é uma das principais fabricantes de cadeiras e componentes para cadeiras no Brasil, além de exportar seus produtos para outros países da América Latina, Estados Unidos e algumas partes da Europa.
A integração da impressão 3D pela Rhodes desempenhou um papel crucial na otimização do seu processo de fabricação e no alcance do sucesso global. Inicialmente, a Rhodes terceirizava suas necessidades de impressão 3D. Eles criavam um arquivo de design assistido por computador (CAD) para os protótipos de componentes das cadeiras, enviavam para uma empresa parceira na Itália e aguardavam o retorno do componente impresso em 3D. Os custos e as restrições de tempo levaram a Rhodes a explorar outras alternativas. Após uma pesquisa no Google levar a Rhodes à re:3D, o tamanho e a acessibilidade do Gigabot da re:3D consolidaram a compra como a primeira impressora 3D interna da Rhodes para prototipagem e iterações de design. Uma década depois, a robusta Gigabot 2 da Rhodes ainda está em plena atividade, sendo usada para prototipar todos os componentes plásticos de suas linhas de móveis.
A robustez e a versatilidade do Gigabot permitiram à Rhodes integrar perfeitamente a impressão 3D em seus processos de desenvolvimento. Desde mitigar falhas de design até produzir protótipos rápidos para avaliação, a Gigabot tem sido uma companheira confiável, funcionando quase que continuamente por uma década. Mas nem sempre foi tão fácil. Júlio levou um ano inteiro de experimentação e aprendizado antes de conseguir impressões de qualidade com a Gigabot, já que ele não tinha experiência prévia com impressão 3D quando a Rhodes decidiu testar a tecnologia. Júlio teve que determinar qual material usar para impressão e encontrar um fornecedor nacional confiável. Ele acabou escolhendo ABS por causa de sua durabilidade, o que foi crucial para testar os protótipos antes de finalizar o design. Júlio construiu uma caixa de proteção para a máquina para superar as diferenças de temperatura durante as diferentes estações, garantindo que o ABS fosse impresso durante todo o ano. Ele também testou todos os tipos de cola no mercado, incluindo spray de cabelo, para fazer as impressões aderirem à mesa de impressão, já que o Gigabot 2 original da re:3D não vinha com a tecnologia PrintinZ.
Júlio começou pequeno, prototipando componentes de cadeiras, como bases de rodízios, colunas, mecanismos, assentos e encostos. A Rhodes também começou a usar o Gigabot para imprimir peças de reposição para máquinas em sua fábrica e foi contratada por seus fornecedores para criar em CAD outros produtos não relacionados a cadeiras. Devido ao sucesso da Gigabot 2, a Rhodes comprou uma Gigabot 4, que será uma atualização em relação ao seu robusto equipamento atual de extrusora única. Júlio prevê maior facilidade de uso e agilidade, permitindo mãos projetos de prototipagem e prazos mais curtos. Júlio acredita que a força e a eficácia da impressão 3D estão bem estabelecidas e espera que a tecnologia continue influenciando a indústria de móveis.
A integração da Gigabot na Rhodes exemplifica como tecnologias inovadoras podem revolucionar indústrias tradicionais. As percepções de Júlio mostram o profundo impacto da impressão 3D nos processos de desenvolvimento da Rhodes, promovendo a criatividade e possibilitando a exploração de novas possibilidades de design. Olhando para o futuro, a Rhodes está pronta para levar suas capacidades de fabricação a novos patamares com a próxima adição da Gigabot 4. Com sua cabeça de impressão de dupla extrusão, esta avançada impressora 3D permitirá que a Rhodes produza protótipos maiores e mais intrincados, expandindo ainda mais os limites da criação de design. Além disso, ao dobrar sua capacidade de impressão com duas Gigabots, a Rhodes visa acelerar seu processo de prototipagem, permitindo uma iteração e refinamento mais rápidos dos designs de suas cadeiras. À medida que a Rhodes continua a aproveitar as capacidades da Gigabot, a empresa reforça uma história de adaptação e inovação na indústria de fabricação de móveis que não está desacelerando.
Jennifer Dennington
Blog Post Author

The māk studio building is a rather nondescript structure in an industrial area just east of downtown Houston. It may not look like much from the outside, but the innards are a different story. This, in a way, is what they have the power to do for their clients, transforming a space that otherwise might pass by unnoticed into one that demands attention.
māk studio’s tagline is simple and to the point: “Make design possible.” They design, build, and manufacture beautiful spaces, functional objects, furniture, and surfaces tailored to commercial brands. The design doesn’t just stop with the structural design, as mentioned more below, interior design is a factor too. The use of such designs as Fine Art America posters, wall art, paintings, eye-catching color, etc. is very important and can give a certain feel to an area.
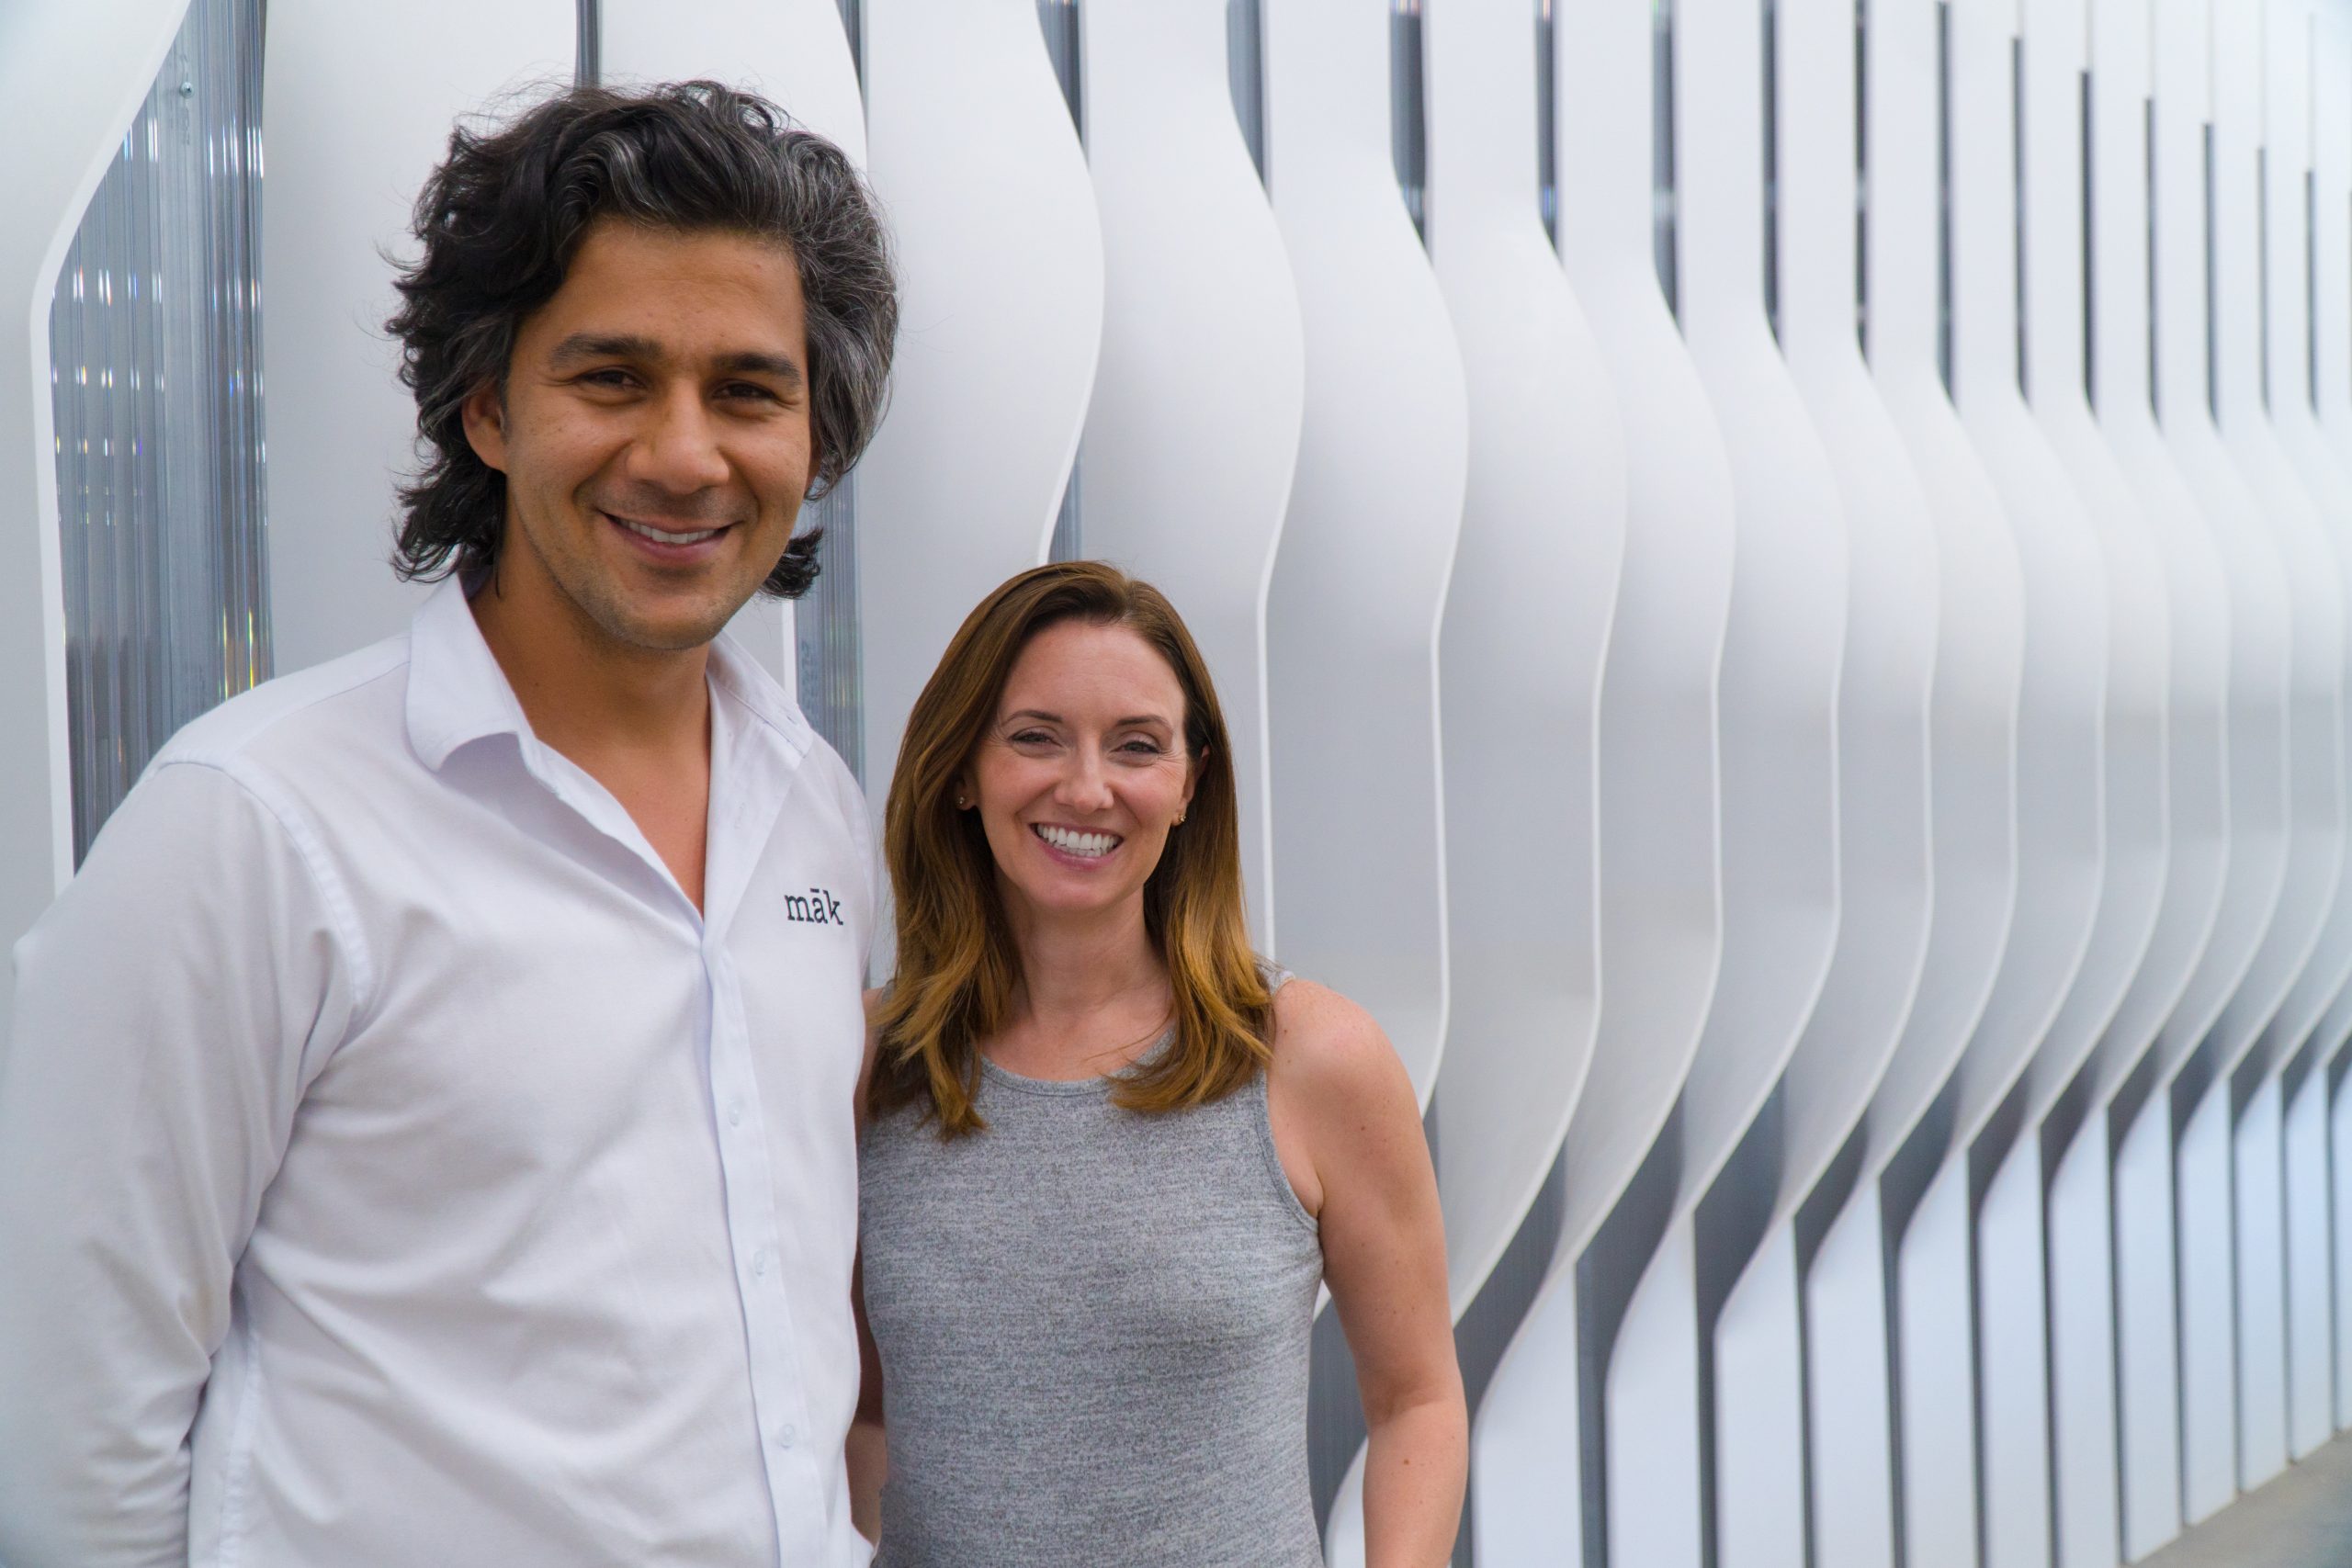
The founders, Liz Cordill and José Aguilar, met while practicing architecture in 2013, and have spent nearly three decades between the two of them as practicing architects. They began hitting roadblocks, however, when it came to actually fabricating some of their more complex ideas.
“There was this disconnect between the design industry and the construction industry where the design industry was developing these really cool concepts and the construction industry was not quite keeping up,” explains Aguilar. “We found an opportunity there to really focus on that niche and just offer that as a design and fabrication service.”
māk was their answer to this hurdle.
“We started this business – José and I – because as practicing architects we were finding that some of the things that we were designing, the technology wasn’t there to fabricate it,” says Cordill.
Cordill and Aguilar started with one machine and grew into the 16,000 square foot facility they occupy today. A massive fin wall separates their production floor from the front portion of the office and showroom where the design and prototyping happens. They can take a concept directly from CAD file to physical form using the array of tools at their disposal – from CNC routers to thermoformers – without leaving the building.
māk studio is a team of architects, industrial designers, interior designers, carpenters, and fabricators; conceiving and creating custom concepts is their specialty. Sometimes, the toughest part of the process can actually be the sale.
The architecture industry used to rely on line drawings to communicate building concepts – a format that Cordill said could be exceptionally difficult to wrap one’s head around. The industry was quick to jump on the 3D train, taking their work into the realm of CAD. But for as photorealistic as these architectural renderings can be, these too are subject to interpretation, says Cordill.
This was something the architecture industry had remedied with hand-built models. “We used to actually build physical models, with cardboard and chipboard and things like that,” recounts Cordill. And while māk wanted a medium that would allow their clients to accurately understand how a particular feature would look and feel in their space, the time sink of laboring over a cardboard model for hours or days didn’t make sense.
The same issues apply to the custom furniture that māk creates today. In order to solve this issue, they turned their sights to 3D printing and ended up getting a Gigabot.
“Having the 3D printer is much more valuable because it’s a faster tool,” says Cordill. “We can set it to work and we don’t have a person sitting there cutting cardboard – and themselves – with an Exacto.”
“The Gigabot is really core to how we do things here,” says Aguilar. “From our sales efforts, to our marketing efforts, to actually solving problems for our clients.”
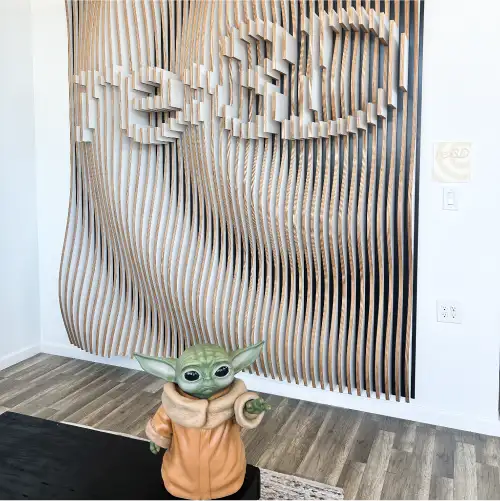
One of Māk’s recent customers was none other than the re:3D Houston factory.
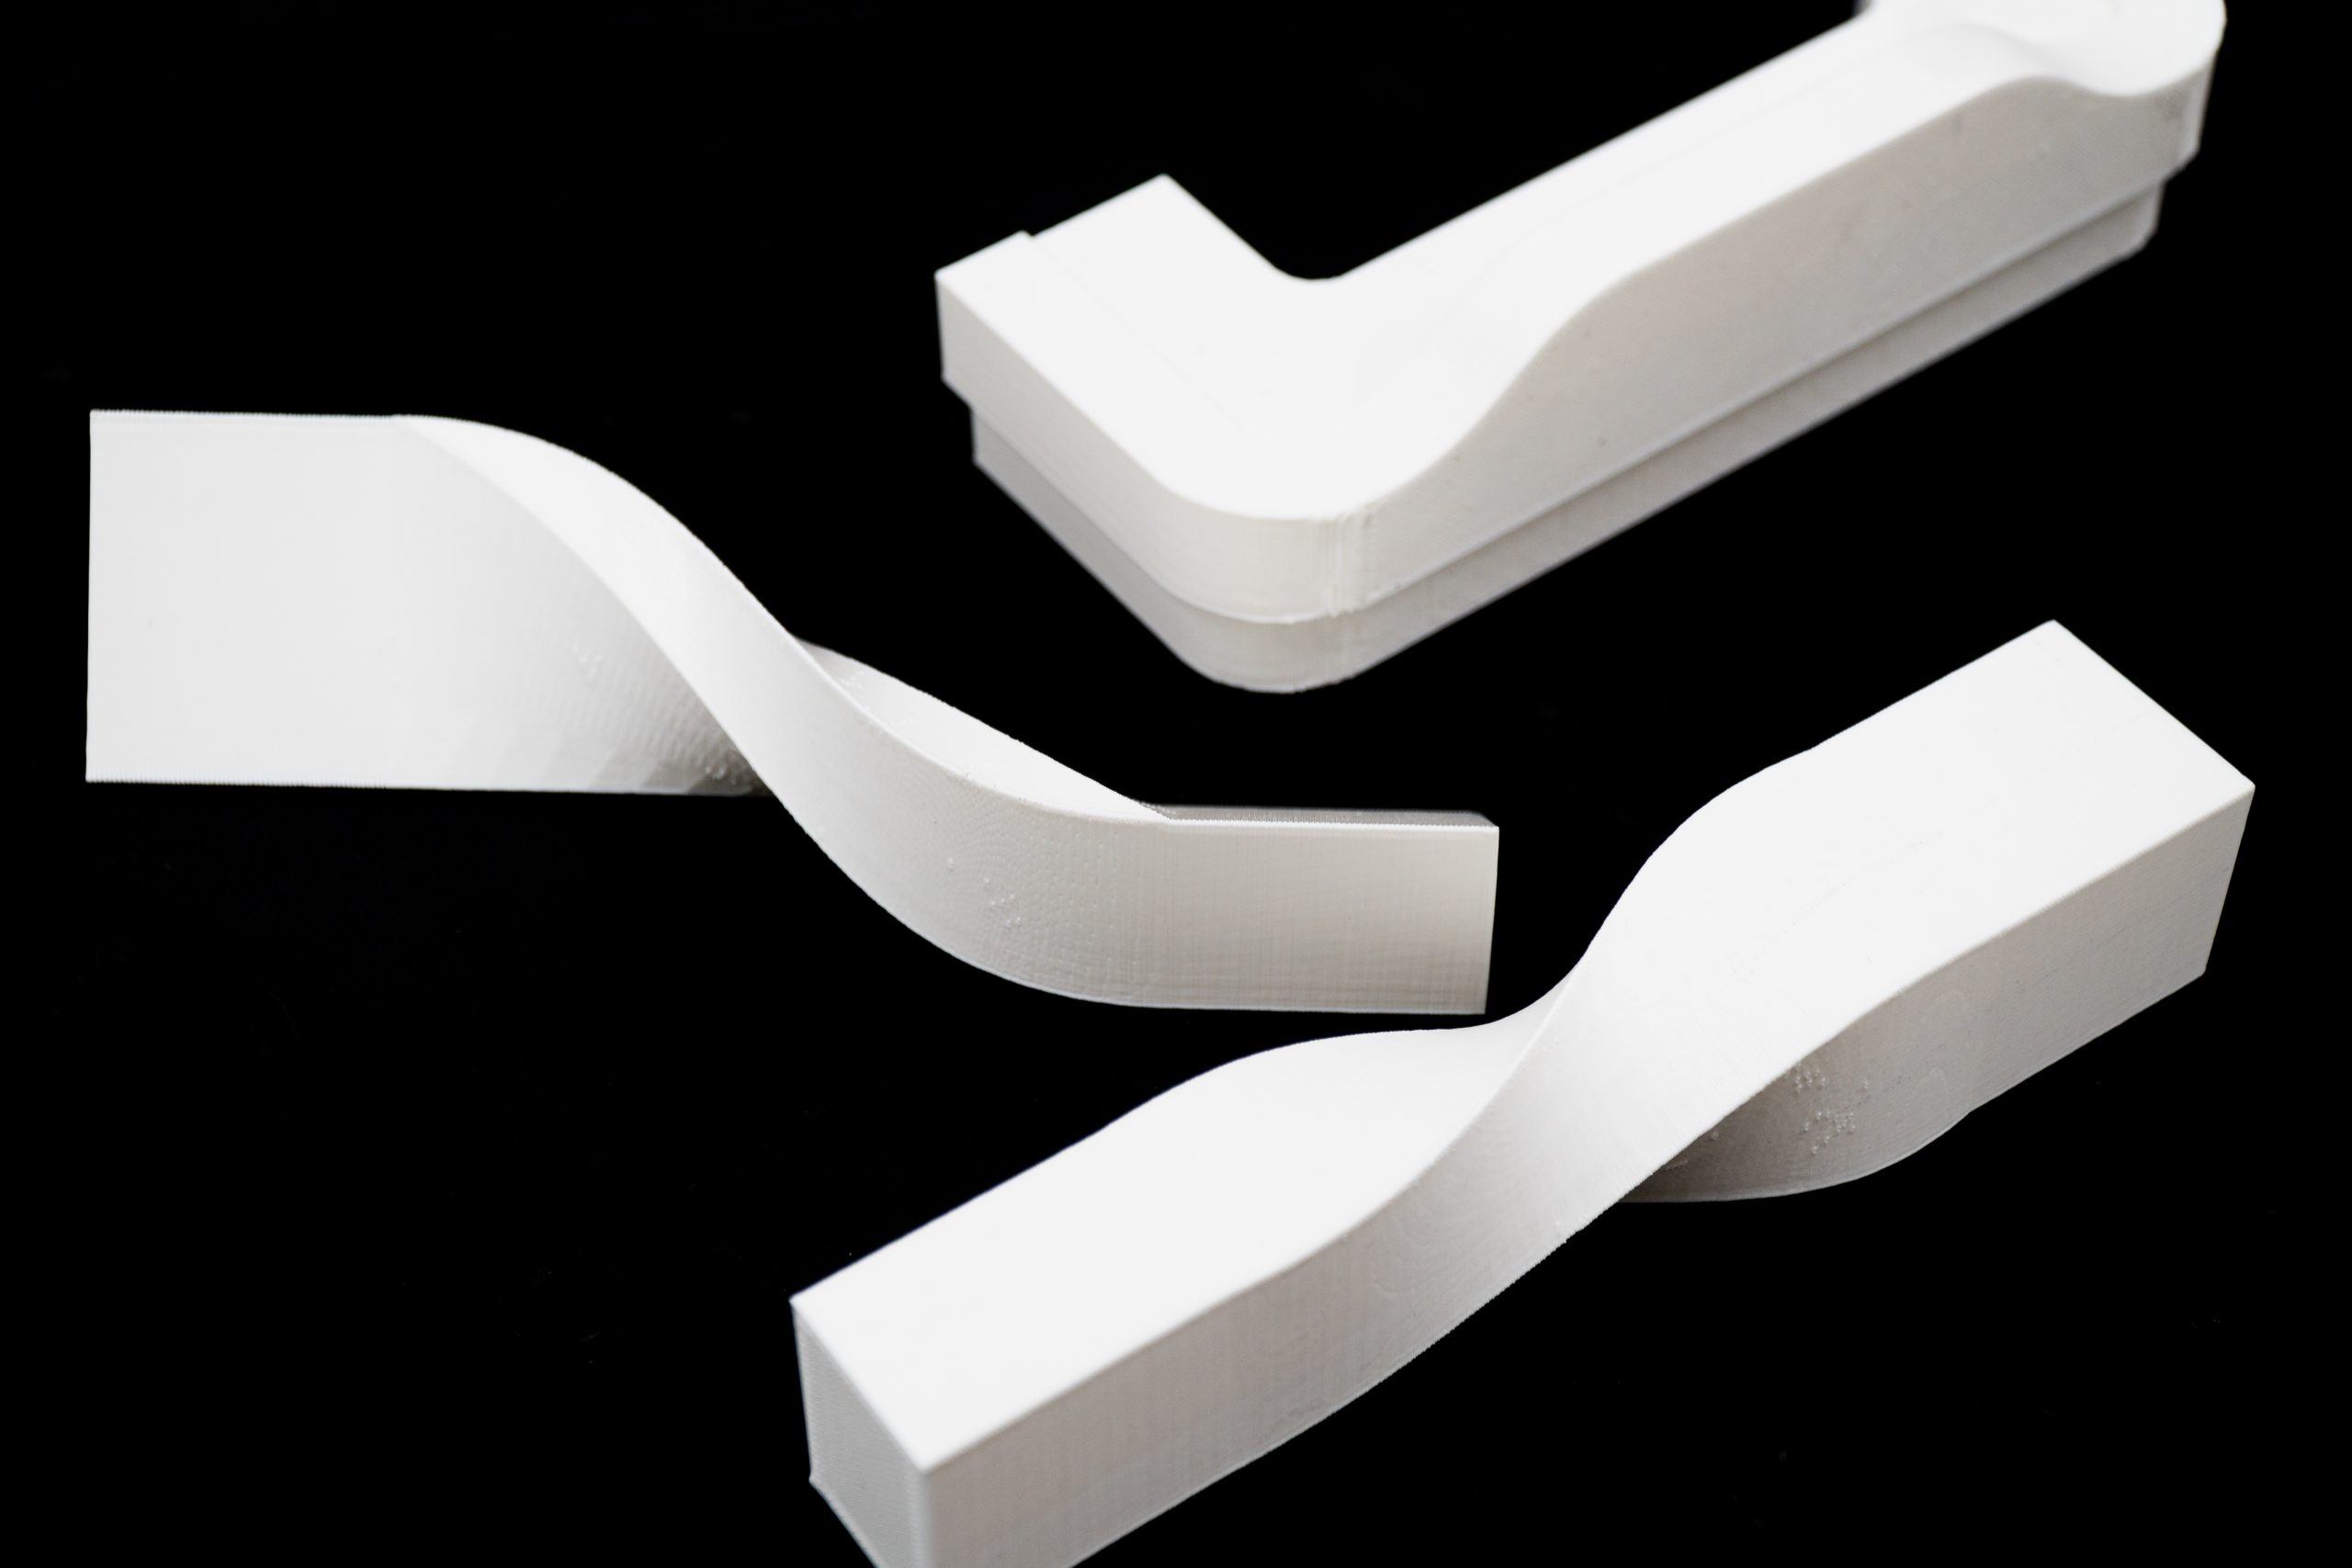
“Designing these walls is a lot of fun.” Polli Bush is Māk’s Project Manager. She walked the re:3D team through the māk design portal user interface, aiding us in the design of several iterations of a logo fin wall.
Once we created three versions, we were able to export STL files of each option and print them in-house on Gigabot. The final decision was put up to a company-wide vote, and with the winner chosen, māk got to fabricating.
The install took no more than an hour: the māk team put together the mounting system of the wall and showed our group how to slide the wooden fins into place. The rippling design took shape before our eyes as each unique slat was added.
Bush explains how the design process has evolved from the pre-3D printer days at Māk, highlighting their ability to rapidly prototype and create accurate scale models of designs. “The technology of 3D printing makes it a lot easier for people to believe in what they’re going to get,” says Bush. “It’s proof of concept in our industry.”
“At the end of the day, we’re problem-solvers for our clients,” says Aguilar.
māk does everything in their power to make their clients visions into reality, using the arsenal of cutting-edge production tools at their disposal. Gigabot fits into this lineup of problem-solving machinery, but Aguilar explains that it can also serve as a check for them.
“We’ve got clients that come up with some really cool stuff, and sometimes it’s very complicated to build,” he says. “If we can’t 3D print something, most likely it’s gonna be really, really hard to actually make it in bigger components. So it actually keeps us in check. If we can 3D print it, that means that we have the logic to actually build it.”
On the other hand, he remarks, if they have major issues with 3D printing scale models, it can serve as an initial sign that perhaps the design needs to be reworked.
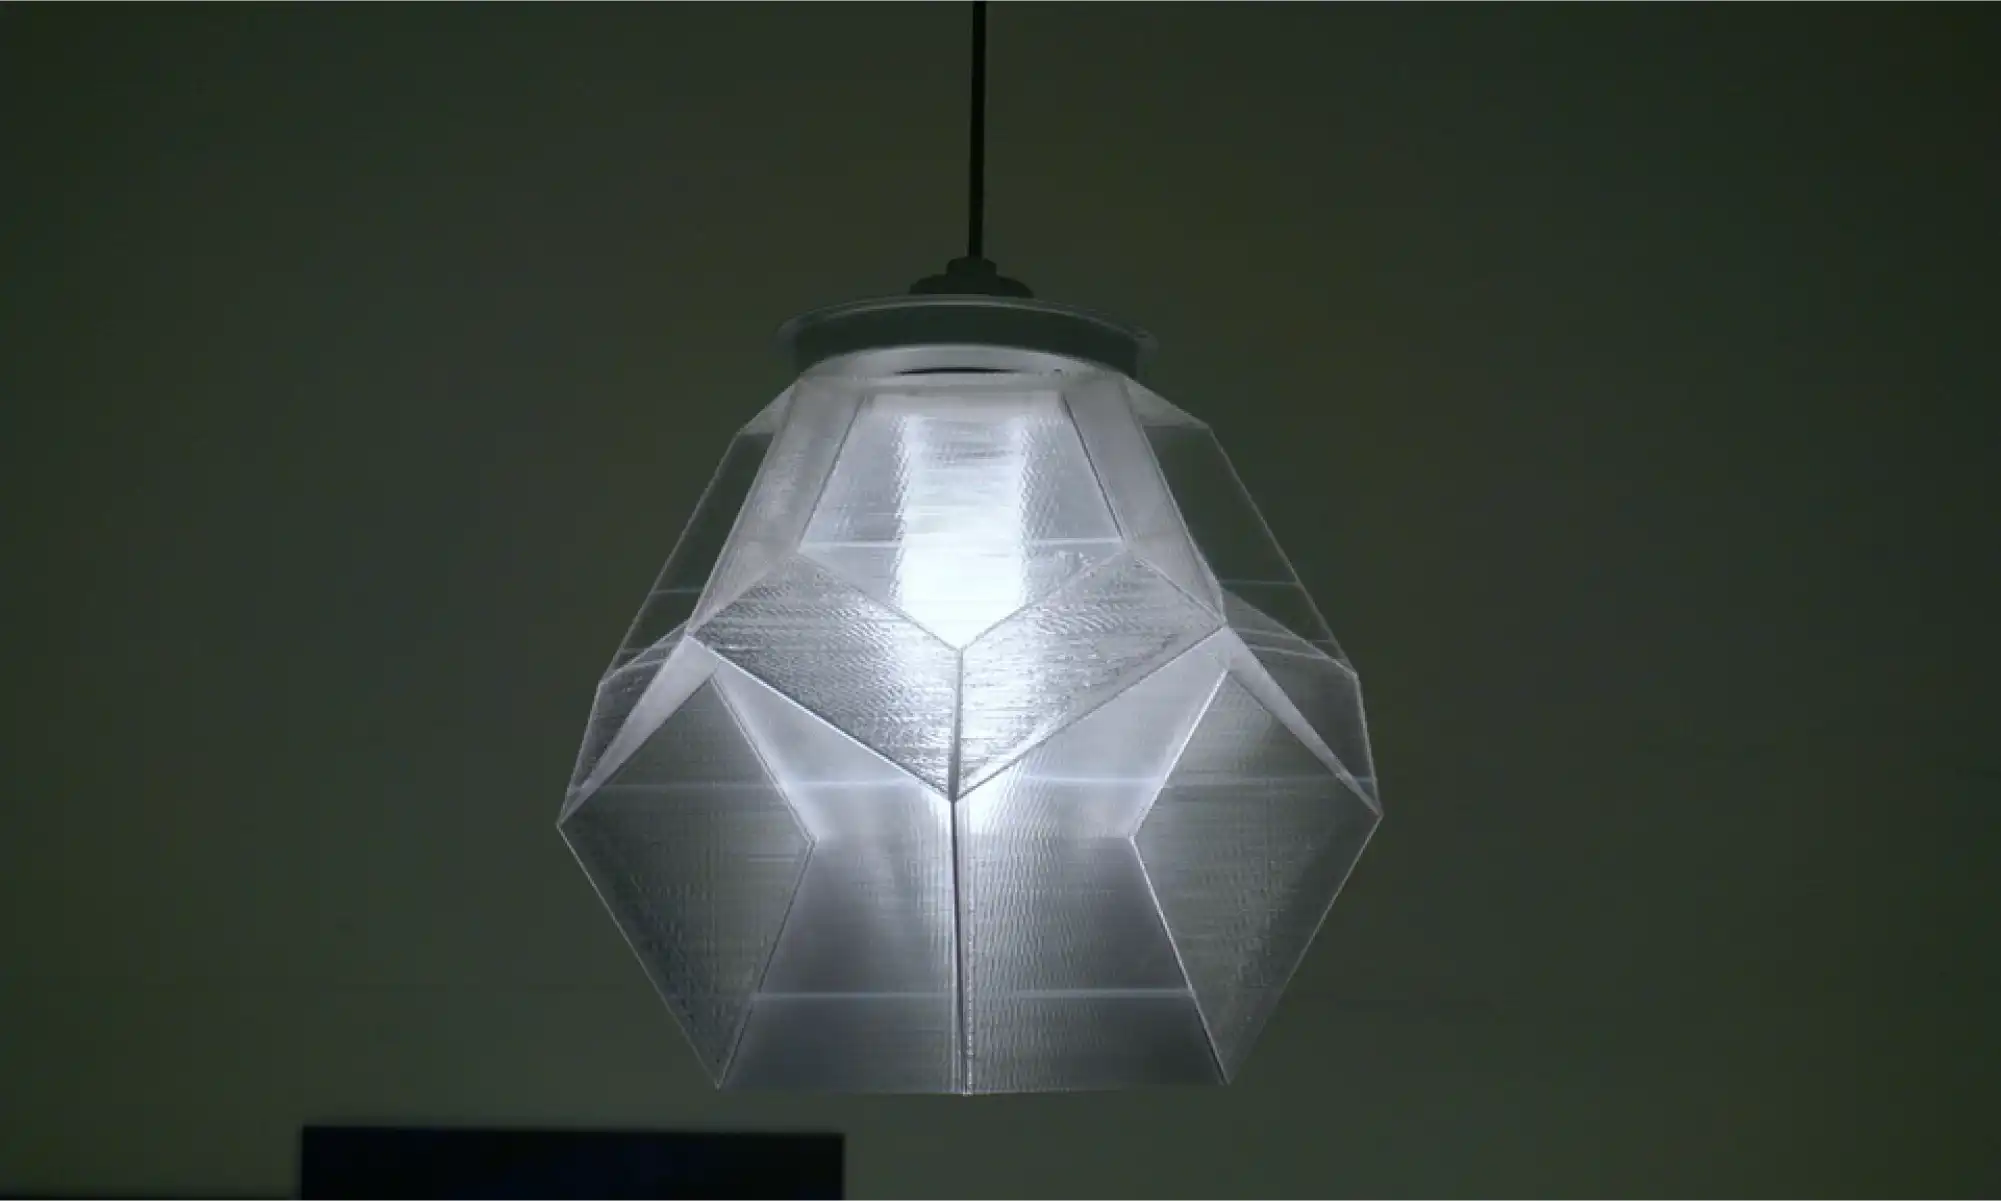
Gigabot can also bridge the gap where other production tools may falter. Aguilar tells the story of a custom light fixture they’re working on with a client, where 3D printing is serving a role in producing the final piece. “We’re studying the idea of doing this faceted light that would be really hard to do without printing,” he says. “It would be very, very time-consuming and it would make the project unattainable.”
Camilo Reinales is a Designer and Fabrication Assistant at māk working on the light project. “This custom light opened the idea of ‘maybe we don’t need to use the traditional fabrication methods, maybe we could start exploring additive manufacturing alternatives.’”
They’re experimenting with printing the pyramidal structure of the fixture in PLA and casting in metal. “For the geometry that it has, it would have taken a lot of time and skill for a craftsman to create,” explains Reinales. “But with 3D printing, the cool thing about it is that if you can model and print it, like 75% of the job is done.”
They printed a functional scale model at 75% infill – a 37 hour print – so they could actually hang items from the structure as they go through testing. The final light will be twelve by fight feet.
Aguilar muses about his journey from small, desktop printing in architecture school to where they are now at māk . “I always want to print a little bigger, a little faster. This was a really great aspect of Gigabot.”
The technology is now so enmeshed in their process Aguilar can hardly picture a time before 3D printing. “[Gigabot] is kind of core to our DNA how we do things here,” he reiterates. “It’s just part of the process. Every project is somewhat touched by [it] right now.”
Cordill reflects on how 3D printing has enabled them to offer products and services to a wider swath of clients. “You can see some of these sort of fancy designs and people think, ‘Oh, that’s really, really expensive. I can never have that in my space,’” she muses. “But our goal is to really make it more accessible to everyone, so that you’ve got access to creating something unique that’s your own, using these design tools.”
It’s clear that at the core of māk is a desire to continue pushing the boundaries of what is possible in their field – after all, that is how the company came to be in the first place. They accomplish this with a pioneering mentality and a pursuit of new tools and technologies that enable the creation of ideas that would otherwise remain unmakeable.
On the relatively recent addition of 3D printing to their production floor lineup, Aguilar muses, “It really has helped us keep up with where the industry is going, where the technology is going, and how do we invest in this technology in the future?”
Learn more about māk studio: https://www.makstudio.us/
Morgan Hamel
Blog Post Author

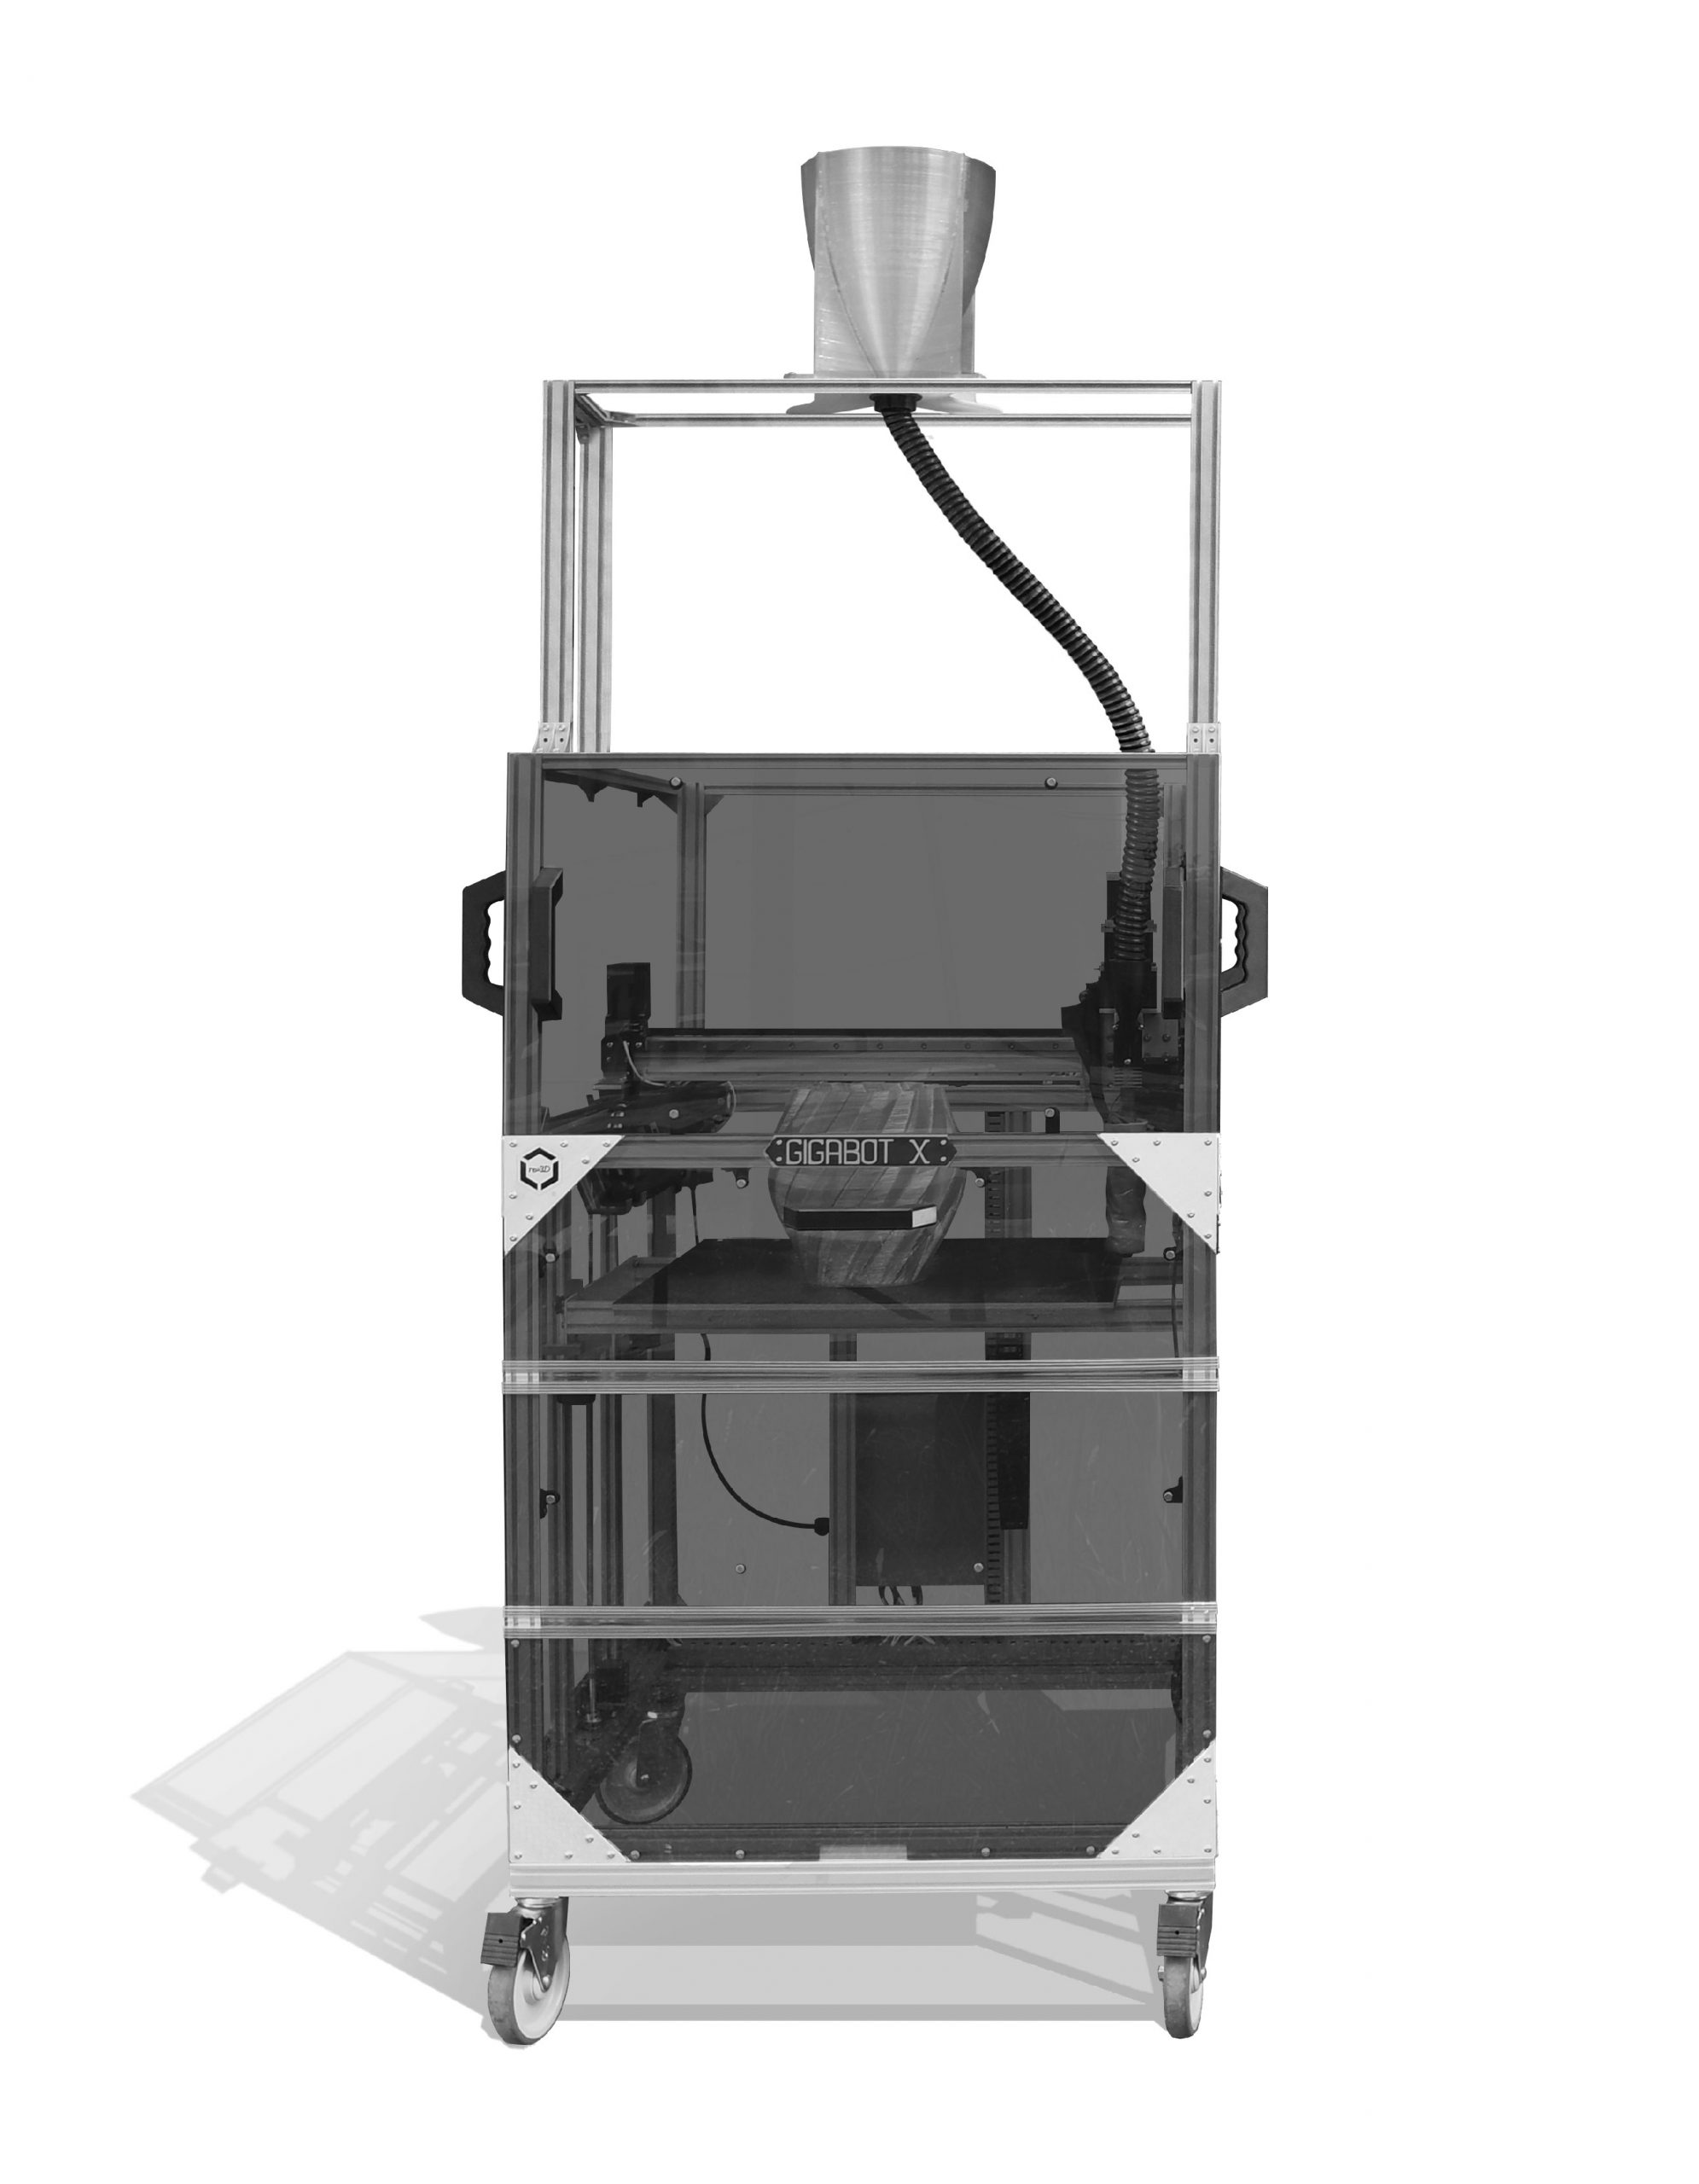
The dream has been the same, since the beginning of re:3D, to create a 3D printer that could print from trash. There was a problem though, first we had to create a printer (the Gigabot), and then we had to figure out a way to print directly from plastic waste (Gigabot X).
So the first part of the dream was to create a large-scale, industrial 3D printer that was open-source and affordable, which is just what we did. The creation and sales of Gigabot has allowed re:3D to become a viable, profitable company. However, as a boot-strapped startup, finding more money, especially for R&D hardware projects was always difficult. But we never stopped believing that we could do it.
Two years ago we had the perfect opportunity to finally fund the creation of our Gigabot X 3D printer. The first was the WeWork Creator Awards, which awarded us the ability to expand our team, our facilities, and our R&D budget. The second was a Phase I SBIR (small business innovation research) grant from the National Science Foundation (NSF). The NSF grant was specifically for the creation of a 3D printer that could print from plastic waste. Subsequently we have received a Phase II award for this project to continue to develop an entire ecosystem to grind, dry, and feed plastic waste into the Gigabot X (GBX) printer that was developed as part of the Phase I grant. The dream was alive! The GBX was real!
Each year, the City of Austin, and specifically the Austin Resource Recovery department hosts an event called Reverse Pitch. Reverse Pitch is unique because it looks for companies within the Austin community who are creating waste that could be put to use in other areas or other businesses. The event starts with the Reverse Pitch, where the companies who are creating waste, pitch their product (trash) to businesses, entrepreneurs, or anyone interested. They talk about the quantities, the types of waste being produced, and any other pertinent information that might be useful.
Next, those who are interested in using one or more of the pitched waste-streams, put together a presentation and create a business model/use case around either creating or augmenting their business using the waste.
This past year one of the companies, HID Global, was pitching plastic polycarbonate (PC) sheets. They were the result of creating ID cards in their factory, and they were producing it in staggering amounts. The challenge was to figure out what we could do with it. I had the opportunity to go up to North Austin and tour the HID Global facility (which is amazing!) and see the process, meet the people, and get to know the waste-stream and company a little bit better. It is really amazing that this billion dollar company would be so warm and welcoming.
PC is a very common 3D printing feedstock. Our filament printing Gigabot prints with PC on a regular basis, in fact we use PC printed parts in all of our Gigabot printers. So I knew that it would be possible to print with this waste stream. Next, the entire process for HID to create their ID cards is done in a ‘clean-room’ environment, so we knew that the waste was extremely clean – another advantage because dirt can cause clogs and other issues in the printing process.
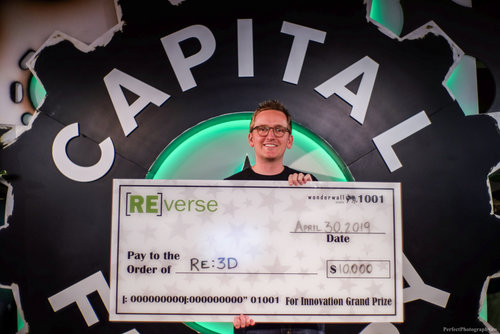
I made the pitch for a line of furniture, home goods, and art pieces to be printed on GBX directly from the HID PC waste. It was an idea that I called, Design: by re:3D. And, we WON! It was extremely exciting to win the pitch competition, and we received $10,000 to jump-start the idea (You can see the video here).
But then the joy turned into nervousness – we needed to divert 2,000 lbs of HID PC from the landfill, and quickly! What were we going to do with all of this stuff?
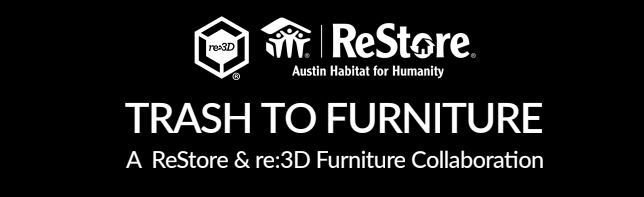
Serendipitously enough, one of the judges for the Reverse Pitch just so happened to work at the Austin Habitat for Humanity ReStore. We struck up a conversation after the competition, and set up a meeting with their team to discuss the idea of turning trash into treasure, and then selling it at the ReStore.
Talk about a dream scenario!

It has been a lot of work to get to this point, almost a year later! The ReStore allowed us to install a small industrial grinder in their back room, and allowed us to send interns over to spend HOURS grinding away at the 2,000lbs of PC that we had picked-up from HID.
We are so excited to announce that the first pieces of furniture are being displayed and put up for silent auction at the ReStore today! These pieces have been printed from waste plastic, this first batch is from plastic water bottles specifically. As we progress with our technology, and hone in our printer settings we are confident that we will be able to print objects from the diverted PC. We have successfully printed small vases and other objects, and we are going to be moving up to furniture shortly.
We are really looking forward to growing our relationship with the Habitat ReStore. And we are so thankful for the continued support from the City of Austin, the Austin Technology Incubator (ATI), and all of the many many more people who have believed in our story and helped us along the way. We look forward to continuing this work, diverting more trash from the landfill, and growing our business and team here in Texas.
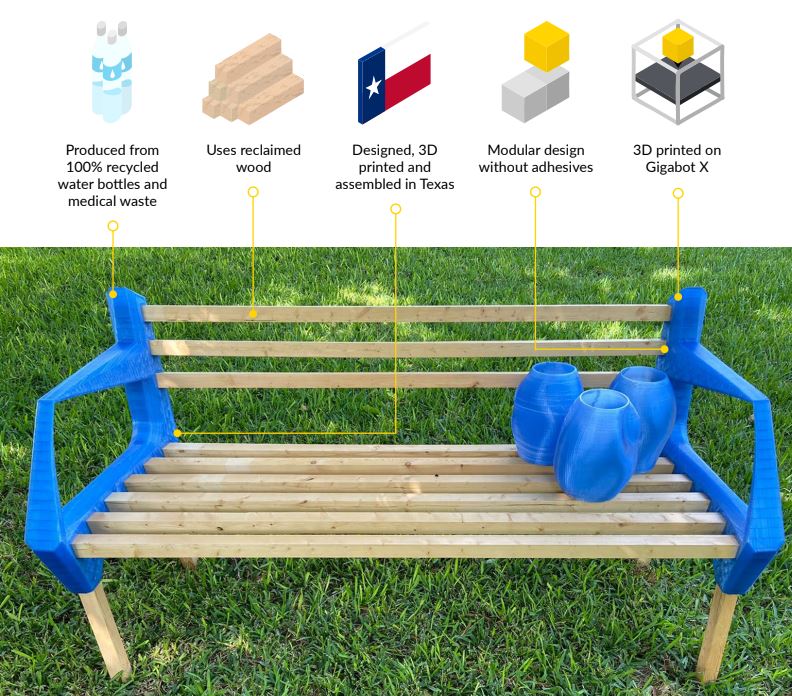
When looking around reStore, I was looking for something that would usually be in stock and was an easy shape to design around. For my first piece I settled to design around 2x2s after seeing a bench outside made entirely of them.
The first design relied on glue to keep it together and I ultimately decided that this wasn’t sustainable. To complete the loop, I wanted the chair to be able to be disassembled, ground up, and turned into new feedstock for GBX. The second design had screw holes so that the 2x2s could be fastened and removed/disassembled. I definitely prefer this design but have already moved on to other ideas that will be even easier to assemble.
Designing for GBX requires adding a little bit more tolerance than you would for a regular print. The layers are larger and slightly less consistent. I learned the hard way when realizing that the tolerance I had designed in was not enough, and had to plane down each piece of wood to fit.
Currently I am experimenting with 3D printed molds for pouring reclaimed cement+polycarbonate scrap into to create side tables.
Check out a quick video about the furniture:
What do you think we should make next? Email: info@re3d.org and let us know!
Mike Strong
Blog Post Author

Everyday we see logos wherever we go. Whether it’s a billboard, flyer, or even a blimp, there’s a good chance it has a logo. One place logos are appearing even more is on 3D prints. 3D printing makes it possible to design and print a variety of objects with a logo stamped right on it. Although it sounds complicated to turn a logo into a 3D print, the process is easy!
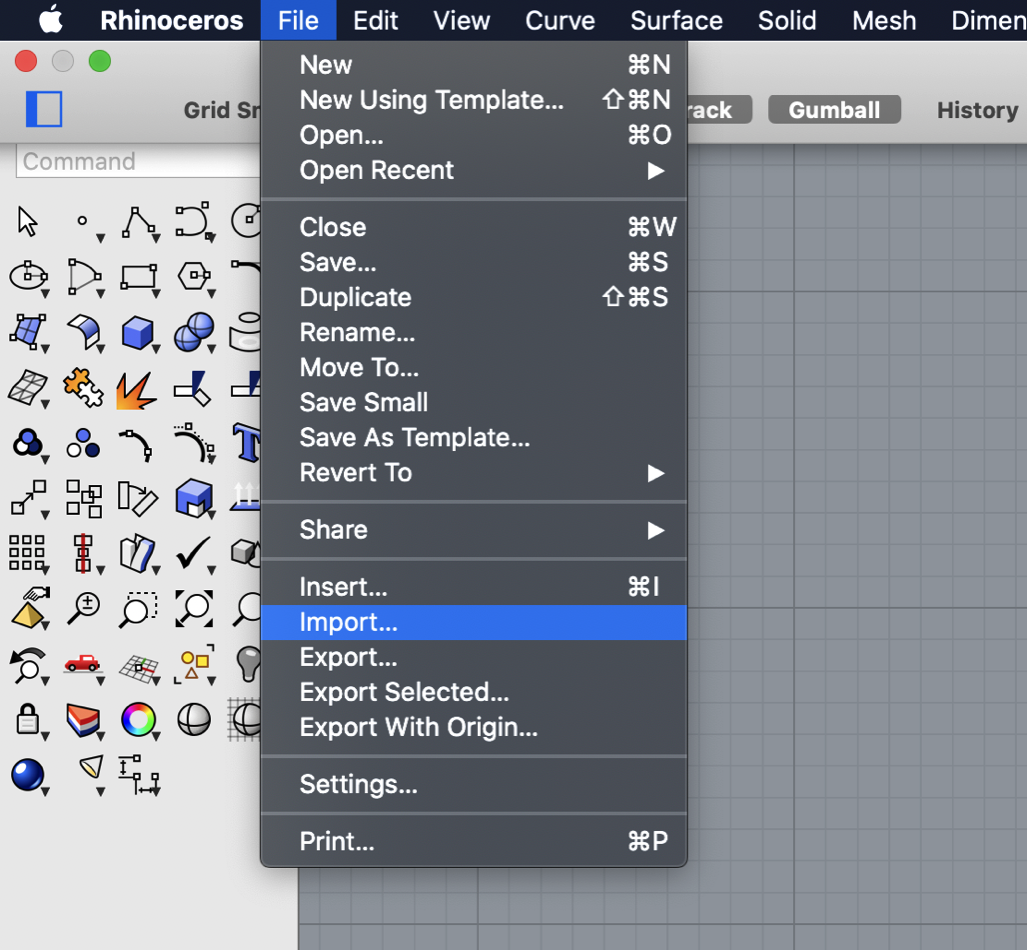
You may have seen our previous tutorial on turning a logo into a 3D print, but over the years we’ve come up with even more tips to help your logo shine. In this updated tutorial, you’ll learn how to take a logo from an image to a 3D print. In this demonstration we’re going to use Rhinoceros 3D, but there many tools including SolidWorks, Tinkercad, Fusion 360, or Onshape that could achieve a similar result.
Before you begin, you will need a vector file of your logo (usually in .ai, .dxf, .svg, or .eps format). If you don’t have a vector file, you can convert your raster file (.jpg, .png, .bmp) using an editor like Adobe Illustrator or Super Vectorizer. Online converters exist as well that automatically take your raster image and turn it into a vector image. In the tips and tricks section later, we will show you a third way to convert a raster file directly in Rhinoceros 3D!
How to Make a 3D Logo
Once you have your vector file, start Rhino 3D (or your CAD software of choice) and import your vector file. If your logo is flipped or upside down, you can use a simple mirror command to reorient the logo. Sometimes a vector file will leave a border when imported. Be sure to delete these border lines too! What you should be left with is the logo design you want to use.
Next, choose a shape you want your logo to live in. This can be whatever you want, so don’t be afraid to get creative! In our example, we are housing our re:3D logo inside a circle. Once you have your shape finalized, extrude it outward. The extrusion length should be around half to two-thirds the height of your logo. We will use this shape later to make a platform for our logo.
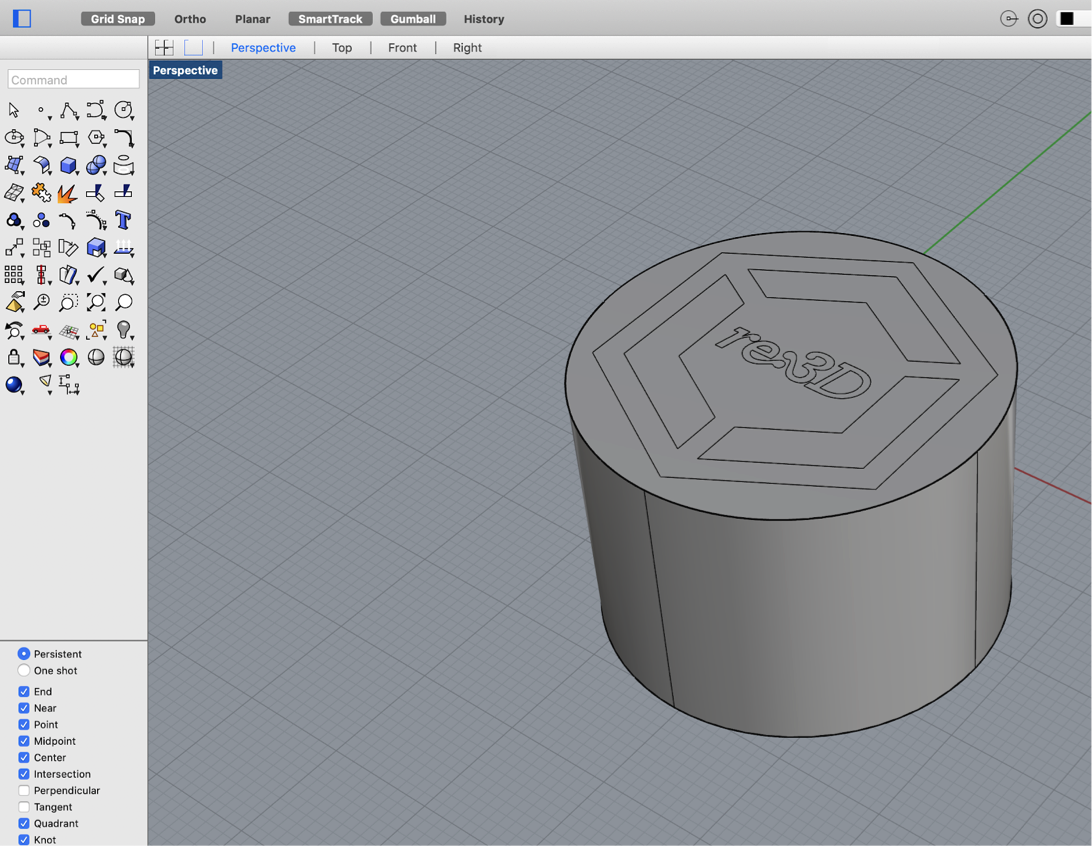
With your shape extruded, you now want to make your logo pop! You have a choice here, you can either extrude your logo outward or cut your logo inward. In our example, we extruded the re:3D logo out of the cylinder’s face. Be sure you don’t cut or extrude too far, or your logo will be hard to see on the final model. The example we have is a good distance for most logos if you’re unsure.
You now need to make your model solid. Although your logo may appear solid on screen, 3D slicing software will get confused if we don’t join together and solidify all the parts of our model. To join everything together, we perform either a boolean union or boolean difference to remove all the overlapping borders and make our model solid. This is important: if you extruded your logo from your shape, perform a boolean union. If you cut your logo into your shape, perform a boolean difference. Mixing these up could ruin the work you’ve put in so far!

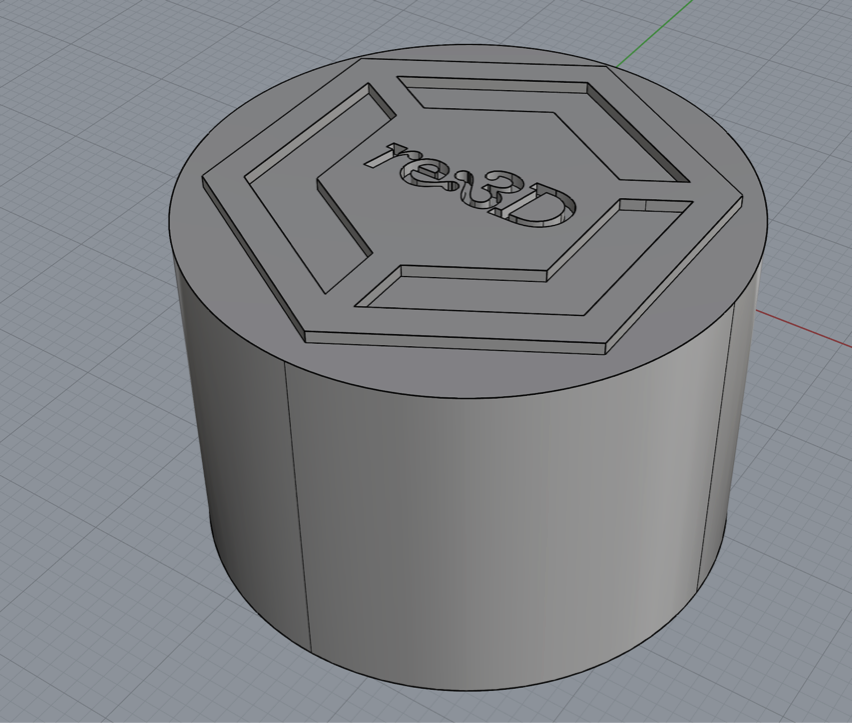
Next, you need to rotate our shape how you want it to sit on a table. Rotate the model so the logo is facing slightly upward. Not only does this make it easier to see your logo, it also helps eliminate overhangs once you print it. Once you’ve positioned your logo how you would like it, look at your logo from the side and draw a horizontal line. Use Rhino’s trim command to cut through your shape and the cap command to seal the hole. For some CAD software, this step may look different.
You now have the basic shape of your tabletop logo! From this point, you can get creative and slice more off your model using the same trim and cap method. Depending on the design of your logo, you can use design features to support your model. For example, we use the shape of the re:3D hexagon to support our final model. Once you’re satisfied with your logo design, export it as a .stl file, slice it in your slicing software, and print it!
Here are a few tips and tricks we found when designing a logo print:
A video of the process is also available below:
Still unsure about making your own 3D printed logo or looking for a more complicated design? Don’t worry, we can design and print your logo for you!
Happy Printing!
Mike battaglia & brian
Blog Post Author

“It is certainly a beautiful campus in which to construct a temporary play structure. It also meant that I would walk by the installation every day on my way to and from work, allowing me to observe the structure over time and learn more about the novel construction system.”
David Costanza, now teaching at Cornell AAP’s Department of Architecture, was a Technology Fellow at Rice University’s School of Architecture at the time of this visit, where he taught for four years.
In Model Object, a Rice seminar that Costanza co-taught with Assistant Professor Andrew Colopy, students explored issues of digital modeling and fabrication through focuses on additive manufacturing, subtractive manufacturing, and cutting.
Costanza came from MIT where he got his M.Arch and S.MarchS, a postgraduate research degree. He was involved in a number of design and fabrication courses there, including as a teaching assistant for the class “How to Make Almost Anything,” where they were heavily invested in 3D printing. At Rice, one of his undertakings as a technology fellow was to restructure the building technology sequence in the School of Architecture, where he worked to incorporate more contemporary and digital tools for design, representation, and manufacturing.
Thanks to his heavy involvement with 3D printing during his time at MIT, Costanza brought a strong additive manufacturing background with him to Rice. This skillset helped him spearhead the bulking up of Rice’s 3D printer arsenal, where he used each machine as a stepping stone to the next level.
When Costanza arrived at Rice, the department had one desktop SLA printer. In his first semester teaching Model Object, he and Colopy wrote a grant and were able to buy a series of Ultimakers, or desktop FFF printers. “We then used the work that was produced in that course to write a larger grant, and that allowed us to purchase the Gigabot,” he explains, “to allow the work that we were doing and the research at the smaller scale to scale up with the larger 3D printer.”
Their shift in focus from SLA to FFF was deliberate, Costanza explains.
They considered both SLS and SLA machines, and although the print resolution is high and allows for fine detail, the technology didn’t give them what they were ultimately looking for. “We’re trying to project forward as to how those geometries might be constructed in the real world,” Costanza muses. “The same translation that we have with an architectural scale model also happens at a full-scale on the construction site. So we’re trying to project how building that model might also scale up.”
SLS and SLA technology “works really well at a small-scale,” he explains, “but they don’t really allow for the scaling up of something that might be architectural.” If they were going to be testing complex geometries that would ultimately be building-sized, they wanted to be sure they were doing so using a method that was actually representative of real world construction.
“Because we’re very interested in the full scale here in the Architecture Department, we can really treat [an extruded] model as something that could scale up,” Costanza explains. “The thing that we’re printing on the Ultimaker can scale up to the Gigabot, and the thing on the Gigabot can scale up to a Kuka arm with [an] extruder at the end of a gantry crane.”
In the real world, building construction typically happens through an additive process: concrete is poured, steel is erected, bricks are laid, et cetera. A 3D print created using fused filament fabrication would therefore be a more realistic representation of how that structure would ultimately come to be. “Where the other models – SLS, SLA – would produce objects that were purely representational,” Costanza continues, “by using an [FFF] printer, we could essentially replicate – more or less, at a different scale – something that could happen at an architectural scale.”
The School of Architecture is now home to a Gigabot – as of several years ago – which lives in the department’s dedicated 3D printing room and spends most of its time producing models of buildings.
Now that architects essentially operate in a digital world – conceptualizing and designing buildings on a computer – “that translation from the digital models that we’re producing into a physical object or scale model can be quite complex for some of the geometries,” Costanza explains. “When the Gigabot is used to produce architectural representational scale models, it’s typically to produce geometry that would be otherwise quite difficult to replicate physically, but is quite simple to produce digitally.”
Rice’s Gigabot also occasionally gets to spend some time on other real-world endeavors.
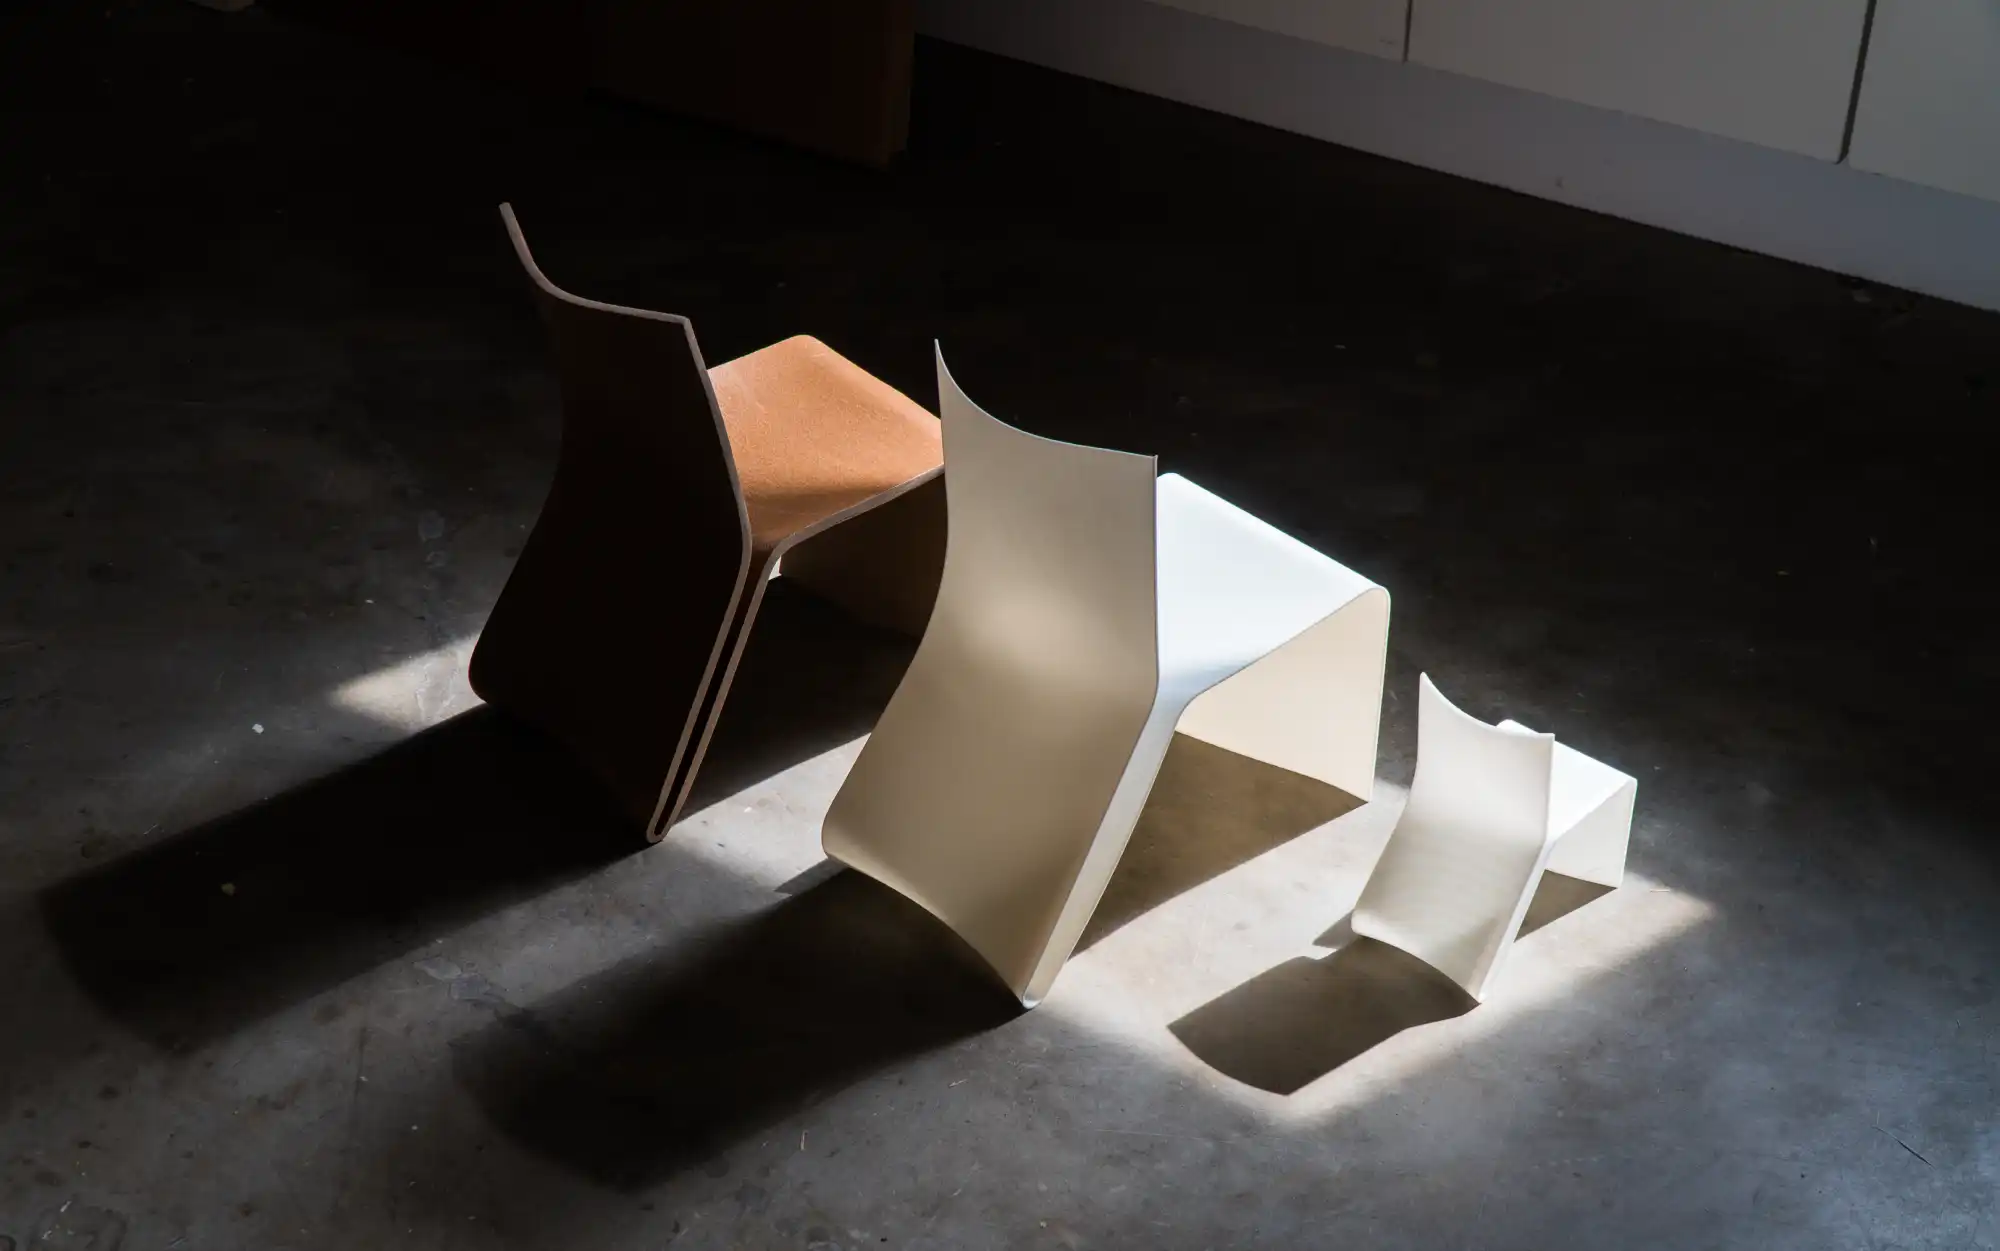
One such project was a chair that Costanza produced in collaboration with his Model Object co-teacher, Colopy. Thermoformed from a single piece of rice husk biocomposite, the final piece sports asymmetrical curves that are just as much function as they are form. The back of the chair flexes slightly to the body’s natural contours, the oblique face of the seat is perfectly angled for a natural tuck of one’s feet as it slopes to the floor, and the shape of the chair allows it to nest for packing purposes.
The design of the chair feels natural and obvious – as good design should – but much testing went into settling on its final form.
“As we were manipulating the geometry of the chair, the Gigabot allowed us to produce quick, iterative prototypes of how the chair might look that we could evaluate for its aesthetic qualities, but also even some of its performative qualities,” Costanza recounts.
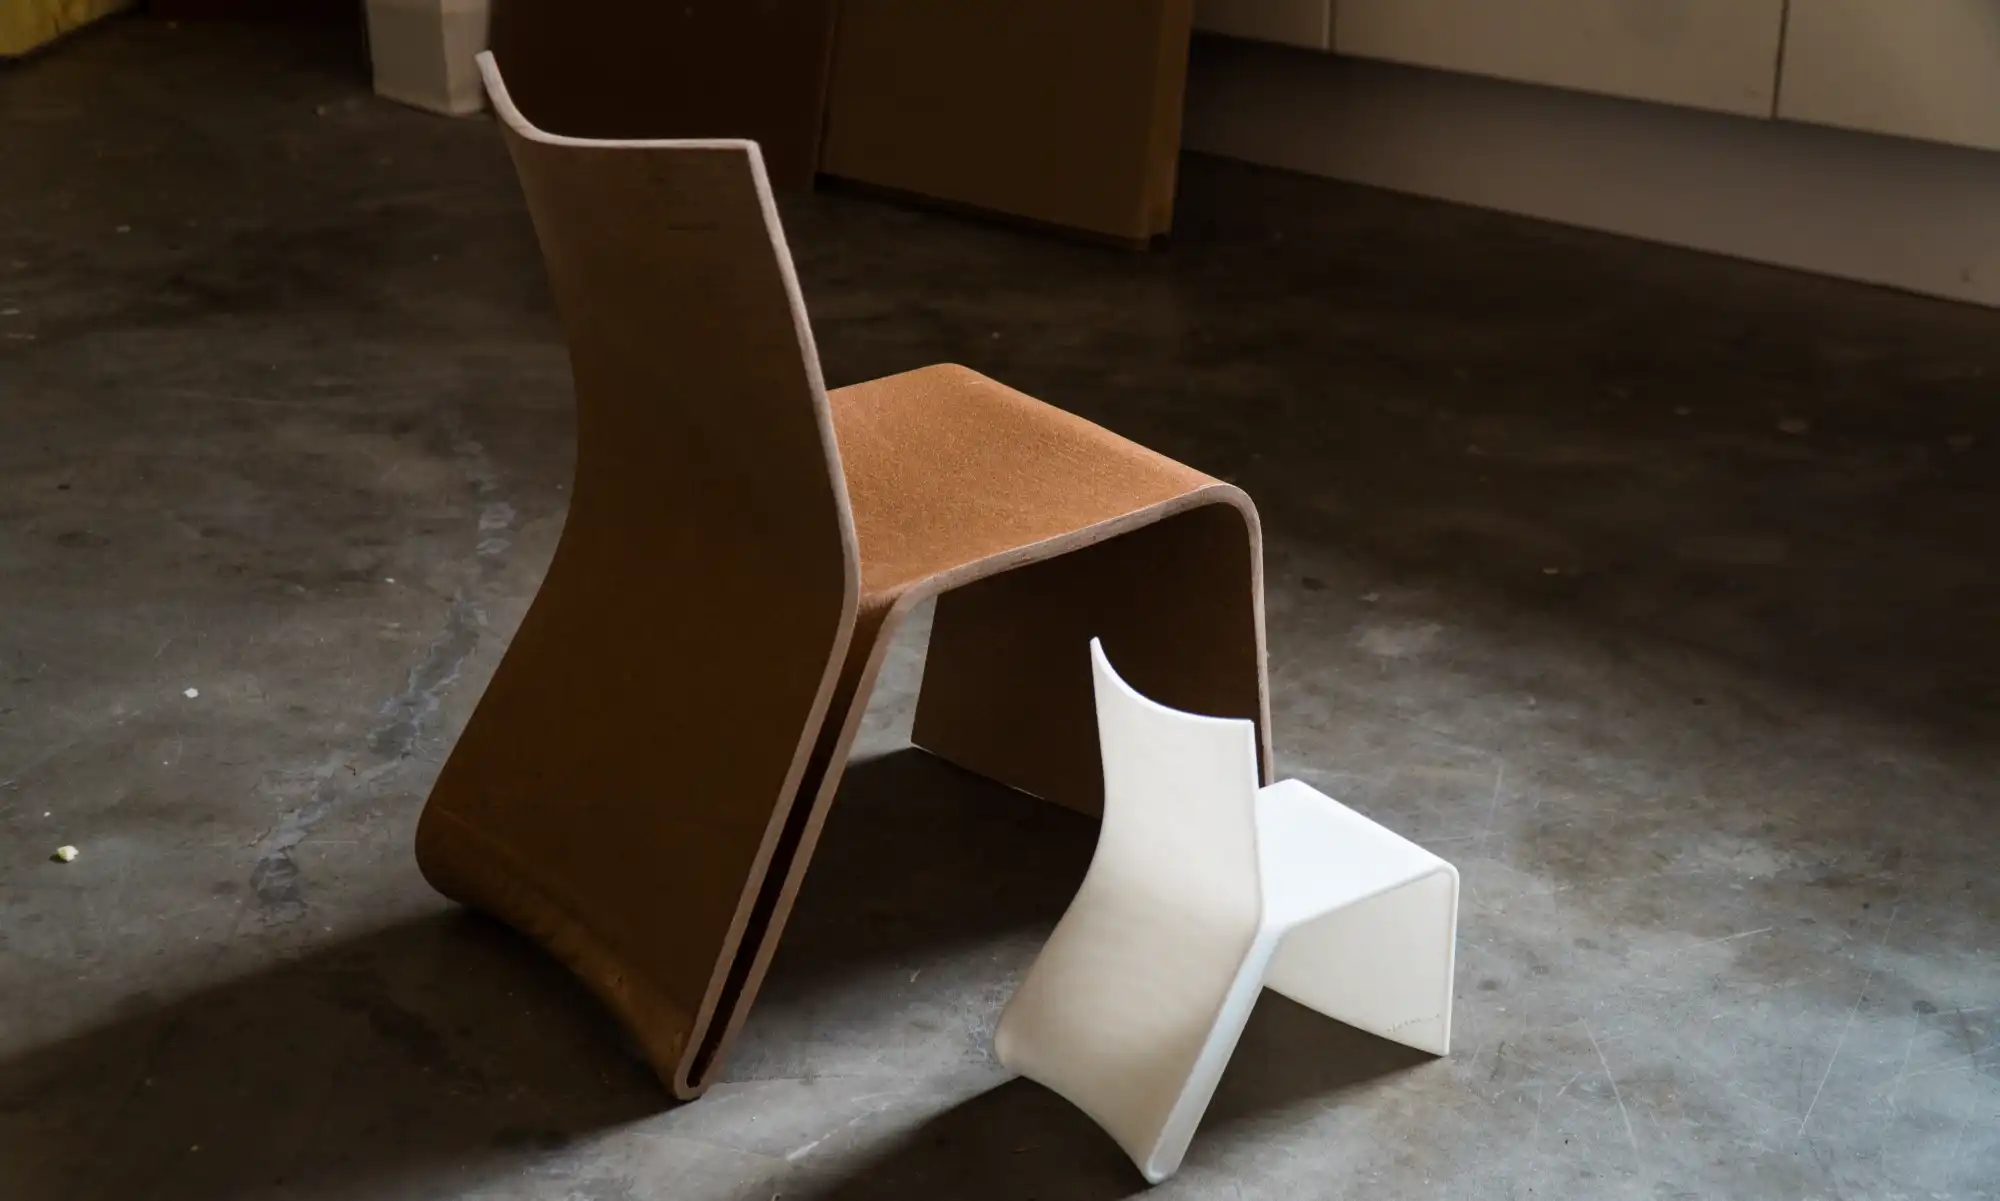
They could use 3D prints not only to take their vision into the physical realm and allow them to turn the design over in their hands, but also to test its functionality. “To see how the plastic flexes for the back of the chair, let’s say, was something that we could test even out of PLA,” Costanza explains.
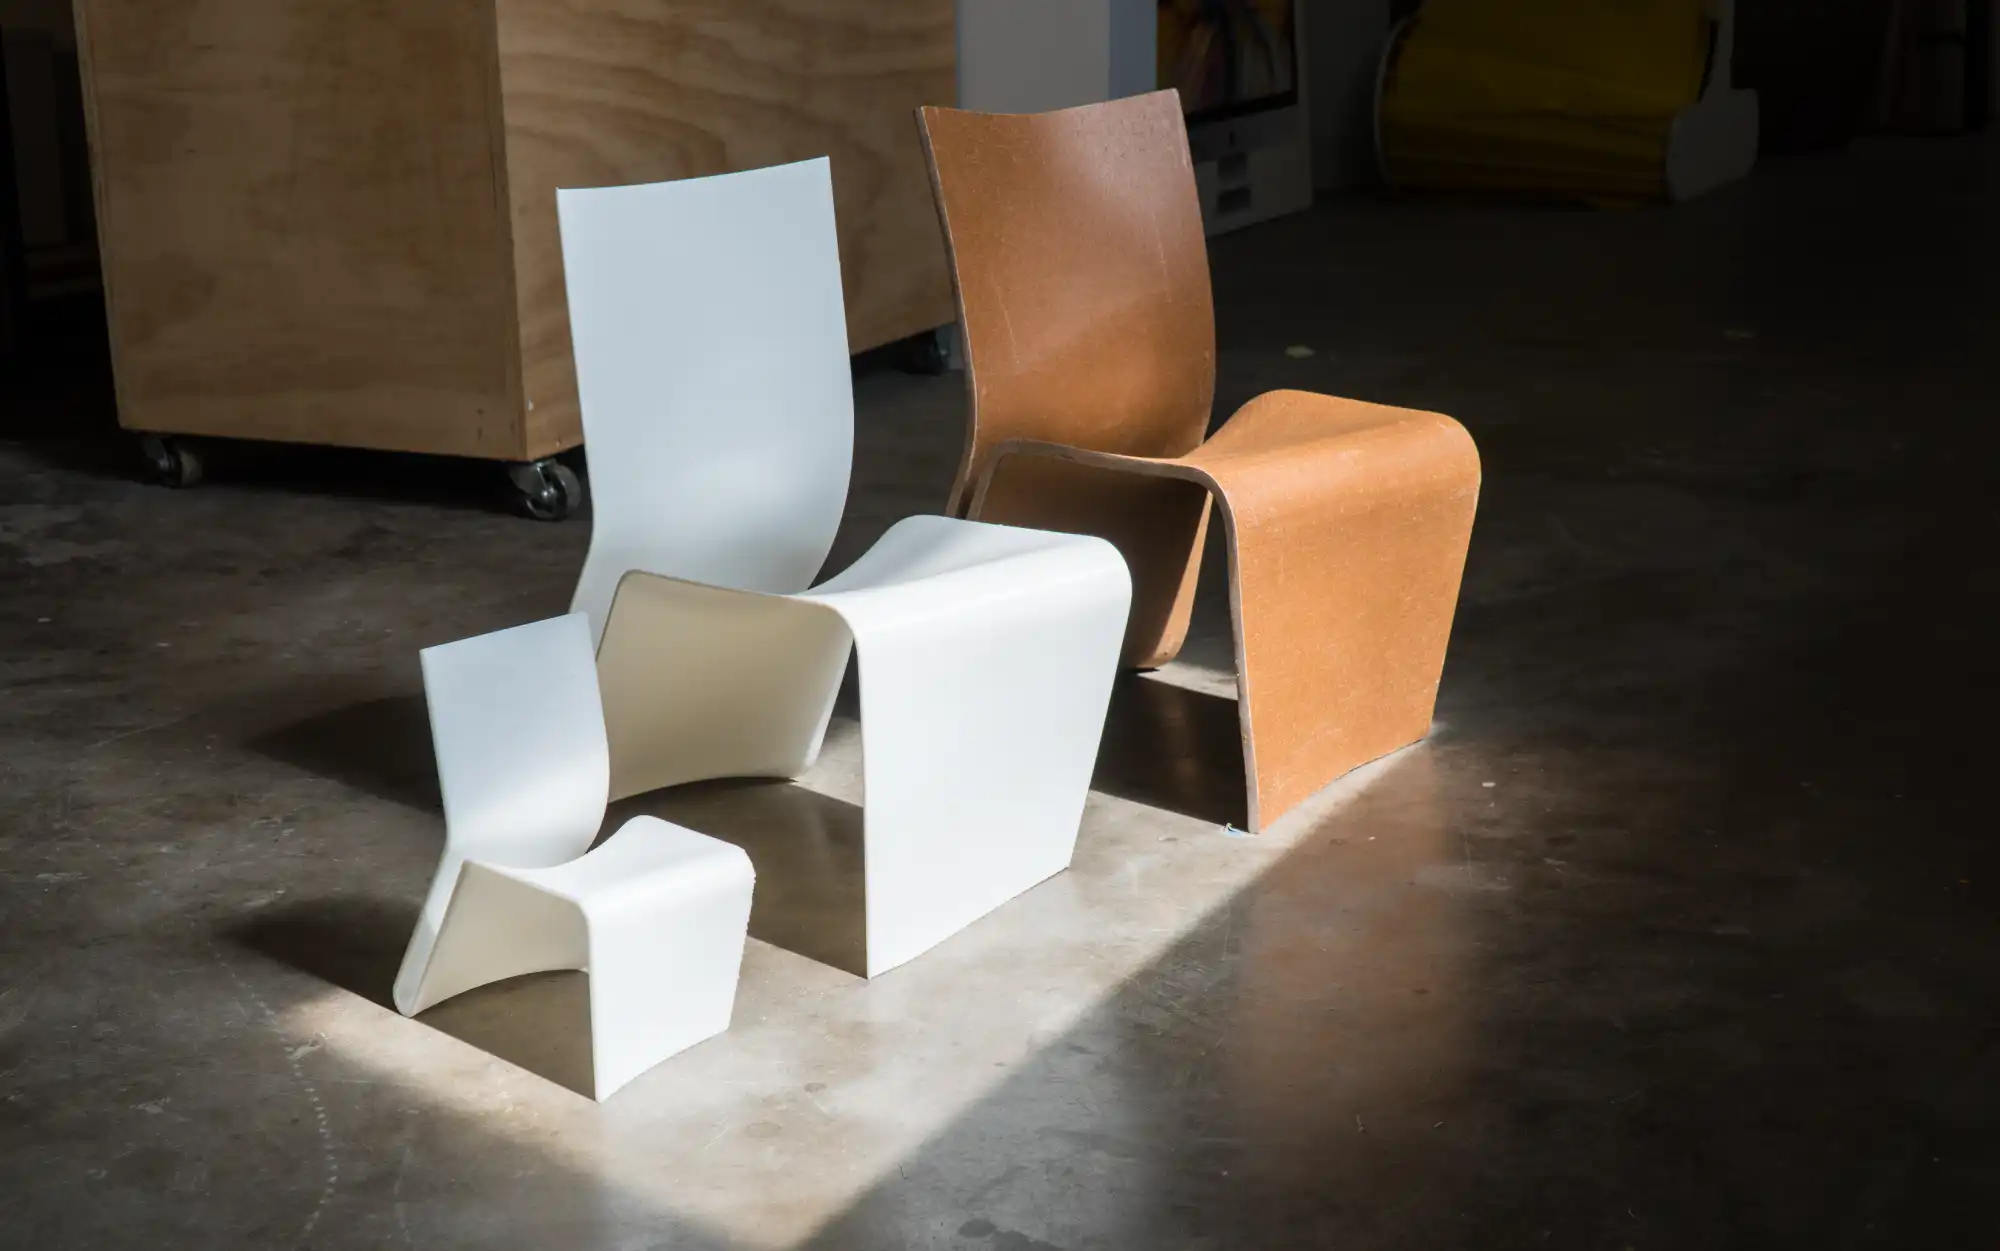
Scaled-down iterations of the chair – from palm-sized miniatures to versions big enough for a kid – still adorn one of the workshops in the architecture building. “We built a number of small scale mock-ups, all the way up to a half-scale version of the chair on the Gigabot,” recounts Costanza. “Between each iteration we were able to manipulate the double curvature of the chair, which is what produced the stiffness for the back, or the double curvature of the seat, which allowed for various degrees of comfort.”
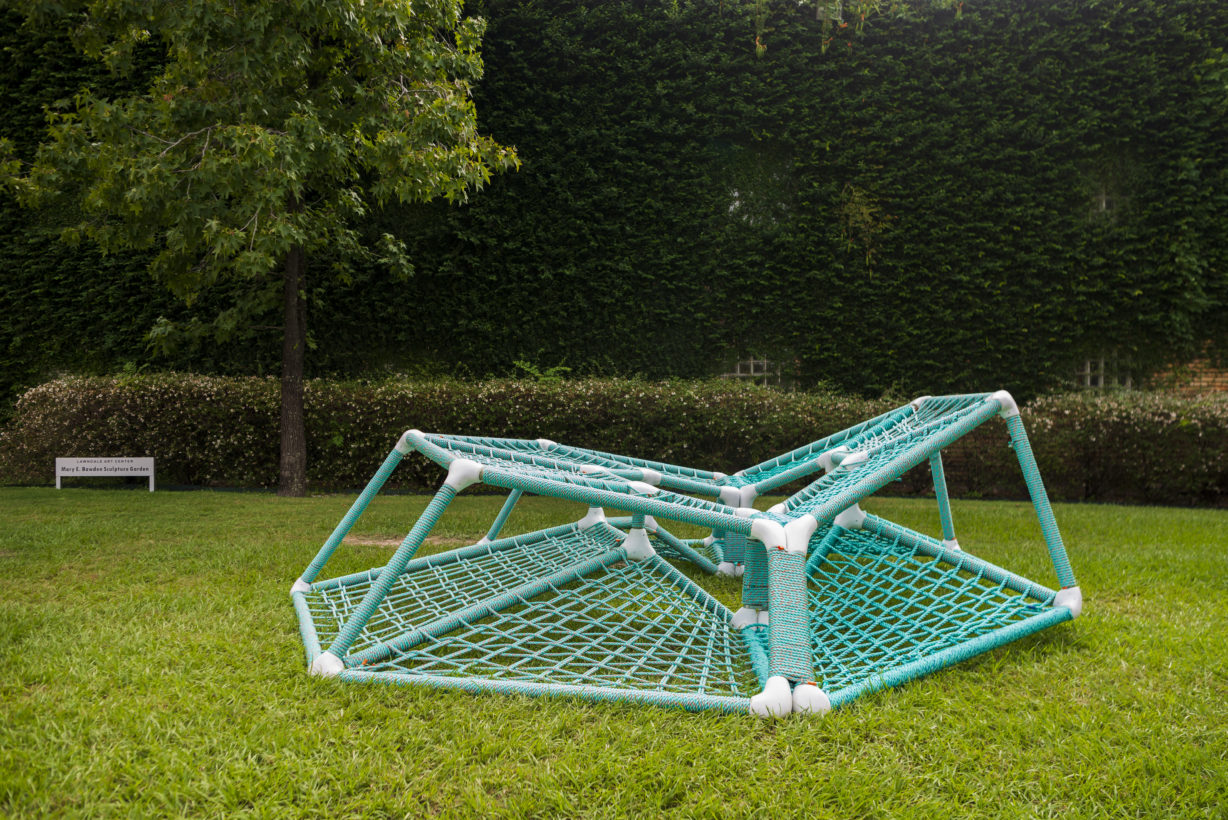
Another project of Costanza’s – originally on exhibit at Lawndale Art Center in Houston – now resides on the Rice campus.
“The design of the object is a kind of communal play structure, something that would bring disparate communities together to play, where one interaction by an individual would have repercussions for someone else on the play structure,” explains Costanza. “So it’s sort of a collective bench, or possibly a see-saw made up of a series of hammocks.”
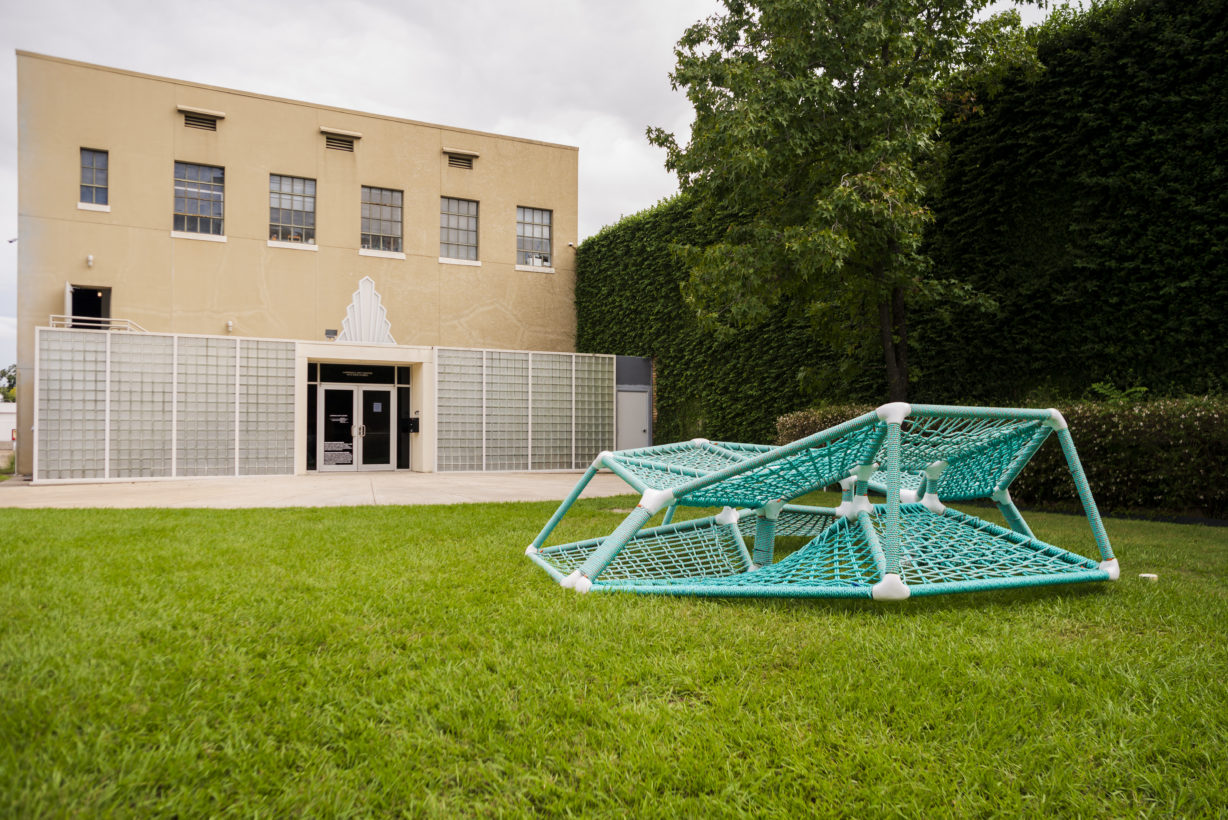
Part furniture piece, part play structure, the design sits roughly 15 feet in diameter, made up of a skeleton of fiberglass pultrusions connected with nodes and wrapped with a webbing of climbing rope. Its asymmetrical upper and lower surfaces prompt loungers to either lay down or sit upright. One design feature in particular lends the structure its name.
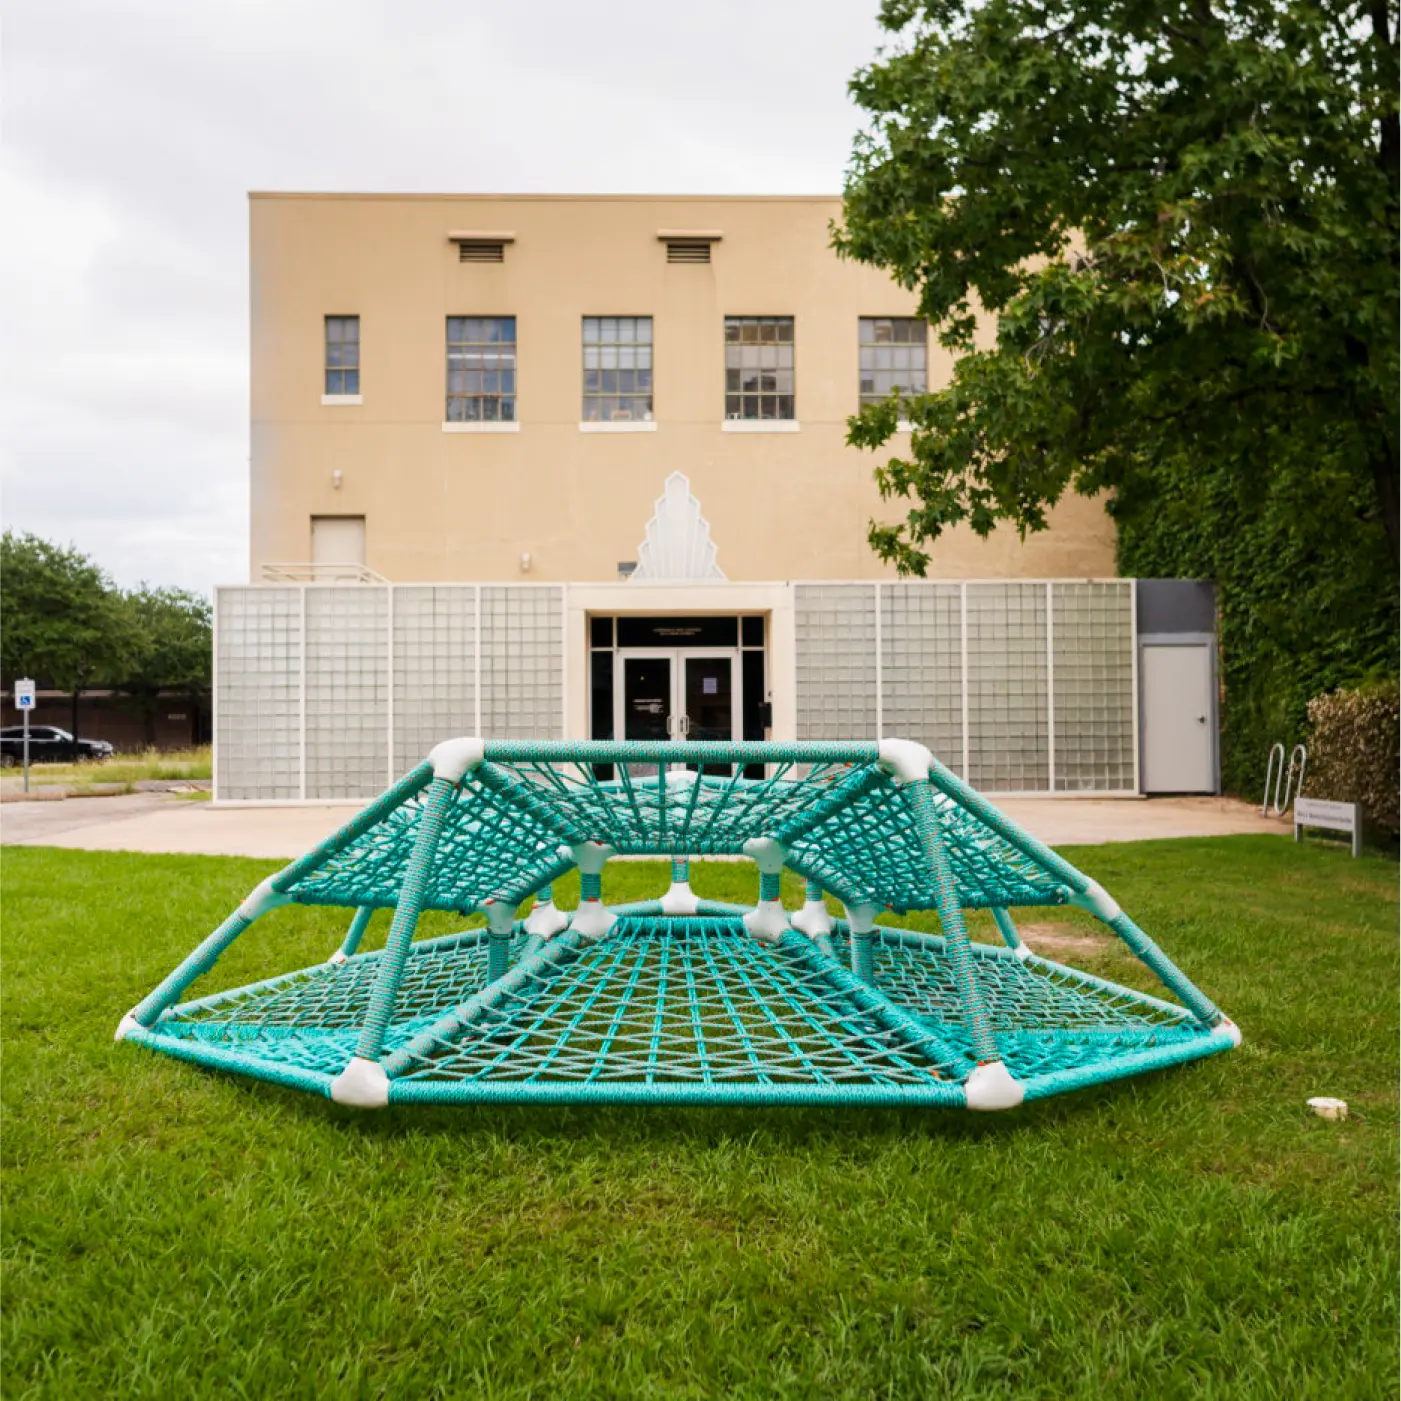
“Depending on the number of people that are occupying the structure, it will tip to one side or to the other,” Costanza explains. “So the name of the object is TipTap…It’s really meant to bring people together through coordinated play.”
In this particular piece of work, Gigabot played more than just a prototyping role. TipTap’s structure is made up of linear, off-the-shelf fiberglass pultrusions which were simply cut to length, joined together by a series of “highly intricate, complex nodes.” Enter Gigabot.
“There are 32 nodes. Each node is unique, and they were all printed on the Gigabot,” says Costanza. The nodes operate as a mold for a fiberglass shell structure: first printed, then wrapped with fiberglass tape and an epoxy resin and vacuum bagged, rendering them structurally sound.
The design of TipTap ultimately hinged on Costanza’s ability to use a large-scale 3D printer for the fabrication of the nodes. “I designed the nodes for the TipTap play structure around the scale of the Gigabot,” he explains, “knowing that they would be 3D printed, knowing how long it would take to print those objects, and the kind of scale that I could produce and the quality of those parts.”
He considered the alternatives – machining molds out of foam and fiberglassing the foam, for example – but noted that the other methods available to him would have been more time-consuming and labor-intensive than his 3D printing method.
“So in the end,” he muses, “we probably would have designed a different object if we did not have the Gigabot.”
Morgan Hamel
Blog Post Author

“You’re always going to have the people who are going to say, ‘Oh, what are you gonna do with a fine arts degree?’”
Lauren Haug is a third-year student at Monmouth University pursuing her Bachelor of Fine Arts in Design, and she’s all-too familiar with the reactions that come with being a student interested in following a passion for art into higher education.
“But when it comes to doing this interdisciplinary stuff, you get to open up so many more avenues that you never thought you’d be able to go into.”
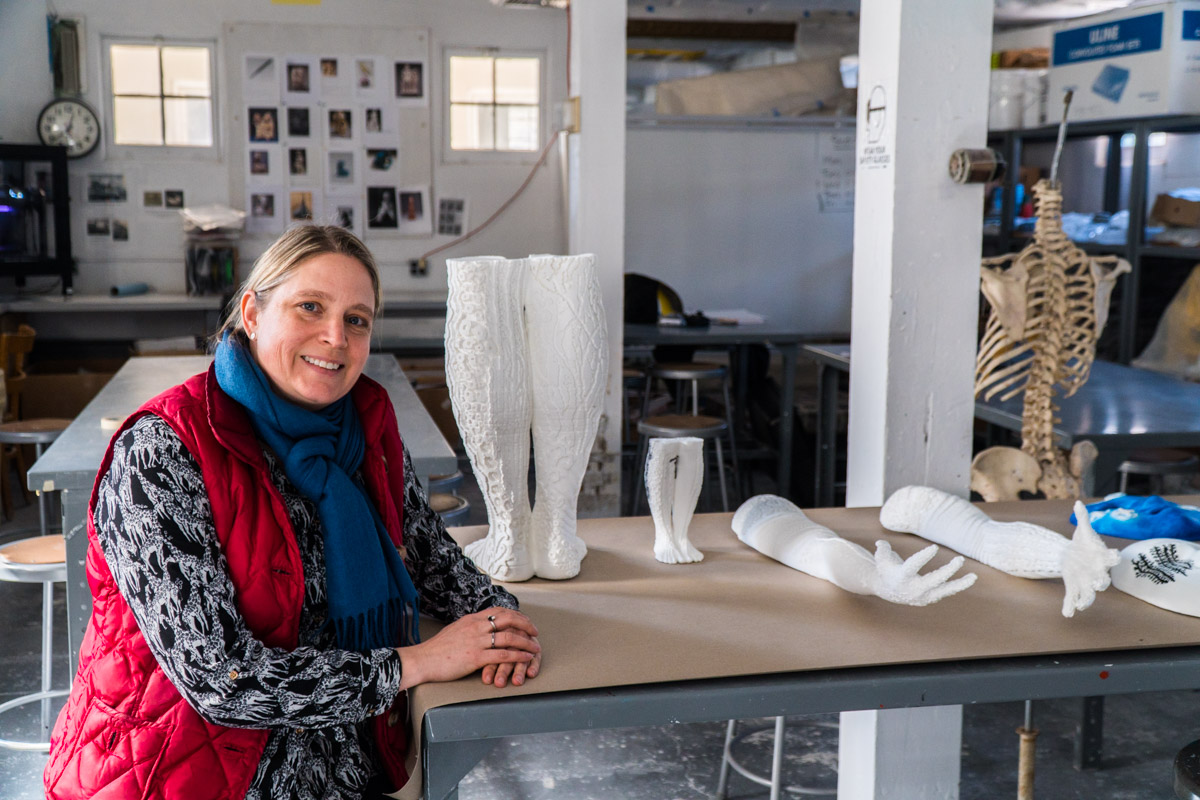
It was at Monmouth that she fell under the tutelage of Kimberly Callas, an Assistant Professor teaching drawing, sculpture, and 3D design at the university, and that Haug’s career visions underwent a stark trajectory change.
Callas is an academically-trained figurative sculptor and social practice artist. Her craft is a very old tradition – she sculpts in clay and casts her work in bronze or concrete. And yet she’s been on the forefront of adopting new technology and finding ways to use it to better her workflow and incorporate it into her teachings.
Her students are reaping the benefits of this as much as she is – graduating with a set of highly-sought after and directly-applicable experience: from CAD and 3D printing to creativity and adaptability.
Callas’s curriculum has been largely influenced by her early experiences working at a makerspace.
“There was a student there who was in engineering, and then there was another student who was a nursing student, and I was there as an artist working,” she recounts. “To me it was really fascinating to work between the fields, and so I wanted that opportunity for my students.”
The interdisciplinary experience stuck with her and has impacted her teachings to this day. “It’s one of the things I really like about 3D printing and emerging technologies, that we can all work together in the space and maybe through touching shoulders we come up with better ideas or innovative ideas,” she says. “I feel like it really does foster innovation; in the arts, being exposed to the other fields, but also the other fields being exposed to the arts.”
Through cross-department projects with her students, Callas encourages the weaving of an artist’s touch into other fields, and vice-versa.
“With the Gigabot, we do a couple of different projects,” she explains. “[The students] have to go out and seek someone in another field that needs a 3D print, or may not even know they need a 3D print yet.” She’s had students work on projects with scientists, anthropologists, mathematicians, and chemists.
“Last semester, I had a student who was able to 3D model and 3D print a molecule that only exists when we make it on this campus,” she recounts. “That was really neat because the students were able to hold the molecule in their hand and look at it, and this is something they’ve been researching for a long time.”
Both Callas and Haug have a particular way of describing the tactile nature of 3D printing. For them, touch is inextricably linked to their craft, and so it’s no wonder that the transmutation of a concept from idea to digital to physical is so meaningful to them. But they also talk about it in a way that extends beyond the art world.
Haug worked on a project with a Monmouth professor to print out DNA in its building-block segments. “Her students will be able to break apart the actual double helix strand and…inspect the pieces that build them and see how they work together, how they link up, and how the actual double helix itself is formed, instead of just being able to look at the page in the textbook,” she explains. From a student’s perspective, Haug describes how this could function as a powerful teaching tool. “I know for myself, personally, when I’m able to feel things and actually look at things from all angles, that it helps me remember.”
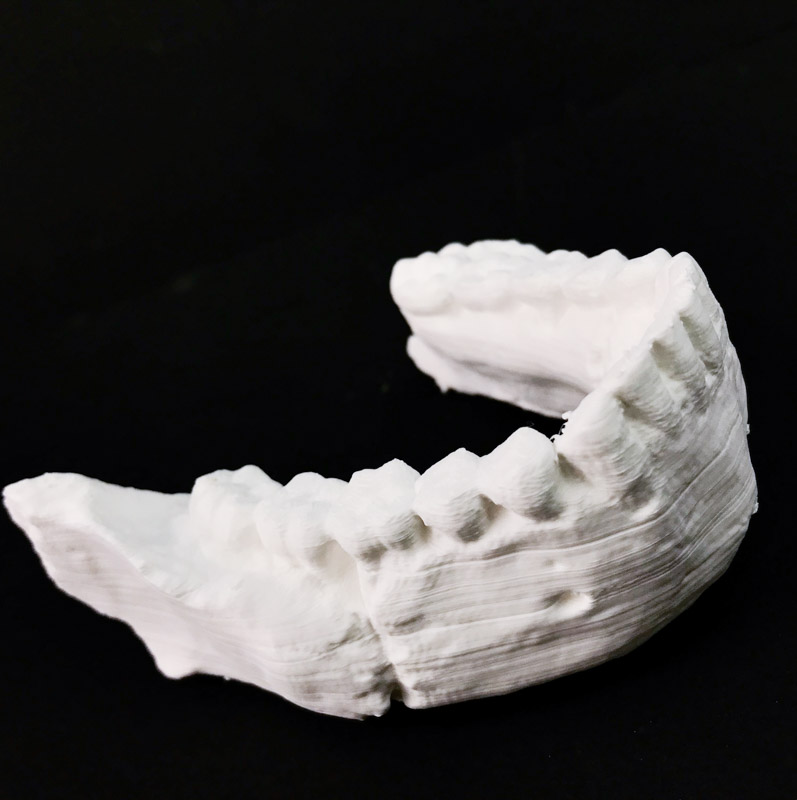
Another student of Callas’s took on a project in the anthropology department, 3D printing a mandible from a scan. “It was a newly-discovered mandible that showed that there was this new evolutionary line in humanoids,” she explains. The discovery was so new that it was still just being researched in a lab, but Callas’s student was able to get ahold of a 3D scan that the laboratory had taken. “We were able to 3D print it for our students to look at the mandible and be able to really examine and understand – ‘Why is this significant? What’s important about this?’ – by physically looking at it, which is what they would be doing in the field.”
It’s this sort of mentality that permeates Callas’ teachings: how does this school project translate into future real-world work? How does this degree cross over, post-graduation, into a career? It’s a deliberate, thoughtful, applicable style of teaching that one would hope every student gets the opportunity to experience.
Callas took her students on a field trip to the Metropolitan Museum of Art’s Media Lab, where students got a firsthand glimpse of what a post-graduation career path might look like. “The students just saw all kinds of possibilities in 3D printing and digital scanning,” she says.
Haug also describes the profound impact this trip had on her. “We got a little backstage tour of [The Met’s] digital imaging labs,” she recounts. “That’s [now] kind of a loose goal for myself to do work with an anthropological aspect to it, ’cause I think that’s really interesting. I really like working with both past and present, and…bringing them together in a way that everyone can be interested in.”
Callas explains that what she’s doing in her classes is more than just teaching her students a software and a machine. Yes, her students come away with CAD and 3D printing experience, but what she’s really trying to impress upon them is a can-do spirit of versatility and flexibility.
“I think one of the things that’s really exciting about the students using the printer…is that sort of entrepreneurial mindset,” she says. “That adaptability is gonna be really important in their work life and going forward. And so 3D printing’s been really important for my students to… understand that this changes all the time and you have to change with it. You have to figure things out yourself, you have to Google it and use YouTube, and that self-direction is really important and I see a lot of growth in them through doing that.”
Callas is speaking from experience.
She got her MFA from the New York Academy of Art and her BFA from the Stamps School of Art at the University of Michigan. She’s been working as an artist in an age-old craft for decades, and yet has nimbly evolved as her field has undergone some major, rapid changes in the last several years.
“It’s been interesting to be able to watch something be introduced to my field of sculpture at this stage that changes it radically,” she says. “I liken 3D printing to when Photoshop was introduced to photography and Illustrator to design work, when everything went onto the computer. Well sculpture hadn’t been on the computer. And so what it’s done to sculpture has been unbelievably fast, so we’re all adapting quickly.”
Where Callas had to evolve efficiently and pick up a new tool midway into her career, she works to give her students a leg up by sending them out into the world well-versed in these new digital tools.
“I try to keep it integrated in every class,” Callas says, of 3D printing. “My big focus is being able to work seamlessly between the handmade and the digital. And I think that that is absolutely necessary for going forward in the world today.”
The old traditions and handmade touches will likely always remain in their own ways, but the injection of digital into the creation process is undeniably beneficial and here to stay. The message under Callas’s teachings seem to be: better to embrace this and prepare for it than to fight it. “I want my students to realize that the digital is going to be a big part of what they do in the studio, even though they still have the dirt and the dust and the plaster dust under their fingernails.”
This fusion of digital and handmade permeates not only Callas’s teachings but also her personal work, where she uses the two mediums to complement one another.
“I work back and forth between the digital and the handmade the whole time,” she says. “Uploading drawings, and then uploading scans, printing things, sculpting from prints, sculpting from the models, scanning what I’ve sculpted in clay, going back into the computer, printing that…so it’s a real back-and-forth process.”
Callas has a long history of working in sustainability, something that has heavily shaped the work she does today.
“I realized when I was working in sustainability that people were having a hard time responding to just environmental data,” she explains. “But if it were a stream or something that they fished in as a child, then they would really protect that space. And so I wanted to find those more emotional connections in people, like where are our emotional and more intimate connections to nature and where do those exist?”
She began experimenting with incorporating local flora into her work, forming a body of work around what she called the “Ecological Self.”
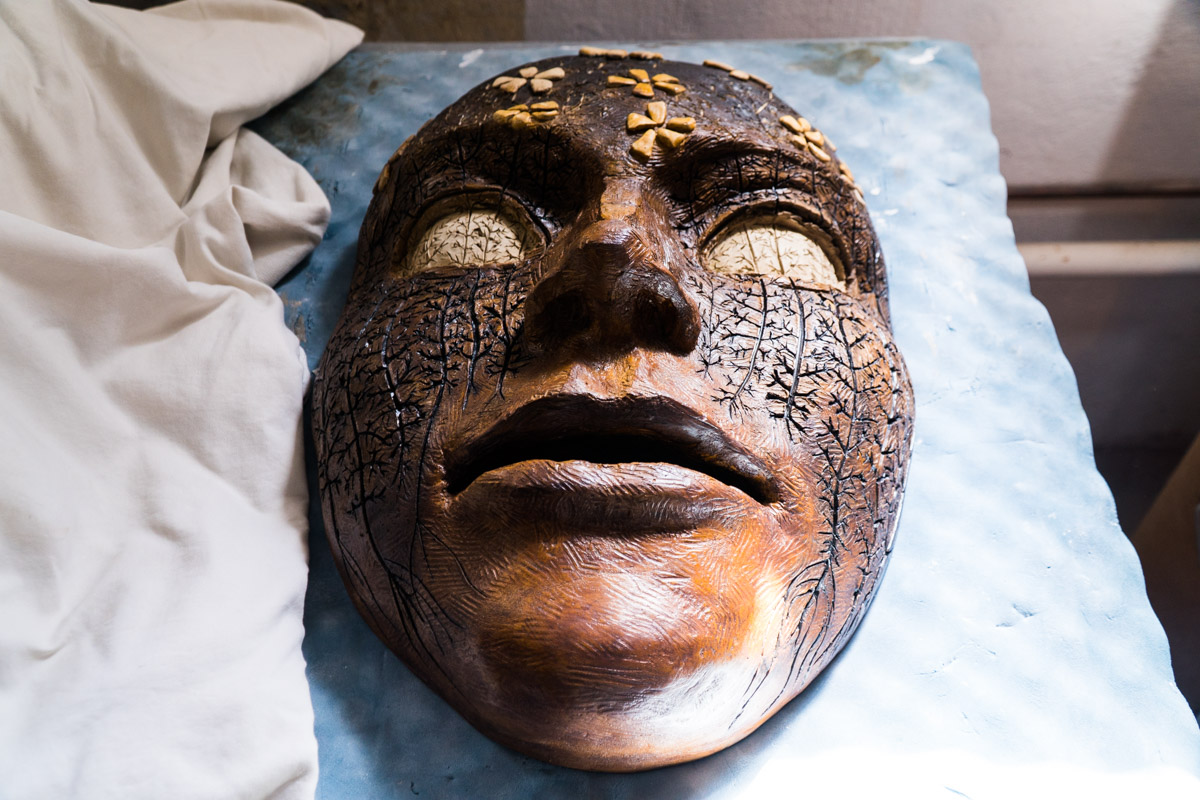
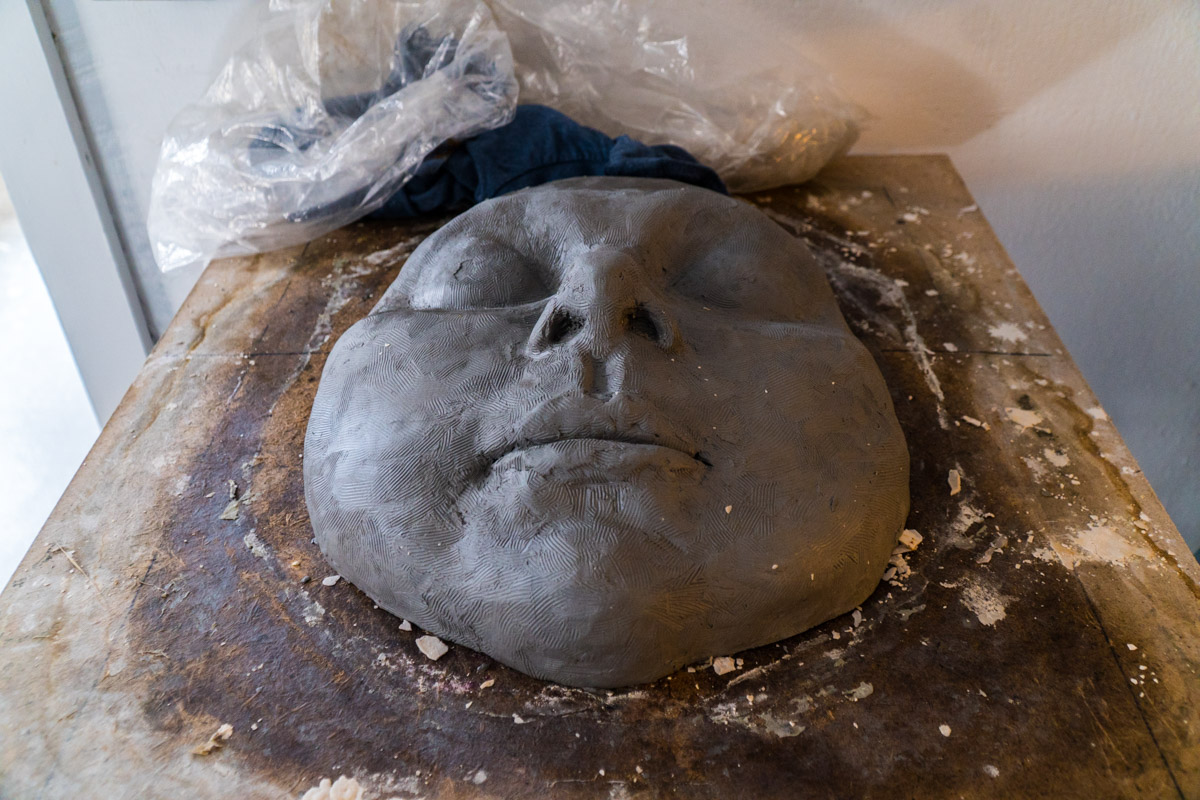
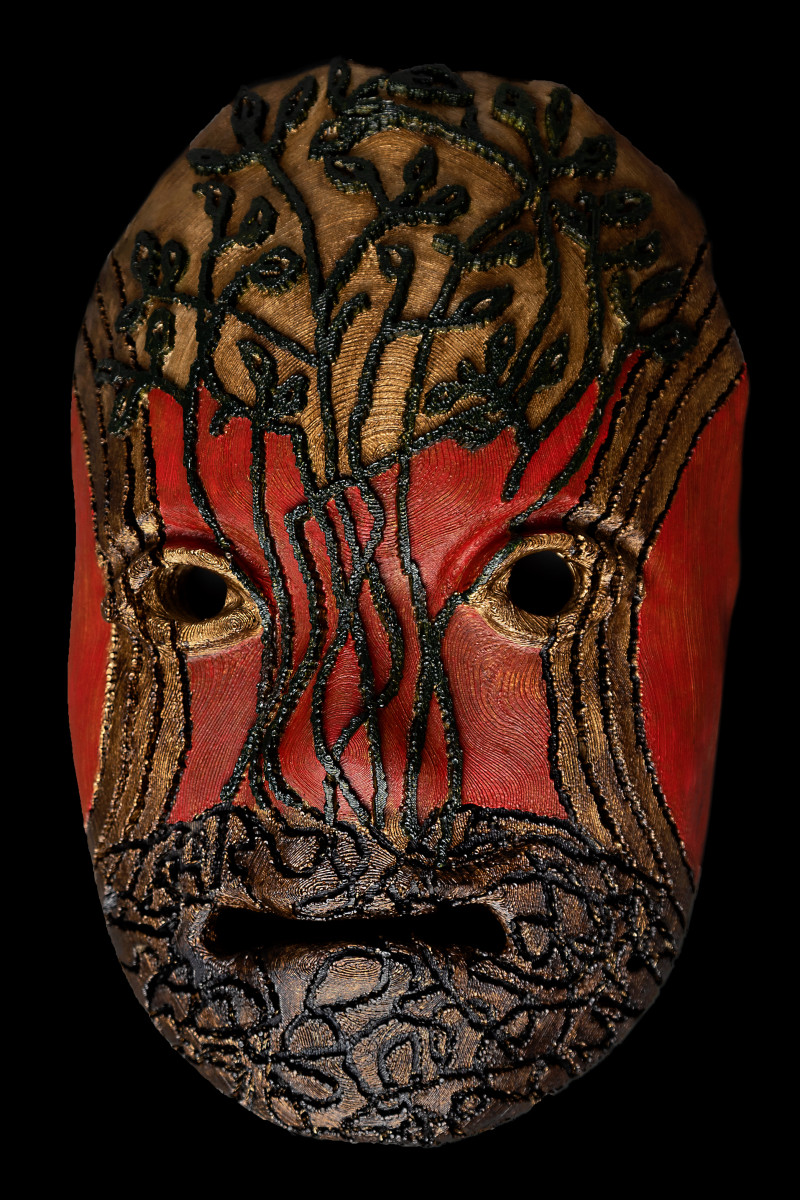
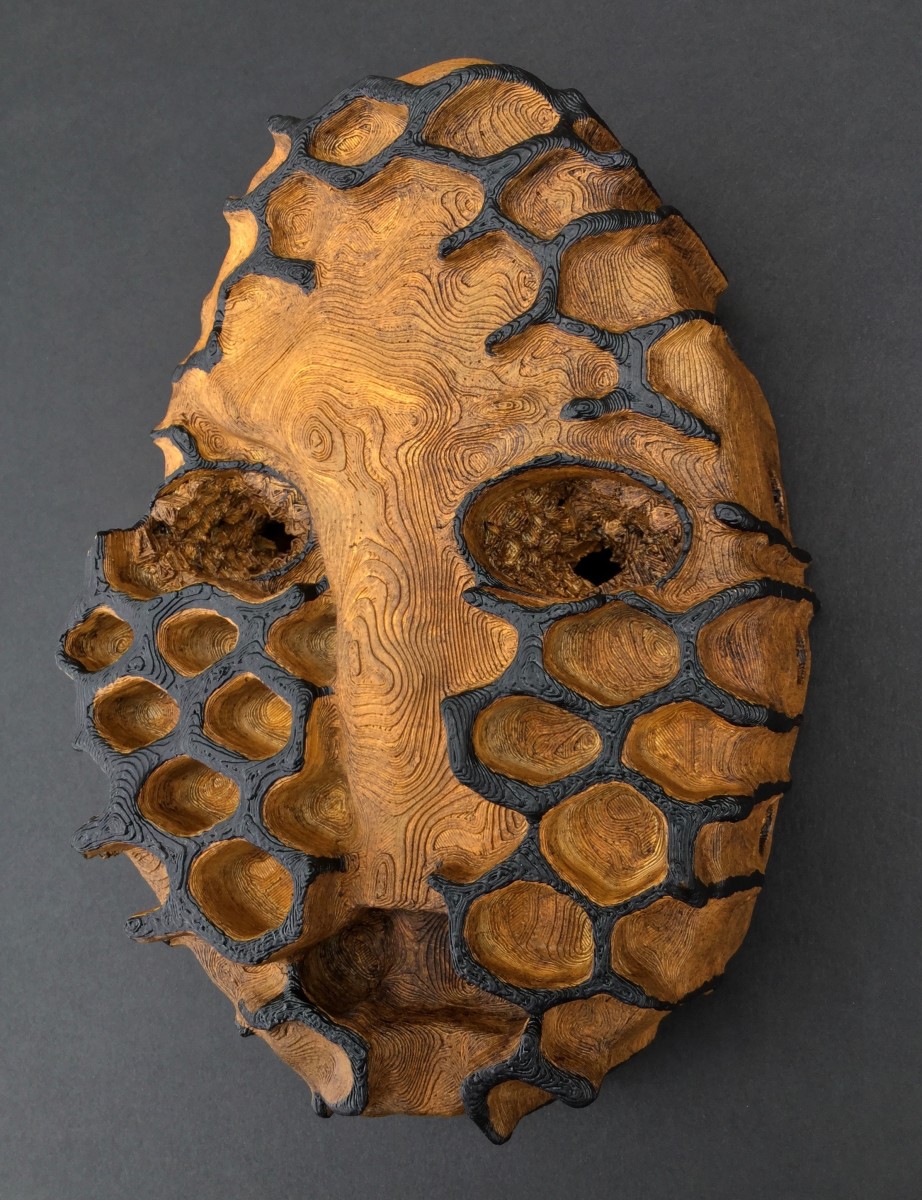
This ultimately evolved into her Eco-Portraits, a mask series in which she does a portrait of an individual around a symbol or pattern from nature that’s significant to that person. “I’m looking for that connection, where is that intimate link between them and nature,” she explains. “And then I take a pattern from that…and I combine it with a portrait.’
Where Callas used to work solely in the handmade realm, she’s found immense advantages with bringing new technology into her work.
“Before, I would sculpt from a model to get the individual portrait, and then I would sculpt and dig into the clay the different patterns,” she explains. “The way that 3D printing has helped it is now I can take a scan of my model and I can 3D print their head, and then I sculpt from the head. I still work in the clay, but I’ll be working from a 3D print of the model so they don’t have to sit there that long.”
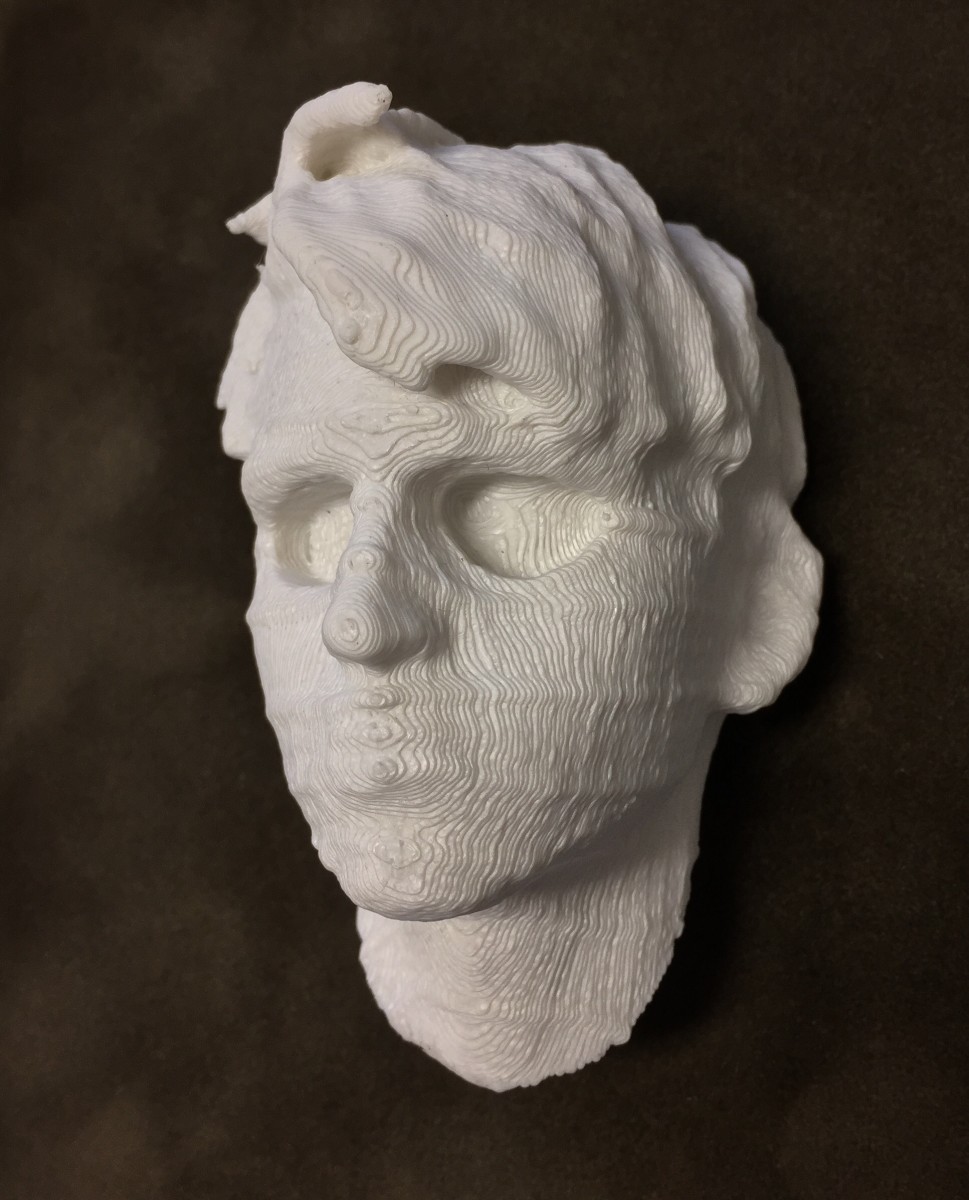
“The other thing that’s been a huge advantage,” she continues, “is often when I want to get an intricate pattern into the clay and then I make the mold and cast it, some of that pattern gets disturbed and broken [and] needs to be repaired. And so with a 3D print, I’m able to digitally scan in my sculpture, get an intricate pattern without much repair work, and I can just 3D print it rather than cast it.”
There are several different aspects to 3D printing that have proven to be of immense help to Callas in her process of creation. “One is that you can change things really quickly, and so if you’re working digitally and you need to shrink something down or enlarge it or change any part of it, it’s much faster than working in clay,” she explains. “And also then you can get copies really quick. If you have to make a mold of a sculpture, it takes you quite a long time, but I can scan a sculpture in a couple of minutes, and then I can 3D print it very quickly compared to what it takes to cast from a mold. So those are some really big advantages.”
What Photoshop is to photography and Illustrator to design, 3D printing is to the physical, Callas explains. And what more valuable function is there in these programs than the undo button? This is a game-changer to which her field never previously had access.
“Oh, there’s no comparison…it’s so much quicker,” she says. “If I make a mistake or if I just don’t like something, I just undo it. But if I don’t like something in clay, I have to rebuild it, and it takes a long time.”
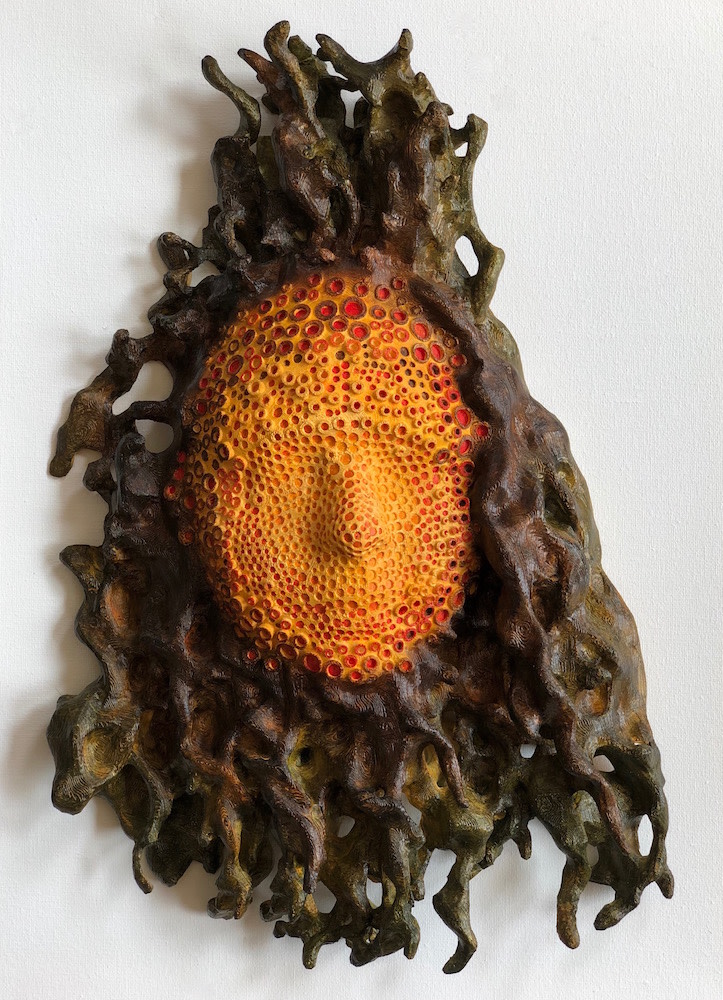
Callas’s current big project is 3D printing a life-size human sculpture with patterns from nature etched into the form – “almost tattooed into the skin” – representing how place shapes us and can very literally become a part of who we are through what we eat and breathe.
She completed an artist residency at an eco-art residency called Joya in Spain last spring – paid for in part by an Urban Coast Institute Faculty Enrichment Grant – collecting symbols and patterns from the wildlife there, which she will add to the 3D printed figure. She’s currently doing test prints for the body, which she estimates will take somewhere between 10-12 prints and 1,300 hours of print time.
While she still loves working in good old-fashioned clay, Callas can’t deny the time and labor savings that comes with adding a 3D printer to her workflow. “I still love working with clay, there’s something to it,” she says. “But I think some of the advantages which I’m looking forward to [include] emailing my file to the foundry rather than shipping huge molds or carrying them…” She laughs, and says of the artist community, “I think we’re going to end up liking that.”
Callas was recently chosen to be the new Artist-in-Residence for the Urban Coast Institute. During this two year appointment, she will be making 3D printed life size figures that combine ocean science with symbols from the ocean.
There’s no denying the impact that Callas’s teachings have upon her students. The interdisciplinary elements in her classes are opening her students’ eyes to interests and career paths that were previously unconsidered.
“I definitely want to pursue something with a sort of museum aspect to it,” says Haug. “I would really like to work with cataloguing and organizing.” She explains that she’s excited about 3D printing’s ability to increase accessibility to information and open doors to research.
“What inspired me to work with the anthropology professor was when they take fossil scans and they upload them to databases, so people all around the world can just print them out and be able to look at them,” she says. A bone segment that may live in a lab a flight away could instead be printed out in the comfort of one’s own facility in less time than it would take to travel there. “That is just remarkable to me,” she muses. “I want to be involved in that.”
Beyond inspiring her students to think outside the box and consider the possibility of applying their art degree outside the world of art, Callas also gives them the final piece of the puzzle: job postings.
“I’m always collecting job descriptions that include 3D printing and 3D scanning and digital modeling,” Callas says. “One of my students could walk right into a medical position with the scanning and the 3D printing [they learn].”
“If you had told me when I was in middle school that I could possibly work in the medical field, I would have told you, ‘What are you talking about? There’s just no way,’” says Haug. “I didn’t even consider the thought that this could be something that would be so interdisciplinary.”
A 3D printed eco-mask by Kimberly will be available at an upcoming auction at Sotherby’s in New York City, October 15th: https://kimberlycallas.com/take-home-a-nude-at-sotherbys-new-york-october-15th/
See more of Kimberly’s 3D printed pieces of work: https://www.artworkarchive.com/profile/kimberly-callas/collection/3d-prints
Morgan Hamel
Blog Post Author

It’s that lovely time of year again where love is all amongst us as weddings are galore! More than a handful of our teammates have utilized the power of 3D printing with Gigabot to create wedding decor that reduces costs while optimizing creative expression & personalization… so we thought we’d share their applications in hopes to inspire 3D printing for your special day.
Jeric 3D printed and assembled an LED sign for his sister’s wedding. The printed parts took 14 hours in total to make using a combination of PLA & PETG – PETG for the front, translucent part of the sign and PLA for everything else. He used super glue and hot glue to hold everything together. He also installed LEDs throughout the inside – the LEDs are RGB and have a transmitter connected, so they can use a remote to control the color and light-up patterns. Check out the photos from the full build process in this album.
Why use 3D printing?
Alessandra designed & 3D printed ‘Mr&Mrs’ wedding cake toppers and table decorations for Samantha Snabes’ sister’s wedding. They took about 1 hour to design and model for each print and the wedding cake topper took approximately 1 hour to print while the table decoration took about 43 hours to print using silver PLA. The prints were then spraypainted with gold.
Why use 3D printing?
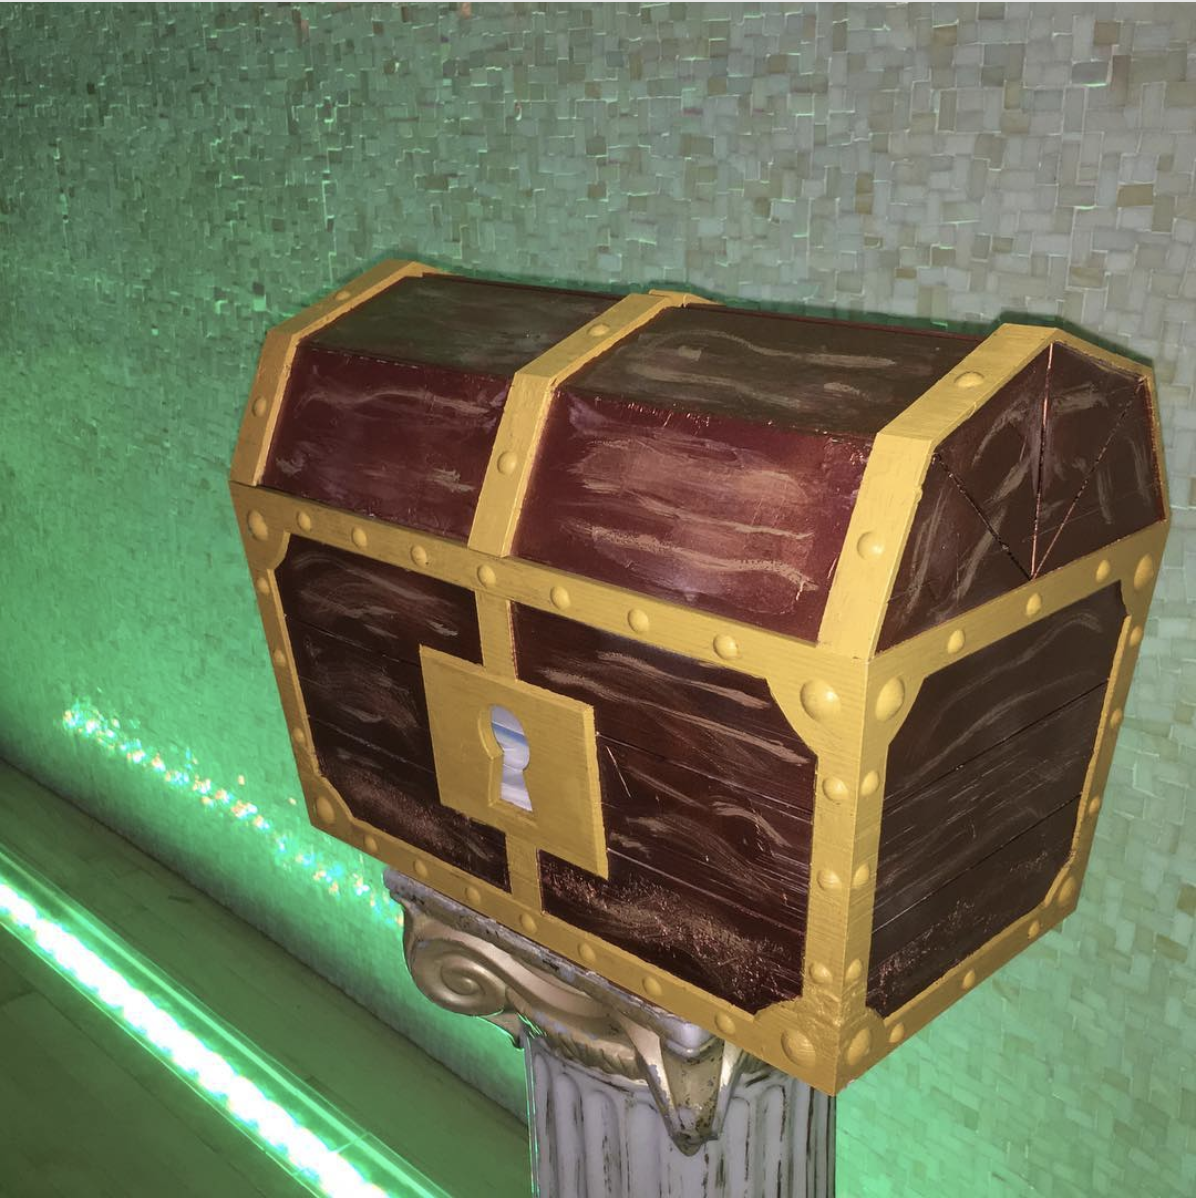
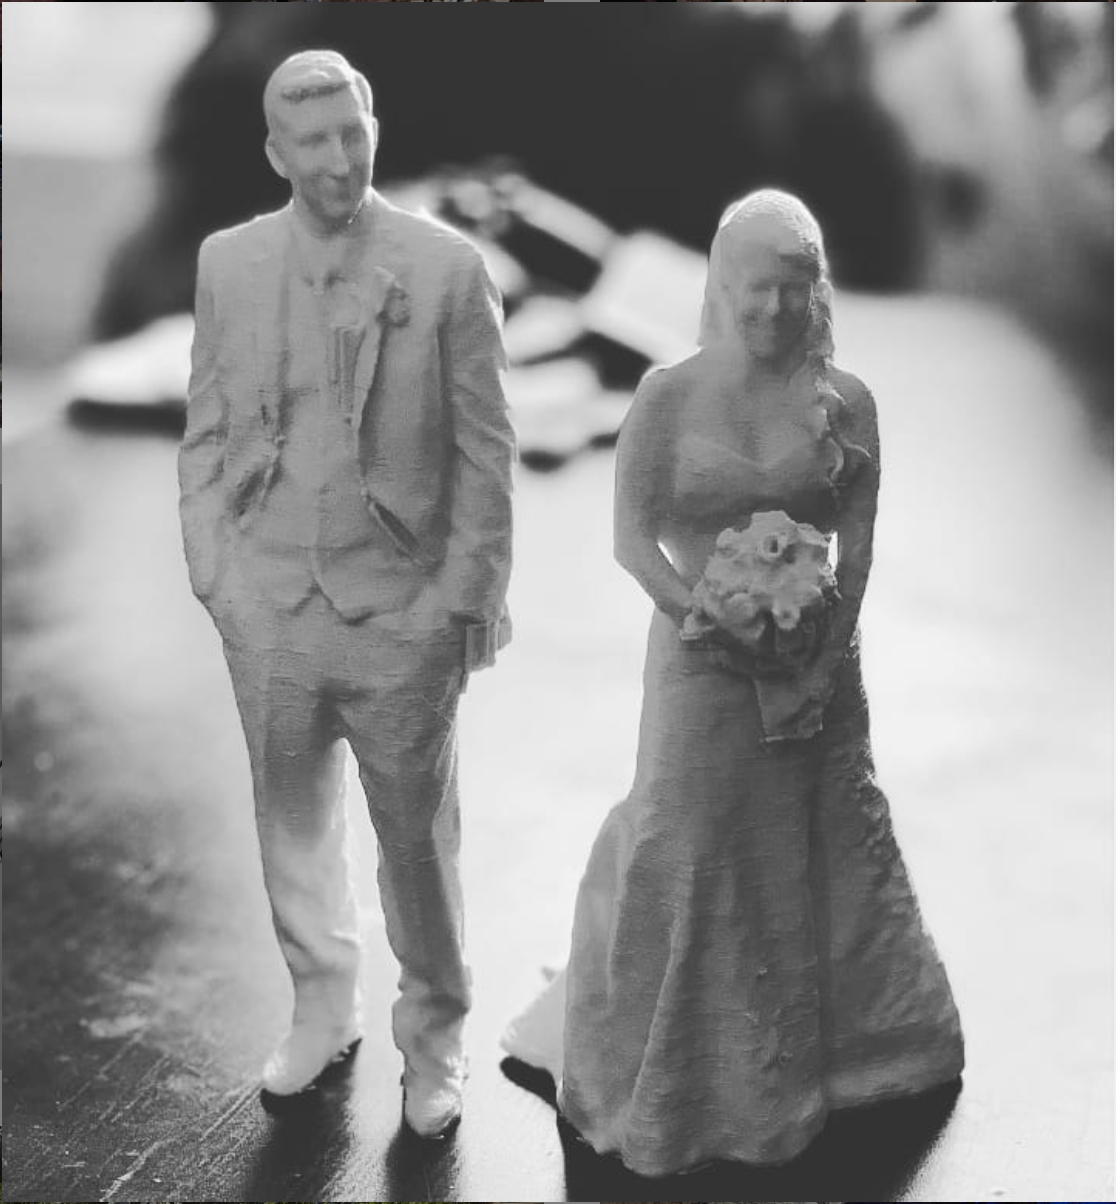
Mike B. 3D printed a Zelda treasure chest for a Zelda themed wedding. The chest had a slot at the top to drop in gift cards. He also 3D scans newlyweds when he goes to weddings and ships them print-outs of themselves a few months later. For the Zelda treasure chest, he used hinges from the hardware store, a bit of Bondo to give a wood texture, acrylic paint, and a clear coat. The design took 2 hours, and Mike kept changing it to look more authentic to the game. The portraits were printed in white PLA and scanned with a Structure Sensor. Scans were cleaned up a bit in MeshMixer.
Why use 3D printing?
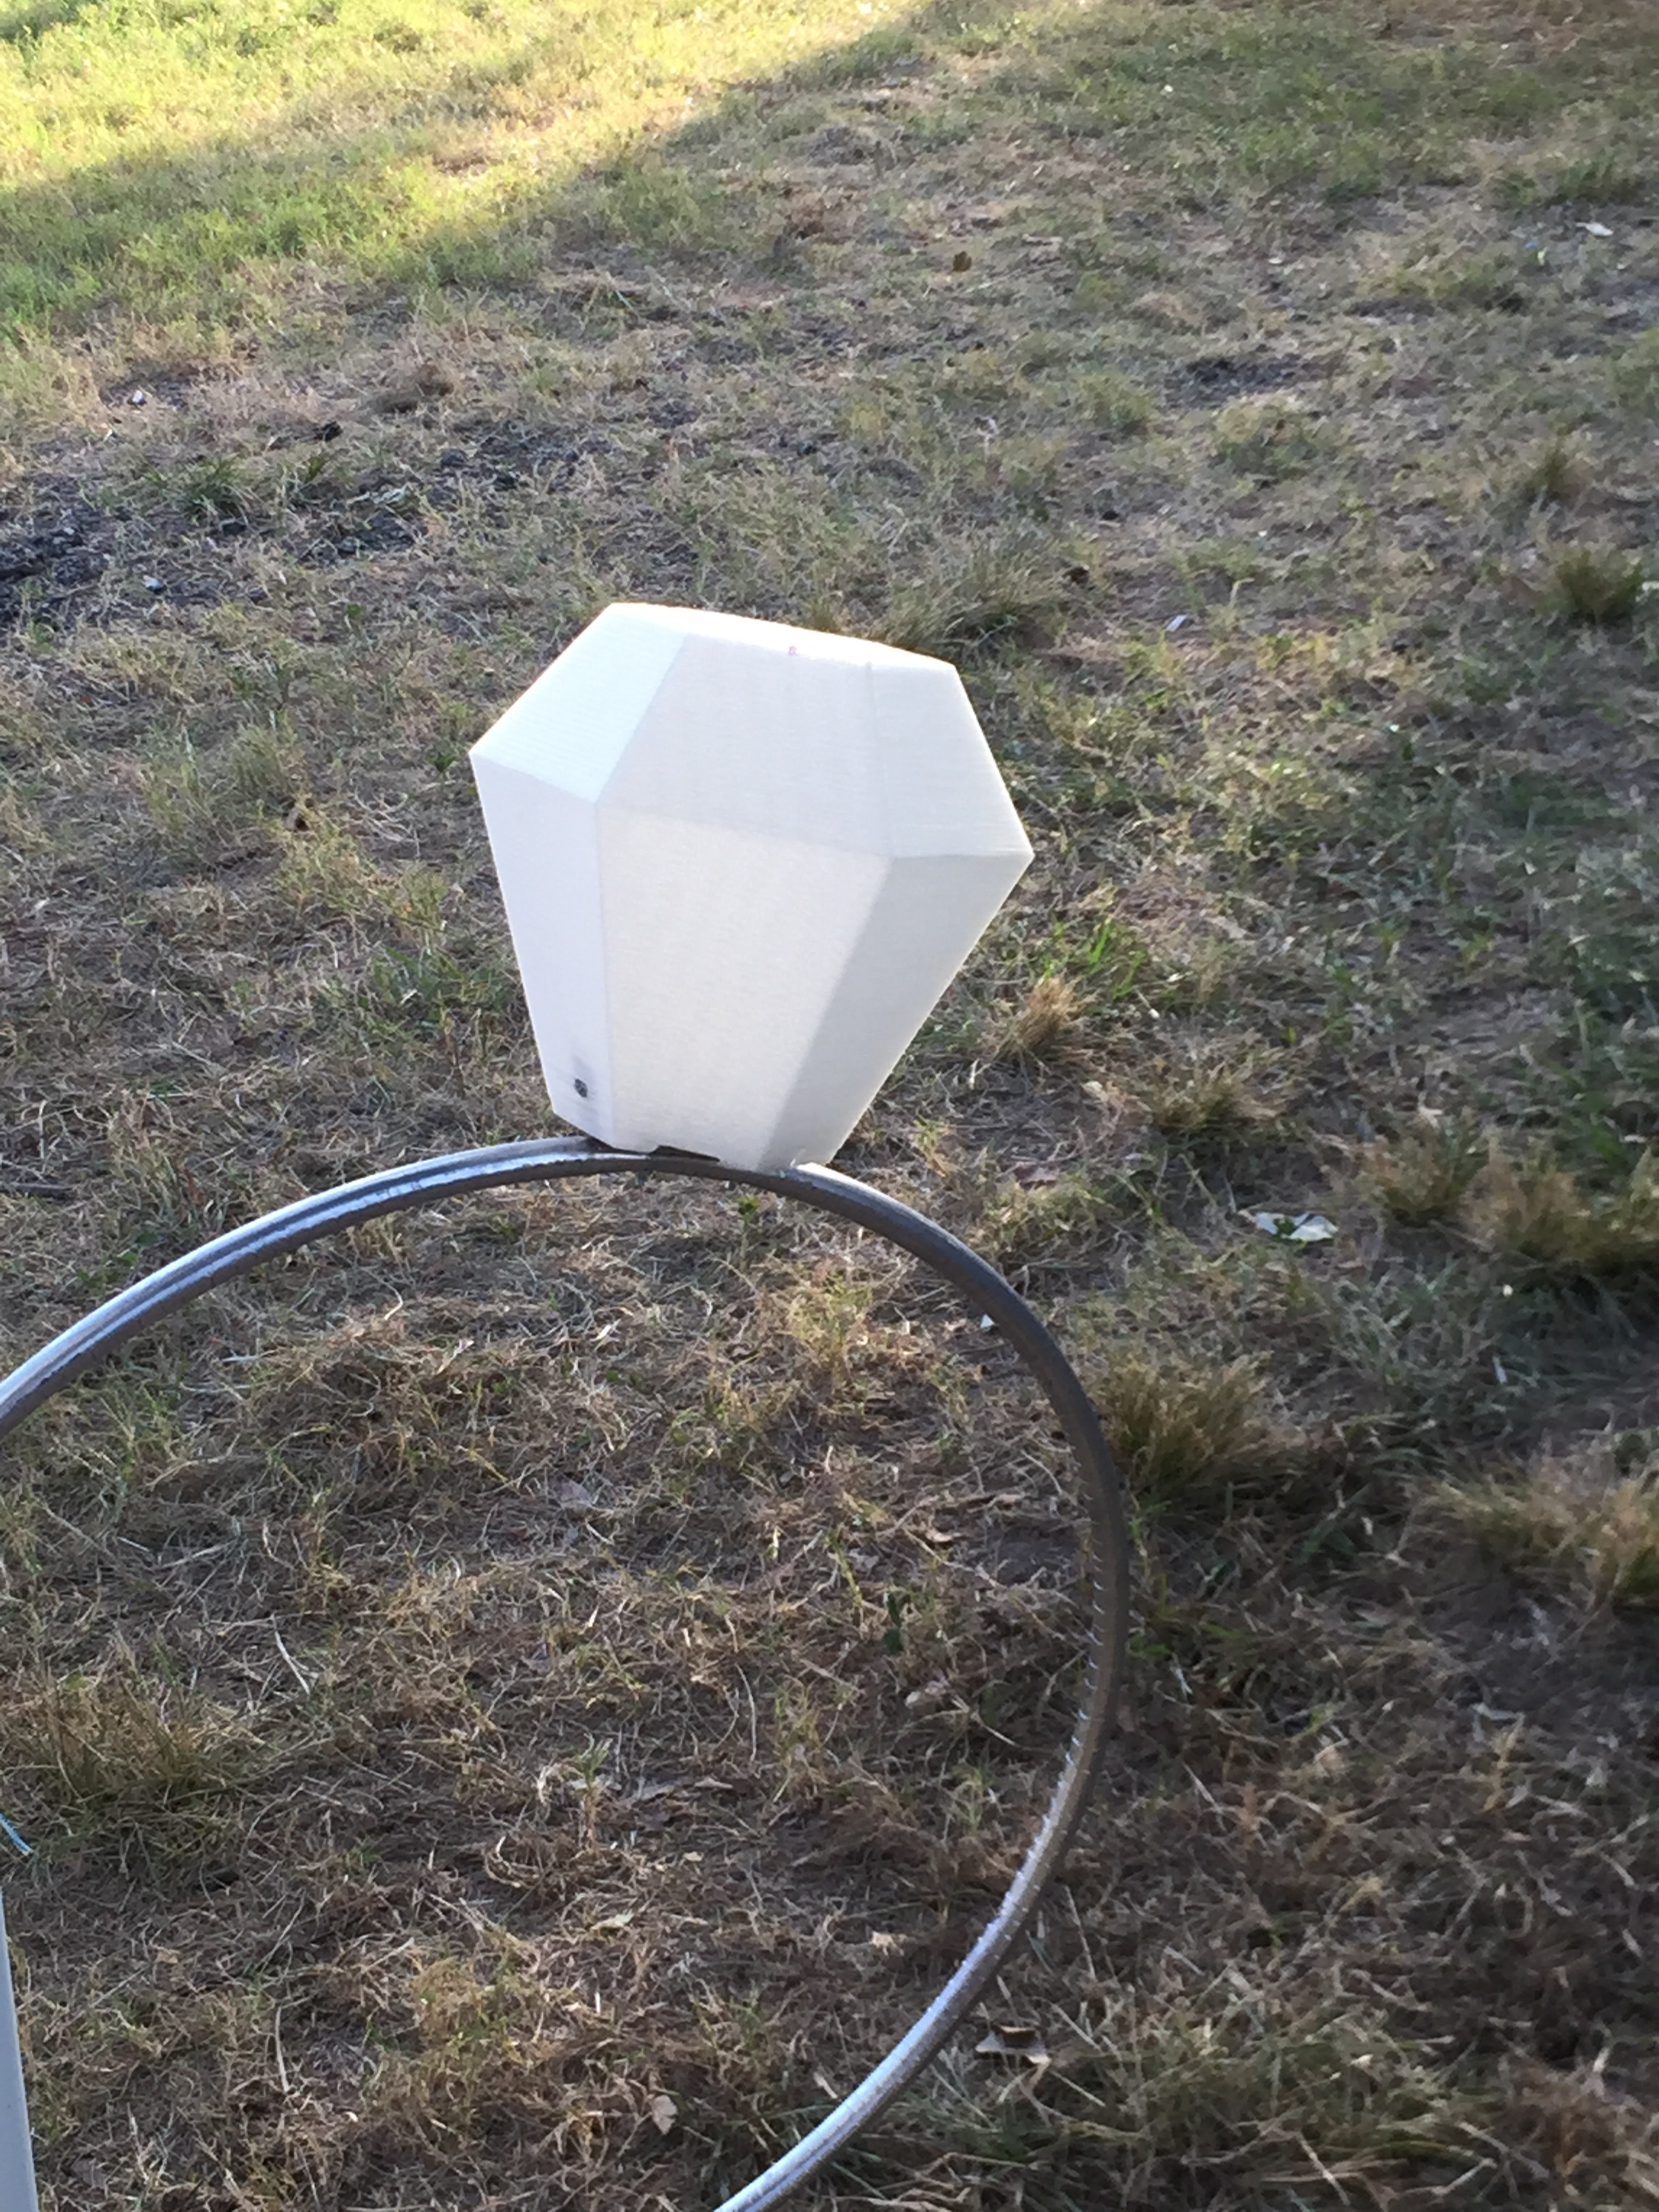
Tammie 3D printed a diamond to be a light within a large diamond ring to further accessorize the wedding. She used natural PLA and it took 1.5 to 2 hours to complete the print using Gigabot and didn’t do any post-processing work on the prints.
Why use 3D printing?
There you have it! Four special 3D printing applications for very special days. We’d love to know – what have you printed for weddings & special occasions? Don’t hesitate to share on our forum! Until then…happy printing ever after 🙂
Cat George
Blog Post Author
Are you ready for a new 3D printing adventure? Join the team! APPLY NOW