


Yep, that’s right- we’re returning to Ireland!
This time we’re showing up in full force with Katy, Matthew, Samantha, Gigabot and some exclusive 3D printed content!
It all began with Web Summit 2015 when our co-founder Lara identified the opportunity and we were invited to apply.
After being selected last year, Samantha had the pleasure of attending sans Gigabot as a female technologist representing the BETA program. While we didn’t win a pot ‘o gold, the experience left us richer in experience & relationships.
While exhibiting we met, WEVOLVER, which resulted in a collaborative effort to leverage their platform & community. They also sponsored this year’s Great Big Gigabot Giveaway.
In addition to making some new friends, throughout the week Samantha had the chance to pitch to thousand in the BETA PITCH category and was blown away to win 2nd place!
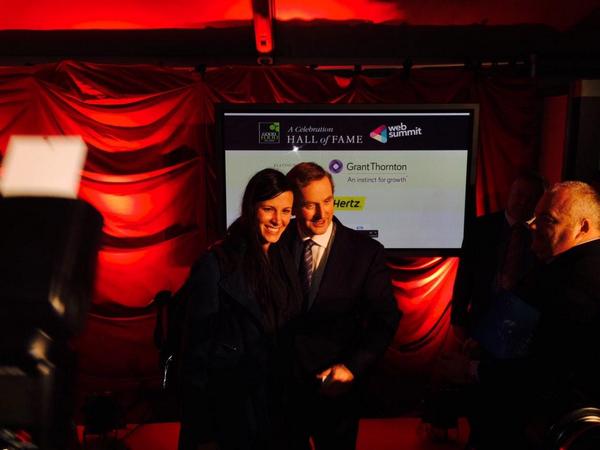
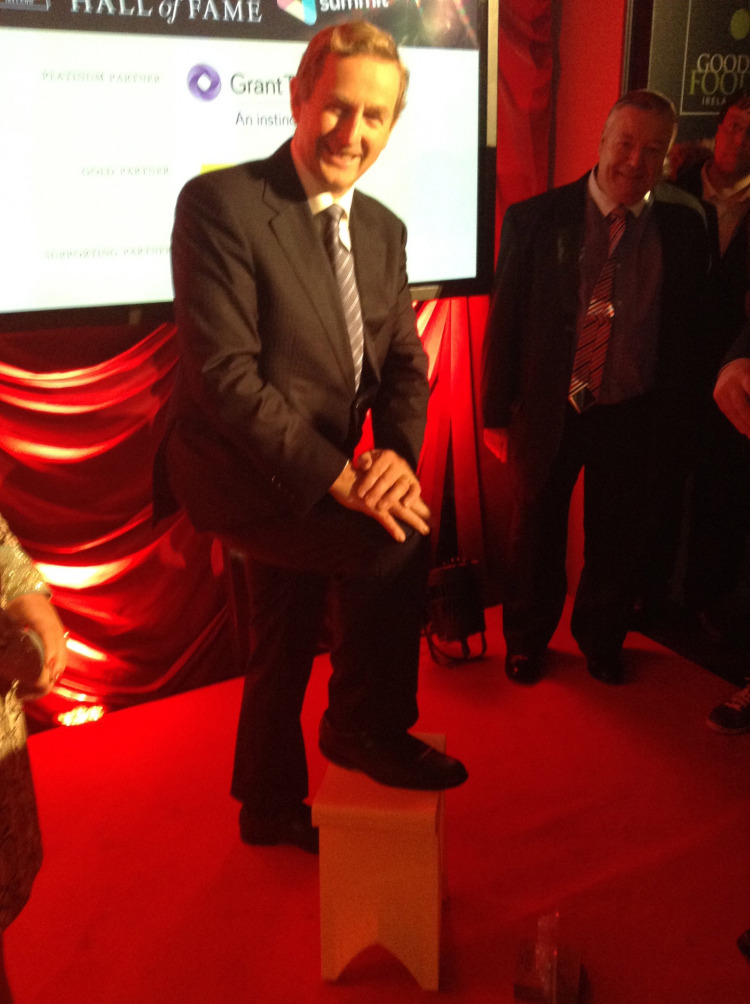
She also had the honor of meeting the “Prime Minister” or Taoiseach Enda Kenny who posed with our traveling 3D printed stool.
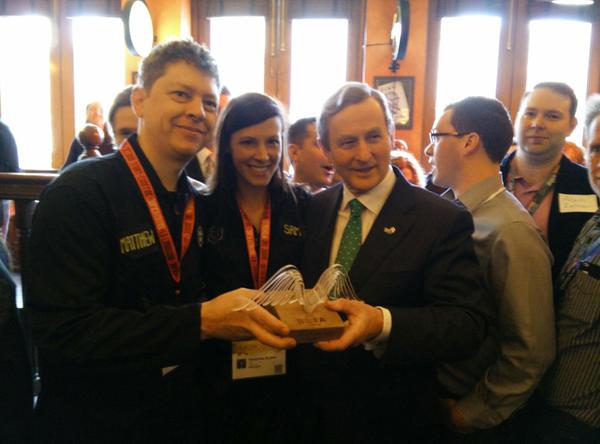
Fast forward 4 months later, Samantha & Matthew had a chance to meet up with the Taoiseach in on St. Paddy’s day during his USA tour for the IDA breakfast during SXSW. They brought the BETA trophy and, of course another 3D printed stool!
Shortly afterwards, Katy, Matthew and Samantha packed their bags and this time Gigabot for what promised to be an adventure on their self proclaimed #road2collison a.k.a. Collision in Las Vegas!
The group was trilled to demo Gigabot for the Summit crowd in the USA along with some pretty slick 3D prints. Again, we pitched….and this time won!
As part of the prize package, we were invited to be part of the 2015 START tour. This provided Matthew and Ernie the opportunity to head to CONVERGE/RISE. At RISE the duo re-connected with the Summit staff, launched our 2nd Great Big Gigabot Giveaway to give away a Gigabot to a group making a difference, learned a ton about Asian Manufacturing and Ernie took his first international trip!
Which leads us back to Ireland…
We can’t wait to meet you and to demo Gigabot for the friends we made last year. We hope you will look us up if you are across the pond next week!
Here’s where you can find us:
Shameless ask
See you soon??!
-Matthew, Katy, Gigabot and Samantha

While applying for summer internships last spring, I did not imagine I would be as involved or as integrated into the company team as I was during my time at re:3D. This past summer, I got to explore and expand upon some of my own passions while taking on the role as the project lead for re:3D’s Great Big Gigabot Giveaway.
As I read the job description for film/social media intern position, I was excited that I would be able further explore my interest in creating videos. This is exactly what I did! This summer I worked with a video editing software called Adobe Premiere Pro CC for re:3D. Having prior experience with only Apple’s iMovie and Windows Movie Maker, I was eager to learn a more versatile software. My role as a summer intern soon evolved to specifically revolve around the second giveaway competition. re:3D was approaching the milestone of shipping out its 300th Gigabot, and the tradition of celebrating such a memorable moment is to give back to the community by giving away one of their industrial 3D printers to some with a vision to make a difference through 3D printing. You watch this year’s announcement video that I developed to announce the contest here.
I had the opportunity to work closely with Samantha and so many other amazing individuals through helping organize this competition. We recruited several amazing judges and in-kind sponsors, and I was astounded by the amount of support we got to help make this project possible. Even members of Tunapanda, the recipient of last year’s giveaway Gigabot, were happy to judge and sponsor this year’s competition. Check out all of this year’s judges and sponsors here if you haven’t already!

Out of all the things I experienced during my summer at re:3D, my favorite was probably being one of the first to see the applicant submissions for the competition. Even though the applicants were very diverse in their backgrounds and ideas, I realized that they all had one key aspect in common: the passion to positively influence their communities. One thing I wish I could go back and change about the competition structure is the length of the submission period. We had several people with great ideas start their applications, but not as many people complete them. It was awesome to see all the people who put forth the effort to create a video to enter into the contest. We also were honored to see the story posted on several industry blogs: 3Dprinting Industry, 3Dprint.com, and Techfortrade.
The purpose of the Great Big Gigabot Giveaway was to give back to the community by supporting an idea to impact society, and well, the 3D printing community certainly has a far reach. The recipient of the 300th Gigabot is Tochukwu, the man who is behind 3D Nigeria. This project plans to inspire a new generation of makers in tertiary institutions in Nigeria. Tochukwu and his team of makers hope to unleash the creative potential of these individuals and create value for consumers.
A big congratulations again to the winner and the runners up, Ability Maker and The Creator Program. You can view the incredible ideas of the entrants in the winner announcement video here or below:
All-in-all, I learned a lot this summer at re:3D from being directly involved on a project I could call my own. More importantly, however, I can definitely say that the best take-away was meeting such extraordinary people and cultivating those relationships. Looking forward to working on another project with re:3D in the future!
Sanchana Vasikaran
Blog Post Author
@v_sanchana

Our engineers have been hard at work over the past several months making some improvements to the current model of Gigabot, and we are excited to announce that we will be releasing this new version this fall.
In October 2015 we will release what you may hear us refer to as “GB3,” or the third generation of Gigabot since its inception. With this new version will come several tweaks and additions, the full list of which is below. We took the first of GB3 model to Roosterteeth today were it will be undergoing extensive field testing over the next two months. This Gigabot will also be filmed so we can release detailed 360 footage to you prior to the official release.
Current Gigabot-owners, not to worry – you will not be left behind. All the alterations and additions will be available as retrofit kits so that anyone can upgrade their current Gigabot. We want to ensure first and foremost that you are taken care of, so we will be making these retrofit upgrade kits available for purchase to you before we begin offering GB3 to the general public.
With these changes and additions comes an increase in the current price of Gigabot. We want to give as much advance notice as possible about this, so our first priority is getting this message out. Unfortunately this means that at this time we do not have finalized prices on the new Gigabot or the retrofit kits, however as soon as we do we will put out that information.
We are excited for the community to get their hands on the new and improved Gigabot, and we look forward to hearing what you think of it! Please don’t hesitate to contact us with any questions at sales@re3d.org.

| GB3 Single Kit | $8,550.00 |
| GB3 Dual Kit | $8,950.00 |
| GB3 Single Extruder Fully Assembled | $10,950.00 |
| GB3 Dual Extruder Fully Assembled | $11,950.00 |
| GB3XL Single Extruder Fully Assembled | $12,950.00 |
| GB3XL Dual Extruder Fully Assembled | $13,950.00 |
| GB2 Cable Carrier Upgrade (Standard & XL) | $395.00 |
|
GB2 to GB3 Single Upgrade (Standard & XL): Includes Out of Filament Detection, Power Switch Relocation, Cable Carrier Upgrade, Z Limit Switch Upgrade, Center Panels, Pre-assembled & Improved Hot/Cold End |
$1,295.00 |
|
GB2 to GB3 Dual Upgrade (Standard & XL): Includes Out of Filament Detection, Power Switch Relocation, Cable Carrier Upgrade, Z Limit Switch Upgrade, Center Panels, Pre-assembled & Improved Hot/Cold Ends |
$1,695.00 |
| Second Extruder Drop in hardware | $495.00 |
| Viki 2.0 (only needed by GB2 owners) | $295.00 |
| Filament Detection (1 Left or 1 Right) | $75.00 |
| Z-Limit Switch Relocation | $95.00 |
| Center Panels (Fit all GBs) | $125.00 |
| GBx Front and Rear Panels | $185.00 |
| GBx All Panels | $300.00 |
| GBxXL Front and Rear Panels | $220.00 |
| GBxXL All Panels | $325.00 |
| Power Re-location switch | Only Available in Single and Dual Upgrade Packages |
| Wheels Kit Low-6’’ (Tall-16’’) | $200.00 ($350) |
| Wheels Kit XL Low-6’’ (Tall-16’’) | $225.00 ($375) |

One of our values at re:3D is to provide 3D printing technologies to communities around the globe, many of whom don’t have the resources we take for granted. Access to plastic feedstock, a consistent power infrastructure, and reliable shipping services have always been a requirement to play in the 3D printing space. We want to change that. One of the microsteps in this direction is to find other ways to power our 3D printer, the Gigabot, while still allowing multi-hour (and sometimes multi-day) prints to emerge from our 600mm X 600mm (2ft X 2 ft) build platform.
I started experimenting this past week using a 40W solar panel and a car battery, and had some success printing a small test print. I’ve gotten some questions since then and wanted to explain a little more about my setup, and also find out if there were any other (successful or not) attempts to take YOUR 3D printer off-the-grid.
Our Gigabot takes 110V or 220V mains power, but then immediately feeds that to a 24V power supply to power the motors, hot end, sensors, USB comm port, and display. The only part that makes use of the mains power is the heated bed (the one that can fry an egg). Since using PLA as an input material usually eliminates the need for a heated bed, I started there.
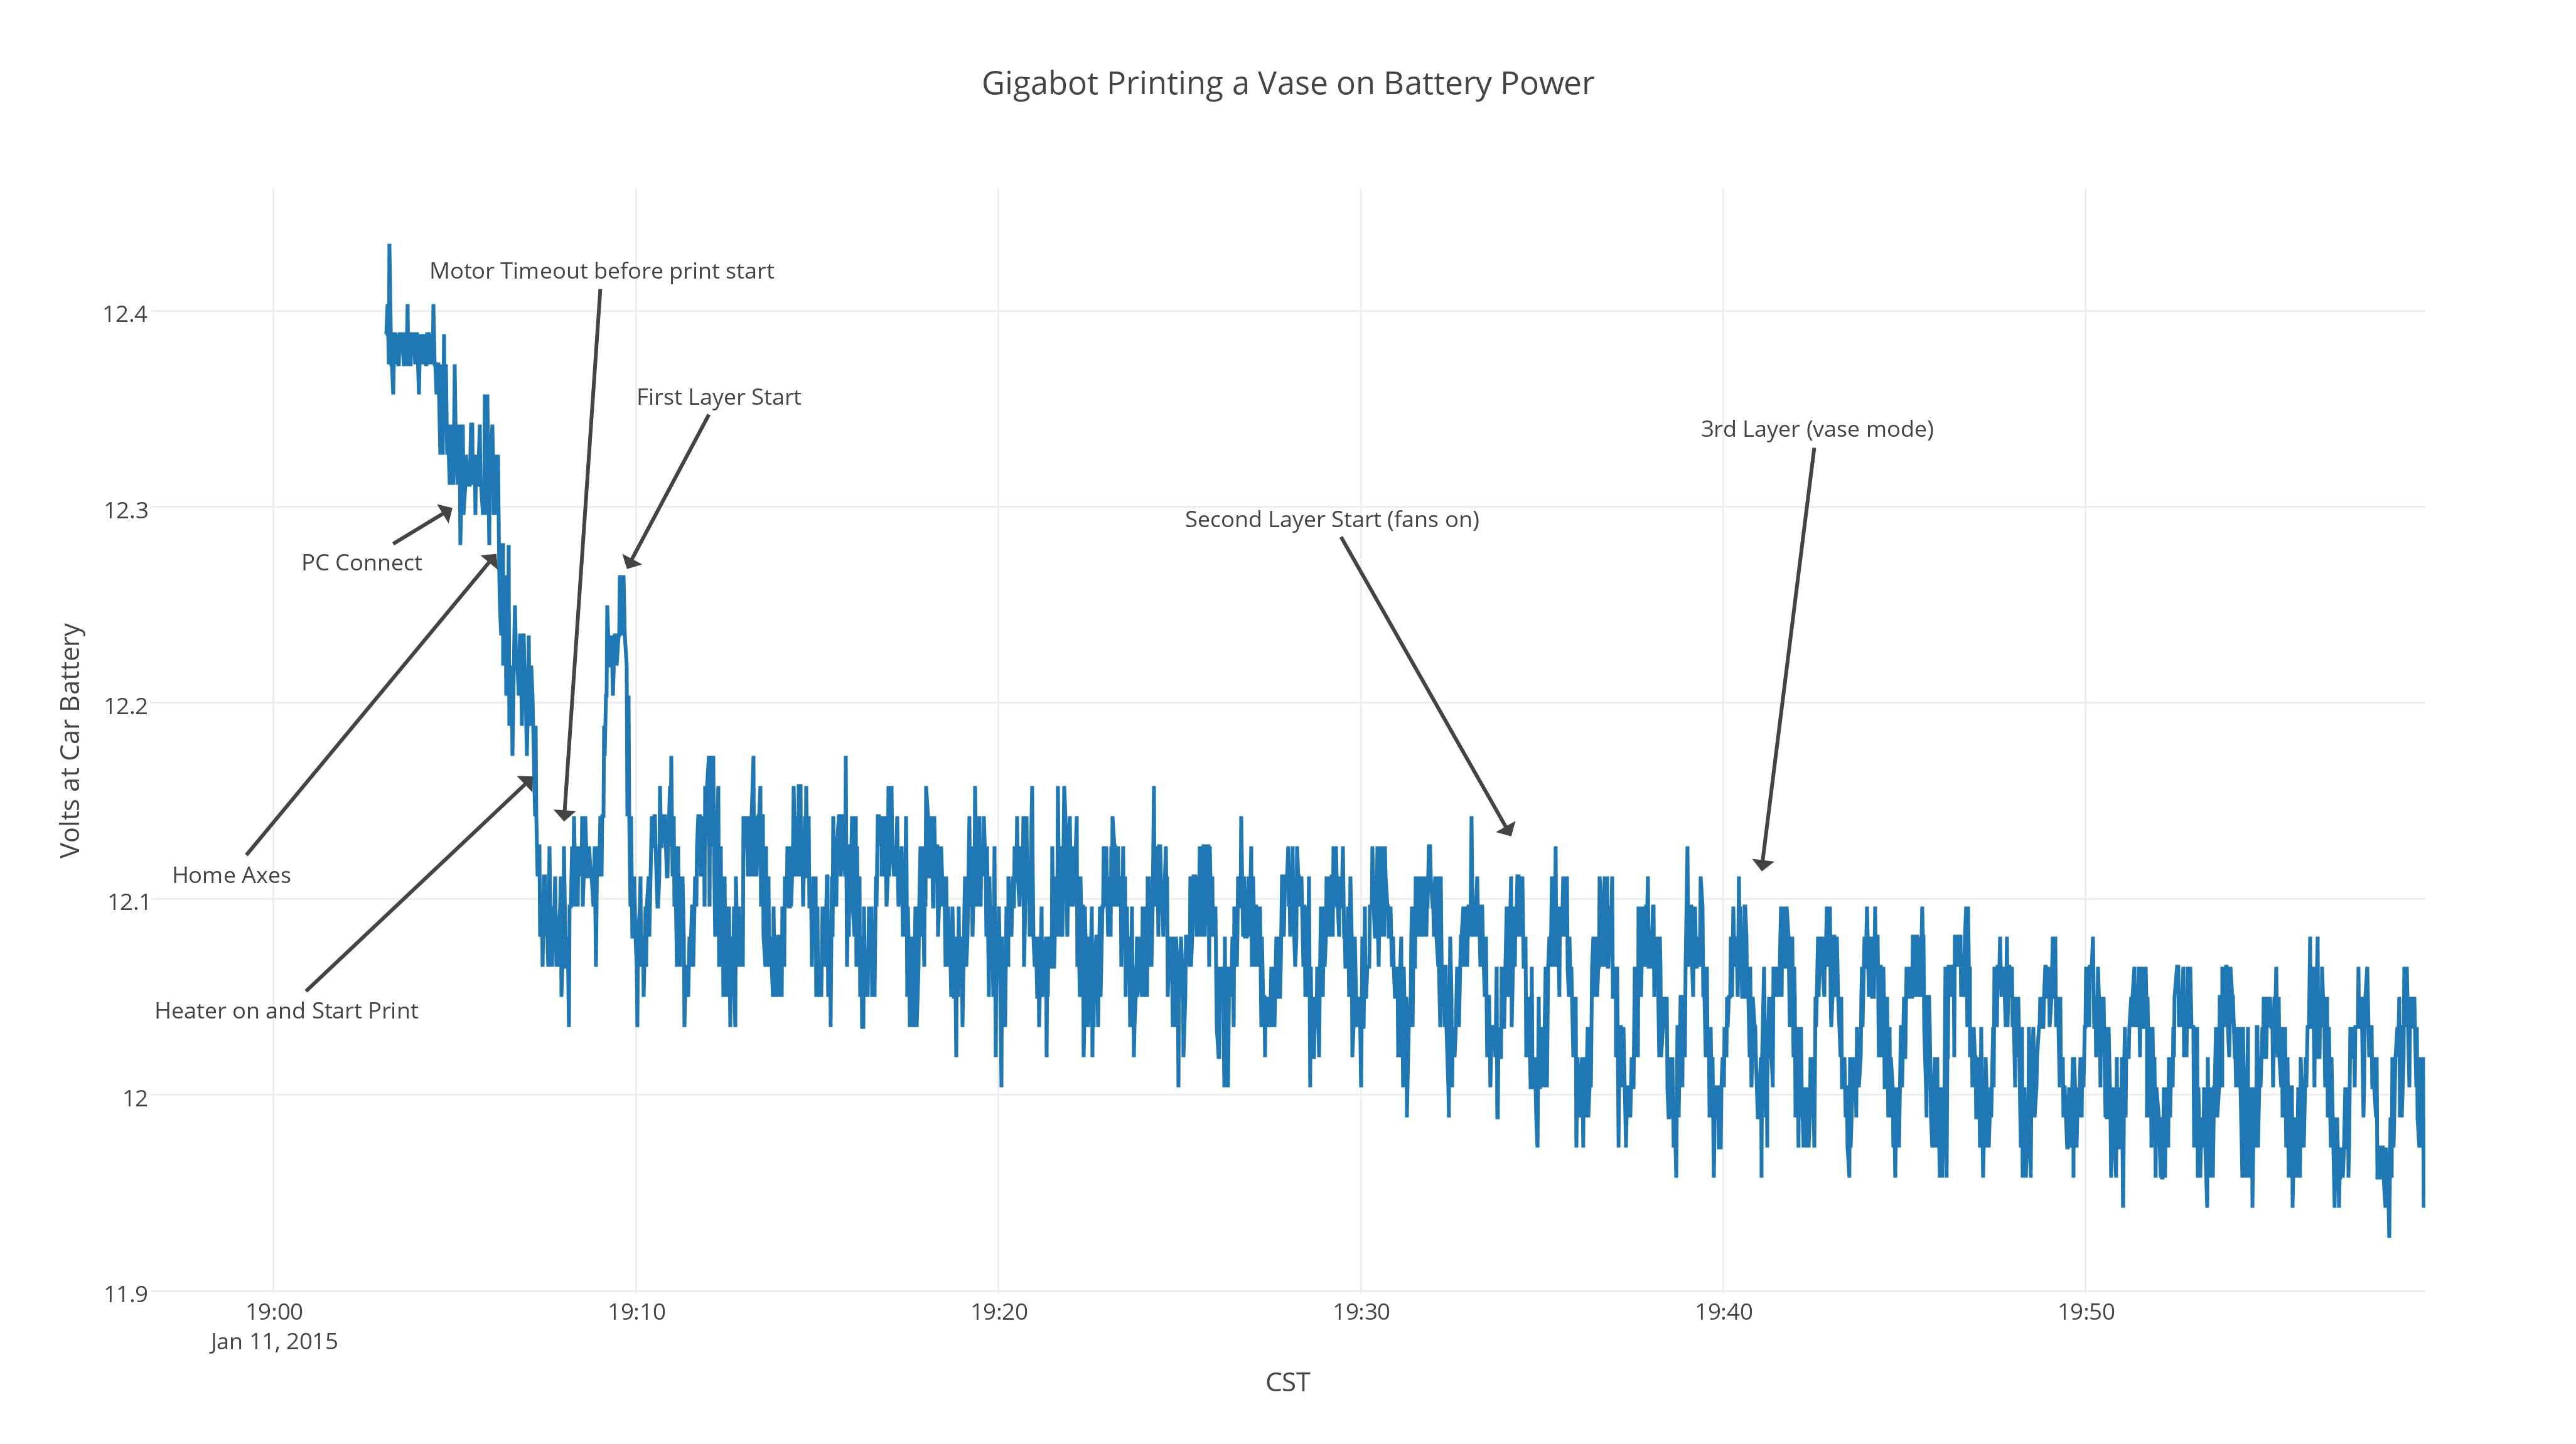
Disconnecting the power supply completely, I wired the 12V battery directly to our controller board and internal cooling fan. I later learned that this cooling fan was a great audible indicator of voltage levels – but more on that later. 12V is at the very low end of what our controller board can take in, but the real question was how long could it print for?
I like to equate electricity to water coming out of a hose (like in this great tutorial from SparkFun), so to follow that analogy, I had to figure out if I could hold enough “water pressure” (voltage) to keep the controller alive, a large enough “holding tank” (car battery) to last for the entire print, while using solar panels to add enough “water” (power) to the system during the print.
After testing with a multimeter, I saw that the Gigabot draws about 5A at the most, and less than an Amp when idle (to keep the controller and comms alive), and on average about 3 or 4 Amps while printing (since the heating element cycles to maintain a constant temperature). Judging by the rating on my car battery of 70 Amp-hours, I could count on about 14 hours of power.
I should add that we often exchange Amps and Watts freely when comparing power levels. They are only interchangeable if the volts of the system remain constant (12V or 24V for Gigabot, 120V for USA Mains, etc.), since Power (Watts) = Current (Amps) * Voltage (Volts).
Or per the above analogy: Ability to Remove Mud From Car = Size of Hose * Water Pressure.
The solar panel I bought from Fry’s was impressive, but at 40W I know it wouldn’t get to the levels I needed, and I could only afford to experiment with one. Plus, pausing a print when the sun goes behind a cloud just isn’t practical, since it would leave many marks of semi-melted plastic along the way, and the stepper motors would lose their homing location. I knew that the final solution would at least rely on some battery power.
We all know what happens when our car battery is suffering when you try to start it: the lights get dim, you turn off everything electrical, and pray that it turns over and you can get home that night. Instead of a gasoline powered motor and alternator to keep the battery alive, I had a solar panel – and it had to last the entire print. So I had some questions – and like any former space station flight controller, I took lots of data.
Would 12V be enough to power a system that we have been used to operating at 24V since the very early days? Would my Gigabot’s hotend pull down the stepper motors too far on battery power and affect the success of the print? Could I use all of the available power in the car battery to make a large enough object without any transient errors? Could I turn on and off the solar panel or battery charger during a print without interrupting it?
At first things looked (and sounded) gloomy. The first few attempts failed, and it seemed that the battery just didn’t have enough power to drive the hotend, motors, and electronics to keep the voltage levels high enough. Even the fan noise sounded sickly – a lot worse then when I had it set up without the multimeter.

The multimeter! That was it!!
I had wired my multimeter in line with the positive line off the battery to read a super accurate space-rated amp-draw during the entire print. I had wanted to measure exactly how much was going in and out of the solar panel, and the battery. The measurement itself was actually resisting the flow of electricity (the equivalent of bending the water hose to hear if water is rushing past the fold in the line). Once I removed the multimeter and tracked only the voltage across the battery terminals, I was able to get over 13 hours of continuous printing time out of my Gigabot – enough to print this 300mm (12-inch) tall vase! Here are the (manually entered) data points for that one:
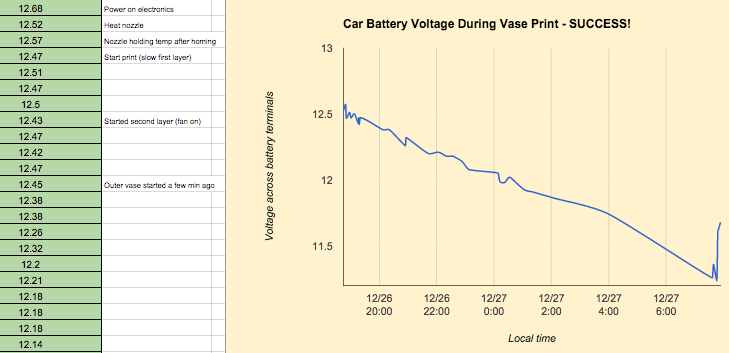
The solar panels are pretty straightforward, and work very similar to the battery charger I plug into the wall, so for the purposes of my experimentation in the garage, I’m alternating printing on battery power with a charger on/off, solar panel connected/disconnected, at varying voltage levels of the battery. I think I have found the limits, since my prints start failing at just about 11V on the battery now.
Also, ever since I automated my data taking process, I get much more sleep at once, without needing to wake up for data takes with pen and paper (and help from Google Sheets). Check out the new and improved version with a little help from plotly!
An interesting part of this method of gathering data is that you can start to see the cycling of the cartridge heater very clearly as the extra current draw pulls the battery voltage down each time the hotend is full-on. This will be useful in tweaking my PID values no doubt, and could also lead to better methods of insulating the hotend so it doesn’t need to heat up as much, thereby saving valuable amp-hours!
Clearly there is a little more work to do before we have a brownout-proof or solar-ready Gigabot out of the box, but I think these experiments prove it’s within the realm of possibility to create 3D objects anywhere – given a robust enough printer, and a light bulb’s worth of energy and imagination.
Chris Gerty
Blog Post Author

It’s one thing to have your company’s or school’s logo on a T-shirt, but have you ever wanted to make a 3D model of your logo to use as a keychain, business card, or maybe a coffee table? In this blog I’ll show you the process I use, and how (kind of) simple it can be. No, really, I’ll keep things basic and in all cases rely on much smarter people and tools than I could muster up myself.
Of course if you have any other suggestions for a better method, corrections/clarification to this method, or are skilled in the “complicated” ways of doing this, please leave comments on the cross-post on our Facebook page or G+ Community.
So, let’s get started.
Say you have a really cool company and one of your co-founders is a ninja of design. Chances are you have a great 2D logo that is just screaming for access to that 3rd dimension. In this example, we’ll use Katy’s re:3D logo. Make sure you have your file saved locally as a .png, .jpg, .gif, or .bmp. These filenames are of the “raster” variety (think pixels on a TV). The clearer the image the better, because we’re about to convert these raster files to vector files (think connect-the-dots meets color-by-number).
There are a bunch of ways to do this in expensive (and probably inexpensive) image processing packages, but I found a pretty solid online converter that does enough to get us by without knowing anything about layers and paintbrushes. Go to http://image.online-convert.com/convert-to-svg and upload your image file where it says “Upload your image you want to convert to SVG:”. Select the “Monochrome” checkbox to help prevent it from getting too confused. Click on “Convert File”. Your .svg version should download to your default directory. Note where this is since you’ll need it in Step 5.
Go to https://tinkercad.com/ and sign up for a free account. I guarantee you’ll use it again. Once you have an account, and have either skipped or run through the actually pretty useful tutorials, start with a fresh palette using the “Create a Design” button from the dashboard.
You’ll be presented with a blank grid, and a random name will be assigned, like Ominous Seapod or something. Click on the “Design” menu, and then “Properties”. Change the name to “3D Logo” or something similar and more original. Choose the visibility and license you want, and then save changes.
On the right side of the screen you should see an “Import” section. If it’s not already expanded, click on the triangle to do so. Then click “Choose File” and point it to your .svg file created in step 2.

Here’s where you need to experiment a bit. Depending on how much resolution you kept in your original file, the model may completely overwhelm the design space. For now, choose values of 5mm for the height and 20% for the scale. This will make sure that you can at least tell if your model ended up on the canvas (and it doesn’t just cover the entire field of view with a single face. For rescaling, if you want to maintain the 5mm height, it’s much easier to just re-import at a different scale, rather than scale with the Tinkercad tools on an over/undersized model.
This is where the tutorials from Tinkercad are useful. Use the zooming and pan/rotate tools via your mouse or trackpad to analyze the model, making sure that all of the detail you need is there. If you see too much missing or some jagged lines, try to find a higher resolution image to start with, and go back to Step 2 and try again.
Adding bits: Tinkercad will also let you add a platform (or anything else) on your model. This can be useful if you have letters in the logo that float free when converted to 3D. Those free-floating insides of “O”s and “A”s will float right off the final product when you 3D print it out, so best to find some way to tack it down. The easiest way to do this is to create a “Geometric” shape from the right sidebar that is an approximate shape of the logo (rectangle, circle, etc.), and give it a dimension of 2mm high. Place it on the platform next to your logo, size it right, make sure it has the same bottom level, then move it right on top of your logo. When both pieces look like they fit, select both at the same time (by simply dragging a select box around the entire thing), and click on “Group” above.
Subtracting bits: If you needed to put a hole somewhere on the model for a keychain, cup holder, etc, all you need to do is follow the above process, but make it a hole instead of a “color”. Use the buttons at the top right to do this. When you “Group” your logo with a small cylinder that spans the height of the model, voilà! It’s a pendant!
This step couldn’t be easier with Tinkercad. Click on the “Design” menu, then “Download for 3D Printing”. Select “.STL”, and the file will start downloading immediately.
They’re popping up everywhere these days: your local library, makerspace, Earth-orbiting laboratory… wherever you are, you’re probably not too far away from a 3D printer with some spare time on its nozzle. If you can’t find one nearby, you can of course order a 3D printer of your very own (we recommend this one, especially if you go the coffee table route) or have someone else print it via a service such as Hubs or Shapeways.
The skills you’ll learn and feeling you’ll get by going end-to-end in making something that never existed before is like no other. Welcome to the world of mass customization, where you don’t have to make 10,000 of something in order for the act of designing it to pay off. Make some new models.. iterate, experiment, and most importantly, share it! If you make something awesome consider posting it on a model sharing platform such as SketchFab and sharing the link here in the Facebook or G+ comments.
Chris Gerty
Blog Post Author

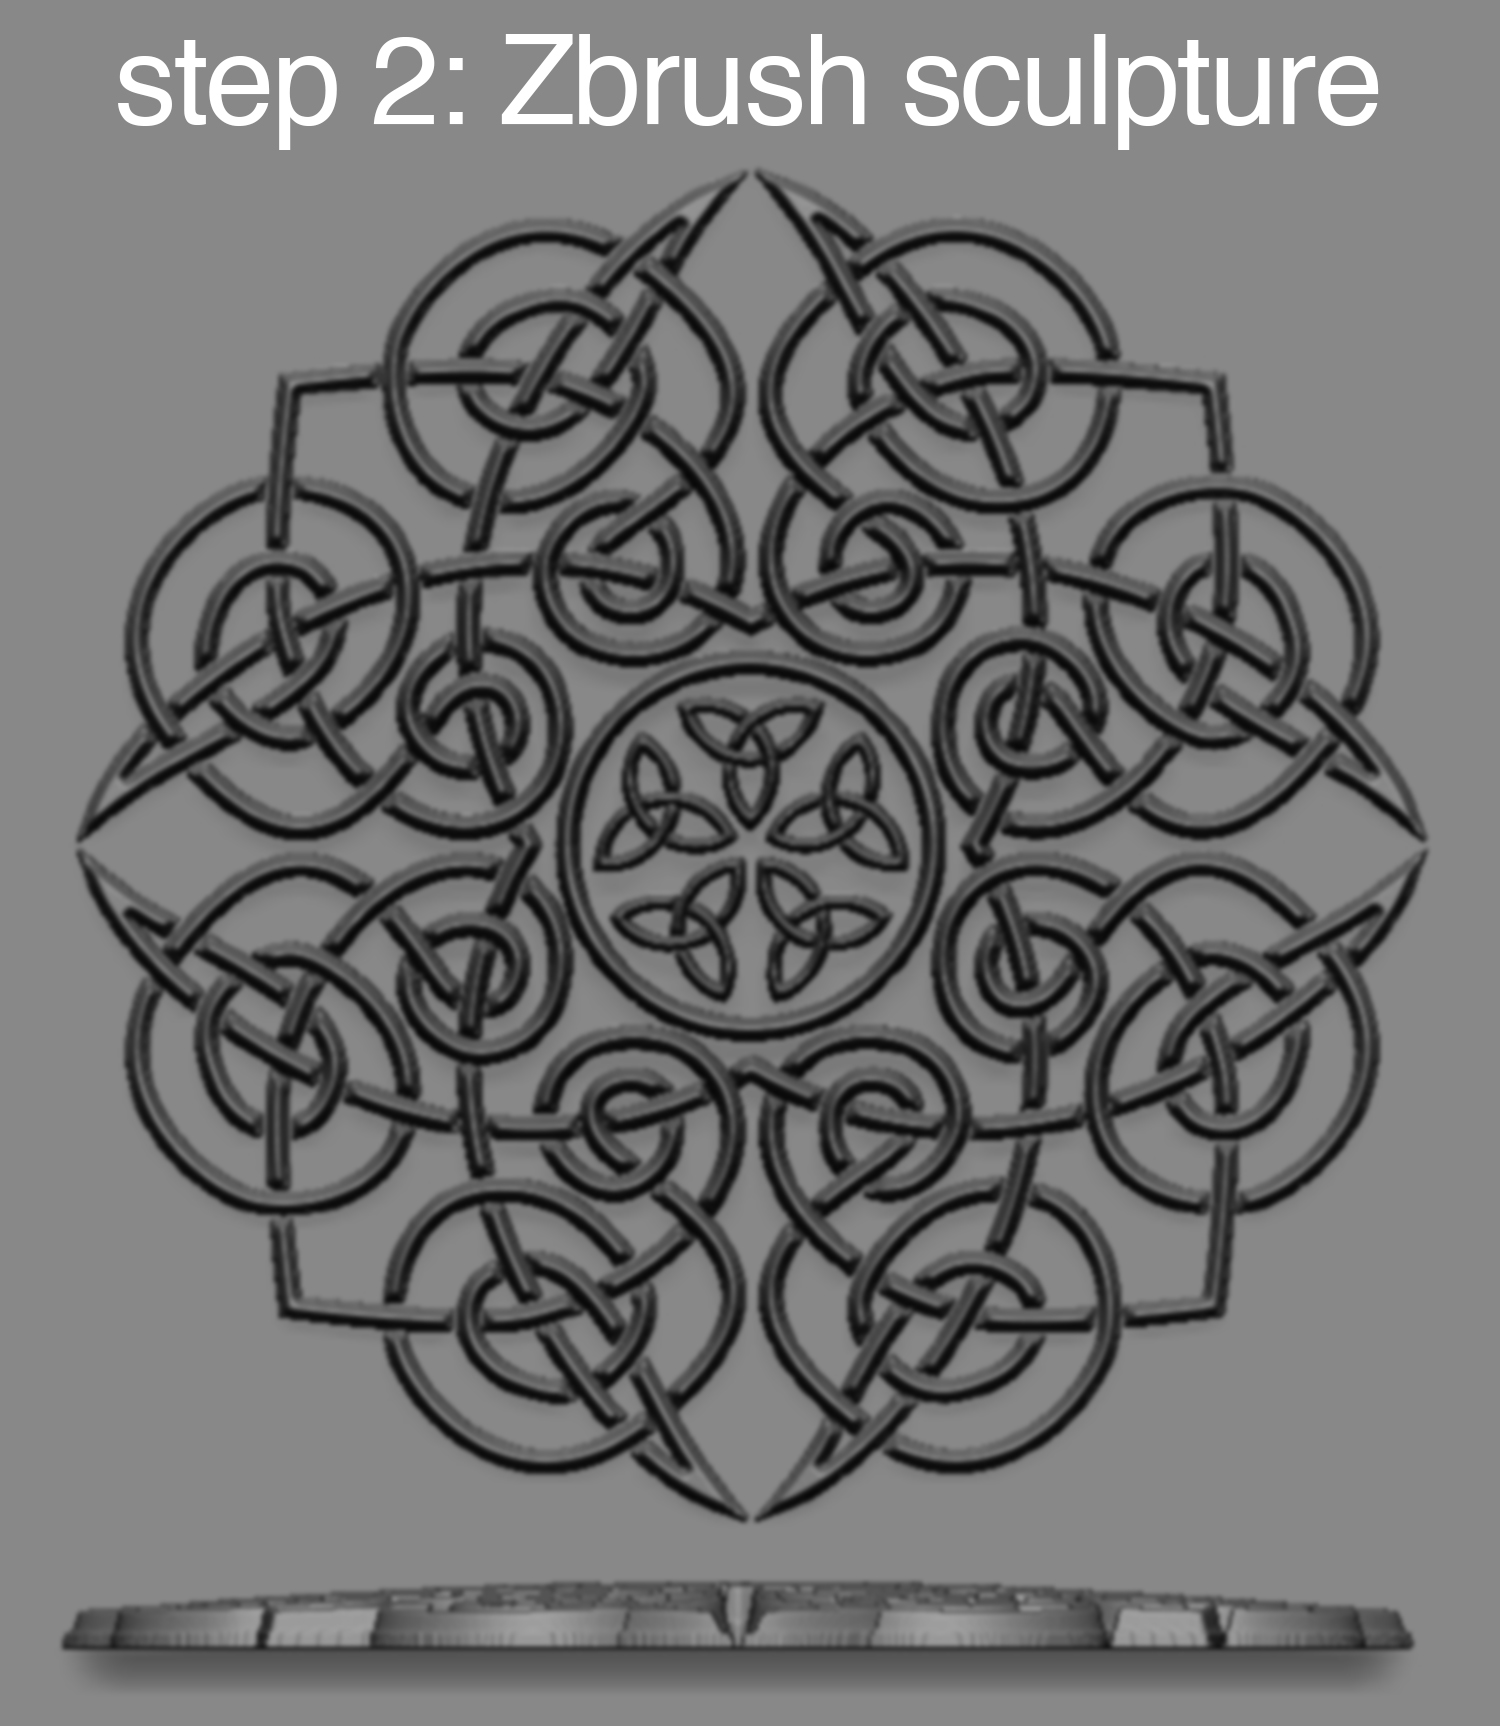
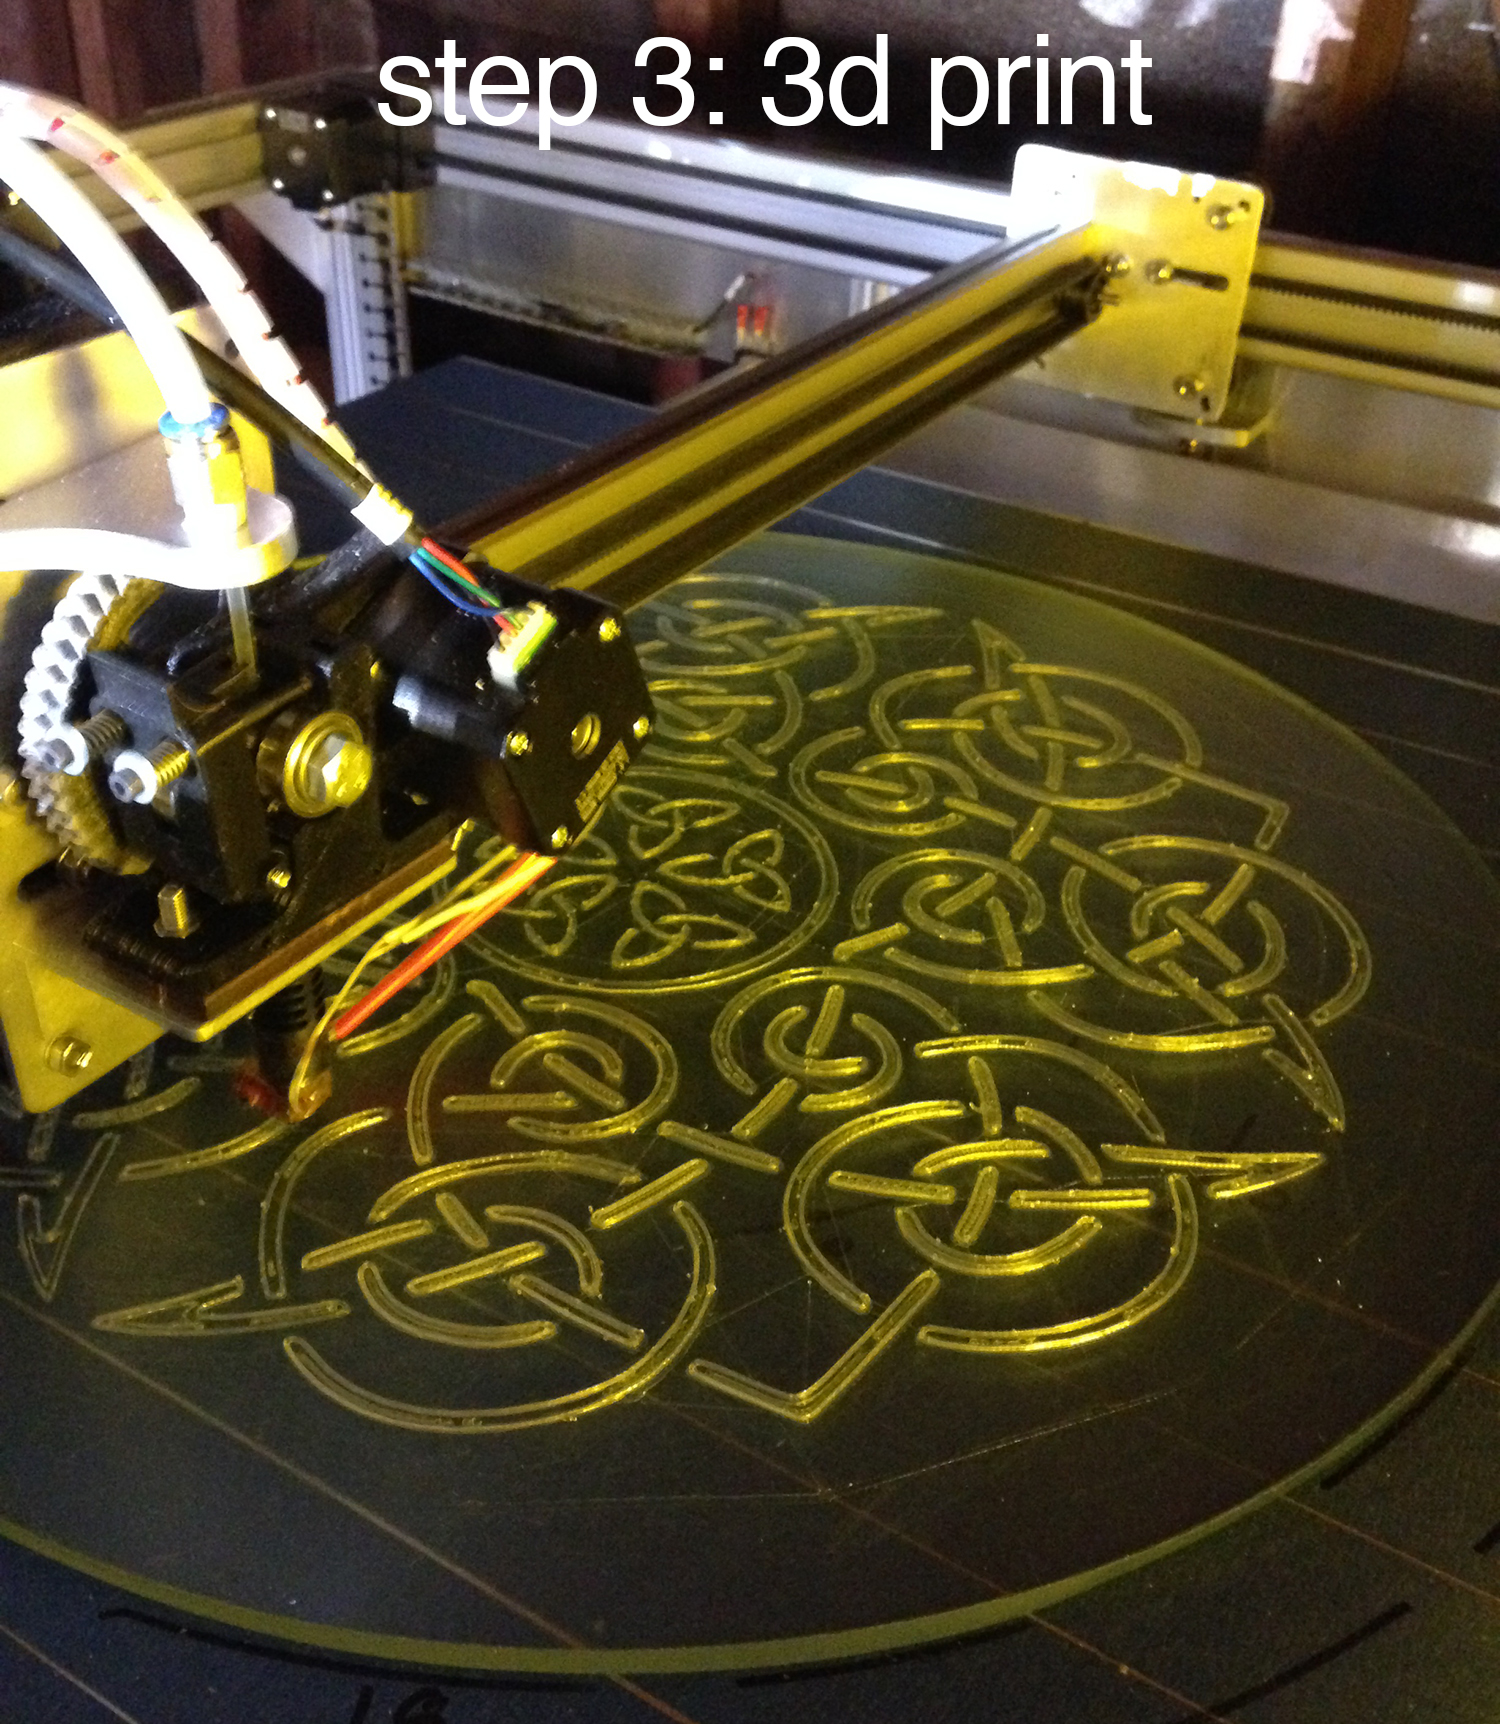
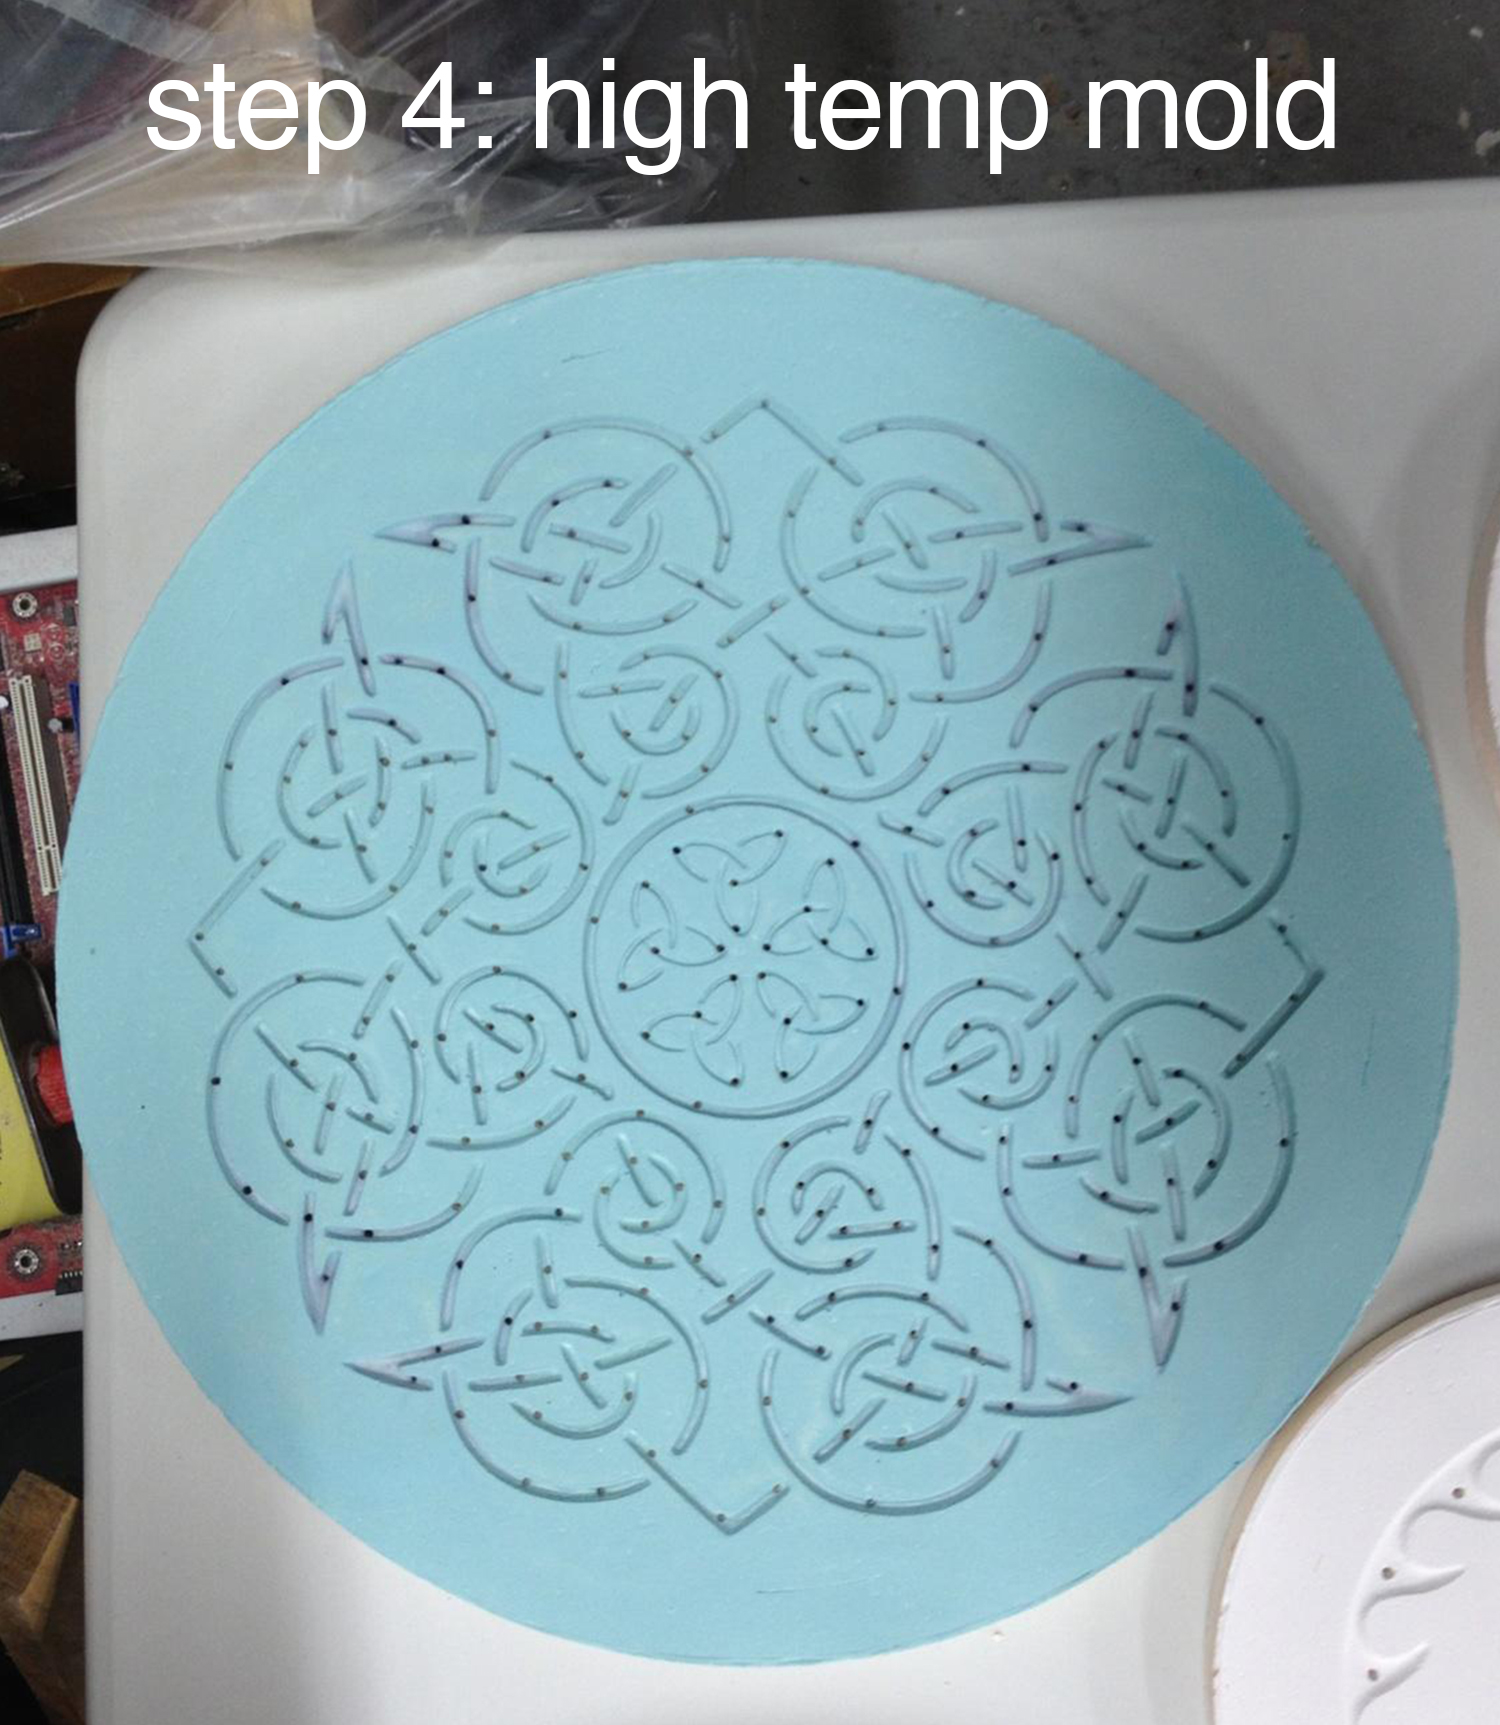
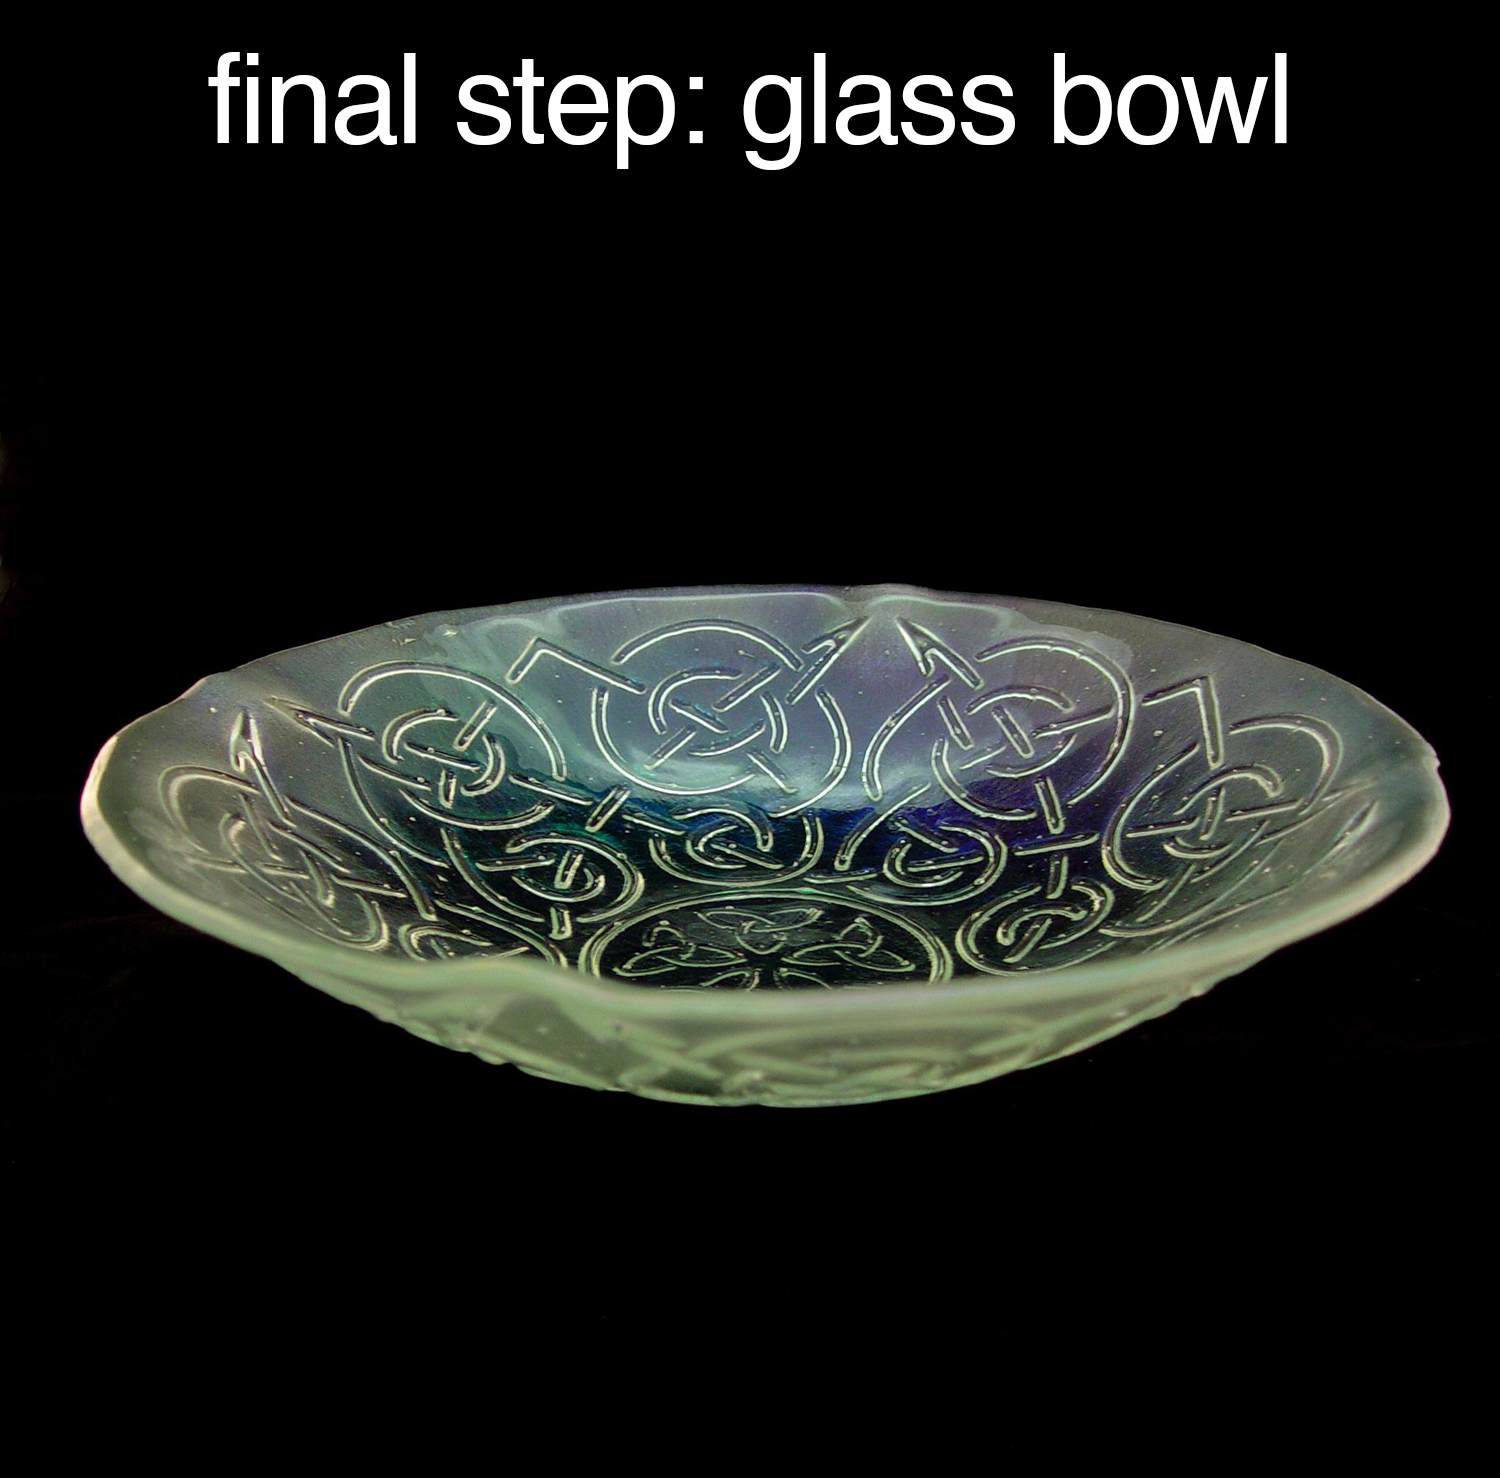
As seen on social media! Artist James Conrad shares his client’s “Celtic Heart Serving Bowl” print made on Gigabot. You can see how this stunning creation was created below.
Want more info?
Contact James Conrad at jjcink@gmail.com and check out Lenchner Glass at http://lenchnerglass.com.
Are you ready for a new 3D printing adventure? Join the team! APPLY NOW