OpenERP—Taking Organization to A Whole New Level

Hello again! In this blog I will be discussing a behind-the-scenes technology called OpenERP that helps keep re:3D running smoothly and efficiently.

Did you know that there are over 1000 pieces in a Gigabot?

The re:3D warehouse has to keep track of inventory and make sure Gigabot pieces never run out. Last summer, re:3D started using a new system called OpenERP to do just that.

What can OpenERP do?

OpenERP is a software that has the power to organize an entire company. It manages the whole gamut from accounting, purchases, and inventory to keeping track of demand. It is structured in modules, and Erik Hausmann is striving to help re:3D make full use of its capabilities. Erik compares OpenERP to a “Swiss Army Knife for business” because it is highly valued for its integrative nature. It not only facilitates transactions in the warehouse, but it also increases re:3D’s small business efficiency overall.

Who is Erik Hausmann?

He’s our Innovation Ninja (formally Technology Innovation Officer or TIO). He manages our OpenERP. He spent six years in Deloitte Consulting working with SAP ERP for Fortune 100 companies in some of the largest systems in the world.

Who is Davydd Kelly?

Davyyd is an exchange student from Australia–he handles all the barcoding in our warehouse. Davydd is an expert in JSON and other open standards. He is working diligently to further refine warehouse processes.

Erik uses Ramen to Explain a Function of OpenERP

Erik survived on Top Ramen as a college student. One day, he looked in his cupboard and saw ten packets of ramen. He knows it takes a good chunk of time to go to the grocery store, so he sets aside an entire day for the purpose of restocking. He knows he should go shopping when he has one or two packets of ramen left as a safety buffer against hunger.

As analogously applied to the warehouse, it is impractical to go looking into hundreds of cupboards to count Gigabot parts everyday. But OpenERP , an MRP (material replenishment planning system), can do all this automatically. While taking into account numerous delaying factors, it can order new shipments when the inventory of a certain type of part runs too low, meaning that a quantity has reached a set minimum. Moreover, OpenERP can even make forecasts about predicted inventory levels.

OpenERP as a Purchasing Tool

Major steps in finalizing a purchase include finding a lead (a likely customer), making a quotation, putting in an order, creating an invoice, and confirming delivery.

OpenERP is also a great tool for re:3D staff when working with customers. OpenERP can make quotes, record factors to an opportunity prediction (ex. There is a 90% this customer will buy our product), add and subtract products, and input discounts or tax. Not to mention it can also create invoices, confirm purchases, and oversee delivery. All this can be done in about five minutes for a quick user. You can find free invoice templates at www.bill.com.

Re:3D is excited to be using OpenERP and will be looking forward to expanding its own systems in the future while living by the open source standard they support.

Keep on printing,

Sunny

Blog Post Author
3D Printing & Dimensional Accuracy

Several members of the Gigabot user community have recently inquired about dimensional accuracy in 3D printing. In this blog, I’ve attempted to explain the following concepts:

  1. Effects of poly count on circle precision
  2. Effects of perimeter order on circle size

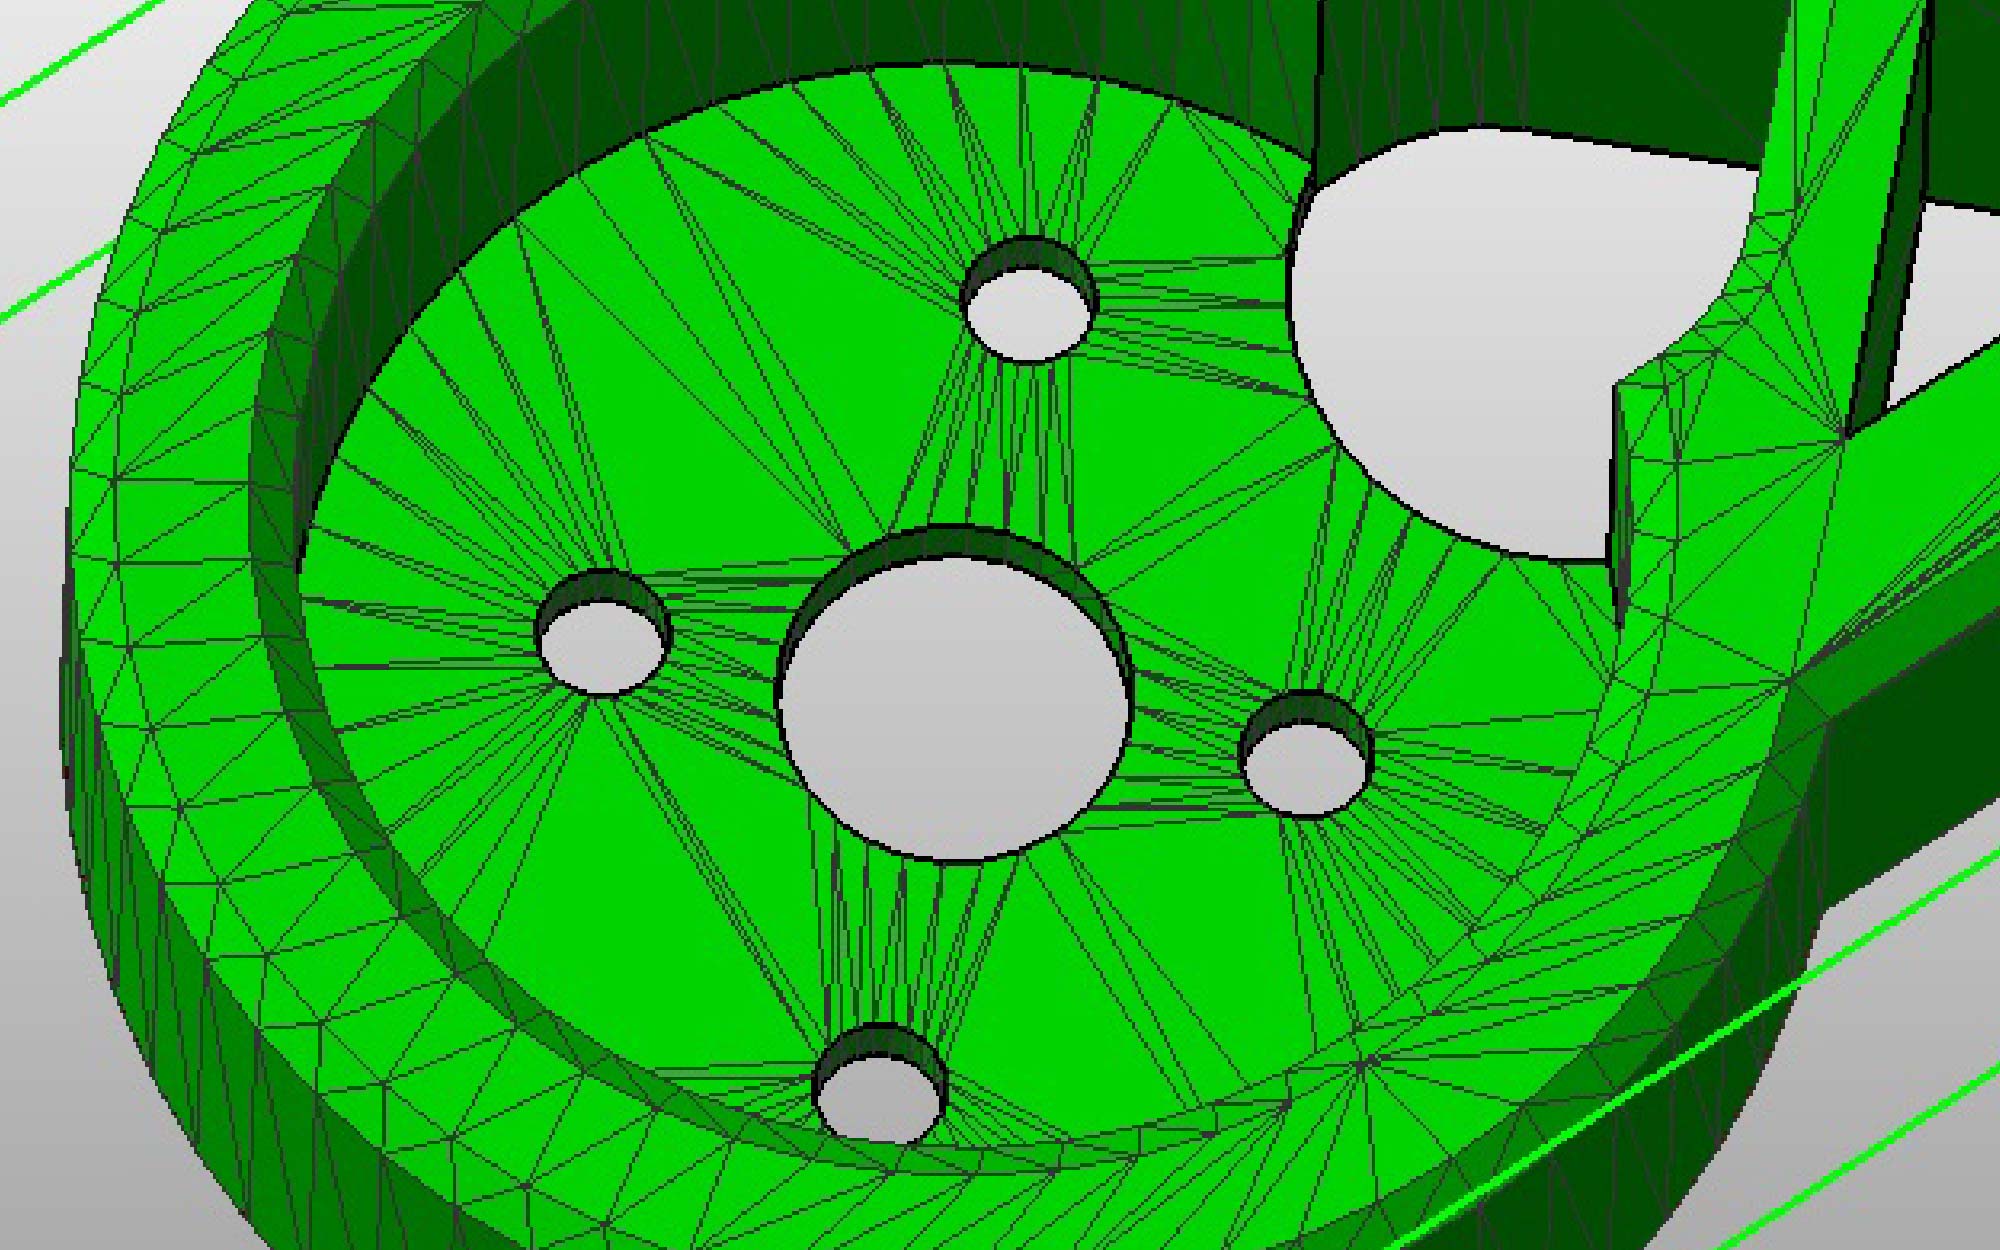
One of the challenges with 3D printing is obtaining the correct size for hole features. Currently the preferred file format for 3D printing is the .stl (Standard Tessellation Language). The STL file format describes 3D images as a series of triangles of various sizes as seen in the figure above.

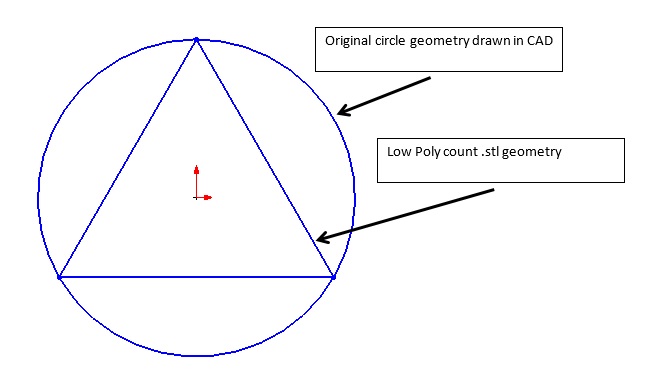
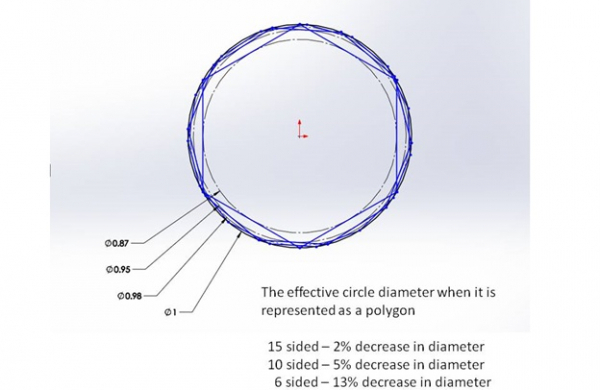
The number and size of the triangles is dictated by the “Preferences” settings of your CAD program. In the extreme example where the CAD model is saved as a “Low Poly count” then the circle or hole feature would be represented by six triangles and the top view would look as the figure below. When 3D printing this circular feature the tool path would follow the triangle geometry and produce a hole much smaller than the original CAD geometry.

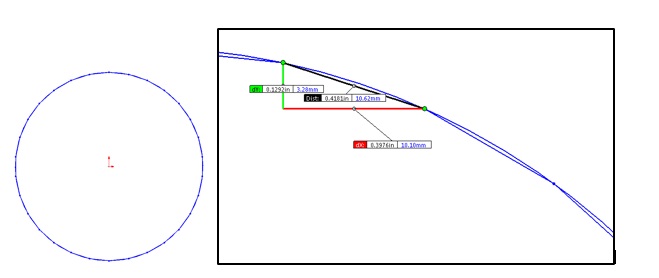
The desire to more accurately represent a true circle would lead to increase the poly count to add more triangles to the model and might look like the below image.

The above image shows a poly count 10x greater than the original “low poly count” example. Increasing the number of triangles does in fact give the 3D printer a better, more accurate circular tool path but at a cost of requiring a higher throughput of data for motion control. If the positional data being fed into the printer has too much resolution

  1. The machine may not be capable of accurately recreating the resolution or
  2. The printer controller may not be able to process the positional data fast enough to maintain a decent print speed.

The happy medium is achieved when the poly count is great enough to accurately describe the circle for the needs of the printed part but yet keeping the poly count low enough to allow the motion control system to print the circle at a good speed.

Effects of perimeter order on circle size

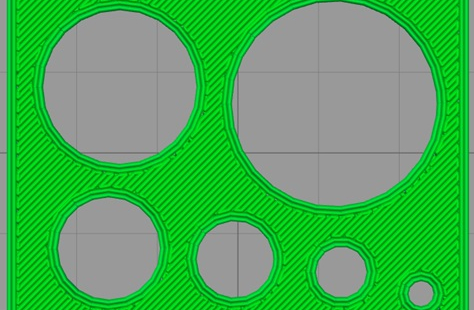
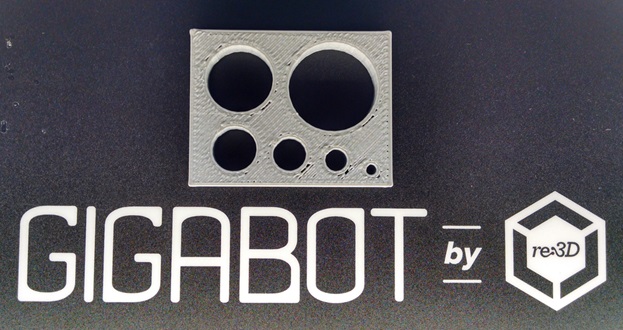
The inside diameter of holes are affected by the order of operations in 3D printing. In the below image the slicer settings have Perimeters = 2. Notice the outside of the box and the inside of the holes have two perimeters. This is often done to strengthen the part and increase the print quality. Most slicing software allow the user to decide if the print starts with the inside perimeter and moves to the outside perimeter.

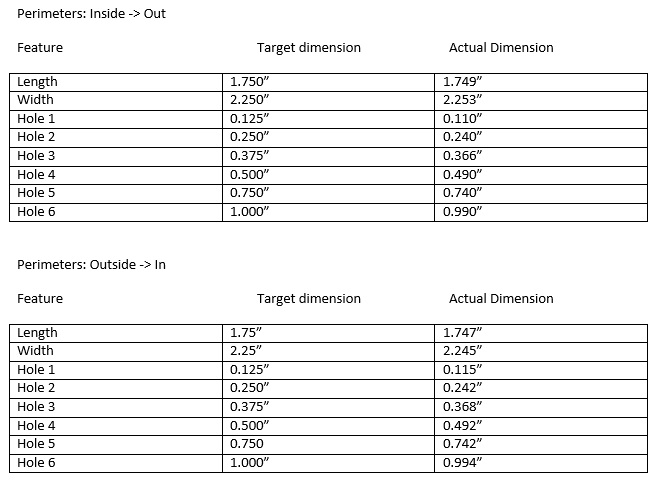
When starting with the inside perimeter the part has improved surface finish. When starting with the outside perimeter the part has improved dimensional accuracy for holes.

The below image shows the actual tool path for a series of circles with diameters ranging from 1/8” to 1”. Notice that each circle is made from many small line segments.

dim4
DIM7.jpg

Also note: Different Slicing programs may also influence the dimensional accuracy of part features.

Additional information on dimensional accuracy in 3D printing [Slic3r Manual]

Is this helpful? What other concepts would you like us to explore?

Happy Printing,

Matthew Fiedler

Blog Post Author

@chief_hacker

How to take your Gigabot Off-the-Grid

One of our values at re:3D is to provide 3D printing technologies to communities around the globe, many of whom don’t have the resources we take for granted.  Access to plastic feedstock, a consistent power infrastructure, and reliable shipping services have always been a requirement to play in the 3D printing space. We want to change that. One of the microsteps in this direction is to find other ways to power our 3D printer, the Gigabot, while still allowing multi-hour (and sometimes multi-day) prints to emerge from our 600mm X 600mm (2ft X 2 ft) build platform.

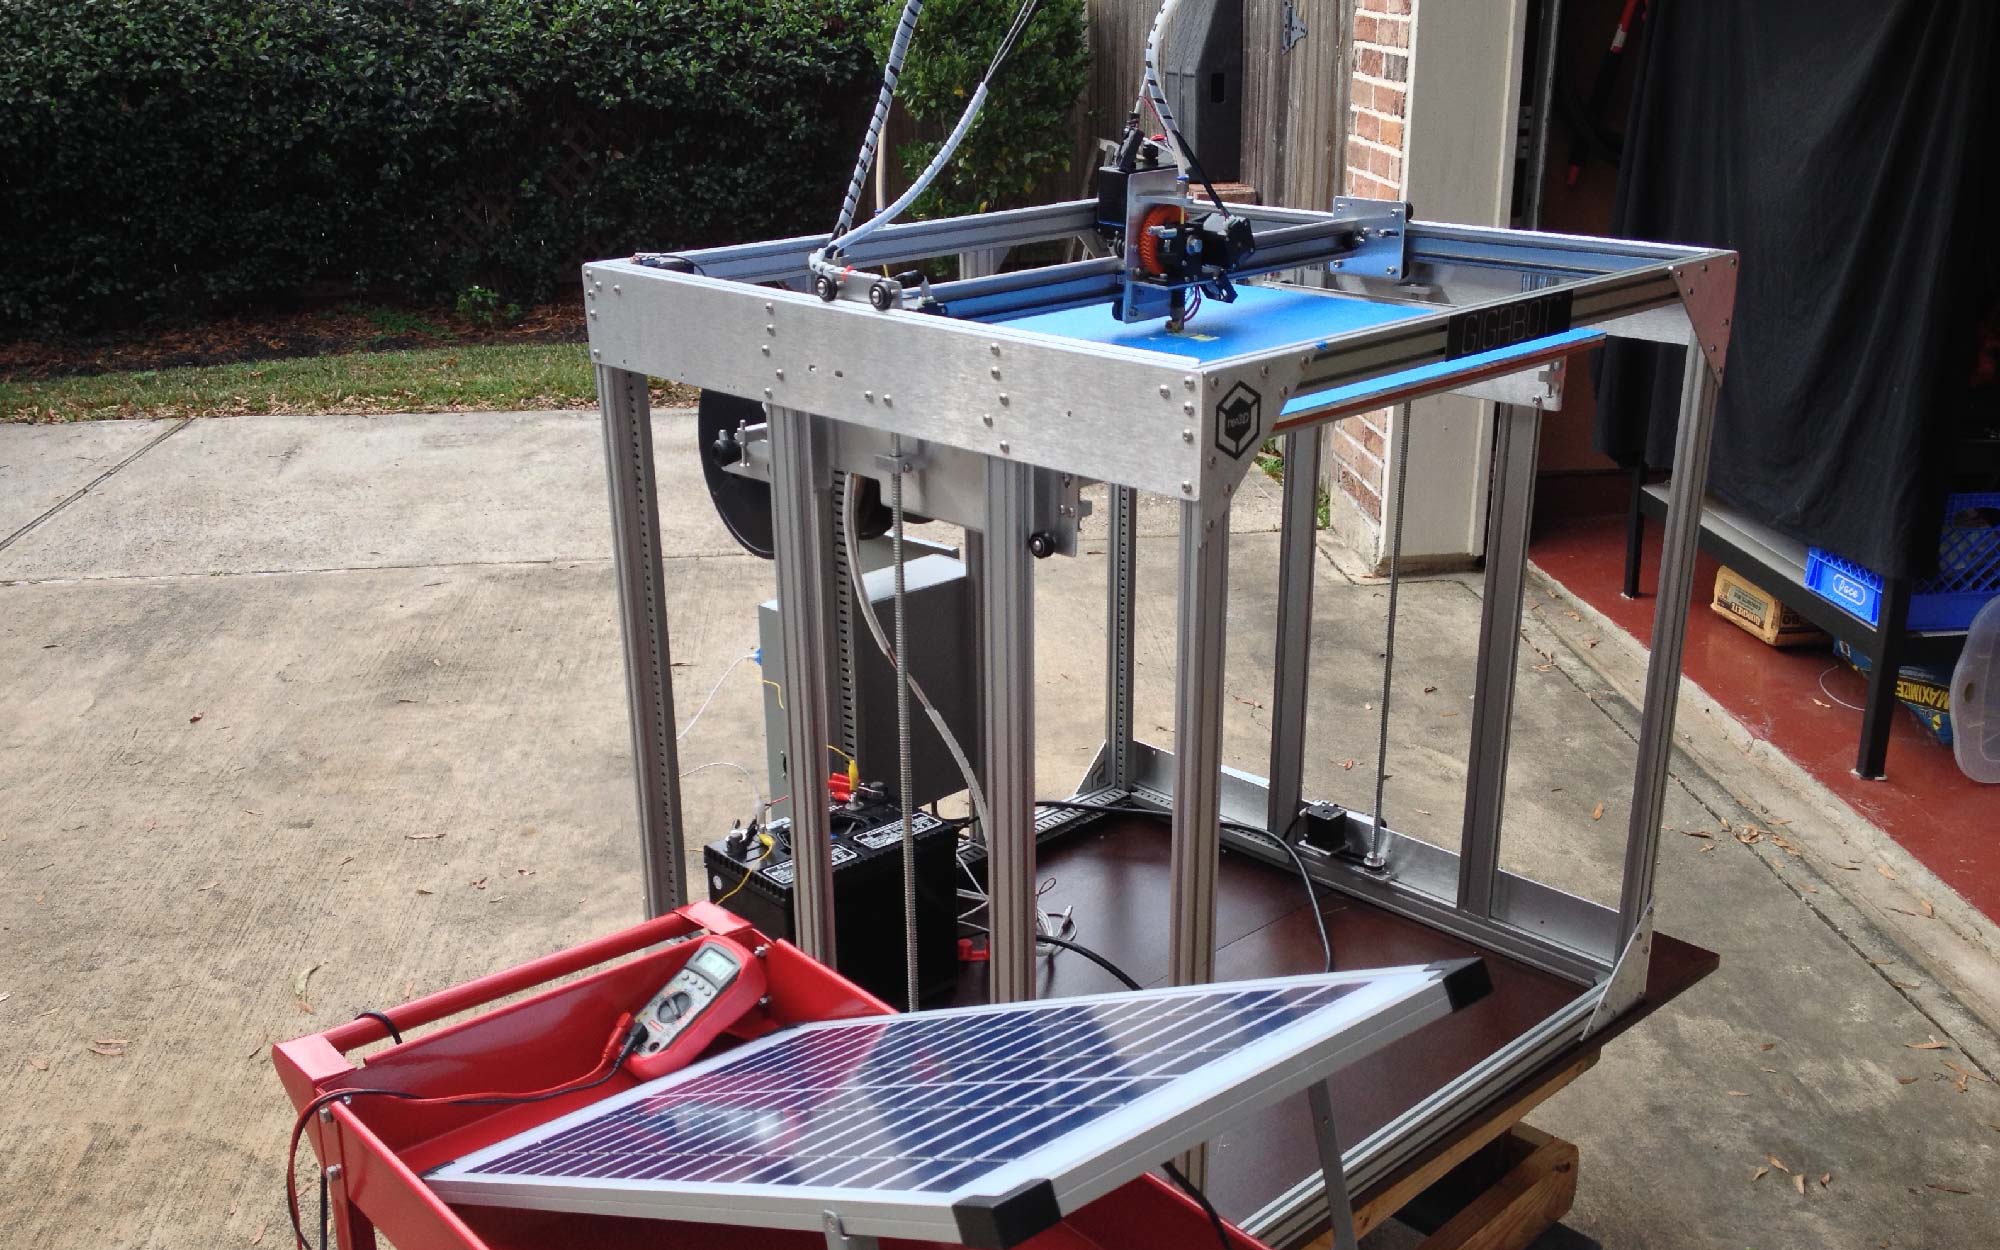
I started experimenting this past week using a 40W solar panel and a car battery, and had some success printing a small test print. I’ve gotten some questions since then and wanted to explain a little more about my setup, and also find out if there were any other (successful or not) attempts to take YOUR 3D printer off-the-grid.

MY SETUP

Our Gigabot takes 110V or 220V mains power, but then immediately feeds that to a 24V power supply to power the motors, hot end, sensors, USB comm port, and display. The only part that makes use of the mains power is the heated bed (the one that can fry an egg).  Since using PLA as an input material usually eliminates the need for a heated bed, I started there.

Disconnecting the power supply completely, I wired the 12V battery directly to our controller board and internal cooling fan. I later learned that this cooling fan was a great audible indicator of voltage levels – but more on that later.  12V is at the very low end of what our controller board can take in, but the real question was how long could it print for?

THE PHYSICS

I like to equate electricity to water coming out of a hose (like in this great tutorial from SparkFun), so to follow that analogy, I had to figure out if I could hold enough “water pressure” (voltage) to keep the controller alive, a large enough “holding tank” (car battery) to last for the entire print, while using solar panels to add enough “water” (power) to the system during the print.

After testing with a multimeter, I saw that the Gigabot draws about 5A at the most, and less than an Amp when idle (to keep the controller and comms alive), and on average about 3 or 4 Amps while printing (since the heating element cycles to maintain a constant temperature). Judging by the rating on my car battery of 70 Amp-hours, I could count on about 14 hours of power.

I should add that we often exchange Amps and Watts freely when comparing power levels. They are only interchangeable if the volts of the system remain constant (12V or 24V for Gigabot, 120V for USA Mains, etc.), since Power (Watts) = Current (Amps) * Voltage (Volts).

Or per the above analogy: Ability to Remove Mud From Car = Size of Hose * Water Pressure.

THE EXPERIENCE

The solar panel I bought from Fry’s was impressive, but at 40W I know it wouldn’t get to the levels I needed, and I could only afford to experiment with one. Plus, pausing a print when the sun goes behind a cloud just isn’t practical, since it would leave many marks of semi-melted plastic along the way, and the stepper motors would lose their homing location. I knew that the final solution would at least rely on some battery power.

We all know what happens when our car battery is suffering when you try to start it: the lights get dim, you turn off everything electrical, and pray that it turns over and you can get home that night. Instead of a gasoline powered motor and alternator to keep the battery alive, I had a solar panel – and it had to last the entire print. So I had some questions – and like any former space station flight controller, I took lots of data.

THE QUESTIONS

Would 12V be enough to power a system that we have been used to operating at 24V since the very early days? Would my Gigabot’s hotend pull down the stepper motors too far on battery power and affect the success of the print? Could I use all of the available power in the car battery to make a large enough object without any transient errors? Could I turn on and off the solar panel or battery charger during a print without interrupting it?

THE RESULTS

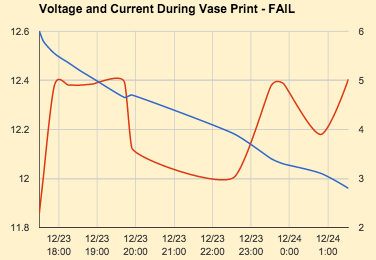
At first things looked (and sounded) gloomy. The first few attempts failed, and it seemed that the battery just didn’t have enough power to drive the hotend, motors, and electronics to keep the voltage levels high enough. Even the fan noise sounded sickly – a lot worse then when I had it set up without the multimeter.

firstpicoffthegrid

The multimeter! That was it!!

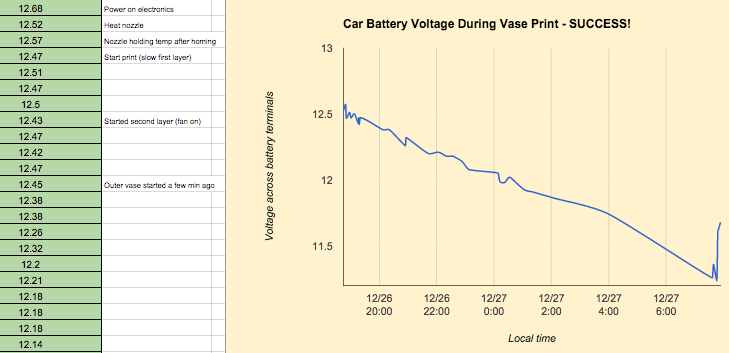
I had wired my multimeter in line with the positive line off the battery to read a super accurate space-rated amp-draw during the entire print. I had wanted to measure exactly how much was going in and out of the solar panel, and the battery. The measurement itself was actually resisting the flow of electricity (the equivalent of bending the water hose to hear if water is rushing past the fold in the line). Once I removed the multimeter and tracked only the voltage across the battery terminals, I was able to get over 13 hours of continuous printing time out of my Gigabot – enough to print this 300mm (12-inch) tall vase! Here are the (manually entered) data points for that one:

The solar panels are pretty straightforward, and work very similar to the battery charger I plug into the wall, so for the purposes of my experimentation in the garage, I’m alternating printing on battery power with a charger on/off, solar panel connected/disconnected, at varying voltage levels of the battery. I think I have found the limits, since my prints start failing at just about 11V on the battery now.

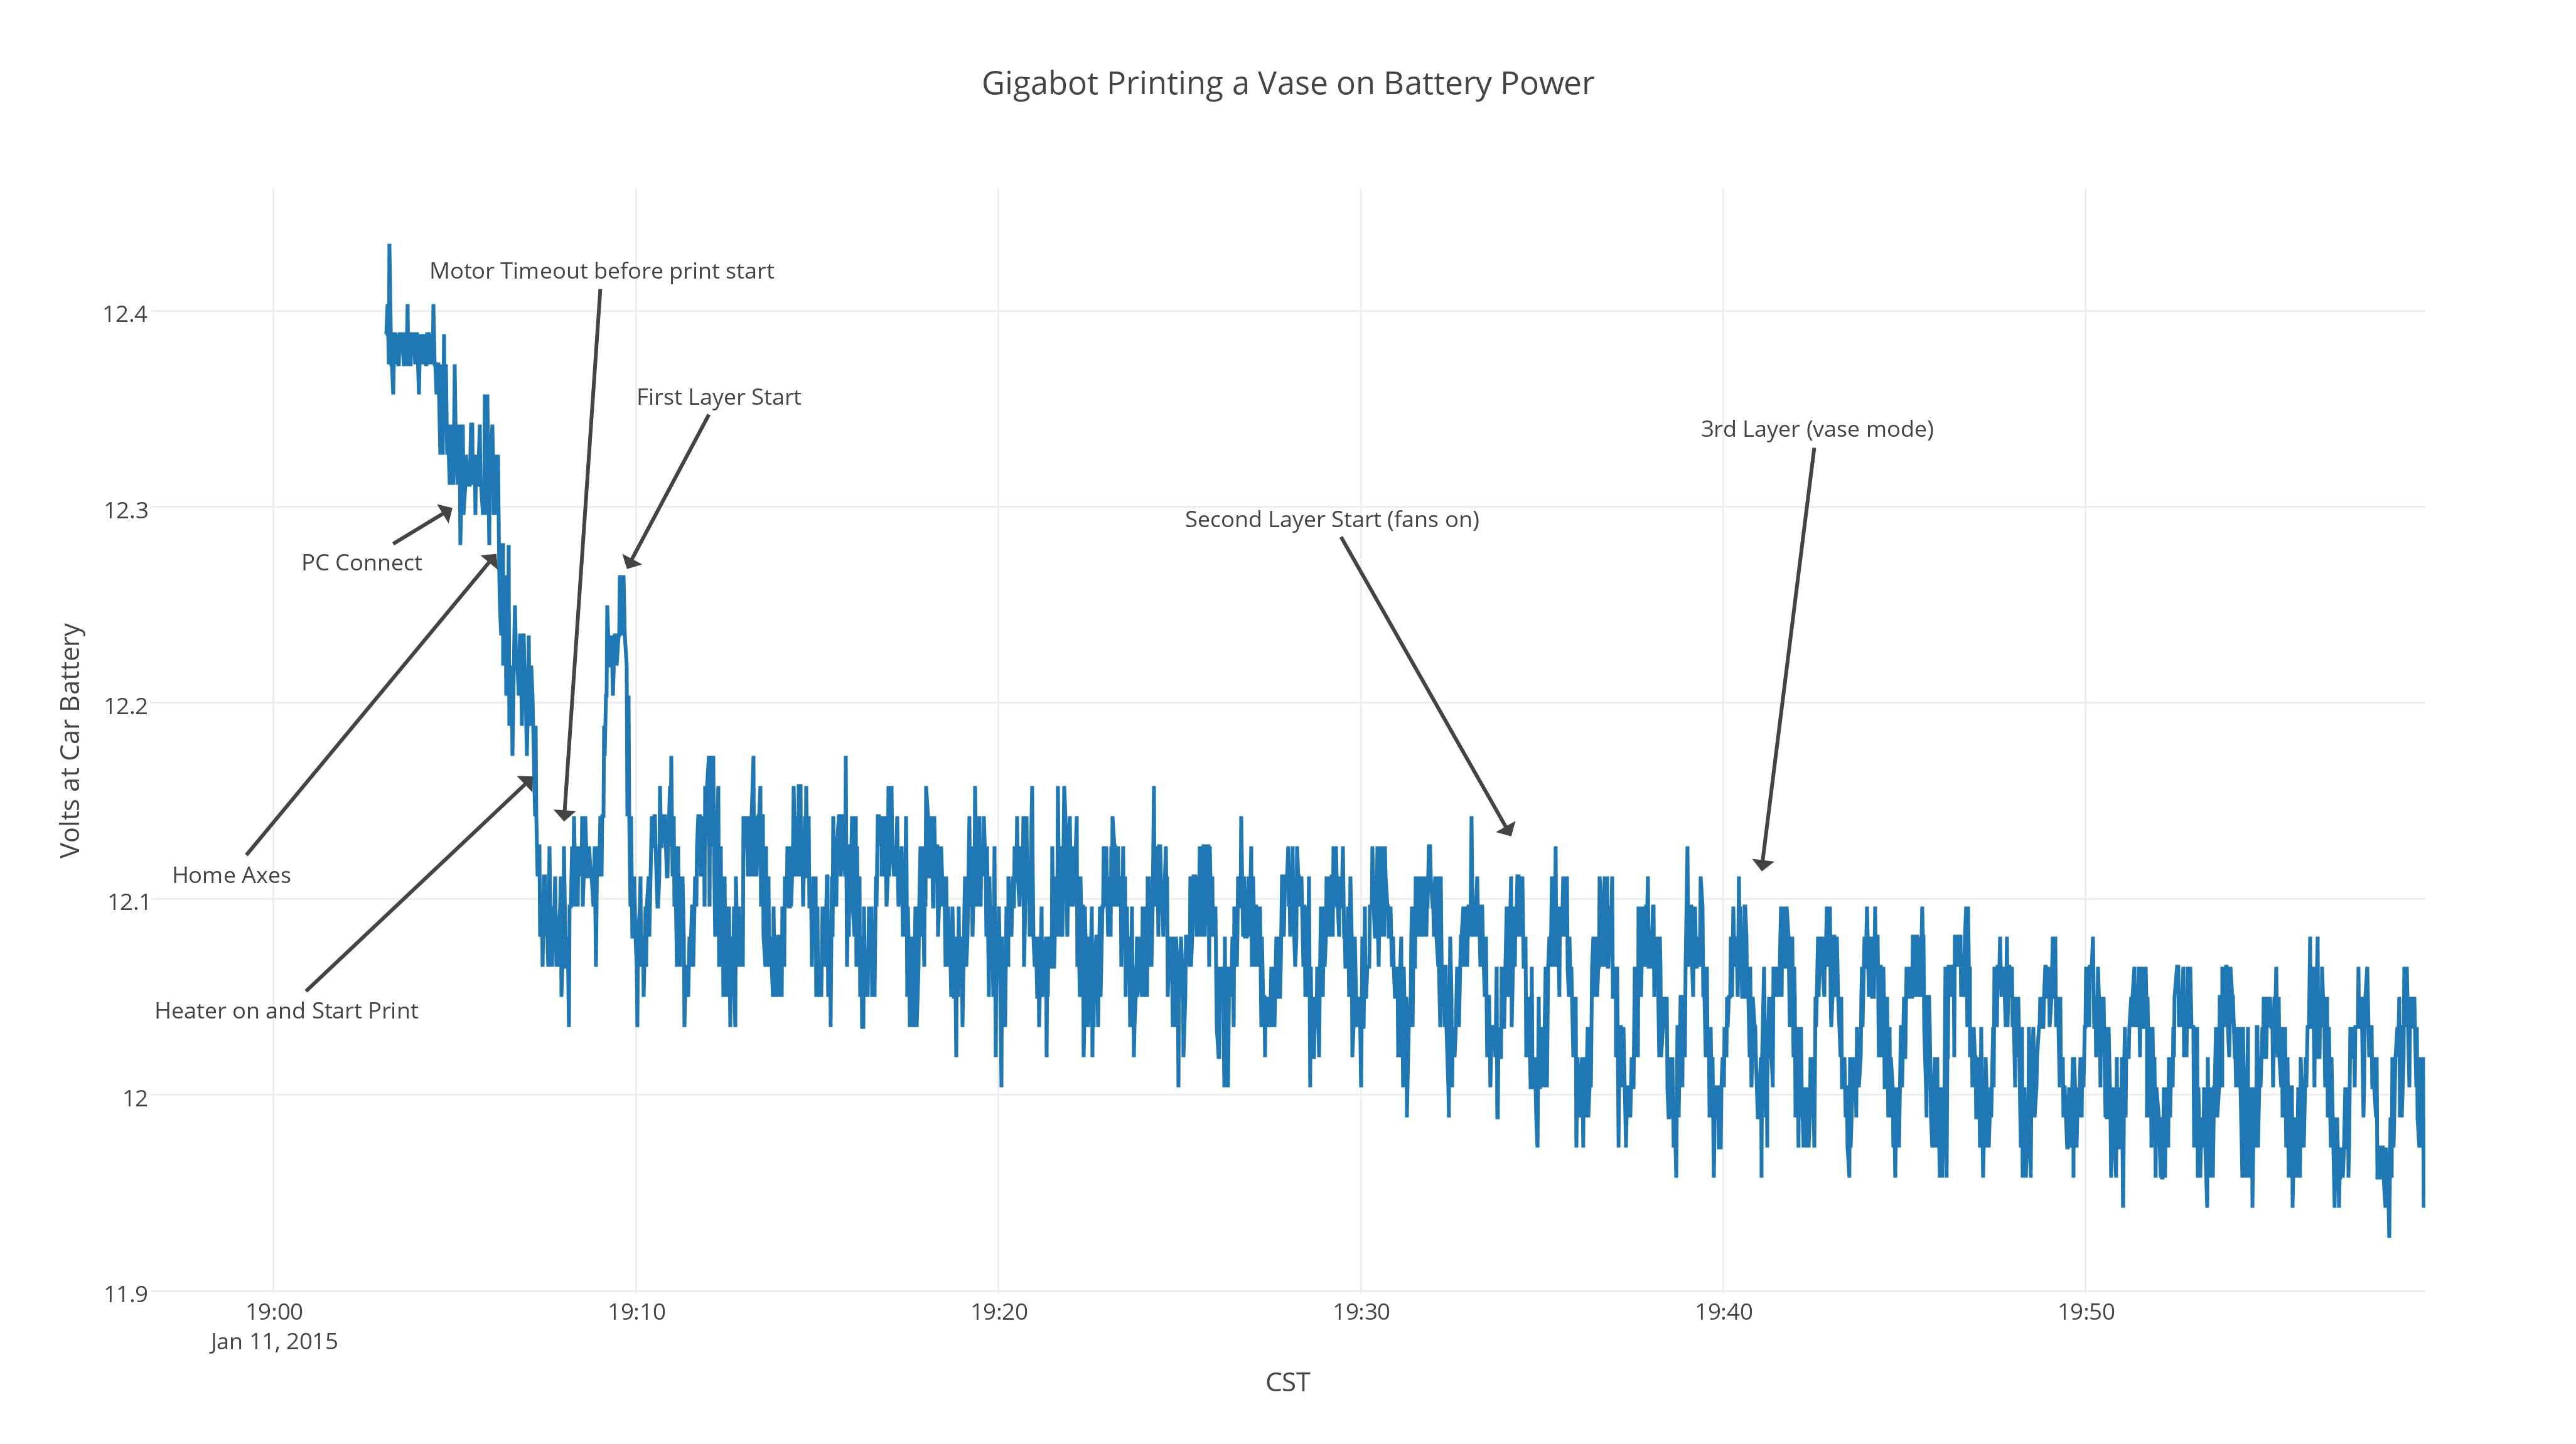
Also, ever since I automated my data taking process, I get much more sleep at once, without needing to wake up for data takes with pen and paper (and help from Google Sheets). Check out the new and improved version with a little help from plotly!

An interesting part of this method of gathering data is that you can start to see the cycling of the cartridge heater very clearly as the extra current draw pulls the battery voltage down each time the hotend is full-on. This will be useful in tweaking my PID values no doubt, and could also lead to better methods of insulating the hotend so it doesn’t need to heat up as much, thereby saving valuable amp-hours!

NEXT STEPS

Clearly there is a little more work to do before we have a brownout-proof or solar-ready Gigabot out of the box, but I think these experiments prove it’s within the realm of possibility to create 3D objects anywhere – given a robust enough printer, and a light bulb’s worth of energy and imagination.

Chris Gerty

Blog Post Author

re:Tech – Control Board

Controller

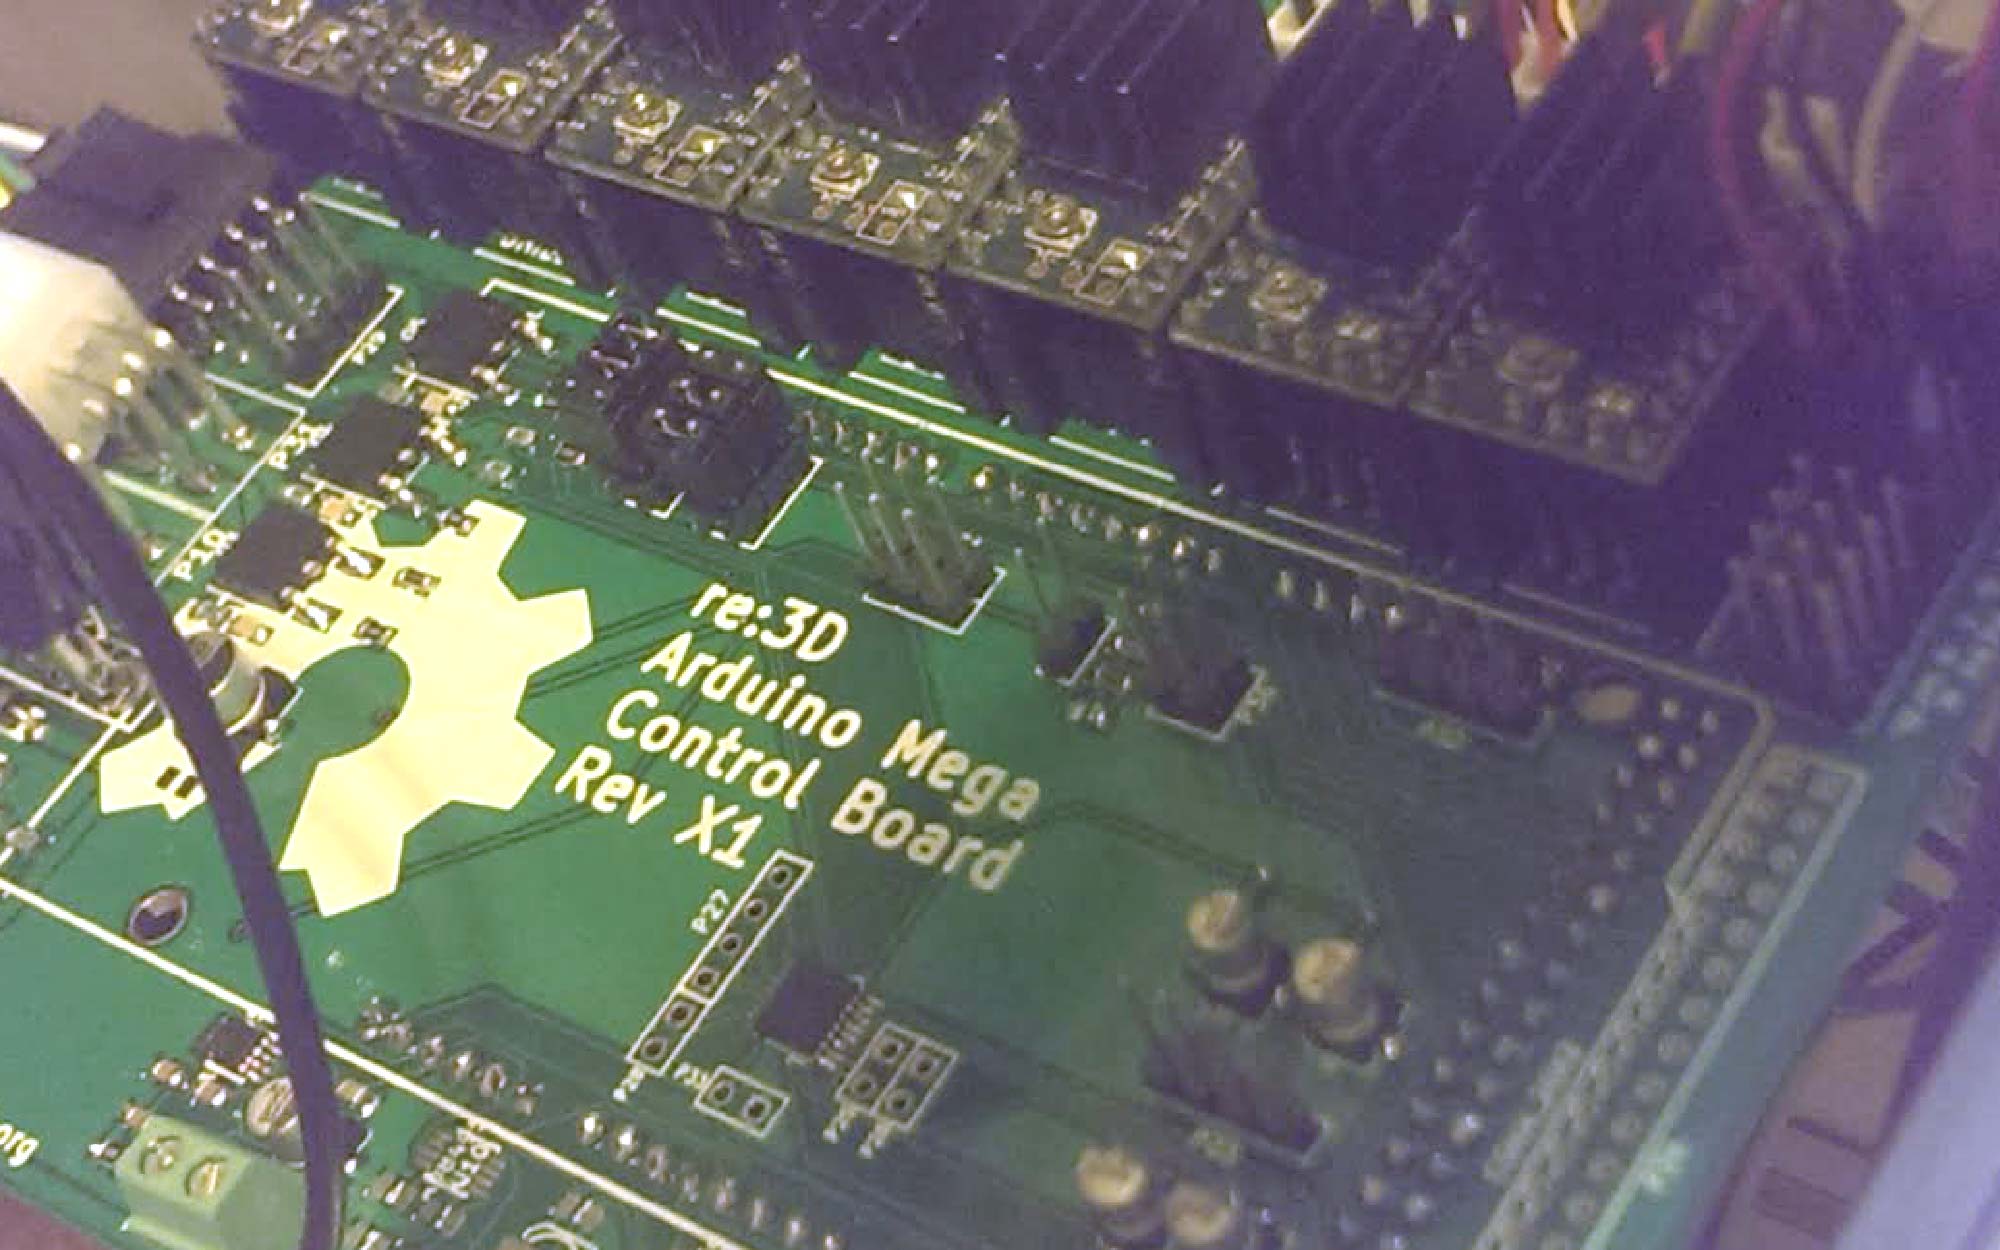
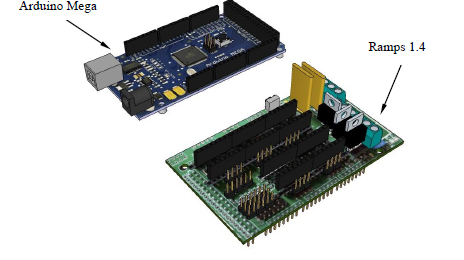
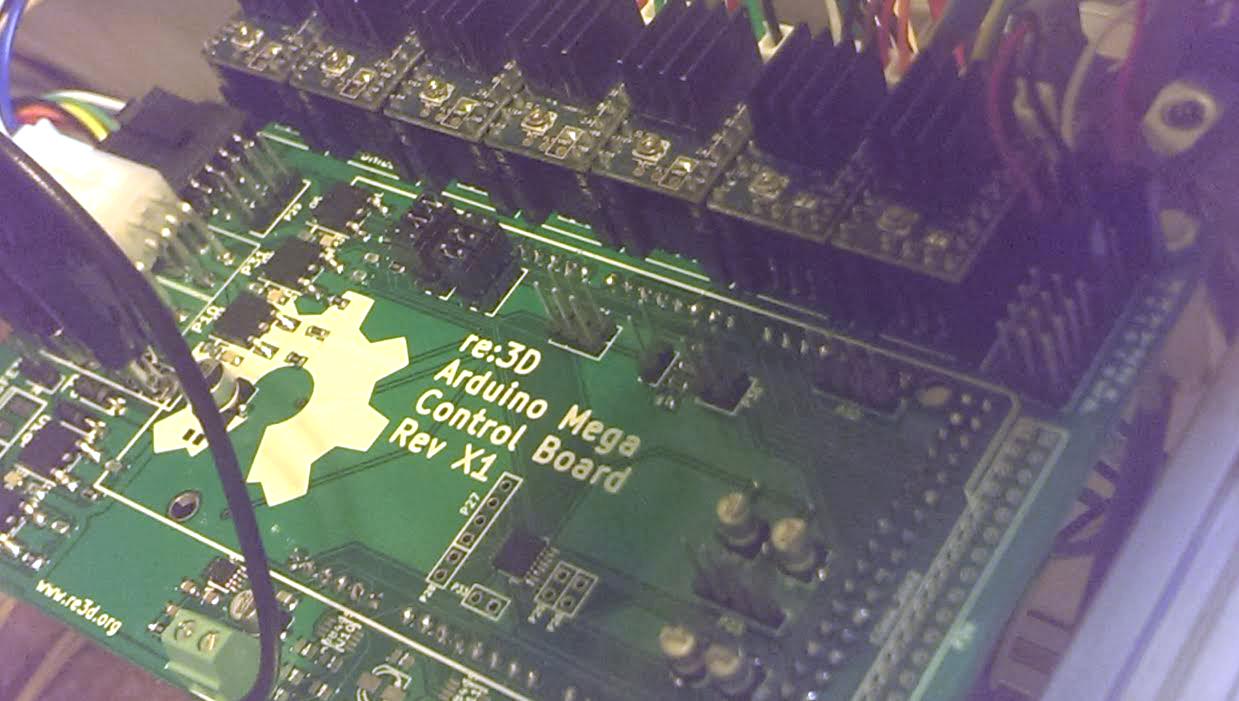
The new controller for OpenGB is loosely based on the open source RAMPS 1.4 control. The RAMPS 1.4 controler mounts on an Arduino Mega as an extension board (known as an Arduino Shield). The goal of the OpenGB controller is to include the following: motor driver for each motor, thermo couple and thermo resistor inputs, enough MOSFET power output for dual extruders, fan, and bed relay, endstops, and extra serial port terminals. This configuration keeps all of the active components on the professional board (arduino) and allows us to design with (mostly) with passive components.

ramps_board

The controller board will include the following features:

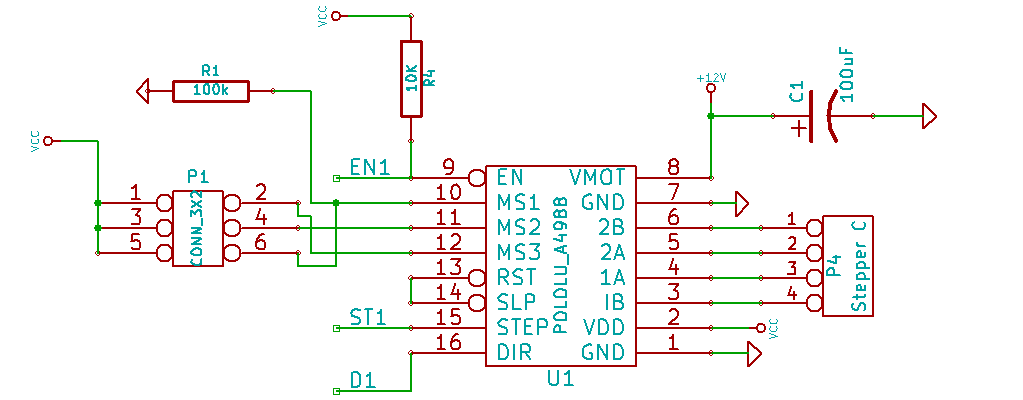
Stepper Motor Driver Sockets (7 drivers)

A total of seven motor drivers will be included, one (1) for the X-Axis, two (2) for the Y-Axis, two (2) for the Z-axis, and two (2) for extruders. The sockets are based on the Ti DRV8825 chip carrier board available from a number of suppliers and are currently used in the Gigabot 2.0.

image40_cropped

The sockets will also add support for the fault and VREF pin on the Sure Step carrier boards. This will allow for better error detection and for programmatically setting the current of each driver.

Preliminary Motor Driver Socket Schematic

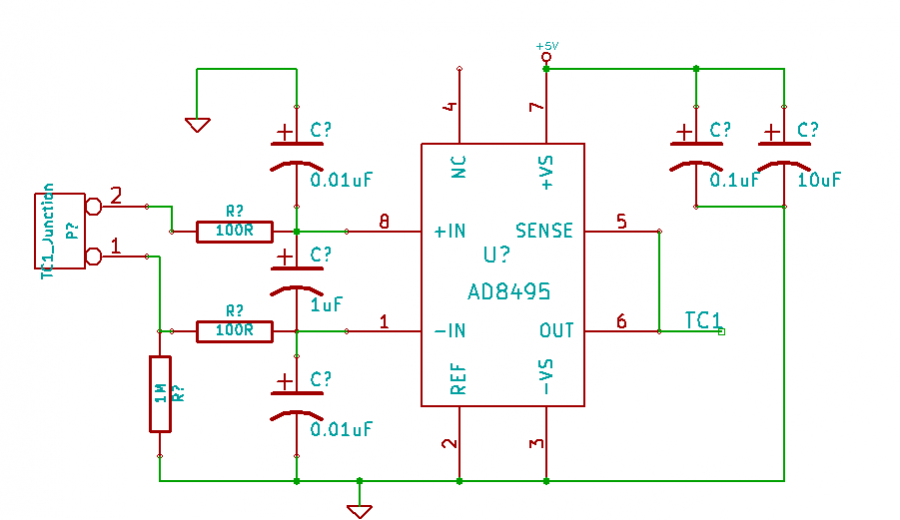
Thermocouple Support (3Circuits)

Two thermocouple inputs will be included in the preliminary controller. They will be based on the AD8495 chip.

image41_cropped

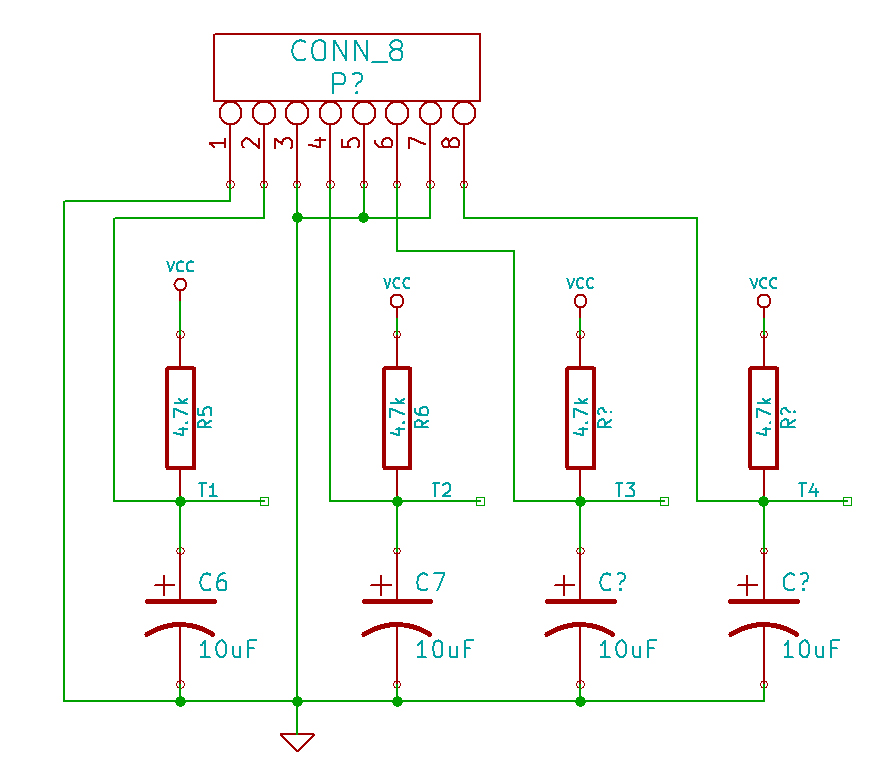
Thermo Resistors (4 Circuits)

Four thermo resistor inputs will be included in the preliminary controller. They can be used for controlling the temperature of the two extruders or monitoring the temperature at other locations on OpenGB. The inputs can also be used for other analog sensing needs.

End Stop Terminals (8 terminals)

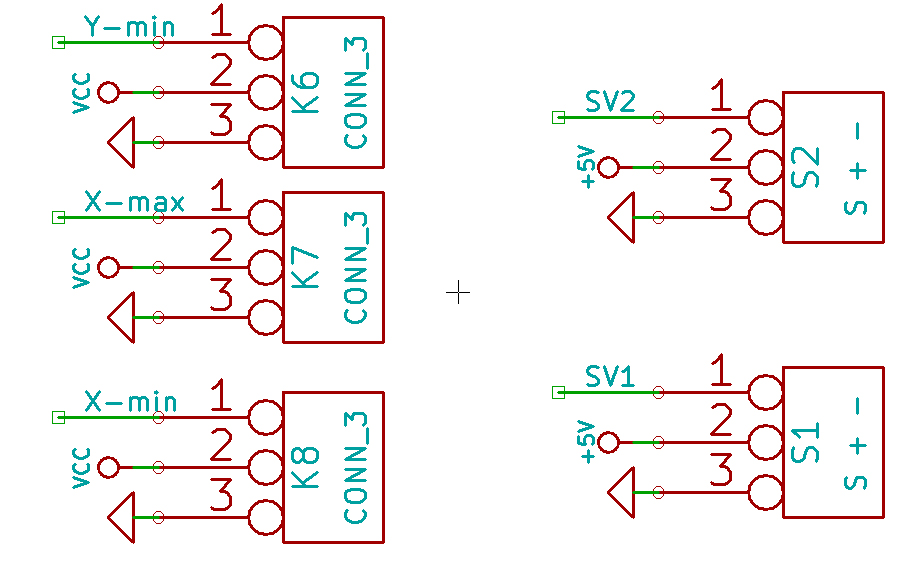
Eight (8) end stop inputs will be included in the preliminary controller. They will be labeled X-min, X-max, Y-min, Y-max, Z-min, Z-max, Filament Out, and extra.

Power Mosfets (4 circuits)

Four (4) power mosfets circuits will be included in the preliminary controller, based on the STP55 mosfet which is rated at 55 amps. Each circuits includes a indicator LED. The Circuits will be labeled Extruder 1, Extruder 2, Bed Relay, and Extra.

Serial Connections (2 terminals)

The arduino serial connection UART 0 and UART 1 will have terminals for easy integration. The SPI and I2C ports will also be broken out for onboard access.

These can will used in future iterations to avoid going through the USB hub with a direct UART to UART connection between the single board computer and the controller.

Reset Switch and Input

A reset switch will be included on the control board. There will also be a terminal block for an external reset switch. This switch should not be necessary for any normal operation.

Input for Induction bed Sensor

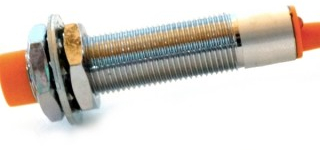
A single voltage divider will be included to enable the use of a bed touch less bed sensor to be used as the Z min limit switch

image46

First revision is shown below, but I am assuming that it is going to change. After we test it I will post the design files, so you can take a look.

Patrick Finucane

Blog Post Author